2021 LEXUS RX350 ignition
[x] Cancel search: ignitionPage 307 of 508

3075-3. Using the air conditioning system and defogger
5
Interior features
Vehicles with seat ventilators
When any switch is pressed, the system
is set to automatic mode and the
“AUTO” indicator (green) lights up.
Each time the switch is pressed, the
operation condition changes as fol-
lows.
Hi (3 segments lit) Mid (2 segments
lit) Lo (1 segment lit) Off
The level indicator (amber) lights up
during operation.
■Second-row seats
Each time the switch is pressed, the
operation condition changes as fol-
lows.
Hi (3 segments lit) Mid (2 segments
lit) Lo (1 segment lit) Off
The level indicator (amber) lights up
during operation.
Type A
Type B
■Operation condition
The engine switch is in IGNITION ON
mode.
■When the air conditioning system is
operating in front seat concentrated air-
flow mode (S-FLOW)
If a passenger is not detected in the front
passenger seat, the seat heater of the front
passenger’s seat will be turned off if on.
( P.300)
■Customization
Some functions can be customized.
( P.461)
A
B
A
WARNING
■To prevent overheating and minor
burn injuries
Observe the following precautions when
using the seat heaters.
●Do not cover the seat with a blanket or
cushion when using the seat heater.
Page 308 of 508
3085-3. Using the air conditioning system and defogger
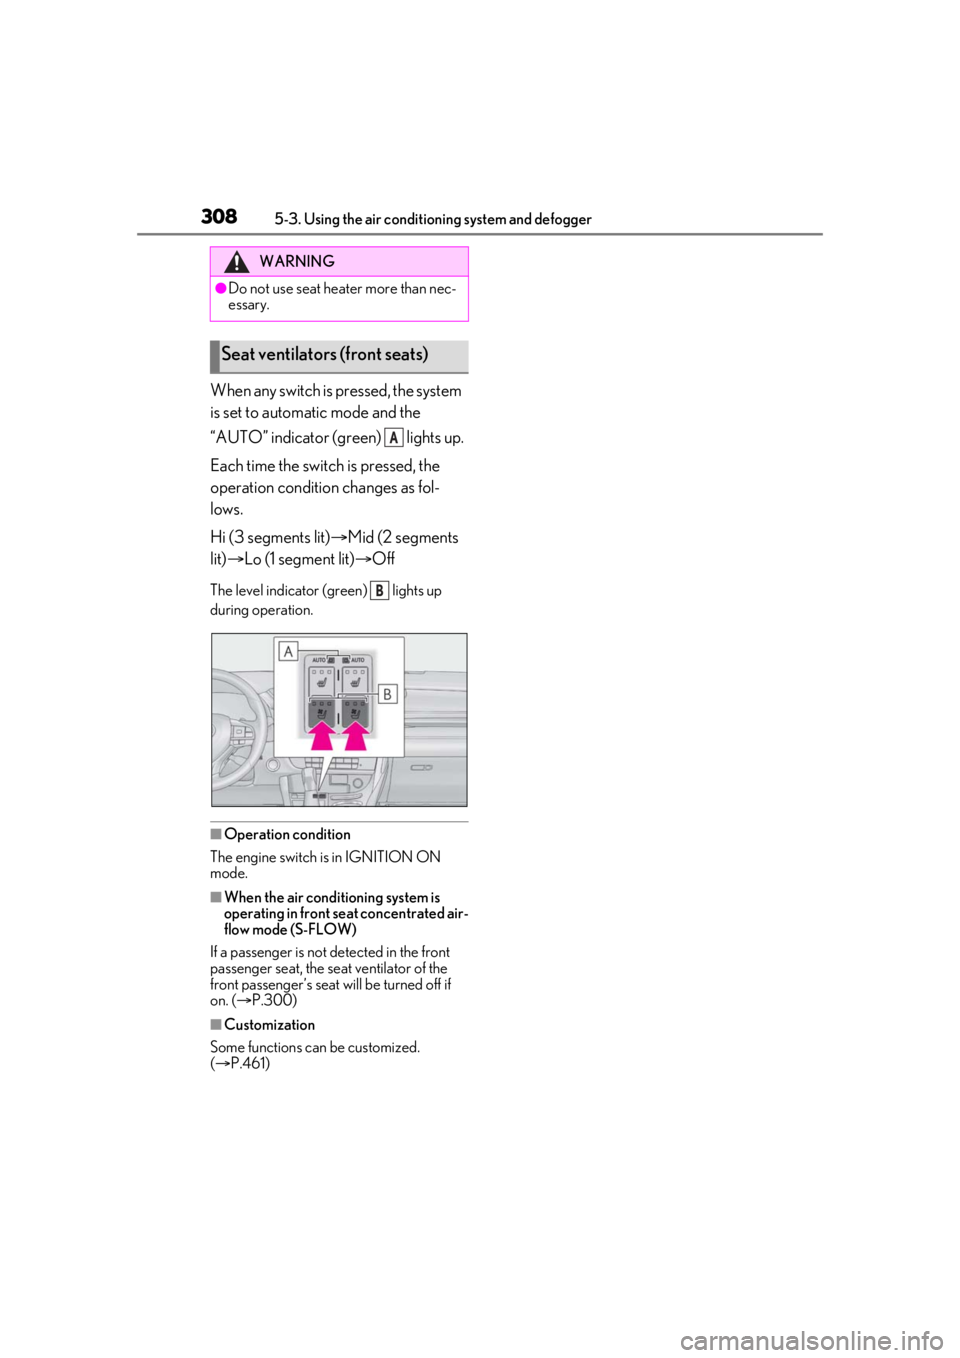
When any switch is pressed, the system
is set to automatic mode and the
“AUTO” indicator (green) lights up.
Each time the switch is pressed, the
operation condition changes as fol-
lows.
Hi (3 segments lit)Mid (2 segments
lit) Lo (1 segment lit) Off
The level indicator (g reen) lights up
during operation.
■Operation condition
The engine switch is in IGNITION ON
mode.
■When the air conditioning system is
operating in front seat concentrated air-
flow mode (S-FLOW)
If a passenger is not detected in the front
passenger seat, the seat ventilator of the
front passenger’s seat wi ll be turned off if
on. ( P.300)
■Customization
Some functions can be customized.
( P.461)
WARNING
●Do not use seat heater more than nec-
essary.
Seat ventilators (front seats)
A
B
Page 322 of 508
3225-6. Using the other interior features
5-6.Using the other interior features
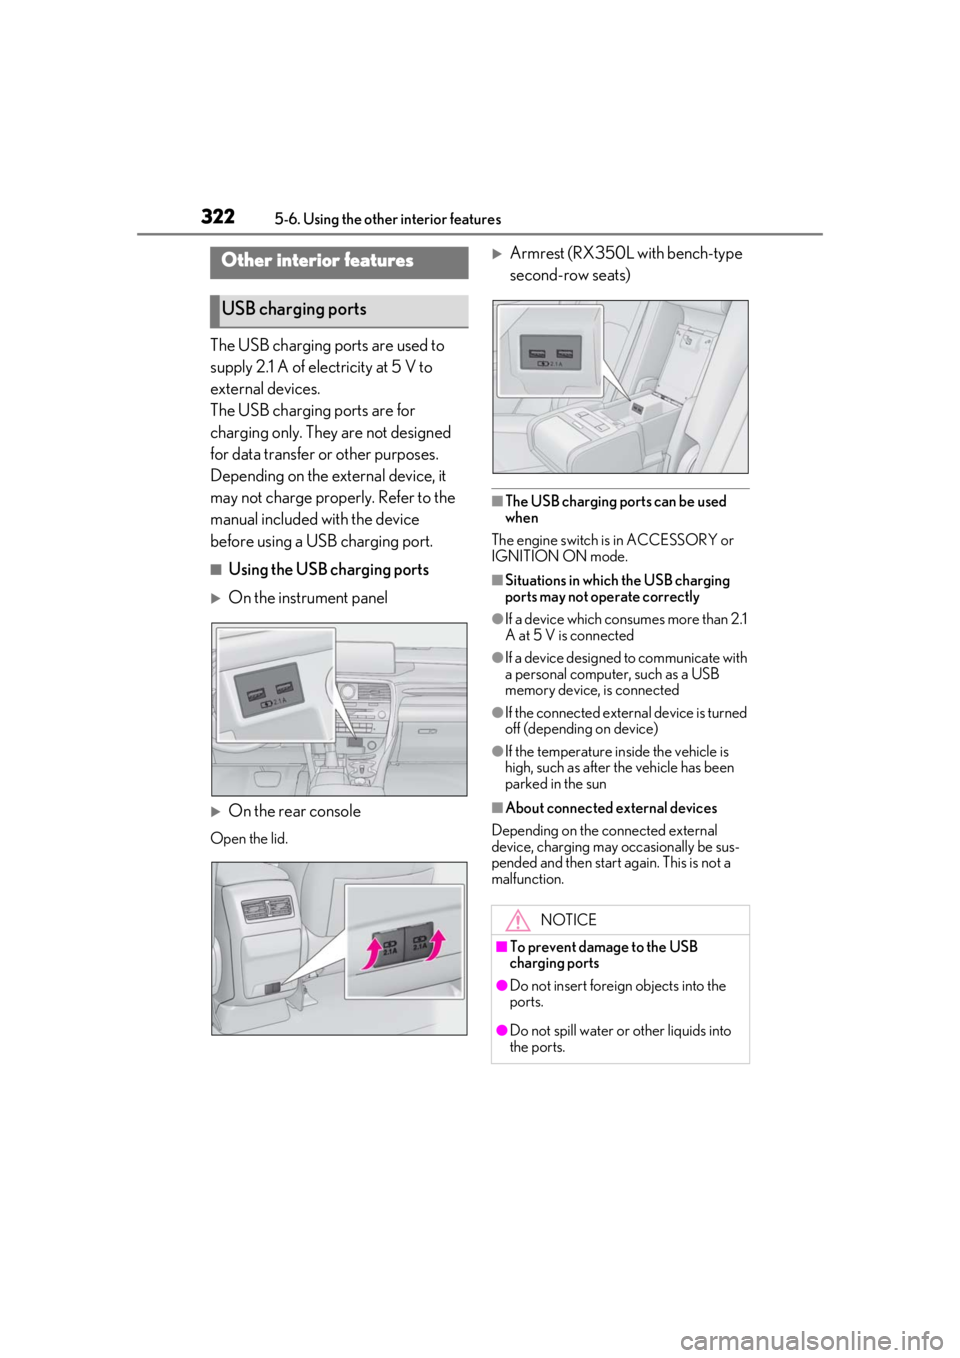
The USB charging ports are used to
supply 2.1 A of electricity at 5 V to
external devices.
The USB charging ports are for
charging only. They are not designed
for data transfer or other purposes.
Depending on the external device, it
may not charge properly. Refer to the
manual included with the device
before using a USB charging port.
■Using the USB charging ports
On the instrument panel
On the rear console
Open the lid.
Armrest (RX350L with bench-type
second-row seats)
■The USB charging ports can be used
when
The engine switch is in ACCESSORY or
IGNITION ON mode.
■Situations in whic h the USB charging
ports may not operate correctly
●If a device which consumes more than 2.1
A at 5 V is connected
●If a device designed to communicate with
a personal computer, such as a USB
memory device, is connected
●If the connected external device is turned
off (depending on device)
●If the temperature inside the vehicle is
high, such as after the vehicle has been
parked in the sun
■About connected external devices
Depending on the connected external
device, charging may occasionally be sus-
pended and then start again. This is not a
malfunction.
Other interior features
USB charging ports
NOTICE
■To prevent damage to the USB
charging ports
●Do not insert foreign objects into the
ports.
●Do not spill water or other liquids into
the ports.
Page 325 of 508

3255-6. Using the other interior features
5
Interior features
Blinks (orange) 4 times repeatedly
■The wireless charger can be operated
when
The engine switch is in ACCESSORY or
IGNITION ON mode.
■Portable devices t hat can be charged
●Portable devices compatible with the Qi
wireless charging standard can be
charged by the wireless charger. How-
ever, compatibility with all devices which
meet the Qi wireless charging standard is
not guaranteed.
●The wireless charger is designed to sup-
ply low power electricity (5 W or less) to
a cellular phone, smartphone, or other
portable device.
■If a cover or accessory is attached to the
portable device
Do not charge a portable device if a cover
or accessory which is not Qi compatible is
attached. Depending on the type of cover
and/or accessory attached, it may not be
possible to charge the portable device. If
the portable device is placed on the
charging area and does not charge, remove
the cover and/or accessories.
■If interference is heard in AM radio
broadcasts while charging
Turn off the wireless charger and check if
the noise is reduced. If noise is reduced,
press and hold the powe r supply switch of
the wireless charger fo r 2 seconds. The fre-
quency of the wireless charger is changed
and noise may be reduced. When the fre-
quency is changed, the operation indicator
light will blink (orange) 2 times.
■Charging precautions
●If the electronic key cannot be detected
in the cabin, charging cannot be per-
formed. When a door is opened and
closed, charging may be temporarily sus-
pended.
●While charging, the wi reless charger and
the portable device will become warm.
This is not a malfunction. If a portable
device becomes warm while charging
and charging stops due to the protection
function of the portable device, wait until
the portable device cools down and
charge it again.
■Sound generated during operation
When the power supply switch is turned on
or while a portable device is being identi-
fied, operation sounds may be heard. This is
not a malfunction.
■Cleaning the wireless charger
P.347
Suspected causesMeasure
A foreign object
exists between
the portable
device and
charging area.
Remove the foreign
object.
Portable device is
not positioned
properly on the
charging area.Move the portable
device toward the cen-
ter of the charging
area.
Suspected causesMeasure
The temperature
of the wireless
charger is exces-
sively high.Stop charging immedi-
ately and continue
charging after a while.
Page 332 of 508
3325-6. Using the other interior features
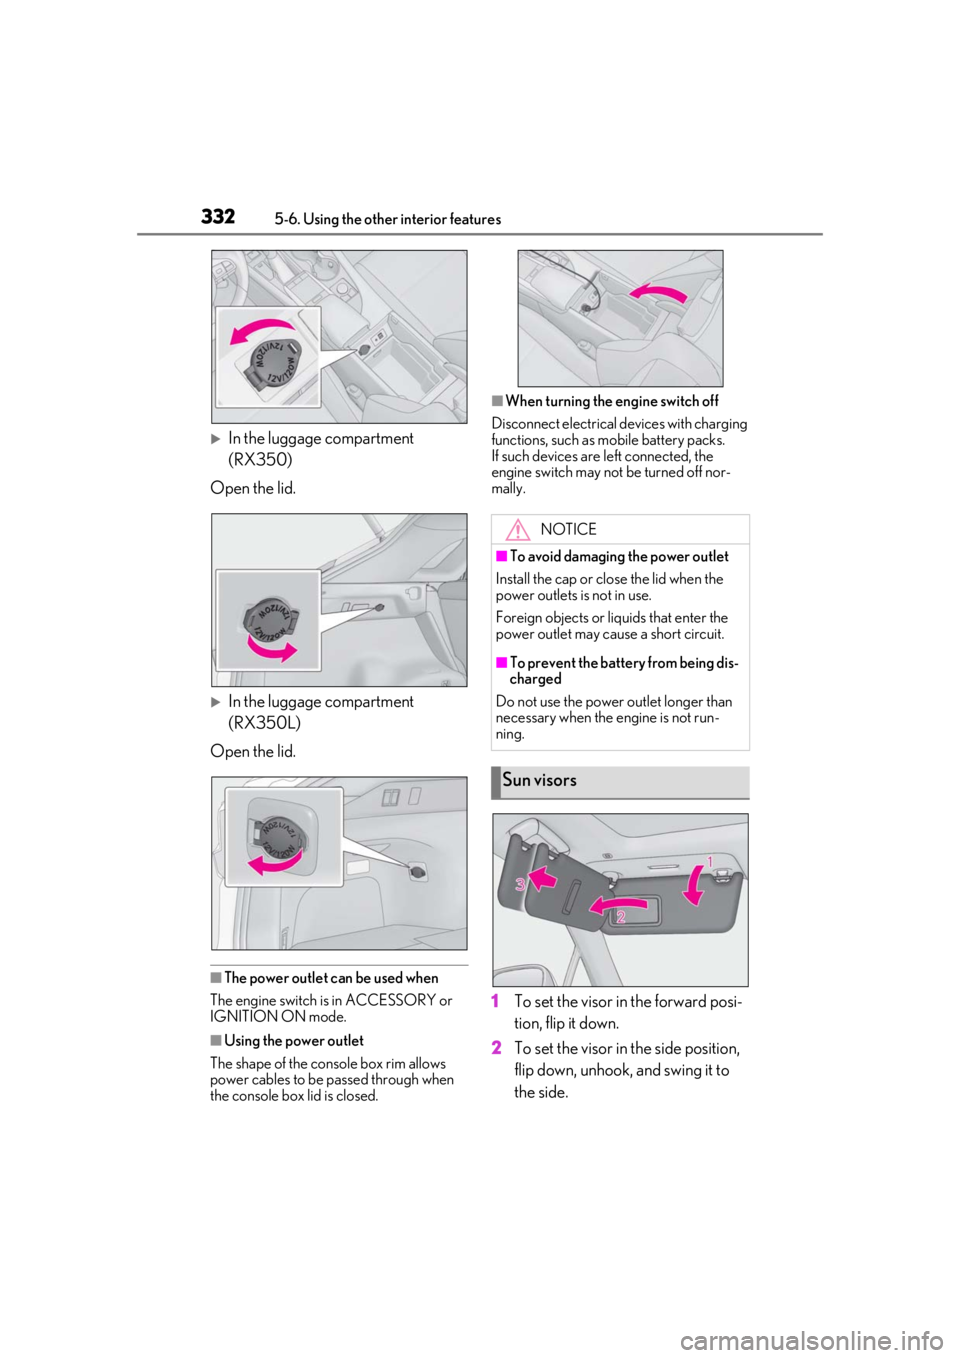
In the luggage compartment
(RX350)
Open the lid.
In the luggage compartment
(RX350L)
Open the lid.
■The power outlet can be used when
The engine switch is in ACCESSORY or
IGNITION ON mode.
■Using the power outlet
The shape of the console box rim allows
power cables to be passed through when
the console box lid is closed.
■When turning the engine switch off
Disconnect electrical devices with charging
functions, such as mobile battery packs.
If such devices are left connected, the
engine switch may not be turned off nor-
mally.
1 To set the visor in the forward posi-
tion, flip it down.
2 To set the visor in the side position,
flip down, unhook, and swing it to
the side.
NOTICE
■To avoid damaging the power outlet
Install the cap or close the lid when the
power outlets is not in use.
Foreign objects or liquids that enter the
power outlet may cause a short circuit.
■To prevent the battery from being dis-
charged
Do not use the power outlet longer than
necessary when the engine is not run-
ning.
Sun visors
Page 356 of 508
3566-3. Do-it-yourself maintenance
Light bulbs
( P.384)
•Bulb with same num-
ber and wattage rat-
ing as original
•Flathead screw- driver
•Wrench
Radiator and con-
denser ( P.362)
Tire inflation pres-
sure (P.373)• Tire pressure gauge
•Compressed air
source
Washer fluid
( P.364)
• Water or washer
fluid containing anti-
freeze (for winter
use)
• Funnel (used only for adding water or
washer fluid)
WARNING
The engine compartment contains many
mechanisms and fluids that may move
suddenly, become hot, or become elec-
trically energized. To avoid death or seri-
ous injury, observe the following
precautions.
■When working on the engine com-
partment
●Keep hands, clothi ng and tools away
from the moving fan and engine drive
belt.
●Be careful not to touch the engine,
radiator, exhaust manifold, etc. right
after driving as they may be hot. Oil
and other fluids may also be hot.
●Do not leave anything that may burn
easily, such as paper and rags, in the
engine compartment.
●Do not smoke, cause sparks or expose
an open flame to fuel or the battery.
Fuel and battery fumes are flammable.
ItemsParts and tools●Be extremely cautious when working
on the battery. It contains poisonous
and corrosive sulfuric acid.
■When working near the electric cool-
ing fan or radiator grille
Be sure the engine switch is off.
With the engine switch in IGNITION
ON mode, the electric cooling fan may
automatically start to run if the air condi-
tioning is on and/or the coolant tempera-
ture is high. ( P.362)
■Safety glasses
Wear safety glasses to prevent flying or
falling material, fluid spray, etc. from get-
ting in your eyes.
NOTICE
■If you remove the air cleaner filter
Driving with the air cleaner filter
removed may cause excessive engine
wear due to dirt in the air.
Page 372 of 508

3726-3. Do-it-yourself maintenance
on.
Depending on the vehicle and driving con-
ditions, initialization may take up to
approximately 1 hour to complete.
■Initializing the tire pressure warning sys-
tem
Initialize the system with the tire inflation
pressure adjusted to the specified level.
■If you press the tire pressure warning
reset switch accidentally
If initialization is performed, adjust the tire
inflation pressure to the specified level and
initialize the tire pr essure warning system
again.
■Initialization procedure
●Make sure to carry ou t initialization after
adjusting the tire inflation pressure.
Also, make sure the tires are cold before
carrying out initializat ion or tire inflation
pressure adjustment.
●If you have accidentally turned the engine
switch off during initialization, it is not
necessary to press the reset switch again
as initialization will restart automatically
when the engine switch has been turned
to IGNITION ON mode for the next
time.
●If you accidentally pr ess the reset switch
when initialization is not necessary, adjust
the tire inflation pres sure to the specified
level when the tires are cold, and conduct
initialization again.
●While the position of each tire is being
determined and the inflation pressures
are not being displayed on the
multi-information display, if the inflation
pressure of a tire drops, the tire pressure
warning light will come on.
■When initialization of the tire pressure
warning system has failed
Initialization may take lo nger to complete if
the vehicle is driven on an unpaved road.
When performing initialization, drive on a
paved road if possible. Depending on the
driving environment and condition of the
tires, initialization will be completed in
approximately 10 to 30 minutes. If initializa-
tion is not complete after driving approxi- mately 10 to 30 minutes, continue driving
for a while.
If the inflation pressure of each tire is not
displayed after driving for approximately 1
hour, perform the following procedure.
●Park the vehicle in a safe place for
approximately 20 minutes. Then drive
straight (with occasional left and right
turns) at approximately 25 mph (40
km/h) or more for approximately 10 to
30 minutes.
However, in the following situations, the tire
inflation pressure will not be recorded and
the system will not operate properly. Per-
form initialization again.
●When operating the tire pressure warn-
ing reset switch, the tire pressure warning
light does not blink 3 times.
●After performing init ialization, the tire
pressure warning light blinks for 1 minute
then stays on while driving.
If the inflation pressure of each tire is still not
displayed, have the vehicle inspected by
your Lexus dealer.
The tire pressure warning valve and
transmitter is equipped with a unique
ID code. When replacing a tire pres-
sure warning valve and transmitter, it is
necessary to register the ID code.
Have the ID code registered by your
Lexus dealer.
WARNING
■When initializing the tire pressure
warning system
Do not initializing tire inflation pressure
without first adjusting the tire inflation
pressure to the spec ified level. Other-
wise, the tire pressu re warning light may
not come on even if the tire inflation pres-
sure is low, or it may come on when the
tire inflation pressure is actually normal.
Registering ID codes
Page 406 of 508
4067-2. Steps to take in an emergency
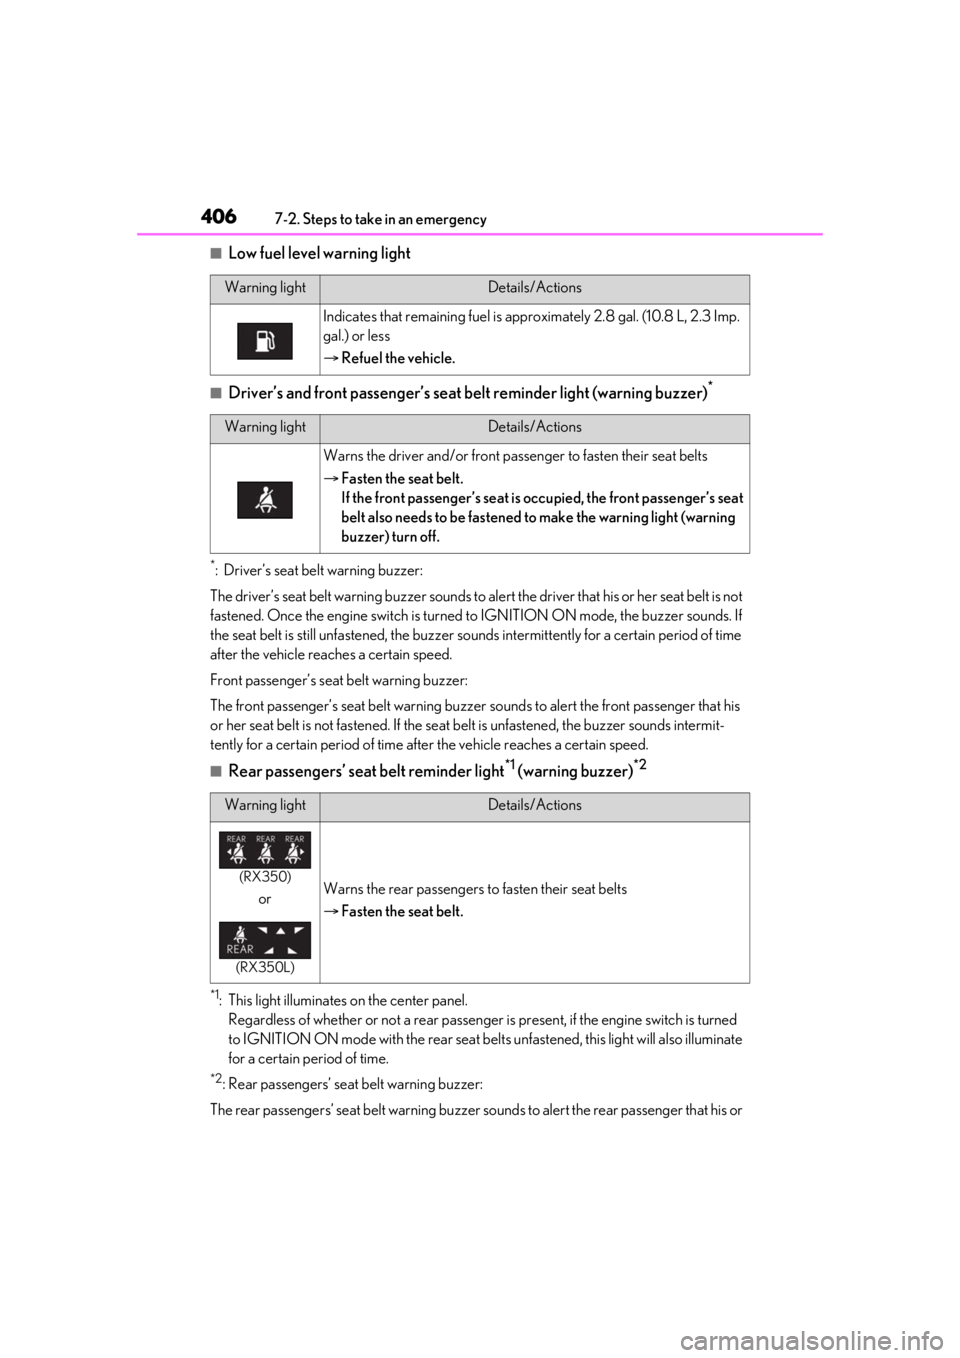
■Low fuel level warning light
■Driver’s and front passenger’s seat belt reminder light (warning buzzer)*
*: Driver’s seat belt warning buzzer:
The driver’s seat belt warning buzzer sounds to al ert the driver that his or her seat belt is not
fastened. Once the engine switch is turned to IGNITION ON mode, the buzzer sounds. If
the seat belt is still unfastened, the buzzer sounds intermittently for a certain period of time
after the vehicle reaches a certain speed.
Front passenger’s seat belt warning buzzer:
The front passenger’s seat belt warning buzzer sounds to alert the front passenger that his
or her seat belt is not fastened. If the seat belt is unfastened, the buzzer sounds intermit-
tently for a certain period of time af ter the vehicle reaches a certain speed.
■Rear passengers’ seat belt reminder light*1 (warning buzzer)*2
*1: This light illuminates on the center panel.
Regardless of whether or not a rear passenger is present, if the engine switch is turned
to IGNITION ON mode with the rear seat belts unfastened, this light will also illuminate
for a certain period of time.
*2: Rear passengers’ seat belt warning buzzer:
The rear passengers’ seat belt warning buzzer sounds to alert the rear passenger that his or
Warning lightDetails/Actions
Indicates that remaining fu el is approximately 2.8 gal. (10.8 L, 2.3 Imp.
gal.) or less
Refuel the vehicle.
Warning lightDetails/Actions
Warns the driver and/or front pass enger to fasten their seat belts
Fasten the seat belt.
If the front passenger’s seat is occupied, the front passenger’s seat
belt also needs to be fastened to make the warning light (warning
buzzer) turn off.
Warning lightDetails/Actions
(RX350)
or
(RX350L)
Warns the rear passengers to fasten their seat belts
Fasten the seat belt.