2021 LEXUS RX350 mirror
[x] Cancel search: mirrorPage 296 of 508

2965-3. Using the air conditioning system and defogger
■Main control screen
Using the touchpad of the Remote
Touch, select the button on the screen.
This system can also be operated by
the touch screen.
Vehicles with DUAL-ZONE climate
control
Sub menu
Selecting the sub menu item to switch the
main screen. : Display the air co nditioning control
screen
: Display the option control screen
Adjust the left side seat tempera-
ture setting
Adjust the fan speed setting
Select the air flow mode
: Air flows to the upper body
: Air flows to the upper body and feet
: Air flows to the feet
: Air flows to the feet and the wind-
shield defogger operates
Adjust the right side seat tempera-
ture setting
Function on/off indicators
When the function is on, the indicator illu-
minates on the control screen.
Sub function menu
When the sub function button on the
WARNING
■To prevent the windshield from fog-
ging up
Do not use the windshield defogger
switch during cool air operation in
extremely humid weather. The difference
between the temperature of the outside
air and that of the windshield can cause
the outer surface of the windshield to fog
up, blocking your vision.
■When the outside rear view mirror
defoggers are operating
Do not touch the outside rear view mir-
ror surfaces, as they can become very
hot and burn you.
NOTICE
■To prevent battery discharge
Do not leave the air conditioning system
on longer than necessary when the
engine is off.
■When repairing/replacing parts of
the air conditioning system
Have repair/replace ment performed by
your Lexus dealer.
When a part of the air conditioning sys-
tem, such as the evaporator, is to be
replaced, it must be replaced with a new
one.
Air conditioning control screen
A
B
C
D
E
F
G
Page 333 of 508
3335-6. Using the other interior features
5
Interior features
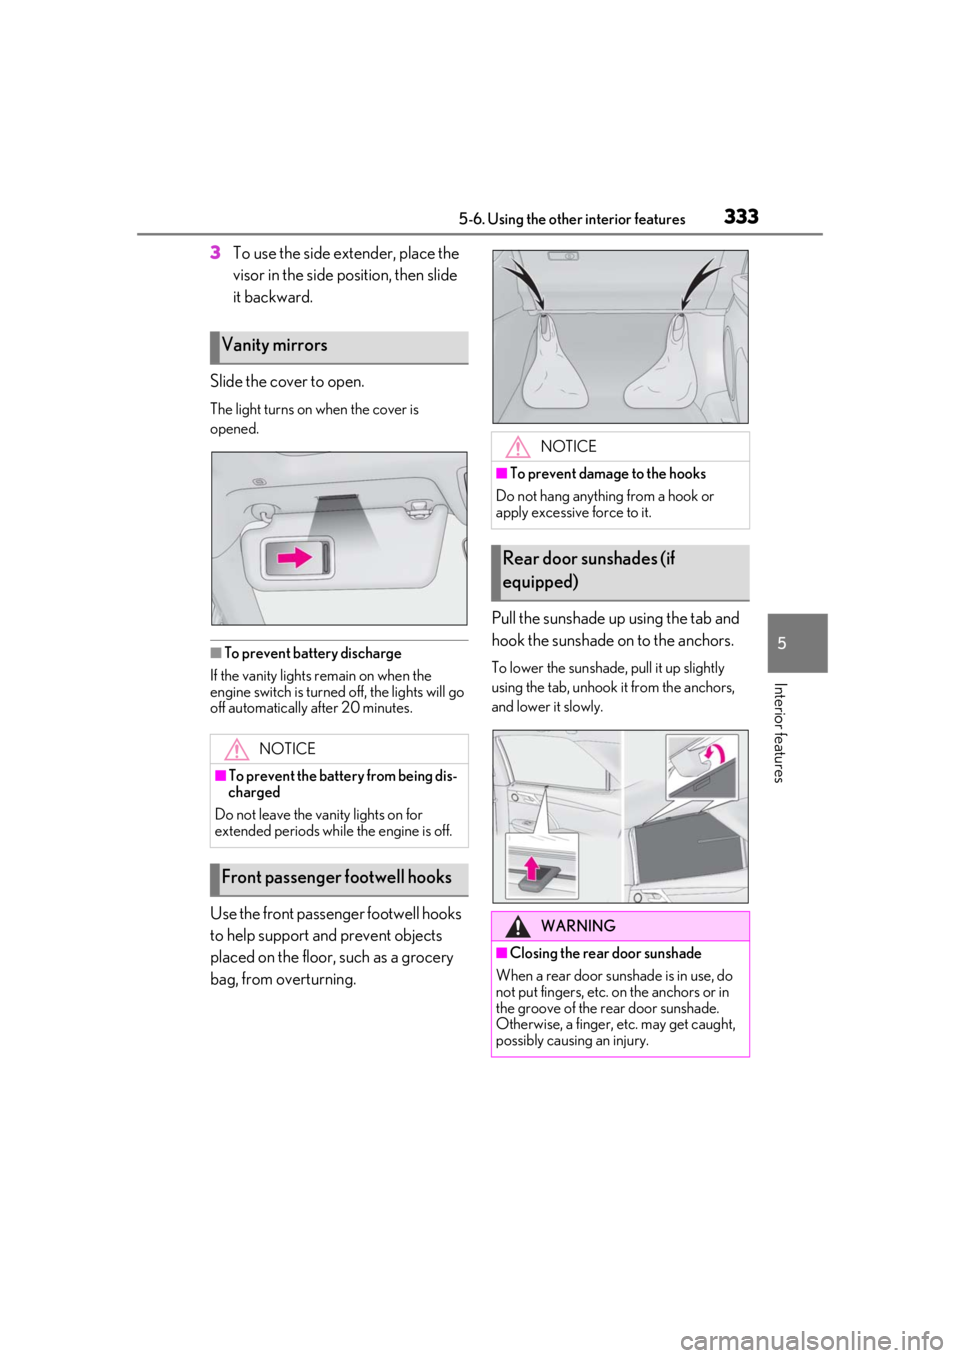
3To use the side extender, place the
visor in the side position, then slide
it backward.
Slide the cover to open.
The light turns on when the cover is
opened.
■To prevent battery discharge
If the vanity lights remain on when the
engine switch is turned off, the lights will go
off automatically after 20 minutes.
Use the front passenger footwell hooks
to help support and prevent objects
placed on the floor, such as a grocery
bag, from overturning. Pull the sunshade up using the tab and
hook the sunshade on to the anchors.
To lower the sunshade, pull it up slightly
using the tab, unhook it from the anchors,
and lower it slowly.
Vanity mirrors
NOTICE
■To prevent the battery from being dis-
charged
Do not leave the vanity lights on for
extended periods while the engine is off.
Front passenger footwell hooks
NOTICE
■To prevent damage to the hooks
Do not hang anything from a hook or
apply excessive force to it.
Rear door sunshades (if
equipped)
WARNING
■Closing the rear door sunshade
When a rear door sunshade is in use, do
not put fingers, etc. on the anchors or in
the groove of the rear door sunshade.
Otherwise, a finger, etc. may get caught,
possibly causing an injury.
Page 336 of 508
3365-6. Using the other interior features
■Before programming HomeLink®
During programming, it is possible
that garage doors, gates, or other
devices may operate. For this rea-
son, make sure that people and
objects are clear of the garage door
or other devices to prevent injury or
other potential harm.
It is recommended that a new bat-
tery be placed in the remote control
transmitter for more accurate pro-
gramming.
Garage door opener motors manu-
factured after 1995 may be
equipped with rolling code protec-
tion. If this is the case, you may need
a stepladder or other sturdy, safe
device to reach the “Learn” or
“Smart” button on the garage door
opener motor.
■Programming HomeLink®
Steps 1 through 3 must be performed
within 60 seconds, otherwise the indi-
cator light will stop flashing and pro-
gramming will not be able to be
completed.
1 Press and release the HomeLink
®
button you want to program and check that the HomeLink
® indica-
tor light flashes (orange).
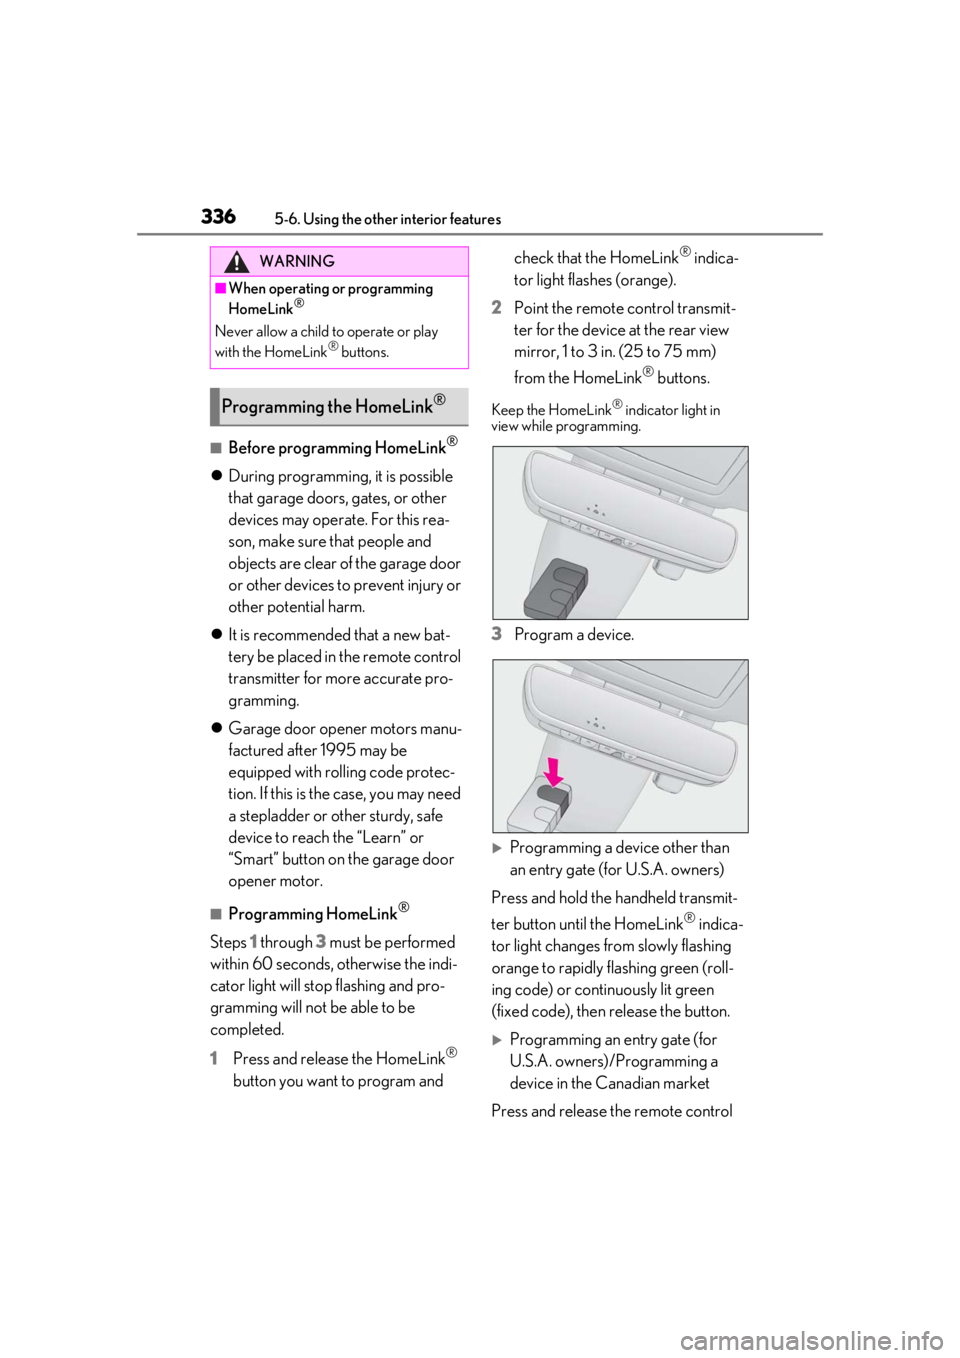
2 Point the remote control transmit-
ter for the device at the rear view
mirror, 1 to 3 in. (25 to 75 mm)
from the HomeLink
® buttons.
Keep the HomeLink® indicator light in
view while programming.
3 Program a device.
Programming a device other than
an entry gate (for U.S.A. owners)
Press and hold the handheld transmit-
ter button until the HomeLink
® indica-
tor light changes from slowly flashing
orange to rapidly flashing green (roll-
ing code) or continuously lit green
(fixed code), then release the button.
Programming an entry gate (for
U.S.A. owners)/Programming a
device in the Canadian market
Press and release the remote control
WARNING
■When operating or programming
HomeLink®
Never allow a child to operate or play
with the HomeLink® buttons.
Programming the HomeLink®
Page 340 of 508

3405-6. Using the other interior features
*:If equipped
To turn the compass on or off, press
and hold the switch for 3 seconds.
Directions are displayed as follows:
■Conditions unfavorable to correct
operation
The compass may not show the correct
direction in the following conditions:
●The vehicle is stopped immediately after
turning.
●The vehicle is on an inclined surface.
●The vehicle is in a place where the earth’s
magnetic field is subject to interference
by artificial magnetic fields (under-
ground car park/parking lot, under a
steel tower, between buildings, roof car
park/parking lot, near an intersection,
near a large vehicle, etc.).
●The vehicle has become magnetized.
(There is a magnet or metal object near
the inside rear view mirror.)
●The battery has been disconnected.
●A door is open.
Compass*
The compass on the inside rear
view mirror indicates the direction
in which the vehicle is heading.
Operation and displays
DisplayDirection
“N”North
“NE”Northeast
“E”East
“SE”Southeast
“S”South
“SW”Southwest
“W”West
“NW”Northwest
WARNING
■While driving the vehicle
Do not adjust the display. Adjust the dis-
play only when the vehicle is stopped.
NOTICE
■To avoid compass malfunctions
Do not place magnets or any metal
objects near the inside rear view mirror.
Doing this may cause the compass sen-
sor to malfunction.
■To ensure normal operation of the
compass
●Do not perform a circling calibration of
the compass in a place where the
earth’s magnetic field is subject to
interference by artificial magnetic
fields.
●During calibration, do not operate
electric systems (moon roof, pan-
oramic moon roof, power windows,
etc.) as they may interfere with the cal-
ibration.
Page 344 of 508
3446-1. Maintenance and care
6-1.Maintenance and care
Working from top to bottom, liber-
ally apply water to the vehicle body,
wheel wells and underside of the
vehicle to remove any dirt and dust.
Wash the vehicle body using a
sponge or soft cloth, such as a
chamois.
For hard-to-remove marks, use car
wash soap and rinse thoroughly with
water.
Wipe away any water.
Wax the vehicle when the water-
proof coating deteriorates.
If water does not bead on a clean surface,
apply wax when the vehicle body is cool.
■Self-restoring coat
The vehicle body has a self-restoring coat-
ing that is resistant to small surface
scratches caused in a car wash etc.
●The coating lasts for 5 to 8 years from
when the vehicle is delivered from the
plant.
●The restoration time differs depending on
the depth of the scratch and outside tem-
perature.
The restoration time may become
shorter when the coating is warmed by
applying warm water.
●Deep scratches caused by keys, coins,
etc. cannot be restored.
●Do not use wax that contains abrasives.
■Automatic car washes
●Before washing the vehicle:
• Fold the mirrors
• Turn off the power back door
Start washing from the front of the vehicle.
Extend the mirrors before driving.
●Brushes used in automatic car washes
may scratch the vehicle surface, parts
(wheel, etc.) and harm your vehicle’s
paint.
●Rear spoiler may not be washable in
some automatic car washes. There may
also be an increased risk of damage to
vehicle.
■High pressure car washes
As water may enter the cabin, do not bring
the nozzle tip near the gaps around the
doors or perimeter of the windows, or spray
these areas continuously.
■When using a car wash
If the door handle becomes wet while the
electronic key is within the effective range,
the door may lock and unlock repeatedly. In
that case, follow the following correction
procedures to wash the vehicle:
●Place the key in a position 6 ft. (2 m) or
more separate from the vehicle while the
vehicle is being wash ed. (Take care to
ensure that the key is not stolen.)
●Set the electronic key to battery-saving
mode to disable the smart access system
with push-button start. ( P.116)
■Wheels and wheel ornaments
●Remove any dirt immediately by using a
neutral detergent.
●Wash detergent off with water immedi-
ately after use.
●To protect the paint from damage, make
sure to observe the following precau-
tions.
• Do not use acidic, alkaline or abrasive
detergent
• Do not use hard brushes
• Do not use detergent on the wheels when they are hot, such as after driving or park-
ing in hot weather
Cleaning and protecting the
vehicle exterior
Perform cleaning in a manner
appropriate to each component
and its material.
Cleaning instructions
Page 467 of 508
4678-2. Customization
8
Vehicle specifications
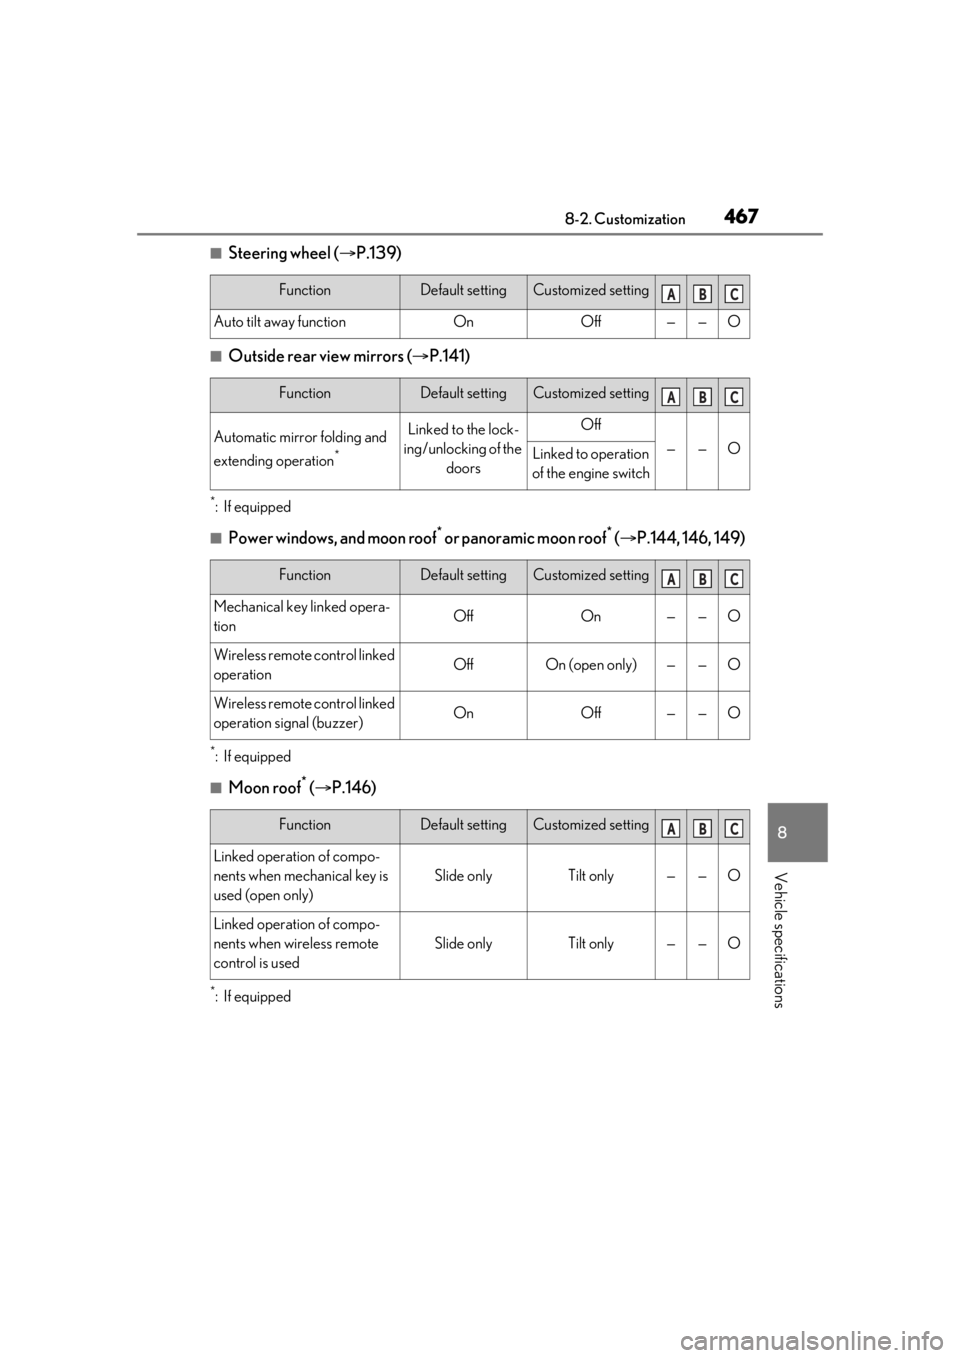
■Steering wheel (P.139)
■Outside rear view mirrors ( P.141)
*:If equipped
■Power windows, and moon roof* or panoramic moon roof* ( P.144, 146, 149)
*:If equipped
■Moon roof* ( P.146)
*:If equipped
FunctionDefault settingCustomized setting
Auto tilt away functionOnOff——O
FunctionDefault settingCustomized setting
Automatic mirror folding and
extending operation
*
Linked to the lock-
ing/unlocking of the doorsOff
——OLinked to operation
of the engine switch
FunctionDefault settingCustomized setting
Mechanical key linked opera-
tionOffOn——O
Wireless remote control linked
operationOffOn (open only)——O
Wireless remote control linked
operation signal (buzzer)OnOff——O
FunctionDefault settingCustomized setting
Linked operation of compo-
nents when mechanical key is
used (open only)
Slide onlyTilt only——O
Linked operation of compo-
nents when wireless remote
control is used
Slide onlyTilt only——O
ABC
ABC
ABC
ABC
Page 470 of 508
4708-2. Customization
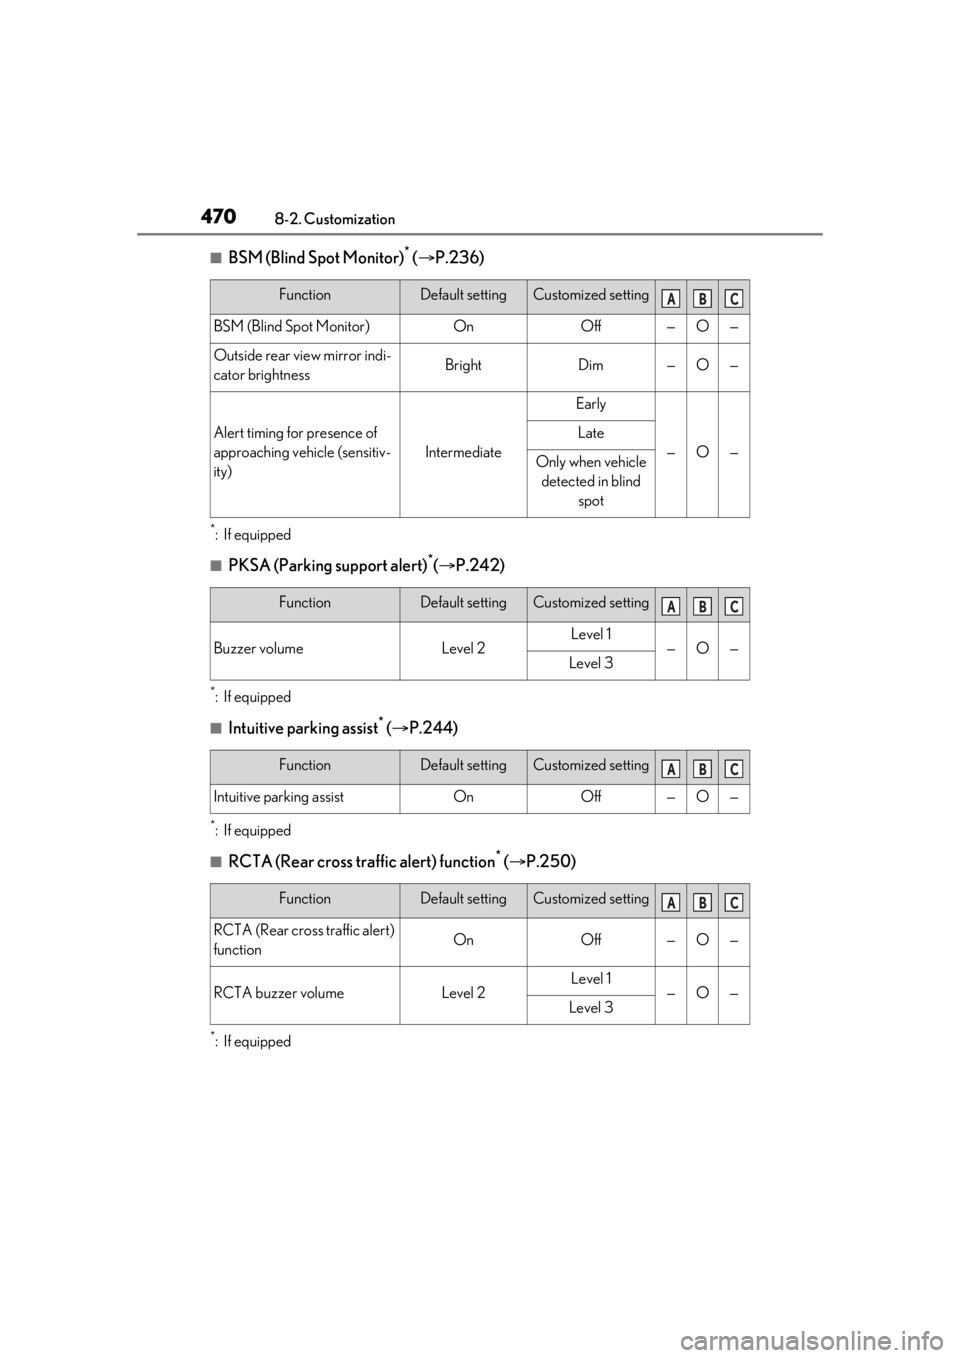
■BSM (Blind Spot Monitor)* ( P.236)
*:If equipped
■PKSA (Parking support alert)*( P.242)
*:If equipped
■Intuitive parking assist* ( P.244)
*:If equipped
■RCTA (Rear cross traffic alert) function* ( P.250)
*:If equipped
FunctionDefault settingCustomized setting
BSM (Blind Spot Monitor)OnOff—O—
Outside rear view mirror indi-
cator brightnessBrightDim—O—
Alert timing for presence of
approaching vehicle (sensitiv-
ity)
Intermediate
Early
—O—
Late
Only when vehicle
detected in blind spot
FunctionDefault settingCustomized setting
Buzzer volumeLevel 2Level 1—O—Level 3
FunctionDefault settingCustomized setting
Intuitive parking assistOnOff—O—
FunctionDefault settingCustomized setting
RCTA (Rear cross traffic alert)
functionOnOff—O—
RCTA buzzer volumeLevel 2Level 1—O—Level 3
ABC
ABC
ABC
ABC
Page 494 of 508

494Alphabetical Index
Bottle holders..................................................316
BrakeBrake hold...................................................... 186
Fluid ...................................................... 362, 447
Parking brake ............................................... 183
Warning light ...............................................403
Brake assist .....................................................274
Break-in tips.................................................... 155
Brightness control Instrument panel light control ................80
BSM (Blind Spot Monitor)....................... 236
Buzzer Hands off steering wheel warning (LTA)......................................................................... 223
C
Care Exterior ........................................................... 344
Interior ............................................................. 347
Seat belts........................................................ 347
Wheels and wheel ornaments............ 344
Cargo capacity.....................................159, 162
Cargo hooks ................................................... 317
Cargo net hooks ............................................ 317
Center Display .............................................288
Chains ................................................................281
Child restraint system Fixed with a LATCH system .................. 54
Fixed with a seat belt...................................50
Front passenger occupant classification system ............................................................. 39
Points to remember .................................... 45
Riding with children ..................................... 45
Types of child restraint system installation method ........................................................... 46
Using an anchor bracket .......................... 57
Child safety Airbag precautions...................................... 36
Battery precautions ......................364, 436
Child restraint system................................. 46
Heated steering wheel and seat heater precautions................................................306 How your child should wear the seat belt
............................................................................. 27
Moon roof precautions............................ 148
Panoramic moon roof precautions ..... 151
Power back door precautions ............. 103
Power window lock switch .................... 146
Power window precautions .................. 145
Rear door child-protectors ................... 102
Seat belt extender precautions.............. 27
Seat belt precautions .................................. 45
Child-protectors............................................102
Cleaning Exterior............................................................ 344
Interior ............................................................. 347
Radar sensor ................................................203
Seat belts ........................................................ 347
Wheels and wheel ornaments ............344
Clock ..........................................................77, 331
Coat hooks.......................................................331
Coin box............................................................316
Compass ......................................................... 340
Condenser ..................................................... 362
Console box ....................................................314
Consumption screen .................................... 92
Cooling system...............................................361 Engine overheating................................... 437
Cornering lights ............................................ 190 Replacing light bulbs ............................... 385
Cruise control Dynamic radar cruise control with full-speed range ...................................... 227
Cup holders .....................................................315
Current fuel consumption .......................... 82
Curtain shield airbags .................................. 30
Customizable features ................................461
D
Daytime running light system .................. 188
Defogger Outside rear view mirrors..................... 294
Rear window ................................................ 294
Windshield .................................................... 294