2021 LEXUS RC300 steering wheel
[x] Cancel search: steering wheelPage 291 of 400
2917-2. Steps to take in an emergency
7
When trouble arises
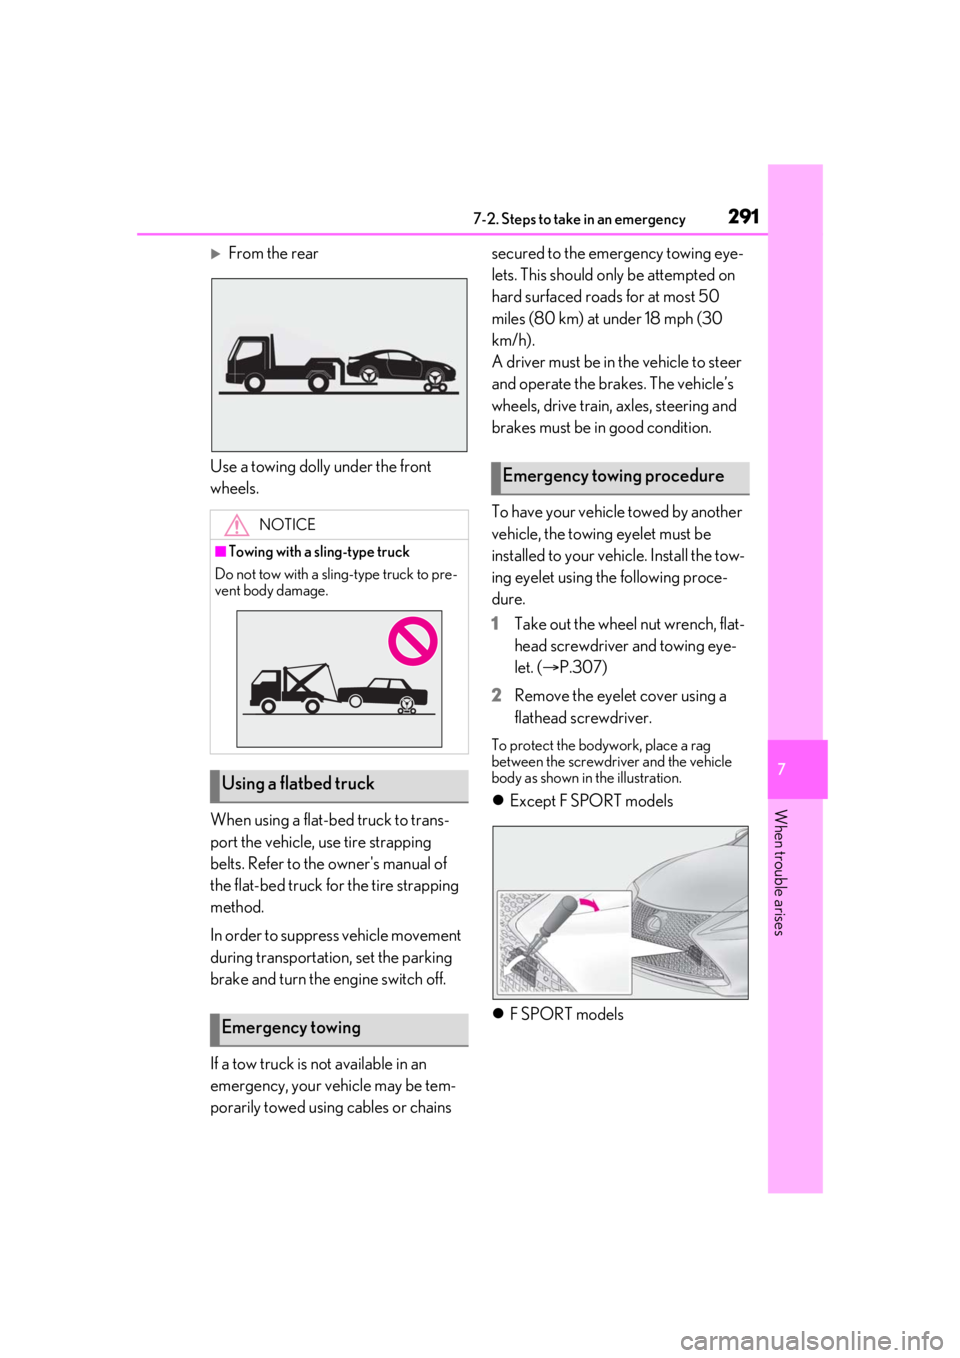
From the rear
Use a towing dolly under the front
wheels.
When using a flat-bed truck to trans-
port the vehicle, use tire strapping
belts. Refer to the owner's manual of
the flat-bed truck for the tire strapping
method.
In order to suppress vehicle movement
during transportati on, set the parking
brake and turn the engine switch off.
If a tow truck is not available in an
emergency, your vehicle may be tem-
porarily towed using cables or chains secured to the emergency towing eye-
lets. This should only be attempted on
hard surfaced roads for at most 50
miles (80 km) at under 18 mph (30
km/h).
A driver must be in the vehicle to steer
and operate the brakes. The vehicle’s
wheels, drive train, axles, steering and
brakes must be in good condition.
To have your vehicle towed by another
vehicle, the towing eyelet must be
installed to your vehicle. Install the tow-
ing eyelet using the following proce-
dure.
1
Take out the wheel nut wrench, flat-
head screwdriver and towing eye-
let. ( P.307)
2 Remove the eyelet cover using a
flathead screwdriver.
To protect the bodywork, place a rag
between the screwdriver and the vehicle
body as shown in the illustration.
Except F SPORT models
F SPORT models
NOTICE
■Towing with a sling-type truck
Do not tow with a sling-type truck to pre-
vent body damage.
Using a flatbed truck
Emergency towing
Emergency towing procedure
Page 292 of 400
2927-2. Steps to take in an emergency
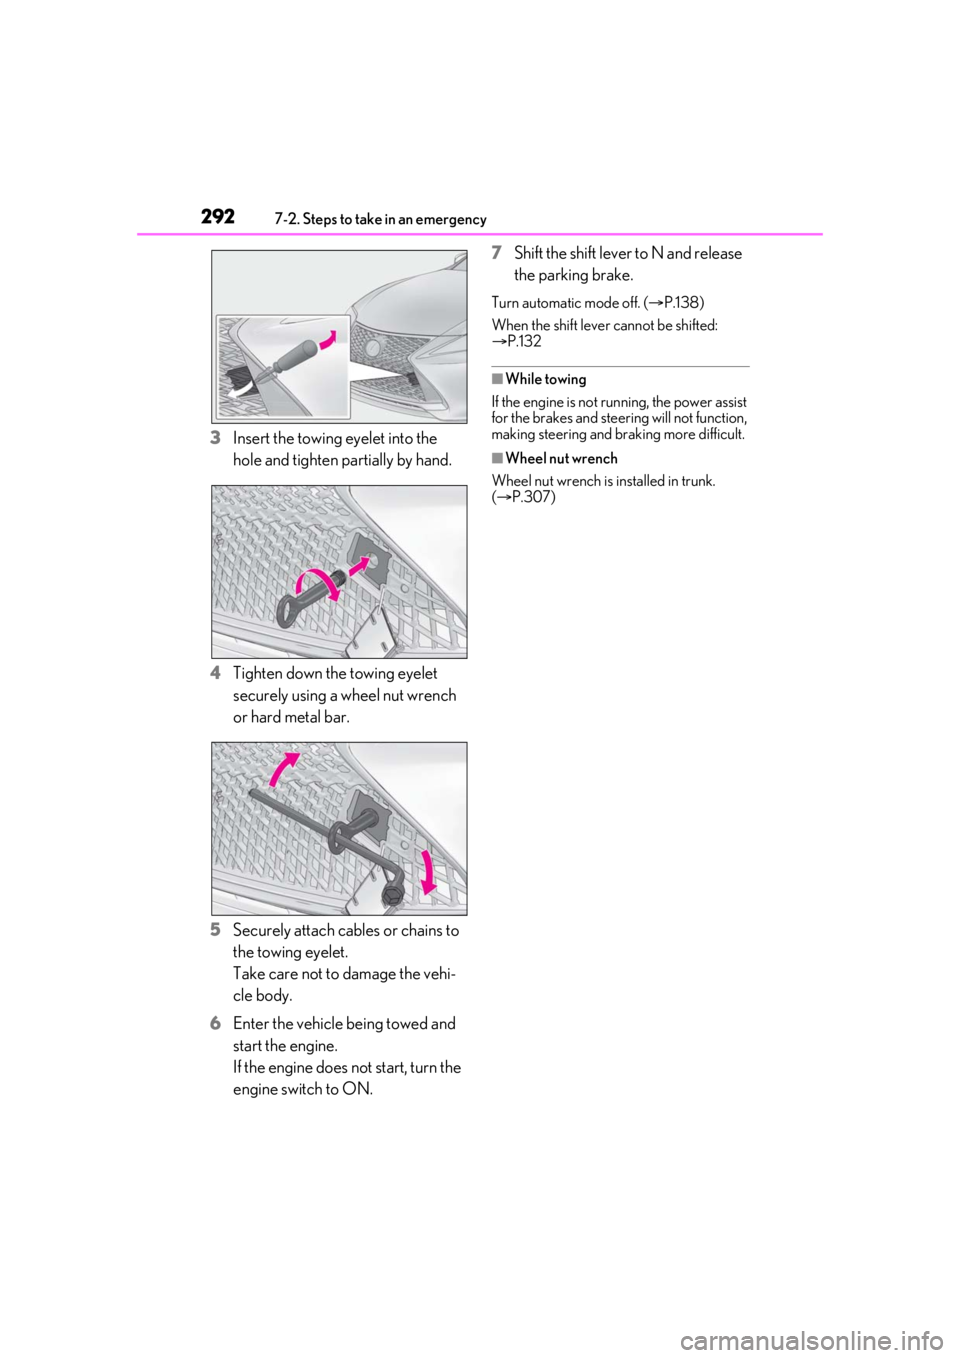
3Insert the towing eyelet into the
hole and tighten partially by hand.
4 Tighten down the towing eyelet
securely using a wheel nut wrench
or hard metal bar.
5 Securely attach cables or chains to
the towing eyelet.
Take care not to damage the vehi-
cle body.
6 Enter the vehicle being towed and
start the engine.
If the engine does not start, turn the
engine switch to ON. 7
Shift the shift lever to N and release
the parking brake.
Turn automatic mode off. ( P.138)
When the shift lever cannot be shifted:
P.132
■While towing
If the engine is not running, the power assist
for the brakes and steering will not function,
making steering and braking more difficult.
■Wheel nut wrench
Wheel nut wrench is installed in trunk.
( P.307)
Page 302 of 400
3027-2. Steps to take in an emergency
WARNING
■If both the ABS and the brake system
warning lights remain on
Stop your vehicle in a safe place immedi-
ately and contact your Lexus dealer. The
vehicle will become extremely unstable
during braking, and the ABS system may
fail, which could cause an accident
resulting in death or serious injury.
■When the electric power steering
system warning light comes on
The steering wheel may become
extremely heavy.
When steering wheel operations are
heavier than usual, grip the steering
wheel firmly and operate it using more
force than usual.
■If the tire pressure warning light
comes on
Be sure to observe the following precau-
tions. Failure to do so could cause a loss
of vehicle control and result in death or
serious injury.
●Stop your vehicle in a safe place as
soon as possible. Adjust the tire infla-
tion pressure immediately.
●If the tire pressure warning light comes
on even after tire inflation pressure
adjustment, it is probable that you have
a flat tire. Check the tires. If a tire is flat,
change it with the spare tire and have
the flat tire repaired by the nearest
Lexus dealer.
●Avoid abrupt maneuvering and brak-
ing. If the vehicle tires deteriorate, you
could lose control of the steering
wheel or the brakes.
■If a blowout or sudden air leakage
should occur
The tire pressure warning system may
not activate immediately.
■Maintenance of the tires
Each tire, including the spare (if pro-
vided), should be checked monthly when
cold and inflated to the inflation pressure
recommended by the vehicle manufac-
turer on the vehicle pl acard or tire infla-
tion pressure label (tire and load
information label). (If your vehicle has
tires of a different size than the size indi-
cated on the vehicle placard or tire infla-
tion pressure label [tire and load
information label], you should determine
the proper tire inflation pressure for
those tires.)
As an added safety fe ature, your vehicle
has been equipped with a tire pressure
monitoring system (TPMS-tire pressure
warning system) that illuminates a low
tire pressure telltale (tire pressure warn-
ing light) when one or more of your tires
is significantly under-inflated. Accord-
ingly, when the low ti re pressure telltale
(tire pressure warning light) illuminates,
you should stop and check your tires as
soon as possible, and inflate them to the
proper pressure. Driving on a signifi-
cantly under-inflated tire causes the tire
to overheat and can lead to tire failure.
Under-inflation also reduces fuel effi-
ciency and tire tread life, and may affect
the vehicle’s handling and stopping abil-
ity.
Please note that the TPMS (tire pressure
warning system) is not a substitute for
proper tire maintenance, and it is the
driver’s responsibility to maintain correct
tire pressure, even if under-inflation has
not reached the level to trigger illumina-
tion of the TPMS low tire pressure telltale
(tire pressure warning light).
Page 313 of 400

3137-2. Steps to take in an emergency
7
When trouble arises
■When the spare tire is equipped
The vehicle becomes lower when driving
with the spare tire compared to when driv-
ing with standard tires.
■If you have a flat rear tire on a road cov-
ered with snow or ice (vehicles with
front and rear tires of the same size
except for vehicles with LDH and
19-inch tires)
Install the spare tire on one of the front
wheels of the vehicle. Perform the following
steps and fit tire chains to the rear tires:
1 Replace a front tire with the spare tire.
2 Replace the flat rear tire with the tire
removed from the front of the vehicle.
3 Fit tire chains to the rear tires.
WARNING
■When using the spare tire
●Remember that the spare tire provided
is specifically desi gned for use with
your vehicle. Do not use your spare
tire on another vehicle.
●Do not use more than one spare tire
simultaneously.
●Replace the spare tire with a standard
tire as soon as possible.
●Avoid sudden acceleration, abrupt
steering, sudden braking and shifting
operations that cause sudden engine
braking.
■When the spare tire is attached
The vehicle speed may not be correctly
detected, and the following systems may
not operate correctly:
• ABS & Brake assist
•VSC
•TRAC
• Dynamic radar cruise control with full-speed range
•PCS
•EPS
• Adaptive Variable Suspension System (if equipped)
• LDA (Lane Departure Alert with steering control)
• VGRS (if equipped)
• LDH (Lexus Dynamic Handling sys- tem) (if equipped)
• DRS (Dynamic Rear Steering) (if equipped)
• VDIM (Vehicle Dynamics Integrated Management)
• Tire pressure warning system
• Lexus parking assist monitor
• Intuitive parking assist (if equipped)
• Navigation system (if equipped)
Also, not only can the following system
not be utilized fully, bu t it may even nega-
tively affect the drive-train components:
• AWD system (if equipped)
■Speed limit when using the spare tire
Do not drive at speeds in excess of 50
mph (80 km/h) when a spare tire is
installed on the vehicle.
The spare tire is not designed for driving
at high speeds. Failure to observe this
precaution may lead to an accident caus-
ing death or serious injury.
■After using the tools and jack
Before driving, make sure all the tools
and jack are securely in place in their
storage location to reduce the possibility
of personal injury during a collision or
sudden braking.
Page 334 of 400
3348-1. Specifications
Use Lexus approved “Toyota Genuine Differential Gear Oil” or an equivalent oil of
matching quality to satisfy th e above specification. Please contact your Lexus dealer for
further details.
*: Minimum pedal clearance when depressed with a force of 112.4 lbf (500 N, 51.0 kgf)
while the engine is running.
Type A
Brakes
Pedal clearance*
RC350 AWD/RC300 AWD
4.5 in. (115 mm) Min.
RC350/RC300
4.1 in. (104 mm) Min.
Pedal free play0.04 0.24 in. (1.0 6.0 mm)
Brake pad wear limit0.04 in. (1.0 mm)
Parking brake lining wear limit0.04 in. (1.0 mm)
Fluid typeSAE J1703 or FMVSS No.116 DOT 3, or SAE
J1704 or FMVSS No.116 DOT 4 brake fluid
Steering
Free playLess than 1.2 in. (30 mm)
Tires and wheels
Tire size235/45R18 94Y, T155/70D17 110M (spare)
Tire inflation pressure (Rec-
ommended cold tire inflation
pressure)
Driving under normal conditions
Front: 35 psi (240 kPa, 2.4 kgf/cm
2 or bar)
Rear: 35 psi (240 kPa, 2.4 kgf/cm
2 or bar)
Spare: 60 psi (420 kPa, 4.2 kgf/cm
2 or bar)
Driving at high speeds (above 100 mph [160 km/h]) (in
countries where such speeds are permitted by law)
Add 3 psi (20 kPa, 0.2 kgf/cm
2 or bar) to the front tires, 6
psi (40 kPa, 0.4 kgf/cm
2 or bar) to the rear tires. Never
exceed the maximum co ld tire inflation pressure indicated
on the tire sidewall.
Page 345 of 400

3458-1. Specifications
8
Vehicle specifications
cornering (turning) traction.
■Temperature A, B, C
The temperature grades are A (the
highest), B, and C, representing the
tire’s resistance to the generation of
heat and its ability to dissipate heat
when tested under controlled condi-
tions on a specified indoor laboratory
test wheel.
Sustained high temperature can cause the
material of the tire to degenerate and
reduce tire life, and excessive temperature
can lead to sudden tire failure. Grade C corresponds to
a level of perfor-
mance which all passenger car tires must
meet under the Fede ral Motor Vehicle
Safety Standard No. 109.
Grades B and A represent higher levels of
performance on the laboratory test wheel
than the minimum required by law.
Warning: The temperature grades of a tire
assume that it is properly inflated and not
overloaded.
Excessive speed, unde rinflation, or exces-
sive loading, either separately or in combi-
nation, can cause heat buildup and
possible tire failure.
Glossary of tire terminology
Tire related termMeaning
Cold tire inflation pressure
Tire pressure when the vehicle has been parked for
three hours or more, or has not been driven more
than 1 mile or 1.5 km under that condition
Maximum inflation pressureThe maximum cold inflated pressure to which a tire
may be inflated, shown on the sidewall of the tire
Recommended inflation pressureCold tire inflation pressure recommended by a
manufacturer
Accessory weight
The combined weight (in excess of those standard
items which may be replaced) of automatic trans-
mission, power steering, power brakes, power win-
dows, power seats, radio and heater, to the extent
that these items are available as factory-installed
equipment (whether installed or not)
Curb weight
The weight of a motor vehicle with standard equip-
ment, including the maximum capacity of fuel, oil
and coolant, and if so equipped, air conditioning
and additional weight optional engine
Page 355 of 400
3558-2. Customization
8
Vehicle specifications
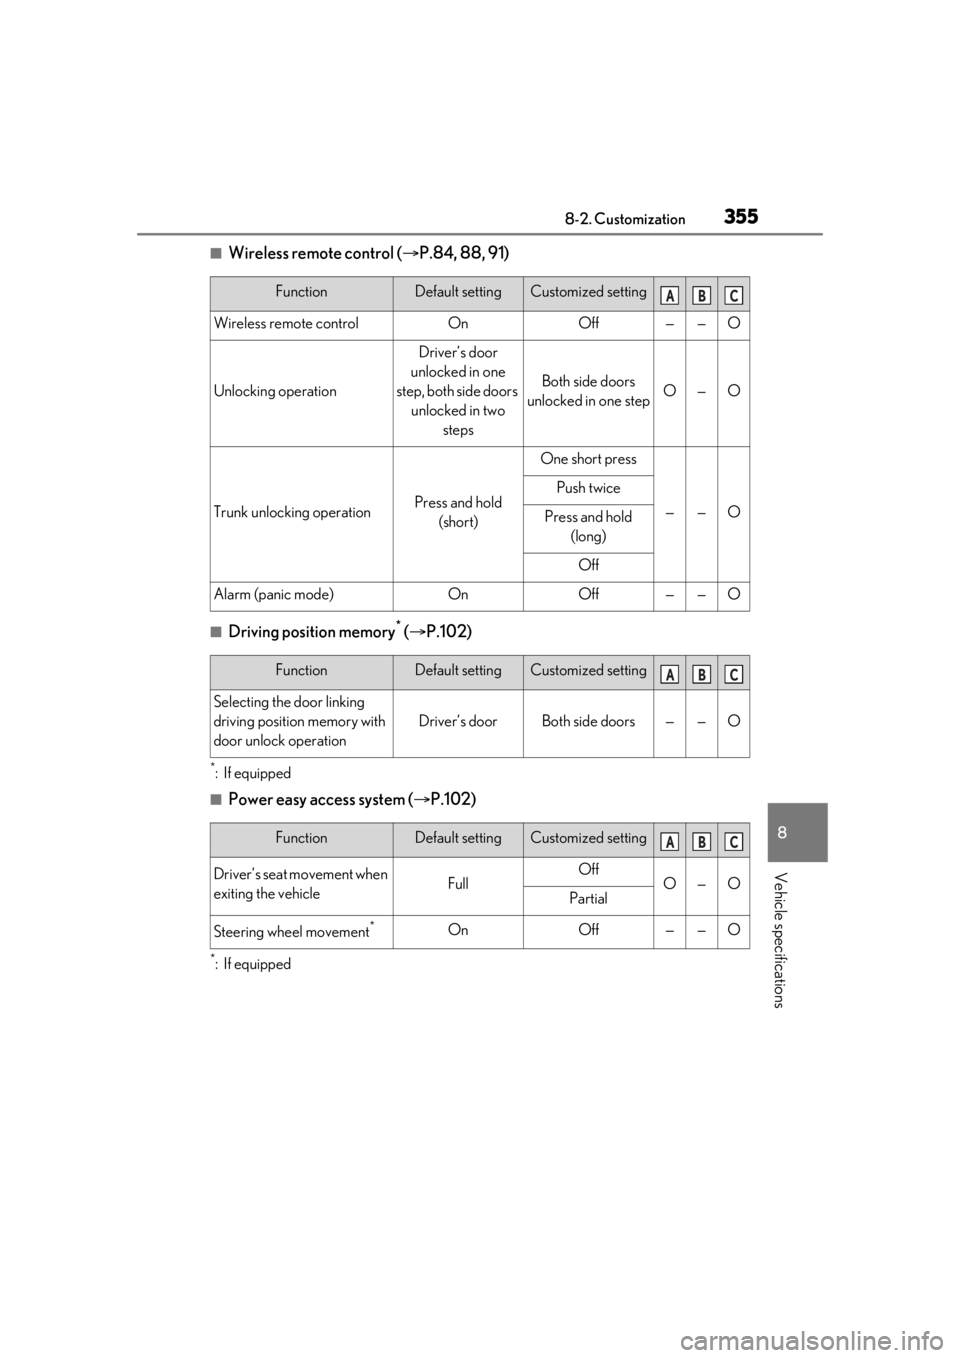
■Wireless remote control (P.84, 88, 91)
■Driving position memory* ( P.102)
*:If equipped
■Power easy access system ( P.102)
*:If equipped
FunctionDefault settingCustomized setting
Wireless remote controlOnOff——O
Unlocking operation
Driver’s door
unlocked in one
step, both side doors unlocked in two steps
Both side doors
unlocked in one stepO—O
Trunk unlocking operationPress and hold (short)
One short press
——O
Push twice
Press and hold (long)
Off
Alarm (panic mode)OnOff——O
ABC
FunctionDefault settingCustomized setting
Selecting the door linking
driving position memory with
door unlock operation
Driver’s doorBoth side doors——O
ABC
FunctionDefault settingCustomized setting
Driver’s seat movement when
exiting the vehicleFullOffO—OPartial
Steering wheel movement*OnOff——O
ABC
Page 357 of 400

3578-2. Customization
8
Vehicle specifications
■Automatic light control system (P.142)
■Lights ( P.142)
■PCS (Pre-Collision System) ( P.162)
■LDA (Lane Departure Alert with steering control) ( P.169)
FunctionDefault settingCustomized setting
Light sensor sensitivityStandard-2 to 2O—O
Time elapsed before head-
lights automatically turn off
after doors are closed
30 seconds
Off
O—O60 seconds
90 seconds
ABC
FunctionDefault settingCustomized setting
Daytime running light system
(except Canada)OnOffO—O
FunctionDefault settingCustomized setting
PCS (Pre-Collision System)OnOff—O—
Adjust alert timingMiddleFar—O—Near
FunctionDefault settingCustomized setting
Steering assist functionOnOff—O—
Alert typeSteering wheel
vibrationBuzzer—O—
Alert sensitivityStandardHigh—O—
Vehicle sway warning func-
tionOnOff—O—
Vehicle sway warning sensi-
tivityStandardHigh—O—Low
ABC
ABC
ABC