2021 LEXUS RC300 air condition
[x] Cancel search: air conditionPage 96 of 400

963-2. Opening, closing and locking the doors and trunk
●When an interior alarm sounds continu-
ously
■Battery-saving function
The battery-saving fu nction will be acti-
vated in order to prevent the electronic key
battery and the vehicle battery from being
discharged while the vehicle is not in opera-
tion for a long time.
●In the following situations, the smart
access system with pu sh-button start may
take some time to unlock the doors.
• The electronic key has been left within approximately 6 ft. (2 m) of the outside of
the vehicle for 10 minutes or longer.
• The smart access system with push-but- ton start has not been used for 5 days or
longer.
●If the smart access system with push-but-
ton start has not been used for 14 days or longer, the doors cann
ot be unlocked at
the passenger door. In this case, take hold
of the driver’s door handle, or use the
wireless remote control or mechanical
key, to unlock the doors.
■Electronic Key Battery-Saving Function
When battery-saving mode is set, battery
depletion is minimized by stopping the elec-
tronic key from receiving radio waves.
Press twice while pressing and holding
. Confirm that the electronic key indica-
tor flashes 4 times.
While the battery-saving mode is set, the
smart access system with push-button start
cannot be used. To cancel the function,
press any of the electronic key buttons.
■Conditions affecting operation
The smart access system with push-button
start uses weak radio waves. In the following
situations, the communication between the
electronic key and the vehicle may be
affected, preventing the smart access sys-
tem with push-button start, wireless remote
control and engine immobilizer system
from operating properly.
(Ways of coping: P.317)
●When the electronic key battery is
depleted
●Near a TV tower, electric power plant,
gas station, radio stat ion, large display,
airport or other fac ility that generates
strong radio waves or electrical noise
●When carrying a portable radio, cellular
phone, cordless phone or other wireless
communication device
●When the electronic key is in contact
with, or is covered by the following metal-
lic objects
• Cards to which aluminum foil is attached
SituationCorrection
procedure
The trunk was closed
while the electronic key
was still inside the trunk
and both side doors were
locked.Retrieve the
electronic key
from the trunk
and close the
trunk lid.
An attempt was made to
lock the vehicle while a
door was open.Close both
side doors and
lock the doors
again.
SituationCorrection procedure
The engine switch was
turned to ACCESSORY
mode while the driver’s
door was open (or the
driver’s door was opened
while the engine switch
was in ACCESSORY
mode).
Turn the engine
switch off and
close the
driver’s door.
The engine switch was
turned off while the
driver’s door was open.Close the
driver’s door.
Page 161 of 400

1614-5. Using the driving support systems
4
Driving
●In the following situations, if the situation has changed (or the vehicle has been driven for
some time) and the normal operating conditions are detected, the message will disappear
and the system will become operational.
If the message does not disappear, contact your Lexus dealer.
• When the temperature around the radar sensor is outside of the operational range, such as when the vehicle is in the sun or in an extremely cold environment
• When the front camera cannot detect objects in front of the vehicle, such as when driving
in the dark, snow, or fog, or when brig ht lights are shining into the front camera
SituationActions
When the area around a sensor is covered
with dirt, moisture (f ogged up, covered with
condensation, ice, etc.), or other foreign
matterTo clean the part of the windshield in front of
the front camera , use the windshield wipers
or the windshield defo gger of the air condi-
tioning system ( P.219).
When the temperature around the front
camera is outside of the operational range,
such as when the vehicle is in the sun or in an
extremely cold environment
If the front camera is hot, such as after the
vehicle had been parked in the sun, use the
air conditioning system to decrease the tem-
perature around the front camera.
If a sunshade was used when the vehicle
was parked, depending on its type, the sun-
light reflected from the surface of the sun-
shade may cause the temperature of the
front camera to become excessively high.
If the front camera is cold, such after the
vehicle is parked in an extremely cold envi-
ronment, use the air conditioning system to
increase the temperature around the front
camera.
The area in front of the front camera is
obstructed, such as when the hood is open
or a sticker is attached to the part of the
windshield in front of the front camera.
Close the hood, remove the sticker, etc. to
clear the obstruction.
Page 171 of 400
1714-5. Using the driving support systems
4
Driving
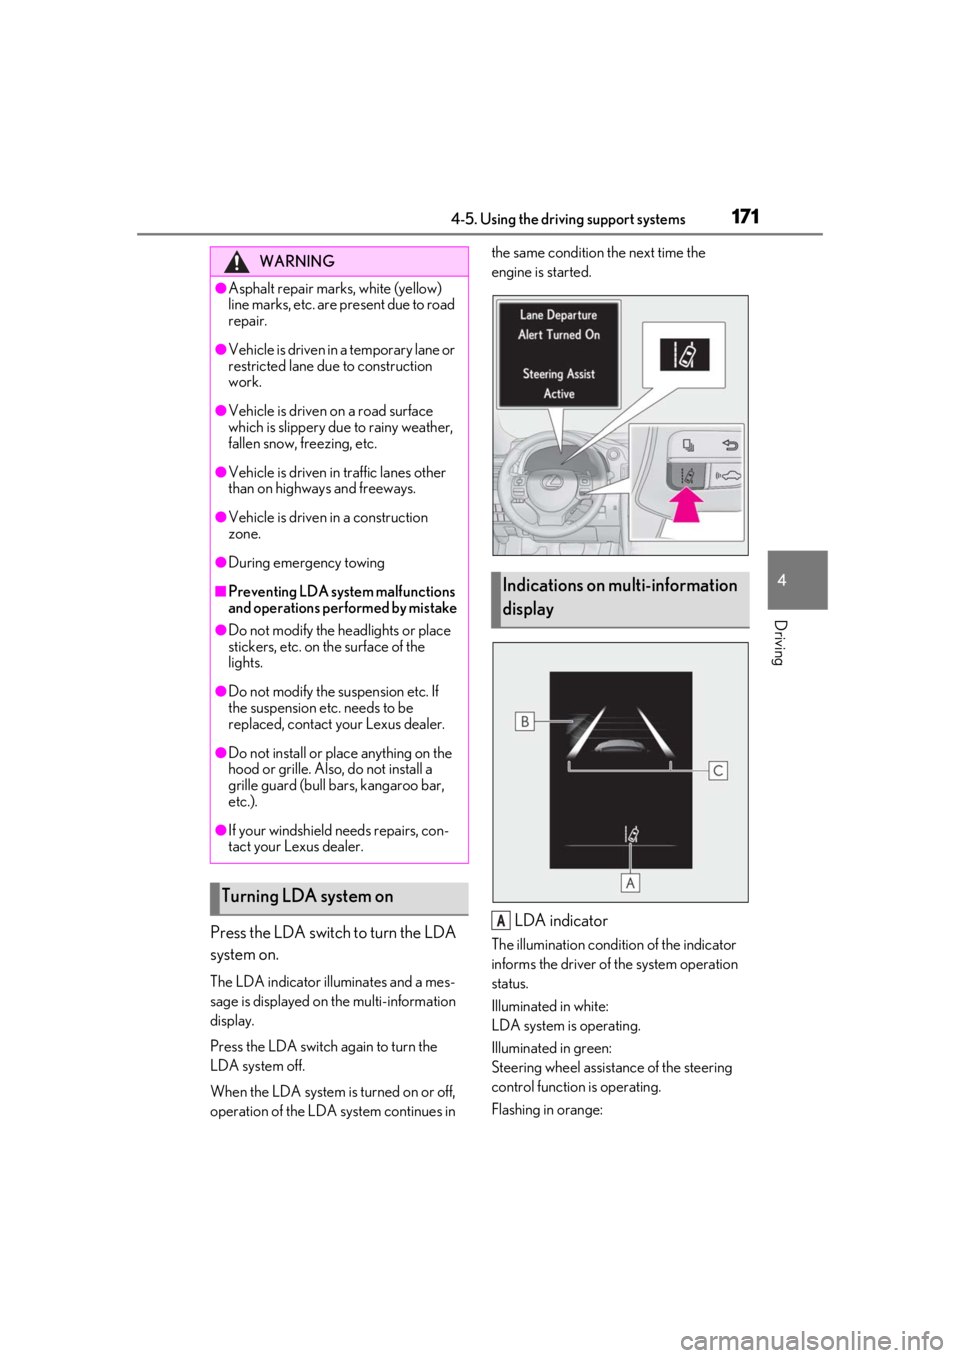
Press the LDA switch to turn the LDA
system on.
The LDA indicator illuminates and a mes-
sage is displayed on the multi-information
display.
Press the LDA switch again to turn the
LDA system off.
When the LDA system is turned on or off,
operation of the LDA system continues in the same condition the next time the
engine is started.
LDA indicator
The illumination condition of the indicator
informs the driver of the system operation
status.
Illuminated in white:
LDA system is operating.
Illuminated in green:
Steering wheel assistance of the steering
control function is operating.
Flashing in orange:
WARNING
●Asphalt repair marks, white (yellow)
line marks, etc. are present due to road
repair.
●Vehicle is driven in a temporary lane or
restricted lane due to construction
work.
●Vehicle is driven on a road surface
which is slippery due to rainy weather,
fallen snow, freezing, etc.
●Vehicle is driven in traffic lanes other
than on highways and freeways.
●Vehicle is driven in a construction
zone.
●During emergency towing
■Preventing LDA system malfunctions
and operations performed by mistake
●Do not modify the headlights or place
stickers, etc. on the surface of the
lights.
●Do not modify the suspension etc. If
the suspension etc. needs to be
replaced, contact your Lexus dealer.
●Do not install or place anything on the
hood or grille. Also, do not install a
grille guard (bull bars, kangaroo bar,
etc.).
●If your windshield needs repairs, con-
tact your Lexus dealer.
Turning LDA system on
Indications on multi-information
display
A
Page 187 of 400

1874-5. Using the driving support systems
4
Driving
■The intuitive parking assist can be oper-
ated when
●Front center sensors:
• The engine switch is in IGNITION ON
mode.
• The shift lever is in a position other than P or R.
• The vehicle speed is less than about 6 mph (10 km/h).
●Front corner sensors:
• The engine switch is in IGNITION ON mode.
• The shift lever is in a position other than P.
• The vehicle speed is less than about 6 mph (10 km/h).
(At any speed when the shift lever is in R)
●Rear corner and rear center sensors:
• The engine switch is in IGNITION ON mode.
• The shift lever is in R.
■Muting the buzzer sound
●To mute the buzzer sound:
The buzzer can be temporarily muted by
pressing “OK” of the meter control
switches while an obstacle detection dis-
play is shown on the multi-information dis-
play.
●To cancel the mute:
Mute will be automatically canceled in the
following situations.
• When the shift position is changed (except shifting from D to N, or N to D).
• When the vehicle speed has reached or
exceeded 6 mph (10 km/h) with the shift
position in D.
• When the intuitive par king assist is turned
off once and turned on again.
• When the engine switch is turned off once and turned to IGNITION ON
mode again.
■If “Clean Parking Assist Sensor” is dis-
played on the multi-information display
A sensor may be covered with ice, snow,
dirt, etc. Remove the ice, snow, dirt, etc.,
from the sensor to return the system to nor-
mal.
Also, due to ice forming on a sensor at low
temperatures, a warning message may be displayed or the sensor may not be able to
detect an object. Once the ice melts, the
system will return to normal.
■Sensor detection information
●The following situations may occur
during use.
• The sensors may be able to only detect objects near the fron t and rear bumpers.
• Depending on the shape of the object
and other factors, the detection distance
may shorten, or detection may be impos-
sible.
• There will be a short delay between object detection and di splay. Even at low
speeds, there is a possibility that the
object will come within the sensor’s
detection areas befo re the display is
shown and the warning beep sounds.
• It might be difficult to hear the buzzer due to the volume of the audio system or air
flow noise of the air conditioning system.
• It may be difficult to hear the buzzer if buzzers for other systems are sounding.
■Conditions under wh ich the function
may not function correctly
Certain vehicle conditions and the sur-
rounding environment may affect the ability
of a sensor to correctly detect objects. Par-
ticular instances where this may occur are
listed below.
●There is dirt, snow or ice on a sensor.
(Cleaning the sensors will resolve this
problem.)
●A sensor is frozen. (Thawing the area will
resolve this problem.)
In especially cold weather, if a sensor is
frozen the sensor display may be dis-
played abnormally, or objects, such as a
wall, may not be detected.
●A sensor is covered in any way.
●When a sensor or the area around a sen-
sor is extremely hot or cold.
●On an extremely bumpy road, on an
incline, on gravel, or on grass.
●The vicinity of the vehicle is noisy due to
vehicle horns, motorcycle engines, air
brakes of large vehicles, or other loud
noises producing ultrasonic waves.
●There is another vehicle equipped with
Page 199 of 400
1994-5. Using the driving support systems
4
Driving
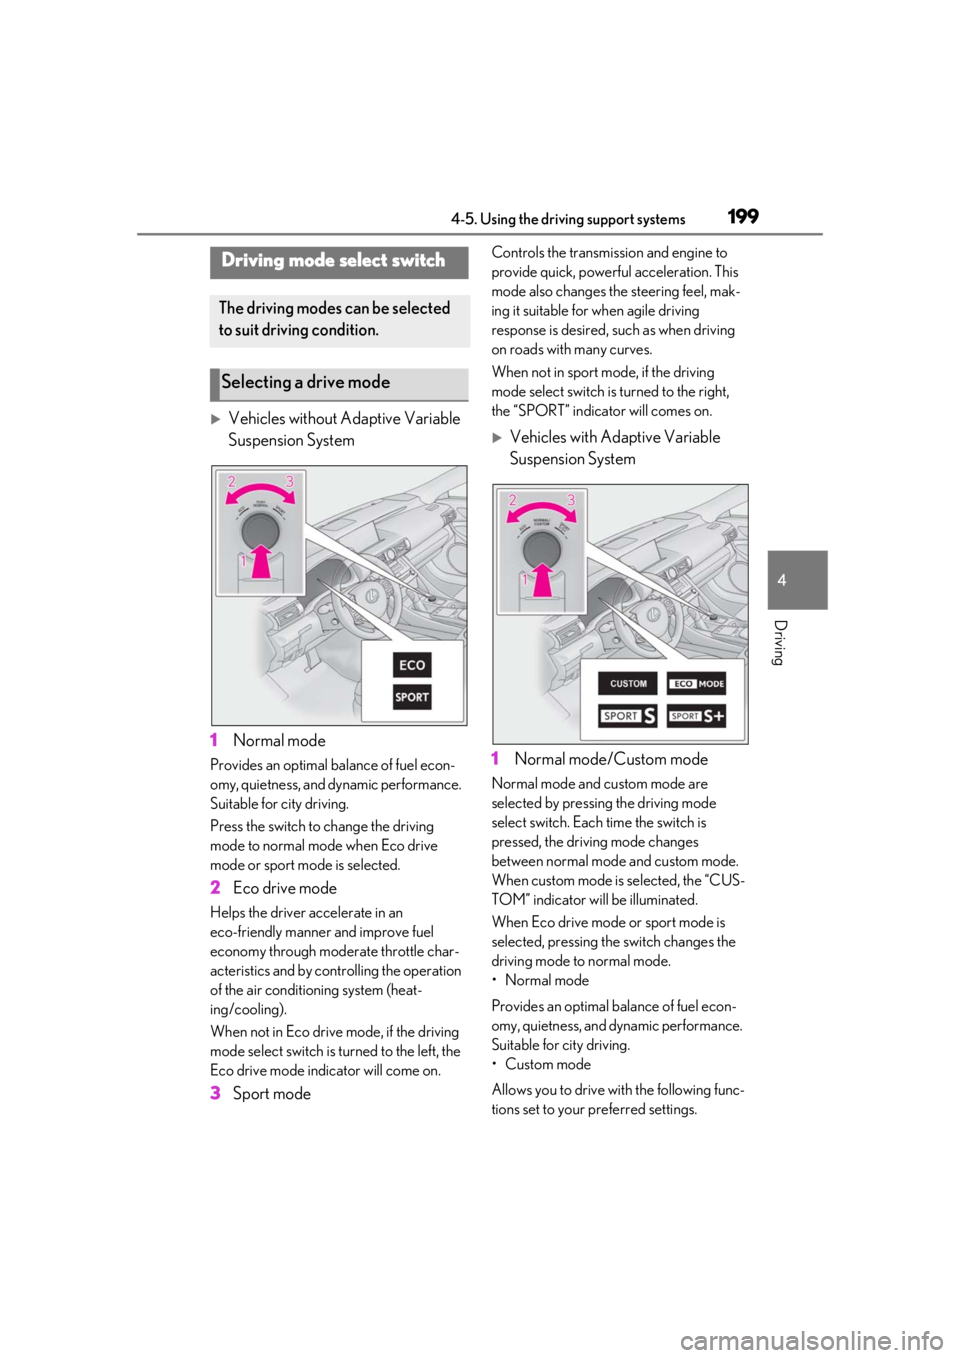
Vehicles without Adaptive Variable
Suspension System
1 Normal mode
Provides an optimal ba lance of fuel econ-
omy, quietness, and dynamic performance.
Suitable for city driving.
Press the switch to change the driving
mode to normal mode when Eco drive
mode or sport mode is selected.
2 Eco drive mode
Helps the driver accelerate in an
eco-friendly manner and improve fuel
economy through moderate throttle char-
acteristics and by controlling the operation
of the air conditioning system (heat-
ing/cooling).
When not in Eco drive mode, if the driving
mode select switch is turned to the left, the
Eco drive mode indicator will come on.
3Sport mode
Controls the transmission and engine to
provide quick, powerful acceleration. This
mode also changes the steering feel, mak-
ing it suitable for when agile driving
response is desired, such as when driving
on roads with many curves.
When not in sport mode, if the driving
mode select switch is turned to the right,
the “SPORT” indicator will comes on.
Vehicles with Adaptive Variable
Suspension System
1 Normal mode/Custom mode
Normal mode and custom mode are
selected by pressing the driving mode
select switch. Each time the switch is
pressed, the driving mode changes
between normal mode and custom mode.
When custom mode is selected, the “CUS-
TOM” indicator will be illuminated.
When Eco drive mode or sport mode is
selected, pressing th e switch changes the
driving mode to normal mode.
• Normal mode
Provides an optimal ba lance of fuel econ-
omy, quietness, and dynamic performance.
Suitable for city driving.
• Custom mode
Allows you to drive with the following func-
tions set to your preferred settings.
Driving mode select switch
The driving modes can be selected
to suit driving condition.
Selecting a drive mode
Page 200 of 400
2004-5. Using the driving support systems
Custom mode settings can only be
changed on the drive mode customization
display of the Center Display. (P.212)
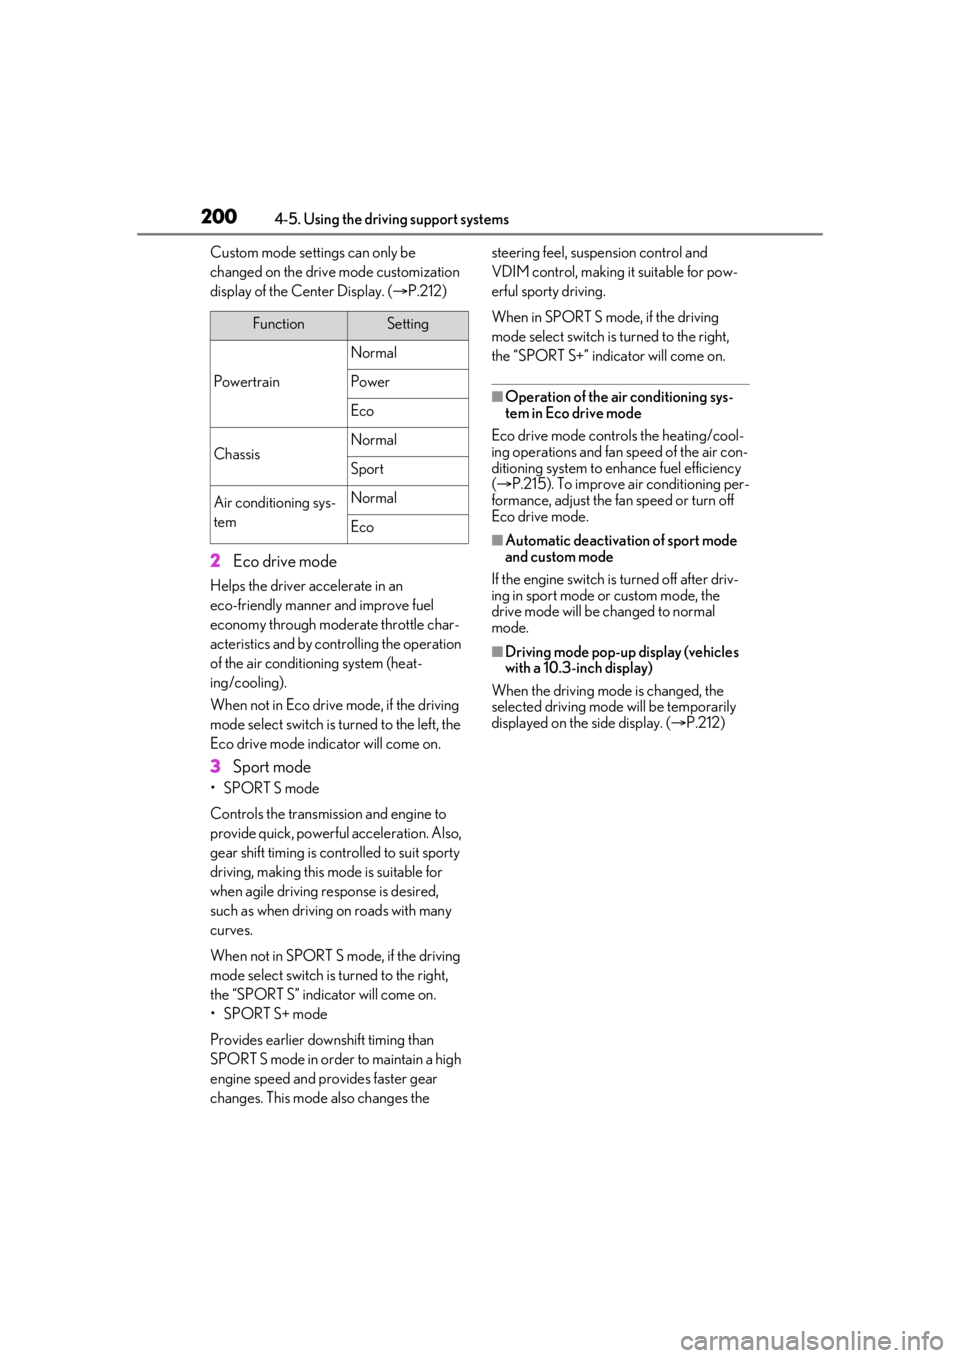
2 Eco drive mode
Helps the driver accelerate in an
eco-friendly manner and improve fuel
economy through moderate throttle char-
acteristics and by controlling the operation
of the air conditioning system (heat-
ing/cooling).
When not in Eco drive mode, if the driving
mode select switch is turned to the left, the
Eco drive mode indicator will come on.
3Sport mode
•SPORT S mode
Controls the transmission and engine to
provide quick, powerful acceleration. Also,
gear shift timing is co ntrolled to suit sporty
driving, making this mode is suitable for
when agile driving response is desired,
such as when driving on roads with many
curves.
When not in SPORT S mode, if the driving
mode select switch is turned to the right,
the “SPORT S” indicator will come on.
•SPORT S+ mode
Provides earlier down shift timing than
SPORT S mode in order to maintain a high
engine speed and provides faster gear
changes. This mode also changes the steering feel, susp
ension control and
VDIM control, making it suitable for pow-
erful sporty driving.
When in SPORT S mode, if the driving
mode select switch is turned to the right,
the “SPORT S+” indicator will come on.
■Operation of the air conditioning sys-
tem in Eco drive mode
Eco drive mode controls the heating/cool-
ing operations and fan speed of the air con-
ditioning system to enhance fuel efficiency
( P.215). To improve air conditioning per-
formance, adjust the fan speed or turn off
Eco drive mode.
■Automatic deactivation of sport mode
and custom mode
If the engine switch is turned off after driv-
ing in sport mode or custom mode, the
drive mode will be changed to normal
mode.
■Driving mode pop-up display (vehicles
with a 10.3-inch display)
When the driving mode is changed, the
selected driving mode will be temporarily
displayed on the side display. ( P.212)
FunctionSetting
Powertrain
Normal
Power
Eco
ChassisNormal
Sport
Air conditioning sys-
temNormal
Eco
Page 205 of 400
2054-6. Driving tips
4
Driving
4-6.Driving tips
Use fluids that are appropriate to
the prevailing outside temperatures.
•Engine oil
• Engine coolant
•Washer fluid
Have a service technician inspect
the condition of the battery.
Have the vehicle fitted with four
snow tires or purchase a set of tire
chains for the rear tires.
*
Ensure that all tires are the specified size
and brand, and that chains match the size
of the tires.
*: Tire chains cannot be mounted on vehi-
cles with front and rear tires of differing
sizes and vehicles with LDH and 19-inch
tires.
Perform the following according to the
driving conditions:
Do not try to forcibly open a window
or move a wiper that is frozen. Pour
Winter driving tips
Carry out the necessary prepara-
tions and inspections before driving
the vehicle in winter. Always drive
the vehicle in a manner appropriate
to the prevailing weather condi-
tions.
Preparation for winter
WARNING
■Driving with snow tires
Observe the following precautions to
reduce the risk of accidents.
Failure to do so may result in a loss of
vehicle control and cause death or seri-
ous injury.
●Use tires of the specified size.
●Maintain the recommended level of air
pressure.
●Do not drive in excess of 75 mph (120
km/h), regardless of the type of snow
tires being used.
●Use snow tires on all, not just some
wheels.
■Driving with tire chains
Observe the following precautions to
reduce the risk of accidents.
Failure to do so may result in the vehicle
being unable to be driven safely, and may
cause death or serious injury.
●Do not drive in excess of the speed
limit specified for the tire chains being
used, or 30 mph (50 km/h), which-
ever is lower.
●Avoid driving on bumpy road surfaces
or over potholes.
●Avoid sudden acceleration, abrupt
steering, sudden br aking and shifting
operations that cause sudden engine
braking.
●Slow down sufficiently before entering
a curve to ensure that vehicle control is
maintained.
●Do not use LDA (Lane Departure
Alert with steering control) system.
NOTICE
■Repairing or replacing snow tires
Request repairs or replacement of snow
tires from Lexus dealers or legitimate tire
retailers.
This is because the removal and attach-
ment of snow tires affects the operation
of the tire pressure warning valves and
transmitters.
Before driving the vehicle
Page 206 of 400
2064-6. Driving tips
warm water over the frozen area to
melt the ice. Wipe away the water
immediately to prevent it from
freezing.
To ensure proper operation of the
climate control system fan, remove
any snow that has accumulated on
the air inlet vents in front of the
windshield.
Check for and remove any excess
ice or snow that may have accumu-
lated on the exterior lights, vehicle’s
roof, chassis, around the tires or on
the brakes.
Remove any snow or mud from the
bottom of your shoes before getting
in the vehicle.
Accelerate the vehicle slowly, keep a
safe distance between you and the
vehicle ahead, and drive at a reduced
speed suitable to road conditions.
Park the vehicle and move the shift
lever to P without setting the park-
ing brake. The parking brake may
freeze up, preventing it from being
released. If the vehicle is parked
without setting the parking brake,
make sure to block the wheels.
Failure to do so may be dangerous
because it may cause the vehicle to
move unexpectedly, possibly lead-
ing to an accident.
When the parking brake is in automatic mode, release the parking brake after shift-
ing the shift lever to P. (
P.137)
If the vehicle is parked without set-
ting the parking brake, confirm that
the shift lever cannot be moved out
of P
*.
*: The shift lever will be locked if it is
attempted to be shifted from P to any
other position with out depressing the
brake pedal. If the shift lever can be
shifted from P, there may be a problem
with the shift lock system. Have the vehi-
cle inspected by your Lexus dealer
immediately.
Vehicles with front and rear tires of
the same size except for vehicles
with LDH and 19-inch tires
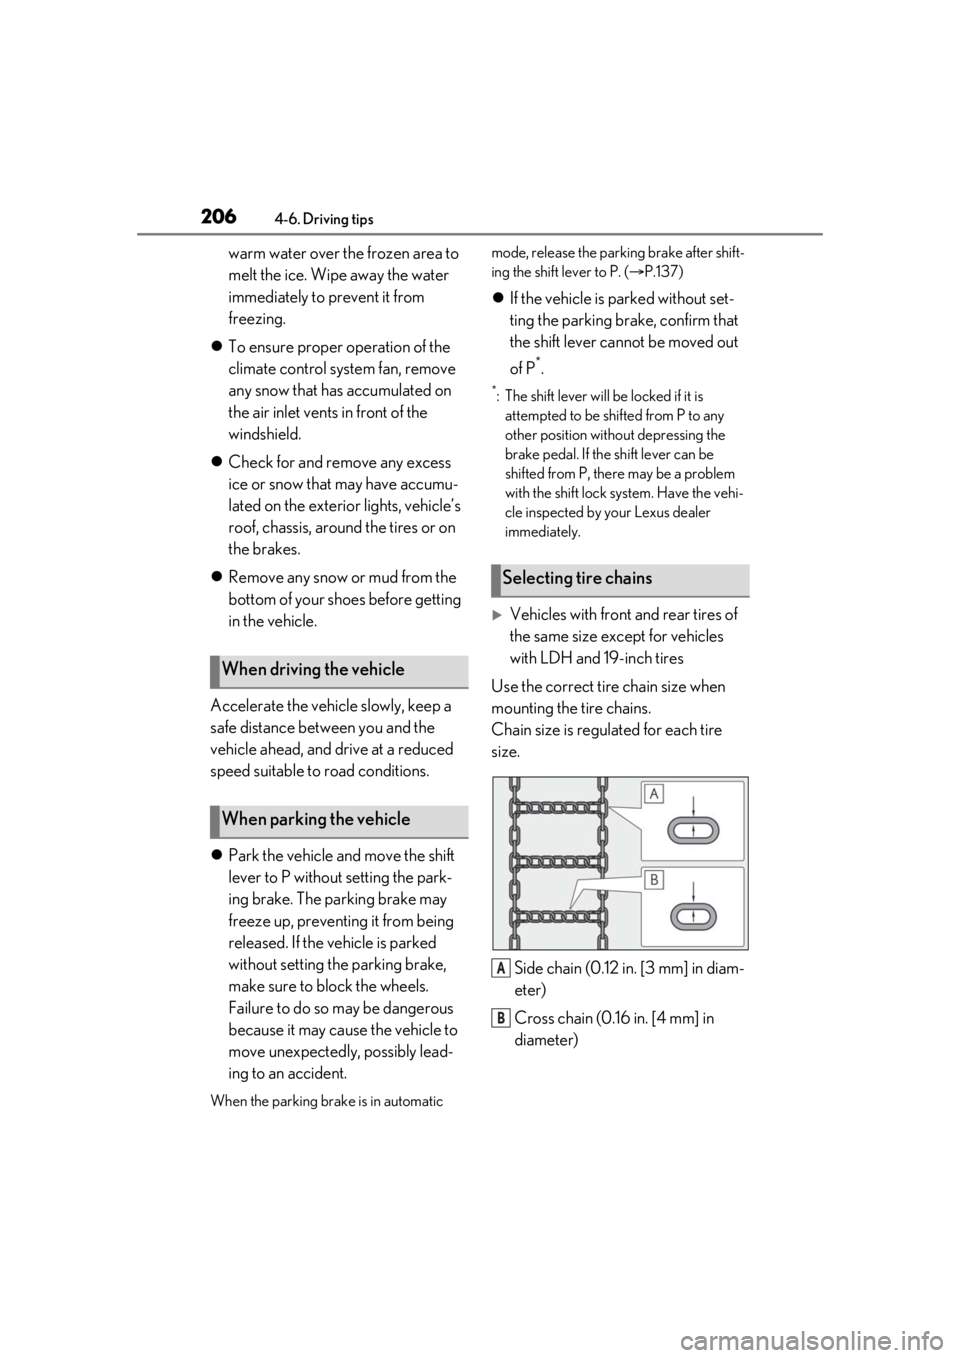
Use the correct tire chain size when
mounting the tire chains.
Chain size is regulated for each tire
size.
Side chain (0.12 in. [3 mm] in diam-
eter)
Cross chain (0.16 in. [4 mm] in
diameter)
When driving the vehicle
When parking the vehicle
Selecting tire chains
A
B