Page 275 of 400

2756-3. Do-it-yourself maintenance
6
Maintenance and careUse only Lexus wheel nuts and
wrenches designed for use with
your aluminum wheels.
When rotating, repairing or chang-
ing your tires, check that the wheel
nuts are still tight after driving 1000
miles (1600 km).
Be careful not to damage the alumi-
num wheels when using tire chains.
Use only Lexus genuine balance
weights or equivalent and a plastic
or rubber hammer when balancing
your wheels. 1
Turn the engine switch off.
2 Open the glove box. Lift up the side
with the stay, disconnect the stay
tabs and remove the partition by
pulling horizontally.
3 Press the tabs and remove the filter
cover.
WARNING
●Never use an inner tube in a leaking
wheel which is designed for a tubeless
tire. Doing so may result in an acci-
dent, causing death or serious injury.
NOTICE
■Replacing tire pressure warning
valves and transmitters
●Because tire repair or replacement
may affect the tire pressure warning
valves and transmitters, make sure to
have tires serviced by your Lexus
dealer or other qualified service shop.
In addition, make sure to purchase
your tire pressure warning valves and
transmitters at your Lexus dealer.
●Ensure that only ge nuine Lexus wheels
are used on your vehicle.
Tire pressure warning valves and trans-
mitters may not work properly with
non-genuine wheels.
Aluminum wheel precautions
Air conditioning filter
The air conditioning filter must be
changed regularly to maintain air
conditioning efficiency.
Removing the air conditioning
filter
Page 277 of 400

2776-3. Do-it-yourself maintenance
6
Maintenance and care
■If the electronic key battery is depleted
The following symptoms may occur:
●The smart access syst em with push-but-
ton start and wireless remote control will
not function properly.
●The operational rang e will be reduced.
■When the card key battery needs to be
replaced (if equipped)
The battery for th e card key is available only
at Lexus dealers. Your Lexus dealer can
replace the battery for you.
Flathead screwdriver
Small flathead screwdriver
Lithium battery CR2032
■Use a CR2032 lithium battery
●Batteries can be purchased at your Lexus
dealer, local electrical appliance shops or
camera stores.
●Replace only with the same or equivalent
type recommended by the manufacturer.
●Dispose of used batteries according to
local laws.
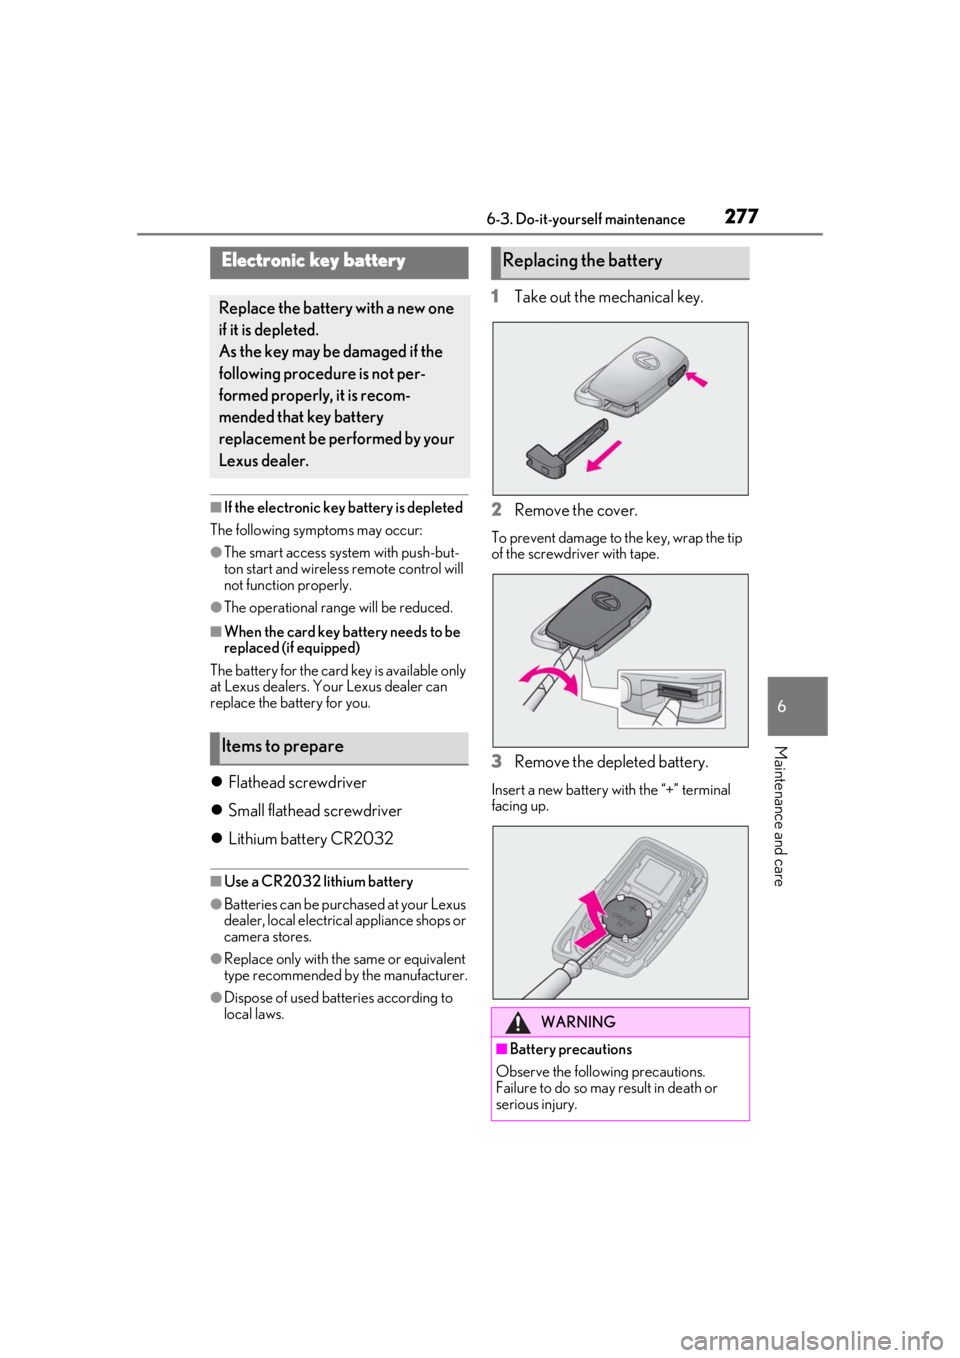
1 Take out the mechanical key.
2 Remove the cover.
To prevent damage to the key, wrap the tip
of the screwdri ver with tape.
3Remove the depleted battery.
Insert a new battery with the “+” terminal
facing up.
Electronic key battery
Replace the battery with a new one
if it is depleted.
As the key may be damaged if the
following procedure is not per-
formed properly, it is recom-
mended that key battery
replacement be performed by your
Lexus dealer.
Items to prepare
Replacing the battery
WARNING
■Battery precautions
Observe the following precautions.
Failure to do so may result in death or
serious injury.
Page 278 of 400

2786-3. Do-it-yourself maintenance
1Turn the engine switch off.
2 Open the fuse box cover.
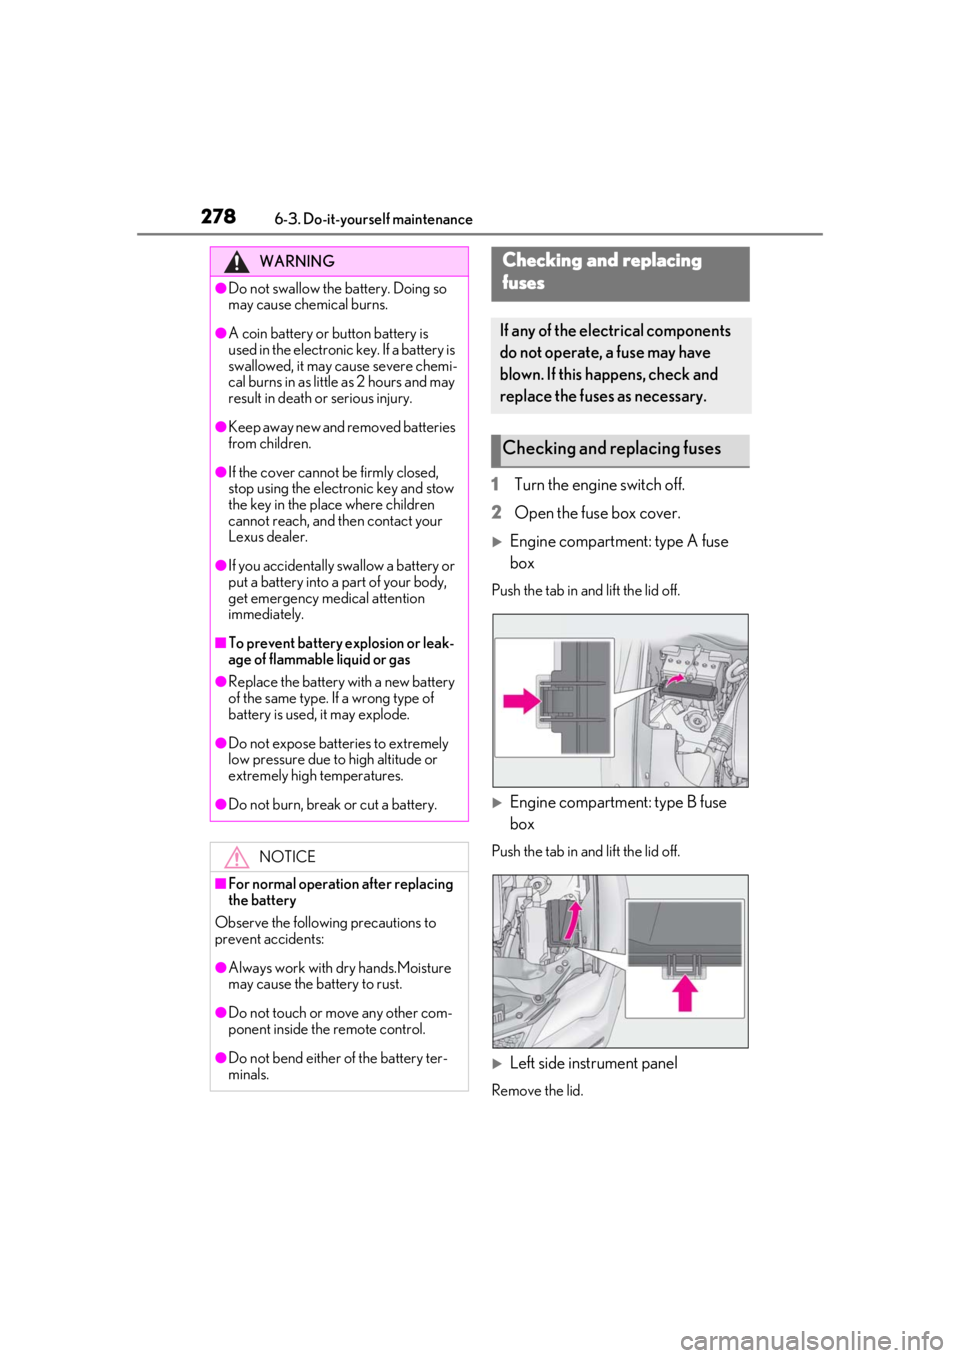
Engine compartment: type A fuse
box
Push the tab in and lift the lid off.
Engine compartment: type B fuse
box
Push the tab in and lift the lid off.
Left side instrument panel
Remove the lid.
WARNING
●Do not swallow the battery. Doing so
may cause chemical burns.
●A coin battery or button battery is
used in the electronic key. If a battery is
swallowed, it may cause severe chemi-
cal burns in as little as 2 hours and may
result in death or serious injury.
●Keep away new and removed batteries
from children.
●If the cover cannot be firmly closed,
stop using the electronic key and stow
the key in the place where children
cannot reach, and then contact your
Lexus dealer.
●If you accidentally swallow a battery or
put a battery into a part of your body,
get emergency medical attention
immediately.
■To prevent battery explosion or leak-
age of flammable liquid or gas
●Replace the battery with a new battery
of the same type. If a wrong type of
battery is used, it may explode.
●Do not expose batteries to extremely
low pressure due to high altitude or
extremely high temperatures.
●Do not burn, break or cut a battery.
NOTICE
■For normal operation after replacing
the battery
Observe the following precautions to
prevent accidents:
●Always work with dry hands.Moisture
may cause the battery to rust.
●Do not touch or move any other com-
ponent inside the remote control.
●Do not bend either of the battery ter-
minals.
Checking and replacing
fuses
If any of the electrical components
do not operate, a fuse may have
blown. If this happens, check and
replace the fuses as necessary.
Checking and replacing fuses
Page 280 of 400

2806-3. Do-it-yourself maintenance
fuse has been replaced, a bulb may need
replacement.
●If the replaced fuse blows again, have the
vehicle inspected by your Lexus dealer.
■If there is an overload in a circuit
The fuses are designed to blow, protecting
the wiring harness from damage.
■When replacing light bulbs
Lexus recommends that you use genuine
Lexus products designed for this vehicle.
Because certain bulbs are connected to cir-
cuits designed to prevent overload,
non-genuine parts or parts not designed for
this vehicle may be unusable.
Adjustment bolt A
Adjustment bolt B
Make sure the vehicle has a full tank
of gasoline and the area around the
headlight is not deformed.
Park the vehicle on level ground.
Make sure the tire inflation pressure
is at the specified level.
Have someone sit in the driver’s
seat.
Bounce the vehicle several times.
1 Using a Phillips-head screwdriver,
turn bolt A in either direction.
Remember the turning direction and the
WARNING
■To prevent system breakdowns and
vehicle fire
Observe the following precautions.
Failure to do so may cause damage to
the vehicle, and possibly a fire or injury.
●Never use a fuse of a higher amperage
rating than that indicated, or use any
other object in place of a fuse.
●Always use a genuine Lexus fuse or
equivalent.
Never replace a fuse with a wire, even
as a temporary fix.
●Do not modify the fuses or fuse boxes.
NOTICE
■Before replacing fuses
Have the cause of electrical overload
determined and repaired by your Lexus
dealer as soon as possible.
Headlight aim
Vertical movement adjusting
bolts
Before checking the headlight
aim
Adjusting the headlight aim
A
B
Page 283 of 400

2836-3. Do-it-yourself maintenance
6
Maintenance and care
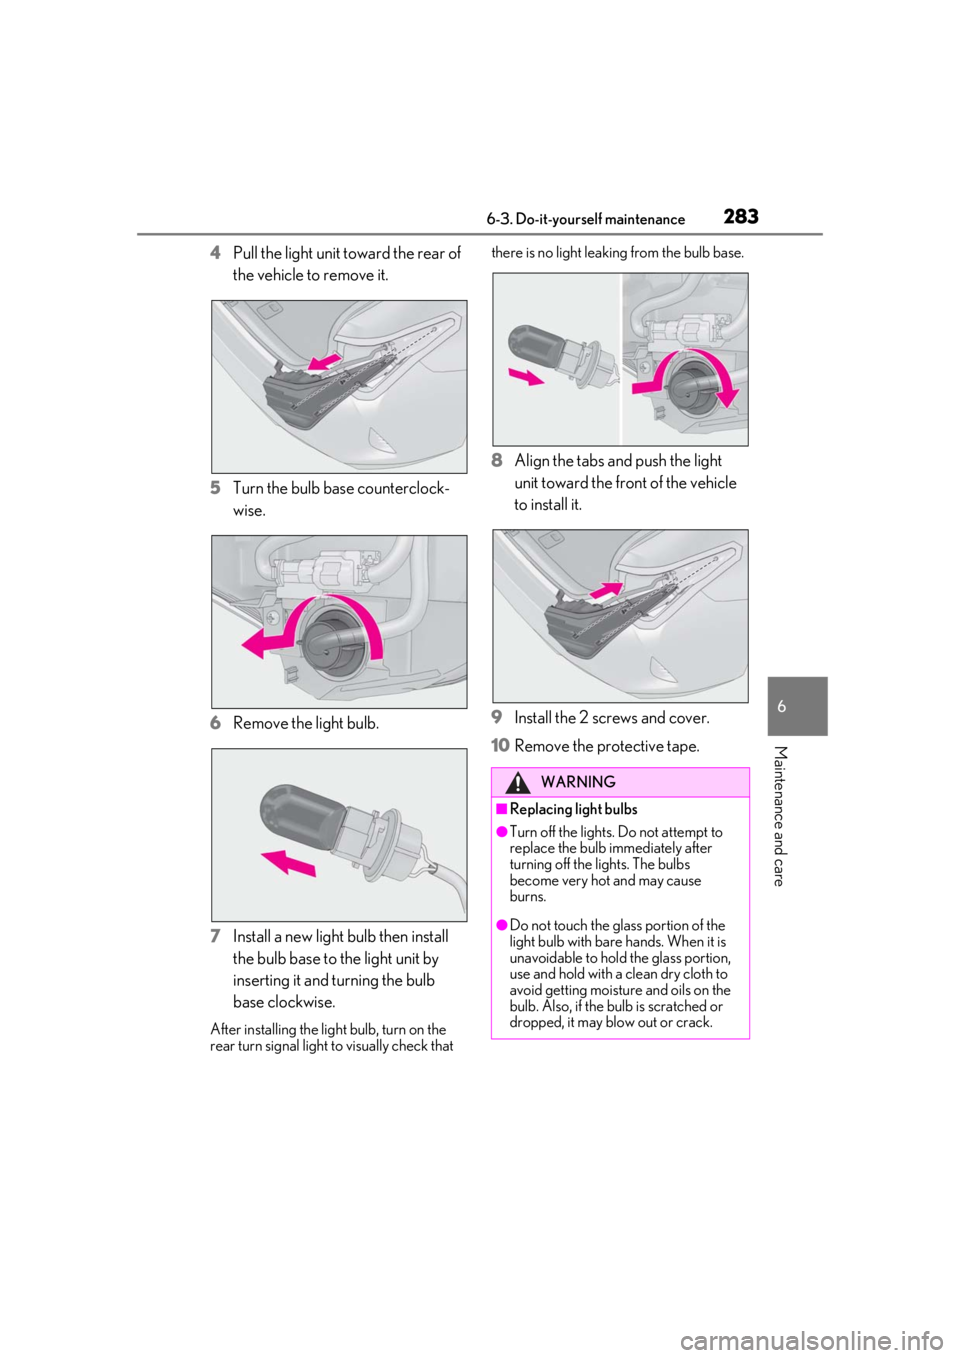
4Pull the light unit toward the rear of
the vehicle to remove it.
5 Turn the bulb base counterclock-
wise.
6 Remove the light bulb.
7 Install a new light bulb then install
the bulb base to the light unit by
inserting it and turning the bulb
base clockwise.
After installing the light bulb, turn on the
rear turn signal light to visually check that there is no light leaking from the bulb base.
8
Align the tabs and push the light
unit toward the front of the vehicle
to install it.
9 Install the 2 screws and cover.
10 Remove the protective tape.
WARNING
■Replacing light bulbs
●Turn off the lights. Do not attempt to
replace the bulb immediately after
turning off the lights. The bulbs
become very hot and may cause
burns.
●Do not touch the glass portion of the
light bulb with bare hands. When it is
unavoidable to hold the glass portion,
use and hold with a clean dry cloth to
avoid getting moisture and oils on the
bulb. Also, if the bu lb is scratched or
dropped, it may blow out or crack.
Page 284 of 400
2846-3. Do-it-yourself maintenance
WARNING
●Fully install light bulbs and any parts
used to secure them. Failure to do so
may result in heat damage, fire, or
water entering the light unit. This may
damage the lights or cause condensa-
tion to build up on the lens.
■To prevent damage or fire
●Make sure bulbs are fully seated and
locked.
●Check the wattage of the bulb before
installing to prevent heat damage.
Page 285 of 400

285
7
7
When trouble arises
When trouble arises
.7-1. Essential informationEmergency flashers.................. 286
If your vehicle has to be stopped in an emergency .......................... 286
If the vehicle is trapped in rising water............................................ 287
7-2. Steps to take in an emergency If your vehicle needs to be towed........................................................ 289
If you think something is wrong ........................................................ 293
Fuel pump shut off system ..... 294
If a warning light turns on or a warning buzzer sounds ....... 295
If a warning message is displayed ........................................................ 303
If you have a flat tire.................. 307
If the engine wi ll not start ........314
If you lose your keys .................. 316
If the fuel filler door cannot be opened......................................... 316
If the electronic key does not operate properly ..................... 317
If the vehicle battery is discharged ......................................................... 319
If your vehicle overheats ........ 322
If the vehicle becomes stuck ........................................................ 326
Page 287 of 400

2877-1. Essential information
7
When trouble arises
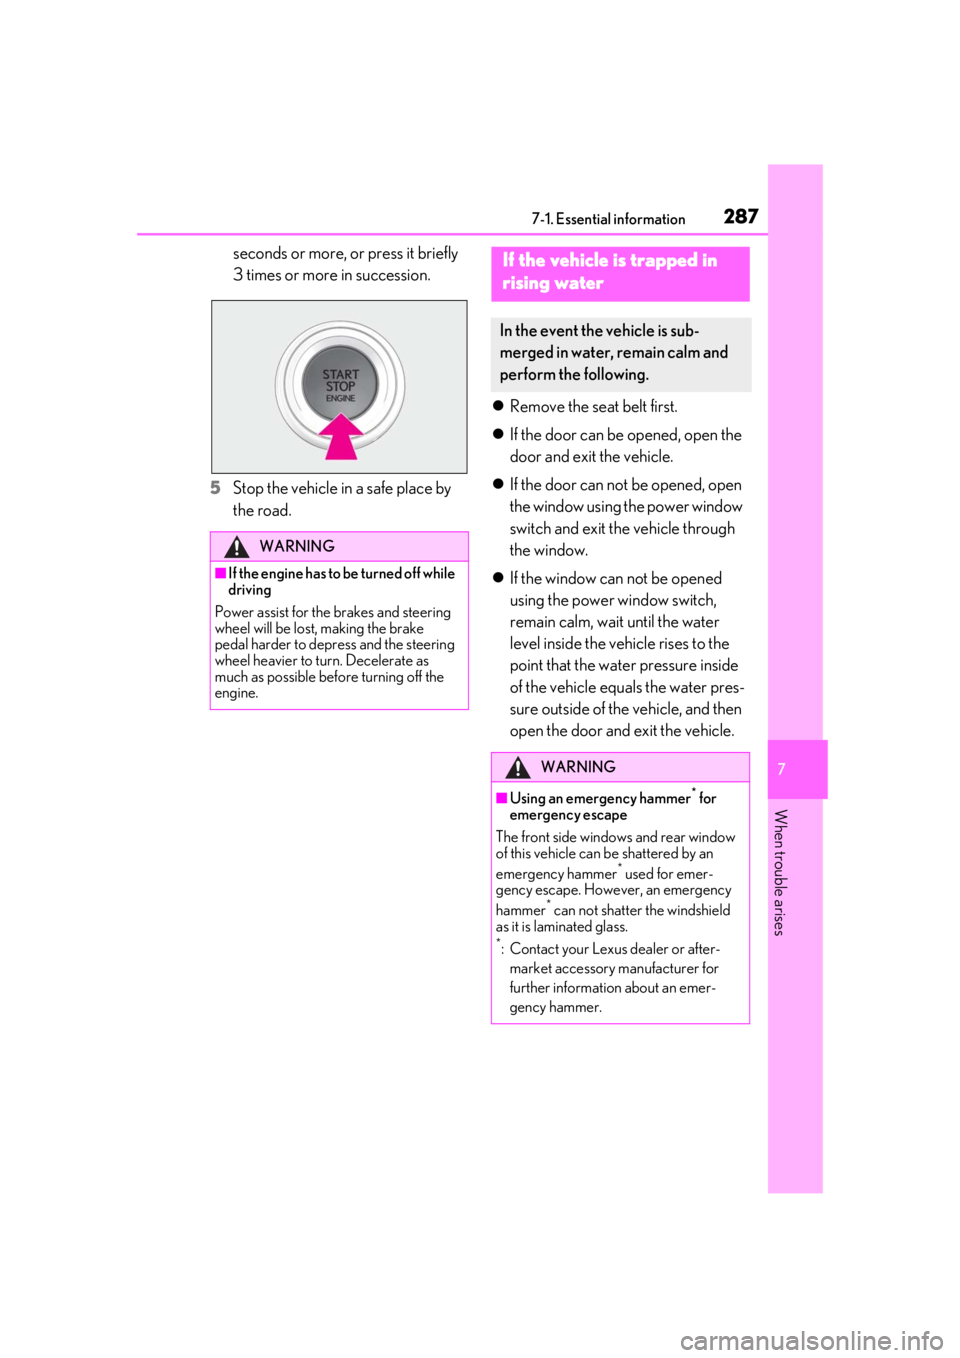
seconds or more, or press it briefly
3 times or more in succession.
5 Stop the vehicle in a safe place by
the road.
Remove the seat belt first.
If the door can be opened, open the
door and exit the vehicle.
If the door can not be opened, open
the window using the power window
switch and exit the vehicle through
the window.
If the window can not be opened
using the power window switch,
remain calm, wait until the water
level inside the vehicle rises to the
point that the water pressure inside
of the vehicle equals the water pres-
sure outside of the vehicle, and then
open the door and exit the vehicle.
WARNING
■If the engine has to be turned off while
driving
Power assist for the brakes and steering
wheel will be lost, making the brake
pedal harder to depress and the steering
wheel heavier to turn. Decelerate as
much as possible before turning off the
engine.
If the vehicle is trapped in
rising water
In the event the vehicle is sub-
merged in water, remain calm and
perform the following.
WARNING
■Using an emergency hammer* for
emergency escape
The front side window s and rear window
of this vehicle can be shattered by an
emergency hammer
* used for emer-
gency escape. However, an emergency
hammer
* can not shatter the windshield
as it is laminated glass.
*: Contact your Lexus dealer or after-
market accessory manufacturer for
further information about an emer-
gency hammer.