2021 LEXUS LS500 air conditioning
[x] Cancel search: air conditioningPage 367 of 520

367
6
6
Maintenance and care
Maintenance and care
.6-1. Maintenance and careCleaning and protecting the vehi-cle exterior ................................ 368
Cleaning and protecting the vehi- cle interior .................................. 371
6-2. Maintenance Maintenance requirements .. 374
General maintenance ............. 375
Emission inspection and mainte- nance (I/M) programs ......... 378
6-3. Do-it-yourself maintenance Do-it-yourself service precautions........................................................ 379
Hood................................................ 381
Positioning a floor jack............. 381
Engine compartment............... 383
Battery ............................................ 391
Tires ................................................ 393
Replacing the tire ...................... 402
Tire inflation pressure .............. 406
Wheels........................................... 407
Air conditioning filter...............409
Electronic key battery .............. 410
Checking and replacing fuses ......................................................... 412
Headlight aim............................... 415
Light bulbs ..................................... 416
Page 371 of 520

3716-1. Maintenance and care
6
Maintenance and care
Remove dirt and dust using a vac-
uum cleaner. Wipe dirty surfaces
with a cloth dampened with luke-
warm water.
If dirt cannot be removed, wipe it off
with a soft cloth dampened with
neutral detergent diluted to approx-
imately 1%.
Wring out any excess water from
the cloth and thoroughly wipe off
remaining traces of detergent and
water.
■Shampooing the carpets
There are several commercial foaming-type
cleaners available. Use a sponge or brush
to apply the foam. Rub in overlapping cir-
cles. Do not use water. Wipe dirty surfaces
and let them dry. Excellent results are
obtained by keeping the carpet as dry as
possible.
■Handling the seat belts
Clean with mild soap and lukewarm water
using a cloth or sponge. Also check the
belts periodically for excessive wear, fraying
or cuts.
■When cleaning the carpeted portions of
the glove box, console box, etc.
If a strong adhesive ta pe is used, there is a
possibility that the su rface of the carpet
could be damaged.
NOTICE
●Do not spray the lower part of the
windshield continuously.
If water enters the air conditioning sys-
tem intake located near the lower part of
the windshield, the ai r conditioning sys-
tem may not operate correctly.
●Do not wash the underside of the vehi-
cle using a high pressure car washer.
Cleaning and protecting the
vehicle interior
Perform cleaning in a manner
appropriate to each component
and its material.
Protecting the vehicle interior
Page 409 of 520

4096-3. Do-it-yourself maintenance
6
Maintenance and care
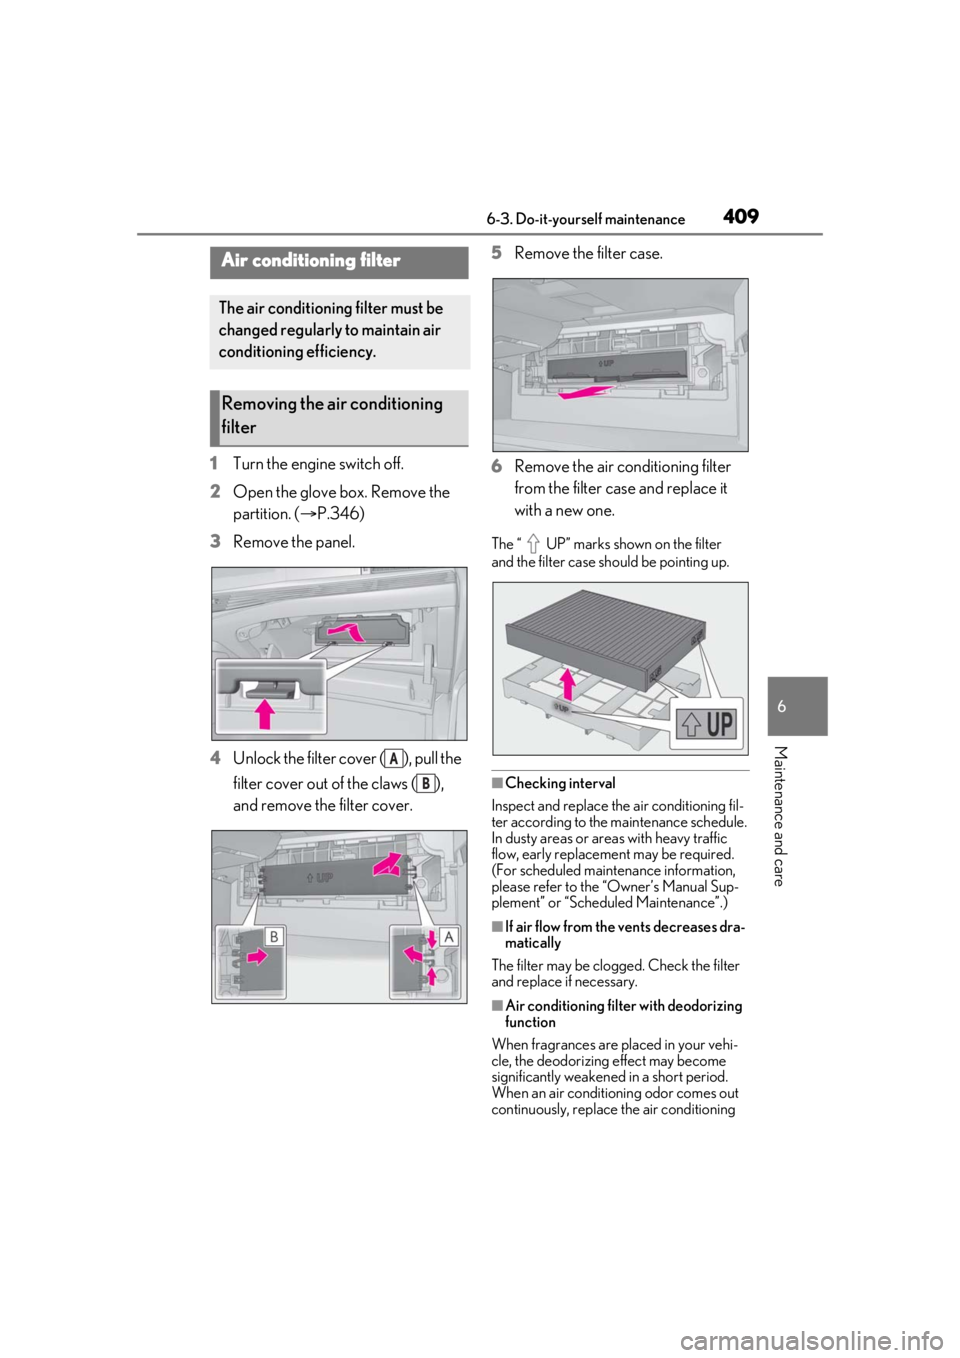
1Turn the engine switch off.
2 Open the glove box. Remove the
partition. ( P.346)
3 Remove the panel.
4 Unlock the filter cover ( ), pull the
filter cover out of the claws ( ),
and remove the filter cover. 5
Remove the filter case.
6 Remove the air conditioning filter
from the filter case and replace it
with a new one.
The “ UP” marks shown on the filter
and the filter case sh ould be pointing up.
■Checking interval
Inspect and replace the air conditioning fil-
ter according to the maintenance schedule.
In dusty areas or areas with heavy traffic
flow, early replacement may be required.
(For scheduled maintenance information,
please refer to the “Owner’s Manual Sup-
plement” or “Scheduled Maintenance”.)
■If air flow from the vents decreases dra-
matically
The filter may be clogged. Check the filter
and replace if necessary.
■Air conditioning filt er with deodorizing
function
When fragrances are placed in your vehi-
cle, the deodorizing effect may become
significantly weakened in a short period.
When an air conditioning odor comes out
continuously, replace the air conditioning
Air conditioning filter
The air conditioning filter must be
changed regularly to maintain air
conditioning efficiency.
Removing the air conditioning
filter
A
B
Page 410 of 520

4106-3. Do-it-yourself maintenance
filter.
■If the electronic key battery is depleted
The following symptoms may occur:
●The smart access system with push-but-
ton start and wireless remote control will
not function properly.
●The operationa l range will be reduced.
■When the card key battery needs to be
replaced (if equipped)
The battery for the card key is available only
at Lexus dealers. Your Lexus dealer can
replace the battery for you.
Flathead screwdriver
Small flathead screwdriver
Lithium battery CR2032
■Use a CR2032 lithium battery
●Batteries can be purchased at your Lexus
dealer, local electrical appliance shops or
camera stores.
●Replace only with the same or equivalent
type recommended by the manufacturer.
●Dispose of used batteries according to
local laws.
NOTICE
■When using the air conditioning sys-
tem
Make sure that a filter is always installed.
Using the air conditioning system without
a filter may cause damage to the system.
■To prevent damage to the filter cover
When moving the filter cover in the
direction of arrow to release the fitting,
pay attention not to apply excessive force
to the claws. Otherwise, the claws may
be damaged.
Electronic key battery
Replace the battery with a new one
if it is depleted.
As the key may be damaged if the
following procedure is not per-
formed properly, it is recom-
mended that key battery
replacement be performed by your
Lexus dealer.
Items to prepare
Page 449 of 520

4497-2. Steps to take in an emergency
7
When trouble arises
1Stop the vehicle in a safe place and
turn off the air conditioning system,
and then stop the engine.
2 If you see steam:
Carefully lift the hood after the
steam subsides.
If you do not see steam:
Carefully lift the hood.
3 After the engine has cooled down
sufficiently, inspect the hoses and
WARNING
■After recharging the battery
Have the battery inspected at your Lexus
dealer as soon as possible.
If the battery is dete riorating, continued
use may cause the battery to emit a mal-
odorous gas, which may be detrimental
to the health of passengers.
■When replacing the battery
●When the vent plug and indicator are
close to the hold down clamp, the bat-
tery fluid (sulfuric acid) may leak.
●For information regarding battery
replacement, contact your Lexus
dealer.
●After replacing, securely attach the
exhaust hose and exhaust hole plug to
the exhaust hole of the replaced bat-
tery. If not properly installed, gases
(hydrogen) may leak into the vehicle
interior, and there is the possible dan-
ger of the gas igniting and exploding.
NOTICE
■When handling jumper cables
When connecting the jumper cables,
ensure that they do not become entan-
gled in the cooling fan or engine drive
belt.
■To prevent damaging the vehicle
The exclusive jump starting terminal is to
be used when charging the battery from
another vehicle in an emergency. It can-
not be used to jump start another vehicle.
If your vehicle overheats
The following may indicate that
your vehicle is overheating.
The engine coolant temperature
gauge ( P.75, 78) is in the red
zone or a loss of engine power is
experienced. (For example, the
vehicle speed does not increase.)
“Engine Coolant Temp High Stop
in a Safe Place See Owner’s
Manual” is shown on the
multi-information display.
Steam comes out from under the
hood.
Correction procedures
Page 451 of 520

4517-2. Steps to take in an emergency
7
When trouble arises
6Start the engine and turn the air
conditioning system on to check
that the radiator cooling fan oper-
ates and to check for coolant leaks
from the radiator or hoses.
The fan operates when the air conditioning
system is turned on immediately after a
cold start. Confirm that the fan is operating
by checking the fan sound and air flow. If it
is difficult to check these, turn the air con-
ditioning system on and off repeatedly.
(The fan may not operate in freezing tem-
peratures.)
7 If the fan is not operating:
Stop the engine immediately and
contact your Lexus dealer.
If the fan is operating:
Have the vehicle inspected at the
nearest Lexus dealer.
■When adding engine coolant
Add coolant in accordance with the follow-
ing procedure. 1
Remove the engine compartment
cover.
2 Remove the engine cover. ( P.384)
3 Remove the caps and .
4 Add coolant through the inlet of the cap
up to the “F” line , and then
replace the cap .
5 Add coolant through the inlet of the cap
until it is full, and then replace the
cap .
6 Install the engine compartment cover
and engine cover. ( P.385)
WARNING
■When inspecting under the hood of
your vehicle
Observe the following precautions.
Failure to do so may result in serious
injury such as burns.
AB
AC
A
B
B
Page 471 of 520

4718-1. Specifications
8
Vehicle specifications
Curb weight
The weight of a motor vehicle with standard equip-
ment, including the maximum capacity of fuel, oil
and coolant, and if so equipped, air conditioning
and additional weight optional engine
Maximum loaded vehicle weight
The sum of:
(a) Curb weight
(b) Accessory weight
(c) Vehicle capacity weight
(d) Production options weight
Normal occupant weight
150 lb. (68 kg) times the number of occupants
specified in the second column of Table 1
* that fol-
lows
Occupant distributionDistribution of occupants in a vehicle as specified in
the third column of Table 1
* below
Production options weight
The combined weight of installed regular produc-
tion options weighing over 5 lb. (2.3 kg) in excess of
the standard items which they replace, not previ-
ously considered in curb weight or accessory
weight, including heavy duty brakes, ride levelers,
roof rack, heavy duty battery, and special trim
RimA metal support for a tire or a tire and tube assem-
bly upon which the tire beads are seated
Rim diameter (Wheel diameter)Nominal diameter of the bead seat
Rim size designationRim diameter and width
Rim type designationThe industry manufacturer’s designation for a rim
by style or code
Rim widthNominal distance between rim flanges
Vehicle capacity weight (Total load
capacity)The rated cargo and luggage load plus 150 lb. (68
kg) times the vehicle’s designated seating capacity
Vehicle maximum load on the tire
The load on an individual ti re that is determined by
distributing to each axle its share of the maximum
loaded vehicle weight, and dividing by two
Tire related termMeaning
Page 487 of 520

4878-2. Customization
8
Vehicle specifications
■Driving mode select switch (P.299)
*:If equipped
■Electronically modulated air suspension* ( P.301)
*:If equipped
■Automatic air conditioning system ( P.323)
■Seat heater/seat ventilators*1 ( P.336)
FunctionDefault settingCustomized set-
ting
Powertrain control in custom
mode
*NormalPowerO———Eco
Chassis control in custom
mode
*NormalSportO———Comfort
Air conditioning operation in
custom mode
*NormalEcoO———
FunctionDefault settingCustomized set-ting
Vehicle height controlOnOff—O——
Ingress/egress height control
functionOnOff—O——
FunctionDefault settingCustomized set-ting
A/C auto switch operationOnOffO——O
Exhaust gas sensor sensitivityStandard-3 to 3O——O
FunctionDefault settingCustomized set-ting
Driver’s seat temperature
preference in automatic
mode
Standard-2 (cooler) to 2 (warmer)O——O
Passenger’s seat tempera-
ture preference in automatic
mode
Standard-2 (cooler) to 2 (warmer)O——O
ABCD
ABCD
ABCD
ABCD