2021 LEXUS LS500 height
[x] Cancel search: heightPage 303 of 520

3034-5. Using the driving support systems
4
Driving
previous height:
A certain amount of time has
elapsed since the doors were closed
The vehicle speed reaches approxi-
mately 3 mph (5 km/h)
The doors are locked using the
smart access system with push-but-
ton start or wireless remote control
■Enabling/Disabling access mode
1 Press the or meter control
switch to select .
2 Press the or meter control
switch to select “Vehicle Settings”
and then press .
3 Press the or meter control
switch to select and then
press .
4 Press the or meter control
switch to select “Access Mode” and
then press .
The setting will change between
enabled/disabled each time the
meter control switch is pressed.
■When the vehicle height has been
increased by a control of access mode
Press the vehicle height adjustment switch
with the engine switch in any mode to return
the vehicle to its previous vehicle height.
■Access mode operation
●Access mode will not operate if the vehi-
cle is not parked on a level road surface.
●Depending on the current vehicle height,
access mode may not operate.
●After the doors are unlocked, if access
mode operates, the vehicle height will increase by approximately 0.8 in. (20
mm) from its normal position. After the
vehicle has been driven, if access mode
operates, the vehicle height will increase
by approximately 0.4 in. (10 mm) from its
normal position.
●If the doors are opened and closed
repeatedly, the system may not operate
temporarily.
Vehicle height control can be tempo-
rarily disabled using the meter control
switches. (
P.83)
When to temporarily disable vehicle height
control: P.301
1Press or to select .
2 Press or to select “Vehicle
Settings” and then press .
3 Press or to select
and then press .
4 Press or to select “Height
Control” and then press .
This setting is memorized even if the
engine switch is turned off.
Even if the vehicle height control func-
tions are disabled, they will be enabled
automatically when the vehicle speed
reaches approximately 19 mph (30
km/h).
Temporarily disabling vehicle
height control
Page 309 of 520

3094-6. Driving tips
4
Driving
4-6.Driving tips
Use fluids that are appropriate to
the prevailing outside temperatures.
•Engine oil
• Engine coolant
•Washer fluid
Have a service technician inspect
the condition of the battery.
Have the vehicle fitted with four
snow tires or purchase a set of tire
chains for the rear tires.
*
Ensure that all tires are the specified size
and brand, and that chains match the size
of the tires.
*: Tire chains cannot be mounted on vehi-
cles with front and rear tires of differing
sizes.
Winter driving tips
Carry out the necessary prepara-
tions and inspections before driving
the vehicle in winter. Always drive
the vehicle in a manner appropriate
to the prevailing weather condi-
tions.
Preparation for winter
WARNING
■Driving with snow tires
Observe the following precautions to
reduce the risk of accidents.
Failure to do so may result in a loss of
vehicle control and cause death or seri-
ous injury.
●Use tires of the specified size.
●Maintain the recommended level of air
pressure.
●Do not drive in excess of 75 mph (120
km/h), regardless of the type of snow
tires being used.
●Use snow tires on all, not just some
wheels.
■When installing tire chains
Before installing tire chains, make sure to
disable all functions of the vehicle height
control of the electronically modulated
air suspension. Otherwise, the vehicle
height may change while installing the
tire chains and part or your body may be
caught under the vehicle, possibly caus-
ing injury. ( P.303)
■Driving with tire chains
Observe the following precautions to
reduce the risk of accidents.
Failure to do so may result in the vehicle
being unable to be driven safely, and may
cause death or serious injury.
●Do not drive in excess of the speed
limit specified for the tire chains being
used, or 30 mph (50 km/h), which-
ever is lower.
●Avoid driving on bumpy road surfaces
or over potholes.
●Avoid sudden acceleration, abrupt
steering, sudden br aking and shifting
operations that cause sudden engine
braking.
●Slow down sufficiently before entering
a curve to ensure that vehicle control is
maintained.
●Do not use LTA (Lane Tracing Assist)
system.
Page 347 of 520

3475-5. Using the storage features
5
Interior features
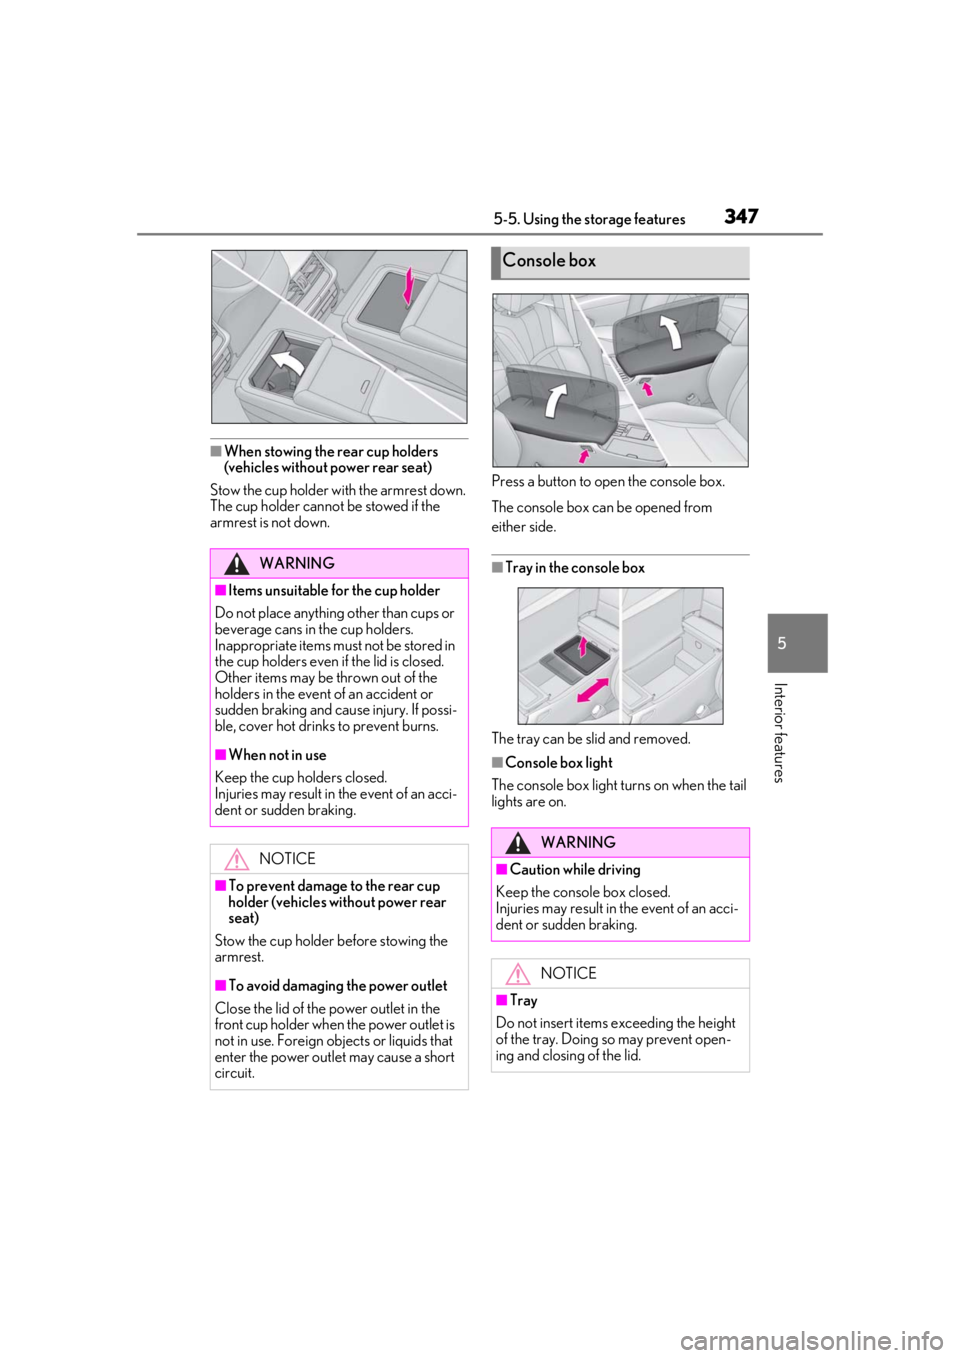
■When stowing the rear cup holders
(vehicles without power rear seat)
Stow the cup holder with the armrest down.
The cup holder cannot be stowed if the
armrest is not down. Press a button to open the console box.
The console box can be opened from
either side.
■Tray in the console box
The tray can be slid and removed.
■Console box light
The console box light turns on when the tail
lights are on.
WARNING
■Items unsuitable for the cup holder
Do not place anything other than cups or
beverage cans in the cup holders.
Inappropriate items must not be stored in
the cup holders even if the lid is closed.
Other items may be thrown out of the
holders in the event of an accident or
sudden braking and cause injury. If possi-
ble, cover hot drinks to prevent burns.
■When not in use
Keep the cup holders closed.
Injuries may result in the event of an acci-
dent or sudden braking.
NOTICE
■To prevent damage to the rear cup
holder (vehicles without power rear
seat)
Stow the cup holder before stowing the
armrest.
■To avoid damaging the power outlet
Close the lid of the power outlet in the
front cup holder when the power outlet is
not in use. Foreign ob jects or liquids that
enter the power outlet may cause a short
circuit.
Console box
WARNING
■Caution while driving
Keep the console box closed.
Injuries may result in the event of an acci-
dent or sudden braking.
NOTICE
■Tray
Do not insert items exceeding the height
of the tray. Doing so may prevent open-
ing and closing of the lid.
Page 402 of 520

4026-3. Do-it-yourself maintenance
approximately 10 to 30 minutes to com-
plete ID code registration.)
If ID code registration is not complete
after driving for approximately 30 min-
utes, continue driving for a while.
• If the vehicle is driven on an unpaved
road, it may take longer than normal to
complete registration.
• If the vehicle is backed up while perform-
ing registration, data collected during
registration will be cleared, and it will take
longer than normal to complete.
• If the vehicle is driven in heavy traffic or another situation where other vehicles
are driven close by, it may take time for
the system to recognize the tire pressure
warning valve and tran smitters of your
vehicle over those of other vehicles.
• If a wheel with a tire pressure warning valve and transmitter installed is inside or
near the vehicle, registration of the ID
codes for the installed wheels may not be
possible.
If ID registration is not complete after driv-
ing for approximately 1 hour, park the vehi-
cle in a safe place for approximately 20
minutes and then perform the ID code reg-
istration procedure again.
●In the following situations, ID code regis-
tration will not be started or was not com-
pleted properly and the system will not
operate properly. Perform the ID code
registration procedure again.
• If, when attempting to start ID code regis-
tration, the tire pressure warning light
does not blink slowly 3 times.
• If, when the vehicle has been driven for
about 20 minutes after performing ID
code registration, the tire pressure warn-
ing light blinks for approximately 1 minute
and then illuminates.
●If ID code registration cannot be com-
pleted after performing the above proce-
dure, contact your Lexus dealer.
Stop the vehicle in a safe place on a
hard, flat surface.
Set the parking brake.
Shift the shift position to P.
Disabling the height control. (if
equipped) ( P.303)
Stop the engine.
■Jack and tools
As your vehicle is eq uipped with run-flat
tires, the following tools for replacing a tire
are not included with your vehicle. They can
be purchased at your Lexus dealer.
●Wheel nut wrench
●Jack
●Jack handle
Replacing the tire
When raising your vehicle with a
jack, position the jack correctly.
Improper placement may damage
your vehicle or cause injury.
If necessary tire replacement
seems difficult to perform, contact
your Lexus dealer.
Before jacking up the vehicle
WARNING
■Using the tire jack
Observe the following precautions.
Improper use of the tire jack may cause
the vehicle to suddenly fall off the jack,
leading to death or serious injury.
●Do not use the tire jack for any pur-
pose other than replacing tires or
installing and removing tire chains.
●Do not use other tire jacks for replac-
ing tires on this vehicle.
Page 403 of 520

4036-3. Do-it-yourself maintenance
6
Maintenance and care
1Chock the tires.
2 Slightly loosen the wheel nuts (one
turn).
3 Turn the tire jack portion by
hand until the notch of the jack is in
contact with the jack point.
The jack point guides are located under
the rocker panel. They indicate the jack
WARNING
●Put the jack properly in its jack point.
●Do not put any part of your body under
the vehicle while it is supported by the
jack.
●Do not start the engine or drive the
vehicle while the vehicle is supported
by the jack.
●Do not raise the vehicle while some-
one is inside.
●When raising the vehicle, do not put an
object on or under the jack.
●Do not raise the vehicle to a height
greater than that required to replace
the tire.
●Use a jack stand if it is necessary to get
under the vehicle.
●Make sure to disable all functions of
the vehicle height control of the elec-
tronically modulate d air suspension
and then stopping the engine.
(
P.303)
●When lowering the vehicle, make sure
that there is no-one near the vehicle. If
there are people nearby, warn them
vocally before lowering.
■Replacing a flat tire for vehicles with
power trunk opener and closer (if
equipped)
In cases such as when replacing tires,
make sure to turn off the trunk opener
main switch (
P.112). Failure to do so
may cause the trunk lid to operate unin-
tentionally if the power trunk opener and
closer switch is accidentally touched,
resulting in hands and fingers being
caught and injured.
Removing a tire
TireWheel chock posi-
tions
Front left-hand sideBehind the rear
right-hand side tire
Front right-hand
sideBehind the rear
left-hand side tire
Rear left-hand sideIn front of the front
right-hand side tire
Rear right-hand sideIn front of the front
left-hand side tire
A
Page 422 of 520

4227-2. Steps to take in an emergency
In the following situations, it is not pos-
sible to be towed by another vehicle
using cables or chains, as the rear
wheels may be locked due to the park-
ing lock. Contact your Lexus dealer or
commercial towing service.
There is a malfunction in the P posi-
tion control system. ( P.177, 436)
There is a malfunction in the engine
immobilizer system. ( P.64)
There is a malfunction in the smart
access system with push-button
start. ( P.442)
The battery is discharged.
( P.444)
WARNING
■While towing
●When towing using cables or chains,
avoid sudden starts, etc. which place
excessive stress on the towing eyelets,
cables or chains. The towing eyelets,
cables or chains may become dam-
aged, broken debris may hit people,
and cause serious damage.
●Make sure to disable all functions of
the vehicle height control of the elec-
tronically modulate d air suspension.
Otherwise, the vehicle height may
change and part of your body may be
caught under the vehicle, possibly
causing injury. (
P.303)
●Do not turn the engine switch off.
This may lead to an accident as the
rear wheels will be locked by the park-
ing lock.
■Installing towing eyelets to the vehi-
cle
Make sure that towing eyelets are
installed securely.
If not securely installed, towing eyelets
may come loose during towing.
NOTICE
■To prevent damage to the vehicle
when towing using a wheel-lift type
truck
●Do not tow the vehicle from the rear
when the engine switch is off. The
steering lock mechanism is not strong
enough to hold the front wheels
straight.
●When raising the vehicle, ensure ade-
quate ground clearance for towing at
the opposite end of the raised vehicle.
Without adequate clearance, the vehi-
cle could be damaged while being
towed.
■To prevent damage to the vehicle
when towing with a sling-type truck
Do not tow with a sling-type truck, either
from the front or rear.
■To prevent damage to the vehicle
during emergency towing
Do not secure cables or chains to the
suspension components.
■Recreational towing (behind motor
home, etc.) (AWD models)
Never dinghy tow your vehicle to pre-
vent causing serious damage to the
AWD system and transmission. ( P.173)
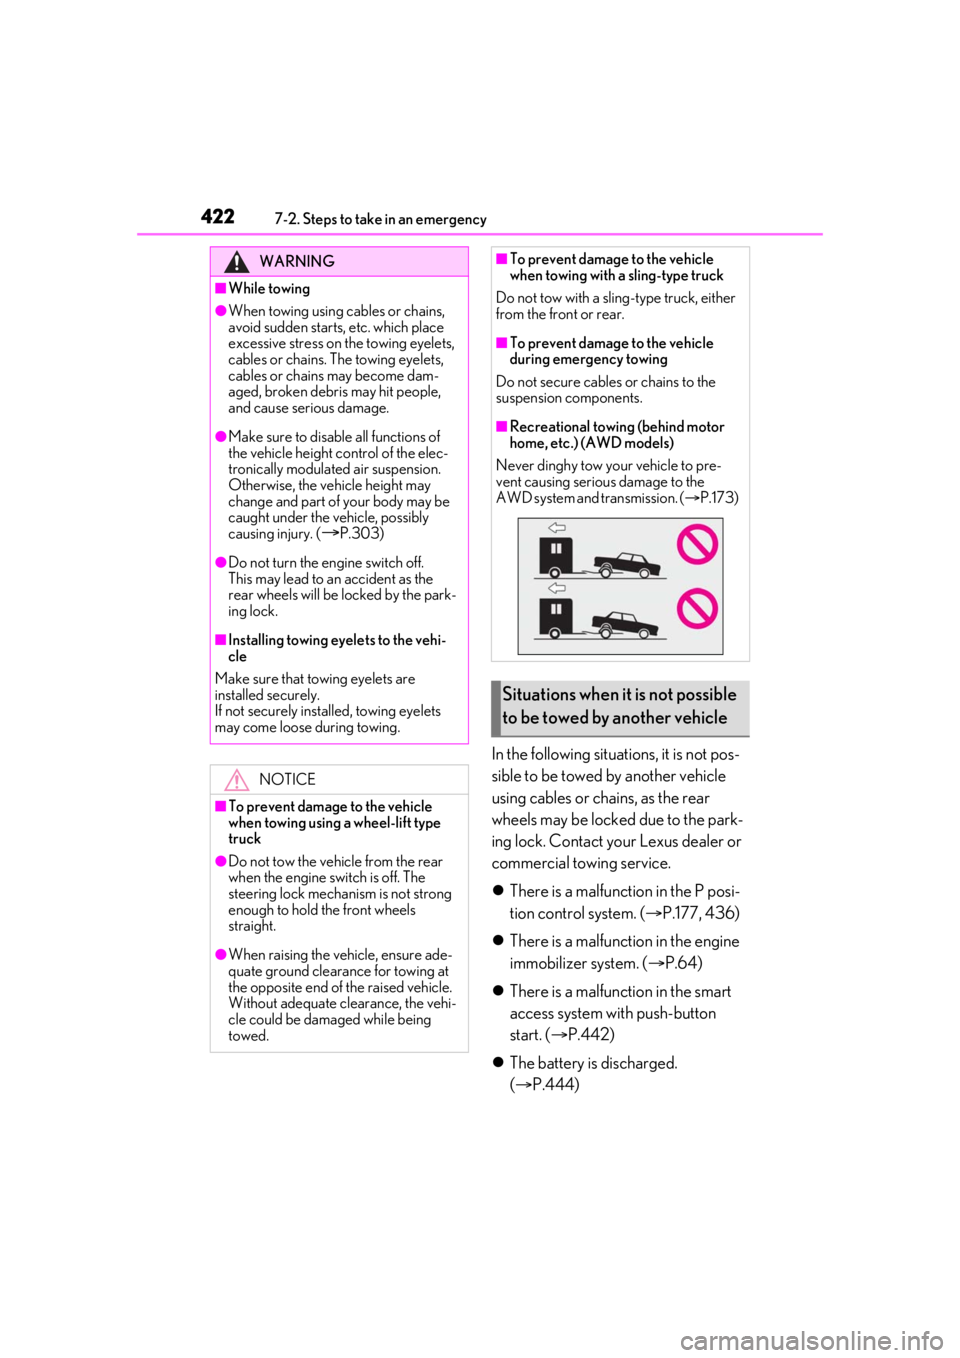
Situations when it is not possible
to be towed by another vehicle
Page 439 of 520

4397-2. Steps to take in an emergency
7
When trouble arises
■In some conditions (such as at high tem-
peratures)
For XXX/XXRXX size tires: You cannot
continue driving for up to 80 miles (50
km).
For XXX/XXRFXX size tires: You cannot
continue driving for up to 160 miles (100
km).
■For the detailed information on run-flat
tires
See the tire warranty booklet.
One of the following may be the cause
of the problem:
There may not be sufficient fuel in
the vehicle’s tank.
Refuel the vehicle.
The engine may be flooded.
Try to restart the engine again fol-
lowing correct starting procedures.
( P.174)
There may be a malfunction in the
engine immobilizer system.
( P.64)
There may be a malfunction in the
shift control system.
* ( P.177, 437)
*: It may not be possible to shift the shift
position from P.
One of the following may be the cause
of the problem:
The battery may be discharged.
NOTICE
■When replacing the tires
When removing or fitting the wheels,
tires or the tire pressure warning valve
and transmitter, contact your Lexus
dealer as the tire pr essure warning valve
and transmitter may be damaged if not
handled correctly.
■When driving over bumps
If a vehicle has a flat tire, the vehicle
height will be lower than usual. Ensure
that nothing strikes the bottom of the
vehicle.
■To avoid damage to the tire pressure
warning valves and transmitters
When a tire is repaired with liquid seal-
ants, the tire pressu re warning valve and
transmitter may not operate properly. If a
liquid sealant is used , contact your Lexus
dealer or other qualified service shop as
soon as possible. Make sure to replace
the tire pressure warning valve and trans-
mitter when replacing the tire. ( P.398)
If the engine will not start
If the engine will not start even
though correct starting procedures
are being followed (P.174), con-
sider each of the following points:
The engine will not start even
though the starter motor oper-
ates normally.
The starter motor turns over
slowly, the interior lights and
headlights are dim, or the horn
does not sound or sounds at a low
volume.
Page 456 of 520

4568-1. Specifications
8-1.Specifications
*1: Unladen vehicles
*2: Without electronically modulated air suspension
*3: With electronically modulated air suspension
*4:Except F SPORT models
*5:F SPORT models
■Vehicle identification number
The vehicle identification number
(VIN) is the legal identifier for your
vehicle. This is the primary identifica- tion number for your Lexus. It is used in
registering the ownership of your vehi-
cle.
This number is stamped on the top left
Maintenance data (fuel, oil level, etc.)
Dimensions and weight
Overall length206.1 in. (5235 mm)
Overall width74.8 in. (1900 mm)
Overall height*1
2WD models57.5 in. (1460 mm)*2
57.1 in. (1450 mm)*3
AWD models57.9 in. (1470 mm)*2
57.5 in. (1460 mm)*3
Wheelbase123.0 in. (3125 mm)
Tread*1
Front
2WD models64.2 in. (1630 mm)
AWD models64.2 in. (1630 mm)*2
64.4 in. (1635 mm)*3
Rear64.4 in. (1635 mm)*4
63.6 in. (1615 mm)*5
Vehicle capacity weight
(Occupants + luggage)870 lb. (395 kg)
Seating capacity
Seating capacity5 (Front 2, Rear 3)
Vehicle identification