2021 LEXUS LS500 check
[x] Cancel search: checkPage 51 of 520
511-2. Child safety
1
For safety and security
6After installing the child restraint
system, rock it back and forth to
ensure that it is installed securely.
(P.53)
■Forward-facing Convertible
seat
1 Adjust the seat
When using the front passenger
seat
If installing the child restraint system to
the front passenger seat is unavoid-
able, refer to P.47for front passenger
seat adjustment.
When using the rear seat
If there is a gap between the child seat
and the seatback, adjust the seatback
angle until good contact is achieved.
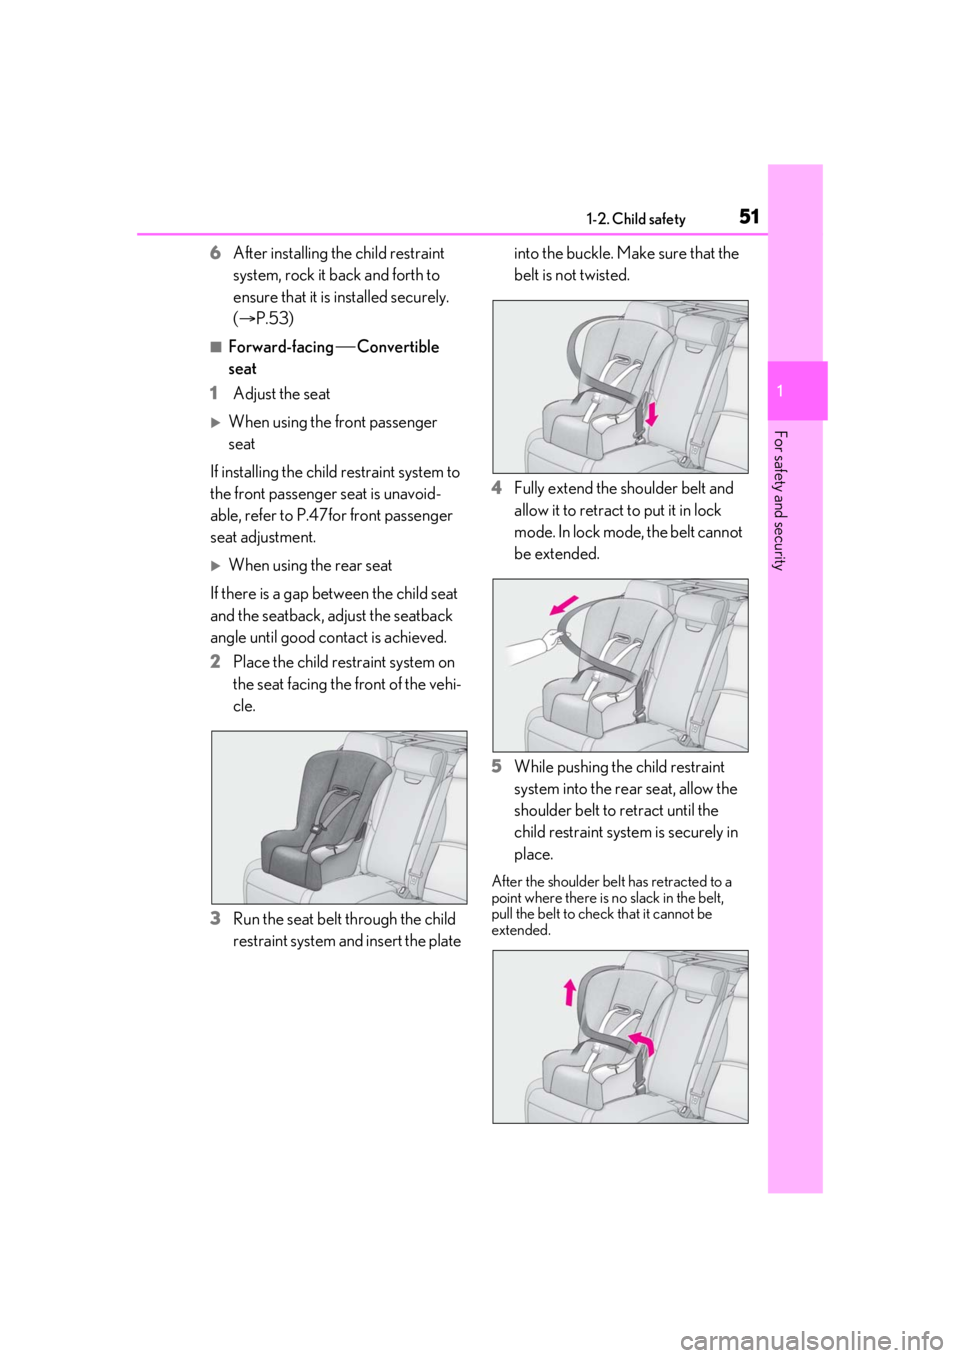
2 Place the child restraint system on
the seat facing the front of the vehi-
cle.
3 Run the seat belt through the child
restraint system and insert the plate into the buckle. Make sure that the
belt is not twisted.
4 Fully extend the shoulder belt and
allow it to retract to put it in lock
mode. In lock mode, the belt cannot
be extended.
5 While pushing the child restraint
system into the rear seat, allow the
shoulder belt to retract until the
child restraint system is securely in
place.
After the shoulder belt has retracted to a
point where there is no slack in the belt,
pull the belt to check that it cannot be
extended.
Page 52 of 520

521-2. Child safety
6If the child restraint has a top tether
strap, follow the child restraint man-
ufacturer’s operation manual
regarding the installation, using the
top tether strap to latch onto the
top tether strap anchor. ( P.55)
7 After installing the child restraint
system, rock it back and forth to
ensure that it is installed securely.
(P.53)
■Booster seat
1 If installing the child restraint sys-
tem to the front passenger seat is
unavoidable, refer to P.47for front
passenger seat adjustment.
2 Place the child restraint system on
the seat facing the front of the vehi-
cle.
Booster type
High back type 4
Sit the child in the child restraint
system. Fit the seat belt to the child
restraint system according to the
manufacturer’s in structions and
insert the plate into the buckle.
Make sure that the belt is not
twisted.
Check that the shoulder belt is correctly
positioned over the child’s shoulder and
that the lap belt is as low as possible.
( P.24)
■Removing a child restraint system
installed with a seat belt
Press the buckle release button and
fully retract the seat belt.
When releasing the buckle, the child
restraint system may sp ring up due to the
rebound of the seat cushion. Release the
buckle while holding down the child
restraint system.
Since the seat belt auto matically reels itself,
slowly return it to the stowing position.
Page 66 of 520

661-4. Theft deterrent system
■Items to check before locking the
vehicle
To prevent unexpected triggering of
the alarm and vehicle theft, make sure
of the following:
Nobody is in the vehicle.
The windows, moon roof (if
equipped) and panoramic moon
roof (if equipped) are closed before
the alarm is set.
No valuables or other personal
items are left in the vehicle.
■Setting
Close the doors, trunk and hood, and
lock all the doors. The system will be
set automatically after 30 seconds.
The indicator light changes from being on
to flashing when the system is set.
■Deactivating or stopping
Do one of the following to deactivate
or stop the alarms:
Except for Canada: Unlock the
doors.
Except for Canada: Open the trunk.
For Canada: Unlock the doors or
open the trunk using the entry func-
tion or wireless remote control.
Turn the engine switch to ACCES-
SORY or IGNITION ON mode, or
start the engine. (The alarm will be
deactivated or stopped after a few
seconds.)
■System maintenance
The vehicle has a maintenance-free type
alarm system.
■Triggering of the alarm
The alarm may be triggered in the following
situations:
(Stopping the alarm deactivates the alarm
system.)
●For Canada: The doors are unlocked
using the mechanical key.
Alarm
The alarm uses light and sound to
give an alert when an intrusion is
detected.
The alarm is triggered in the follow-
ing situations when the alarm is set:
Except for Canada: A locked
door or trunk is unlocked or
opened in any way other than
using the entry function, wireless
remote control or mechanical
key. (The doors will lock again
automatically.)
For Canada: A locked door or
trunk is unlocked or opened in
any way other than using the
entry function or wireless remote
control. (The door s will lock again
automatically.)
The hood is opened.
Setting/deactivating/stopping
the alarm system
Page 71 of 520

712-1. Instrument cluster
2
Vehicle status information and indicators
Warning lights inform the driver of mal-
functions in the indicated vehicle’s sys-
tems.
*1: These lights come on when the engine switch is turned to IGNITION ON
mode to indicate that a system check is
Warning lights
(U.S.A.)
Brake system warning light*1
( P.427)
(red)
(Canada)
Brake system warning light*1
( P.427)
(yellow)
Brake system warning light*1
( P.427)
High coolant temperature
warning light
*2 ( P.427)
Charging system warning
light
*2 ( P.428)
Low engine oil pressure warn-
ing light
*2 ( P.428)
(U.S.A.)
Malfunction indicator lamp*1
( P.428)
(Canada)
Malfunction indicator lamp*1
( P.428)
SRS warning light
*1 ( P.428)
Pop Up Hood warning light
*1
( P.429)
(U.S.A.)
ABS warning light*1 ( P.429)
(Canada)
ABS warning light*1 ( P.429)
Inappropriate pedal operation
warning light
*2 ( P.429)
(red)
Electric power steering system
warning light
*1 ( P.430)
(yellow)
Electric power st eering system
warning light
*1 ( P.430)
Low fuel level warning light
( P.430)
Driver’s and front passenger’s
seat belt re minder light
( P.430)
Rear passengers’ seat
belt reminder lights
(except F SPORT mod-
els) ( P.431)
Rear passengers’ seat belt
reminder lights (F SPORT mod-
els) ( P.431)
Tire pressure warning light
*1
( P.431)
(orange)
LTA indicator ( P.431)
(flashes)
RCD OFF indicator (if
equipped) ( P.432)
(flashes or
illuminates)PCS warning light*1 ( P.432)
Slip indicator
*1 ( P.432)
(flashes)
(U.S.A.)
Parking brake indicator
( P.433)
(flashes)
(Canada)
Parking brake indicator
( P.433)
(flashes)
Brake hold operated indicator*1
( P.433)
Page 73 of 520

732-1. Instrument cluster
2
Vehicle status information and indicators
Drive mode indicators
Except F SPORT models
F SPORT models
*1: These lights come on when the engine
switch is turned to IGNITION ON
mode to indicate that a system check is
being performed. They will turn off after
the engine is started, or after a few sec-
onds. There may be a malfunction in a
system if the lights do not come on, or
turn off. Have the vehicle inspected by
your Lexus dealer.
*2: This light comes on when the system is turned off.
*3: This light illuminates on the outside rear view mirrors.
*4: This light illuminates on the multi-infor- mation display.
*5: When the outside temperature is approximately 37°F (3°C) or lower, this
indicator will flash for approximately 10
seconds, then stay on.
(Canada)
Parking brake indicator
( P.186)
Brake hold standby indicator
*1
( P.188)
Brake hold operated indicator
*1
( P.188)
Eco Driving Indicator Light
*1
( P.85)
Low outside temperature indi-
cator
*5 ( P.75, 78)
Security indicator
*6 ( P.64,
66)
“AIR BAG ON/OFF”
indicator
*1, 6 ( P.40)
Snow mode indicator ( P.182)
Normal mode indicator
( P.299)
Custom mode indicator (if
equipped) ( P.299)
Comfort mode indicator (if
equipped) ( P.299)
Eco drive mode indicator
( P.299)
Sport mode indicator (if
equipped) ( P.299)
Sport S mode indicator (if
equipped) ( P.299)
Sport S+ mode indicator (if
equipped) ( P.299)
Snow mode indicator ( P.182)
Normal mode indicator
( P.299)
Custom mode indicator
( P.299)
Comfort mode indicator
( P.299)
Eco drive mode indicator
( P.299)
Sport S mode indicator
( P.299)
Sport S+ mode indicator
( P.299)
Page 76 of 520

762-1. Instrument cluster
Displays warning messages if a malfunction occurs (P.436)
■Outside temperature display
●In the following situations, the correct
outside temperature may not be dis-
played, or the display may take longer
than normal to change:
• When stopped, or driving at low speeds (less than 12 mph [20 km/h])
• When the outside temperature has
changed suddenly (at the entrance/exit of
a garage, tunnel, etc.)
●When “--” or “E” is displayed, the system
may be malfunctioning. Take your vehicle
to your Lexus dealer.
■Liquid crystal display
P.83
■Customization
The gauges and meters can be customized
on of the multi-information display.
( P.87)
■Display items
Odometer
Displays the total distance the vehicle has
been driven.
Trip meter A/trip meter B
Displays the distance the vehicle has been
driven since the meter was last reset. Trip
meters A and B can be used to record and
display different distances independently.
Distance until next engine oil
change
Displays the distance the vehicle can be
driven until an oil change is necessary.
■Changing the display
Each time the “ODO TRIP” switch is
pressed, the displayed item will be
changed. When the trip meter is dis-
played, pressing and holding the switch
will reset the trip meter.
WARNING
■The information display at low tem-
peratures
Allow the interior of the vehicle to warm
up before using the liquid crystal infor-
mation display. At extremely low tem-
peratures, the in formation display
monitor may respond slowly, and display
changes may be delayed.
For example, there is a lag between the
driver’s shifting and the new gear number
appearing on the display. This lag could
cause the driver to downshift again,
causing rapid and excessive engine brak-
ing and possibly an accident resulting in
death or injury.
NOTICE
■To prevent damage to the engine and
its components
●Do not let the indicator needle of the
tachometer enter the red zone, which
indicates the maximum engine speed.
●The engine may be overheating if the
engine coolant temperature gauge is
in the red zone (H). In this case, imme-
diately stop the vehicle in a safe place,
and check the engine after it has
cooled completely. ( P.449)
Odometer and trip meter dis-
play
Page 81 of 520

812-1. Instrument cluster
2
Vehicle status information and indicators
■Display items
Odometer
Displays the total distance the vehicle has
been driven.
Trip meter A/trip meter B
Displays the distance the vehicle has been
driven since the meter was last reset. Trip
meters A and B can be used to record and
display different distances independently.
Distance until next engine oil
change
Displays the distance the vehicle can be
driven until an oil change is necessary.
■Changing the display
Each time the “ODO TRIP” switch is
pressed, the displayed item will be changed. When the trip meter is dis-
played, pressing and holding the switch
will reset the trip meter.
■Pop-up display
The distance until the next engine oil
change will displayed when a warning
message indicating that oil mainte-
nance should be performed soon or is
required is displayed.
The brightness of the instrument panel
lights can be adjusted.
1 Darker
2 Brighter
■Brightness of the meters (day mode and
night mode)
The brightness of the meters changes
between day mode and night mode.
●Day mode: When the tail lights are off or
WARNING
For example, there is a lag between the
driver’s shifting and the new gear number
appearing on the display. This lag could
cause the driver to downshift again,
causing rapid and excessive engine brak-
ing and possibly an accident resulting in
death or injury.
NOTICE
■To prevent damage to the engine and
its components
●Do not let the indicator needle of the
tachometer enter the red zone, which
indicates the maximum engine speed.
●The engine may be overheating if the
engine coolant temperature gauge is
in the red zone (H). In this case, imme-
diately stop the vehicle in a safe place,
and check the engine after it has
cooled completely. ( P.449)
Odometer and trip meter dis-
play
Changing the instrument panel
light brightness
Page 90 of 520

902-1. Instrument cluster
Displays the following items:
• Speedometer
• Shift position/shift range/gear position (P.178)
Tachometer/Eco Driving Indicator display area ( P.93)
HUD (Head-up display) switch
■Head-up display will operate when
The engine switch is in IGNITION ON
mode.
■When using the head-up display
The head-up display may seem dark or hard
to see when viewed through sunglasses,
especially polarized su nglasses. Adjust the
brightness of the head-up display or
remove your sunglasses.
■Street name display
Only street names whic h are included in the
map data will be displayed.
■Outside temperature display
●When the ambient temperature is
approximately 37°F (3°C) or lower, the
low outside temperature indicator will
flash for approximately 10 seconds and
the outside temperature display will turn
off. In this case, the display will be dis-
played again when the outside tempera-
ture becomes approximately 41°F (5°C)
or higher.
●In the following situations, the correct
outside temperature may not be dis-
played, or the display may take longer
than normal to change:
• When stopped, or driving at low speeds (less than 12 mph [20 km/h])
• When the outside temperature has
changed suddenly (at the entrance/exit of
a garage, tunnel, etc.)
●When “--” or “E” is displayed, the system
may be malfunctioning. Take your vehicle
to your Lexus dealer.
F
G
WARNING
■When using the head-up display
●Check that the position and brightness
of the head-up display image does not
interfere with safe driving. Incorrect
adjustment of the image’s position or
brightness may obstruct the driver’s
view and lead to an accident, resulting
in death or serious injury.
●Do not continuously look at the
head-up display while driving as you
may fail to see pedestrians, objects on
the road, etc. ahead of the vehicle.
NOTICE
■Head-up display projector
●Do not place any drinks near the
head-up display projector. If the pro-
jector gets wet, electrical malfunctions
may result.
●Do not place anything on or put stick-
ers onto the head-up display projector.
Doing so could interrupt head-up dis-
play indications.
●Do not touch the inside of the head-up
display projector or thrust sharp edges
or the like into the projector.
Doing so could cause mechanical mal-
functions.