Page 403 of 520

4036-3. Do-it-yourself maintenance
6
Maintenance and care
1Chock the tires.
2 Slightly loosen the wheel nuts (one
turn).
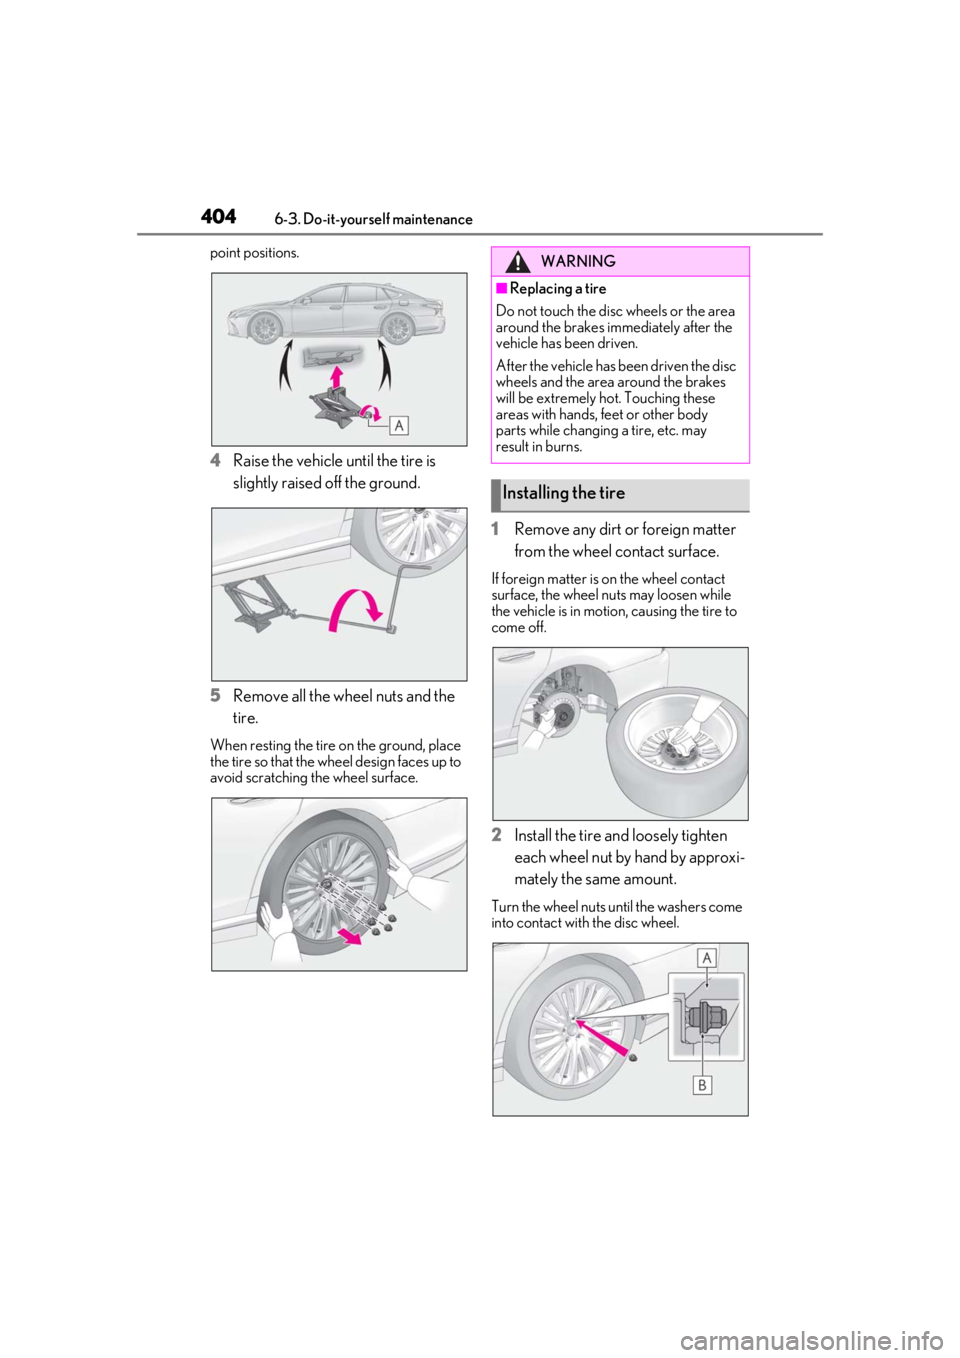
3 Turn the tire jack portion by
hand until the notch of the jack is in
contact with the jack point.
The jack point guides are located under
the rocker panel. They indicate the jack
WARNING
●Put the jack properly in its jack point.
●Do not put any part of your body under
the vehicle while it is supported by the
jack.
●Do not start the engine or drive the
vehicle while the vehicle is supported
by the jack.
●Do not raise the vehicle while some-
one is inside.
●When raising the vehicle, do not put an
object on or under the jack.
●Do not raise the vehicle to a height
greater than that required to replace
the tire.
●Use a jack stand if it is necessary to get
under the vehicle.
●Make sure to disable all functions of
the vehicle height control of the elec-
tronically modulate d air suspension
and then stopping the engine.
(
P.303)
●When lowering the vehicle, make sure
that there is no-one near the vehicle. If
there are people nearby, warn them
vocally before lowering.
■Replacing a flat tire for vehicles with
power trunk opener and closer (if
equipped)
In cases such as when replacing tires,
make sure to turn off the trunk opener
main switch (
P.112). Failure to do so
may cause the trunk lid to operate unin-
tentionally if the power trunk opener and
closer switch is accidentally touched,
resulting in hands and fingers being
caught and injured.
Removing a tire
TireWheel chock posi-
tions
Front left-hand sideBehind the rear
right-hand side tire
Front right-hand
sideBehind the rear
left-hand side tire
Rear left-hand sideIn front of the front
right-hand side tire
Rear right-hand sideIn front of the front
left-hand side tire
A
Page 404 of 520
4046-3. Do-it-yourself maintenance
point positions.
4Raise the vehicle until the tire is
slightly raised off the ground.
5 Remove all the wheel nuts and the
tire.
When resting the tire on the ground, place
the tire so that the wh eel design faces up to
avoid scratching the wheel surface.
1 Remove any dirt or foreign matter
from the wheel contact surface.
If foreign matter is on the wheel contact
surface, the wheel nuts may loosen while
the vehicle is in motion, causing the tire to
come off.
2 Install the tire and loosely tighten
each wheel nut by hand by approxi-
mately the same amount.
Turn the wheel nuts until the washers come
into contact with the disc wheel.
WARNING
■Replacing a tire
Do not touch the disc wheels or the area
around the brakes immediately after the
vehicle has been driven.
After the vehicle has been driven the disc
wheels and the area around the brakes
will be extremely hot. Touching these
areas with hands, feet or other body
parts while changing a tire, etc. may
result in burns.
Installing the tire
Page 414 of 520

4146-3. Do-it-yourself maintenance
Type ANormal fuse
Blown fuse
Type B
Normal fuse
Blown fuse
Type CNormal fuse
Blown fuse
Type DNormal fuse
Blown fuse
■After a fuse is replaced
●When installing the lid, make sure that the
tab is installed securely.
●If the lights do not turn on even after the
fuse has been replaced, a bulb may need
replacement.
●If the replaced fuse blows again, have the
vehicle inspected by your Lexus dealer.
■If there is an overload in a circuit
The fuses are designed to blow, protecting
the wiring harness from damage.
A
B
A
B
A
B
WARNING
■To prevent system breakdowns and
vehicle fire
Observe the following precautions.
Failure to do so may cause damage to
the vehicle, and possibly a fire or injury.
●Never use a fuse of a higher amperage
rating than that indicated, or use any
other object in place of a fuse.
●Always use a genuine Lexus fuse or
equivalent.
Never replace a fuse with a wire, even
as a temporary fix.
●Do not modify the fuses or fuse boxes.
A
B
Page 417 of 520
417
7
7
When trouble arises
When trouble arises
.7-1. Essential informationEmergency flashers................... 418
If your vehicle has to be stopped in an emergency ........................... 418
If the vehicle is trapped in rising water............................................. 419
7-2. Steps to take in an emergency If your vehicle needs to be towed......................................................... 421
If you think something is wrong ........................................................ 425
Fuel pump shut off system ..... 426
If a warning light turns on or a warning buzzer sounds ....... 427
If a warning message is displayed ........................................................ 436
If you have a flat tire.................. 438
If the engine wi ll not start .......439
If you lose your keys .................. 441
If the fuel filler door cannot be opened......................................... 441
If the electronic key does not operate properly .................... 442
If the vehicle battery is discharged ........................................................ 444
If your vehicle overheats ........ 449
If the vehicle becomes stuck ........................................................ 452
Page 427 of 520
4277-2. Steps to take in an emergency
7
When trouble arises
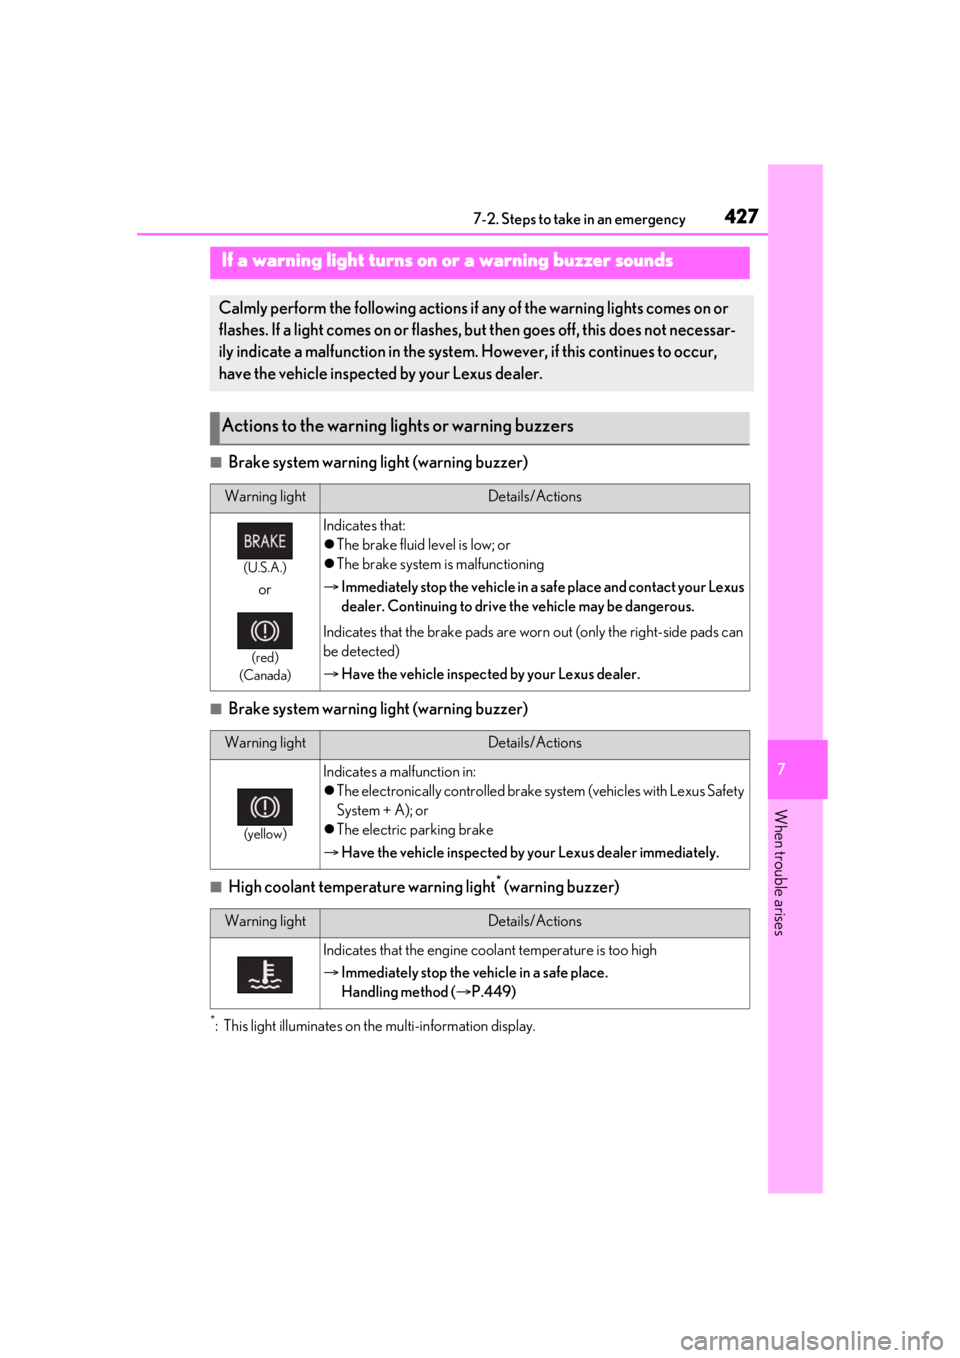
■Brake system warning light (warning buzzer)
■Brake system warning light (warning buzzer)
■High coolant temperature warning light* (warning buzzer)
*: This light illuminates on the multi-information display.
If a warning light turns on or a warning buzzer sounds
Calmly perform the following actions if any of the warning lights comes on or
flashes. If a light comes on or flashes, bu t then goes off, this does not necessar-
ily indicate a malfunction in the system. However, if this continues to occur,
have the vehicle inspected by your Lexus dealer.
Actions to the warning lights or warning buzzers
Warning lightDetails/Actions
(U.S.A.)
or
(red)
(Canada)
Indicates that:
The brake fluid level is low; or
The brake system is malfunctioning
Immediately stop the vehicle in a safe place and contact your Lexus
dealer. Continuing to drive the vehicle may be dangerous.
Indicates that the brake pads are worn out (only the right-side pads can
be detected)
Have the vehicle inspected by your Lexus dealer.
Warning lightDetails/Actions
(yellow)
Indicates a malfunction in:
The electronically controlled brake sy stem (vehicles with Lexus Safety
System + A); or
The electric parking brake
Have the vehicle inspected by your Lexus dealer immediately.
Warning lightDetails/Actions
Indicates that the engine coolant temperature is too high
Immediately stop the vehicle in a safe place.
Handling method ( P.449)
Page 428 of 520

4287-2. Steps to take in an emergency
■Charging system warning light* (warning buzzer)
*: This light illuminates on the multi-information display.
■Low engine oil pressure warning light* (warning buzzer)
*: This light illuminates on the multi-information display.
■Malfunction indicator lamp (warning buzzer)
■SRS warning light (warning buzzer)
Warning lightDetails/Actions
Indicates a malfunction in the vehicle’s charging system
Immediately stop the vehicle in a safe place and contact your Lexus
dealer.
Warning lightDetails/Actions
Indicates that the engine oil pressure is too low
Immediately stop the vehicle in a safe place and contact your Lexus
dealer.
Warning lightDetails/Actions
(U.S.A.)
or
(Canada)
Indicates a malfunction in:
The electronic engine control system;
The electronic throttle control system; or
The electronic automatic transmission control system
Immediately stop the vehicle in a safe place and contact your Lexus
dealer.
Warning lightDetails/Actions
Indicates a malfunction in:
The SRS airbag system;
The front passenger occupant classification system; or
The seat belt pretensioner system
Have the vehicle inspected by your Lexus dealer immediately.
Page 429 of 520
4297-2. Steps to take in an emergency
7
When trouble arises
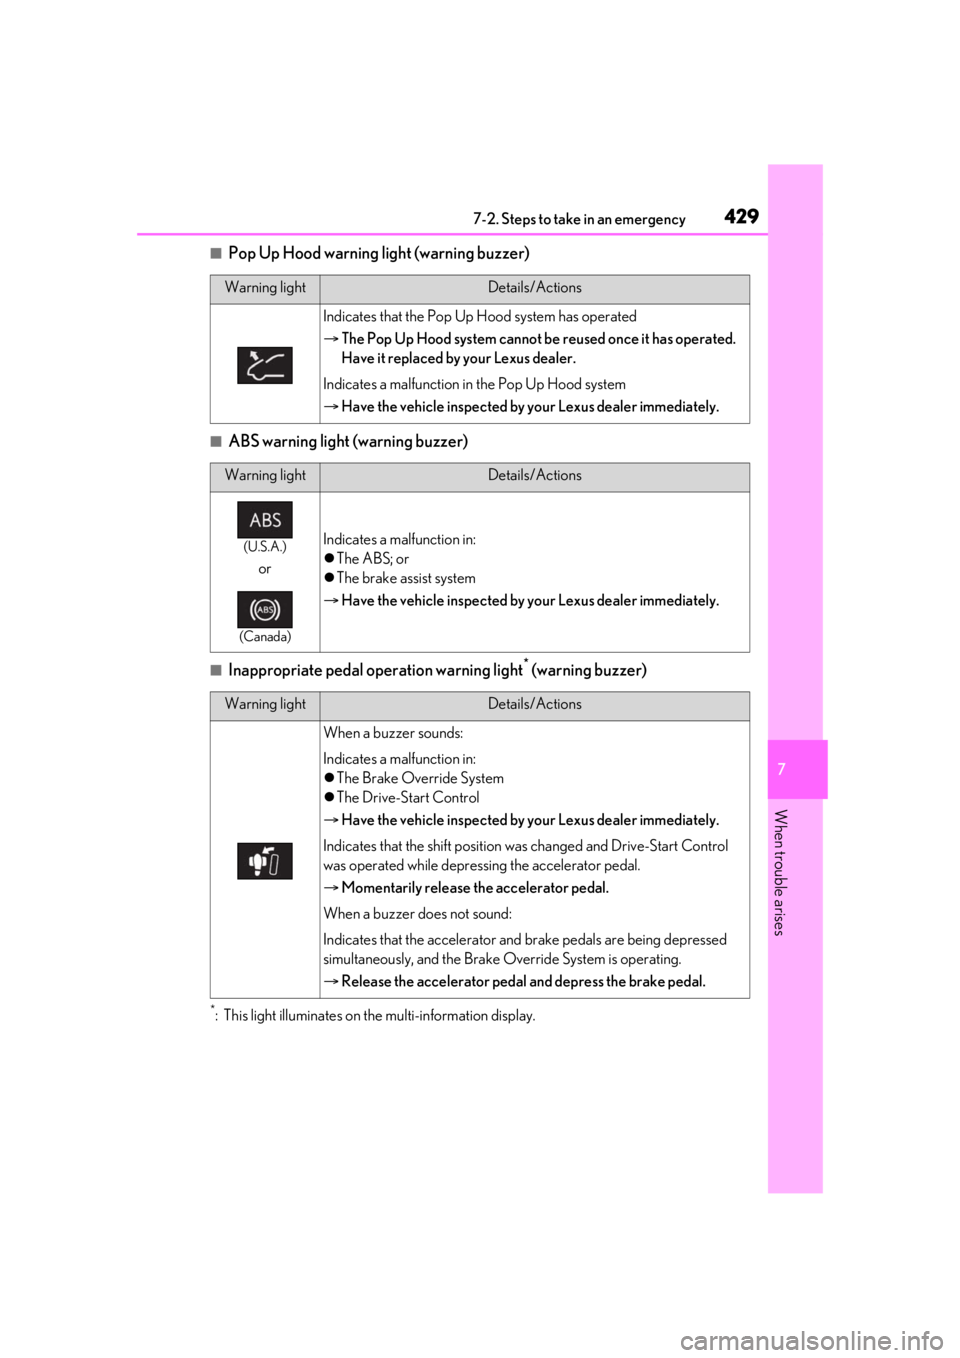
■Pop Up Hood warning light (warning buzzer)
■ABS warning light (warning buzzer)
■Inappropriate pedal operation warning light* (warning buzzer)
*: This light illuminates on the multi-information display.
Warning lightDetails/Actions
Indicates that the Pop Up Hood system has operated
The Pop Up Hood system cannot be reused once it has operated.
Have it replaced by your Lexus dealer.
Indicates a malfunction in the Pop Up Hood system
Have the vehicle inspected by your Lexus dealer immediately.
Warning lightDetails/Actions
(U.S.A.)
or
(Canada)
Indicates a malfunction in:
The ABS; or
The brake assist system
Have the vehicle inspected by your Lexus dealer immediately.
Warning lightDetails/Actions
When a buzzer sounds:
Indicates a malfunction in:
The Brake Override System
The Drive-Start Control
Have the vehicle inspected by your Lexus dealer immediately.
Indicates that the shift position was changed and Drive-Start Control
was operated while depressi ng the accelerator pedal.
Momentarily release th e accelerator pedal.
When a buzzer does not sound:
Indicates that the accelerator and brake pedals are being depressed
simultaneously, and the Brake Override System is operating.
Release the accelerator pedal and depress the brake pedal.
Page 430 of 520
4307-2. Steps to take in an emergency
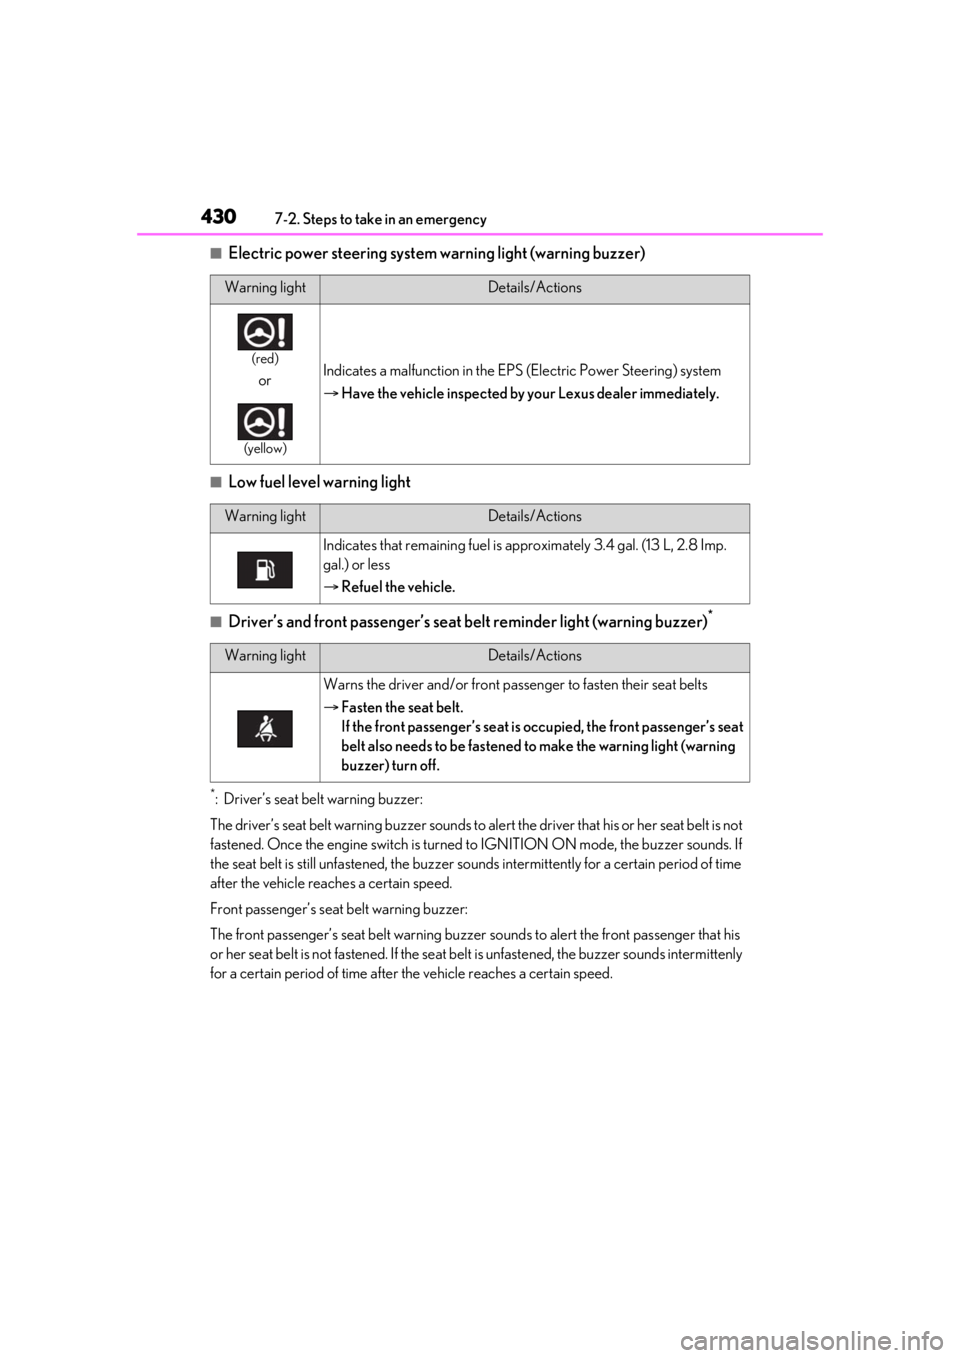
■Electric power steering system warning light (warning buzzer)
■Low fuel level warning light
■Driver’s and front passenger’s seat belt reminder light (warning buzzer)*
*: Driver’s seat belt warning buzzer:
The driver’s seat belt warning buzzer sounds to al ert the driver that his or her seat belt is not
fastened. Once the engine switch is turned to IGNITION ON mode, the buzzer sounds. If
the seat belt is still unfastened, the buzzer sounds intermittently for a certain period of time
after the vehicle reaches a certain speed.
Front passenger’s seat belt warning buzzer:
The front passenger’s seat belt warning buzzer sounds to alert the front passenger that his
or her seat belt is not fastened. If the seat be lt is unfastened, the buzzer sounds intermittenly
for a certain period of time after the vehicle reaches a certain speed.
Warning lightDetails/Actions
(red)
or
(yellow)
Indicates a malfunction in the EPS (Electric Power Steering) system
Have the vehicle inspected by your Lexus dealer immediately.
Warning lightDetails/Actions
Indicates that remaining fuel is approximately 3.4 gal. (13 L, 2.8 Imp.
gal.) or less
Refuel the vehicle.
Warning lightDetails/Actions
Warns the driver and/or front pass enger to fasten their seat belts
Fasten the seat belt.
If the front passenger’s seat is occupied, the front passenger’s seat
belt also needs to be fastened to make the warning light (warning
buzzer) turn off.