2021 Lexus IS350 fog
[x] Cancel search: fogPage 3 of 436

3TABLE OF CONTENTS
1
2
3
4
5
6
7
8
9
Automatic transmission..............138
Turn signal lever............................. 142
Parking brake ................................. 143
Brake Hold....................................... 146
ASC (Active Sound Control) .. 147
4-3. Operating the lights and wipers Headlight switch ............................ 149
AHB (Automatic High Beam) ............................................................. 151
Windshield wipers and washer ............................................................ 154
4-4. Refueling Opening the fuel tank cap.......... 161
4-5. Using the driving support systems Lexus Safety System + 2.5 ........ 164
PCS (Pre-Collision System)..... 170
LTA (Lane Tracing Assist)......... 180
RSA (Road Sign Assist) .............. 189
Dynamic radar crui se control with
full-speed range.......................... 192
BSM (Blind Spot Monitor) ....... 202
PKSA (Parking Support Alert) ........................................................... 208
Intuitive parking assist ................. 210
RCTA (Rear Cross Traffic Alert) function ........................................... 216
PKSB (Parking Support Brake) ............................................................ 221
Parking Support Brake function (static objects) ............................ 226
Parking Support Brake function (rear-crossing vehicles).......... 232
Driving mode select switch...... 236
Driving assist systems ................. 238
4-6. Driving tips Winter driving tips ....................... 2435-1. Remote Touch/Display
Remote Touch............................... 248
Center Display.............................. 250
5-2. Using the air conditioning system and defogger
Automatic air conditioning system.......................................................... 253
Heated steering wheel/seat heat- ers/seat ventilators..................... 261
5-3. Using the interior lights Interior lights list ........................... 263
5-4. Using the storage features List of storage features .............. 266
Trunk features ............................... 268
5-5. Using the other interior features Other interior features .............. 270
Garage door opener ................. 273
6-1. Maintenance and care Cleaning and protecting the vehi-cle exterior................................... 280
Cleaning and protecting the vehi- cle interior .................................... 283
6-2. Maintenance Maintenance re quirements .....286
General maintenance................ 287
Emission inspection and mainte- nance (I/M) program s
............290
6-3. Do-it-yourself maintenance Do-it-yourself service precautions............................................................ 291
Hood ................................................. 293
5Interior features
6Maintenance and care
Page 11 of 436

11Pictorial index
Pictorial index
■Exterior
Doors .......................................................................................................................... ..P.92
Locking/unlocking .............................................................................................................. P.92
Opening/closing the side windows .............................................................................P.118
Locking/unlocking by using th e mechanical key ................................................P.359
Warning lights/warning messages ................................................................P.337, 346
Trunk .......................................................................................................................... ... P.96
Opening from inside the cabin ...................................................................................... P.97
Opening from outside ....................................................................................................... P.97
Opening by using the mechanical key ....................................................................P.360
Warning lights/warning messages ................................................................P.337, 346
Outside rear view mirrors..................................................................................... P.116
Adjusting the mirror angle ............................................................................................... P.116
Folding the mirrors ............................................................................................................ .. P.117
Driving position memory
*.............................................................................................. P.108
Defogging the mirrors .................................................................................................... P.253
Windshield wipers .................................................................................................. P.154
A
B
C
D
Page 14 of 436

14Pictorial index
Parking brake switch ............................................................................................. P.143
Applying/releasing ........................................................................................................... P.143
Precautions for winter season .. ................................................................................... P.244
Warning buzzer/messages.......................................................................................... P.346
Turn signal lever ...................................................................................................... P.142
Headlight switch...................................................................................................... P.149
Headlights/parking lights/tail lights/daytime running lights ........................... P.149
Windshield wiper and washer switch ................................................................ P.154
Usage...................................................................................................................................... P.154
Adding washer fluid .........................................................................................................P.3 02
Warning messages .......................................................................................................... P.346
Emergency flasher switch .................................................................................. P.328
Trunk opener .............................................................................................................. P.97
Hood lock release lever .......................................................................................P.293
Tilt and telescopic steering control switch
*1.................................................... P.113
Adjustment ..................................................................................................................... ........ P.113
Driving position memory
*1............................................................................................. P.108
Tilt and telescopic steeri ng lock release lever
*1............................................. P.113
Adjustment ..................................................................................................................... ........ P.113
Air conditioning system ...................................................................................... P.253
Usage..................................................................................................................................... P.253
Rear window defogger................................................................................................... P.253
Audio system
*2
Trunk opener main switch ..................................................................................... P.98
*1: If equipped
*2: Refer to “NAVIGATION AND MULTIMEDIA SYSTEM OWNER’S MANUAL”.
E
F
G
H
I
J
K
L
M
N
O
Page 116 of 436
1163-4. Adjusting the steering wheel and mirrors
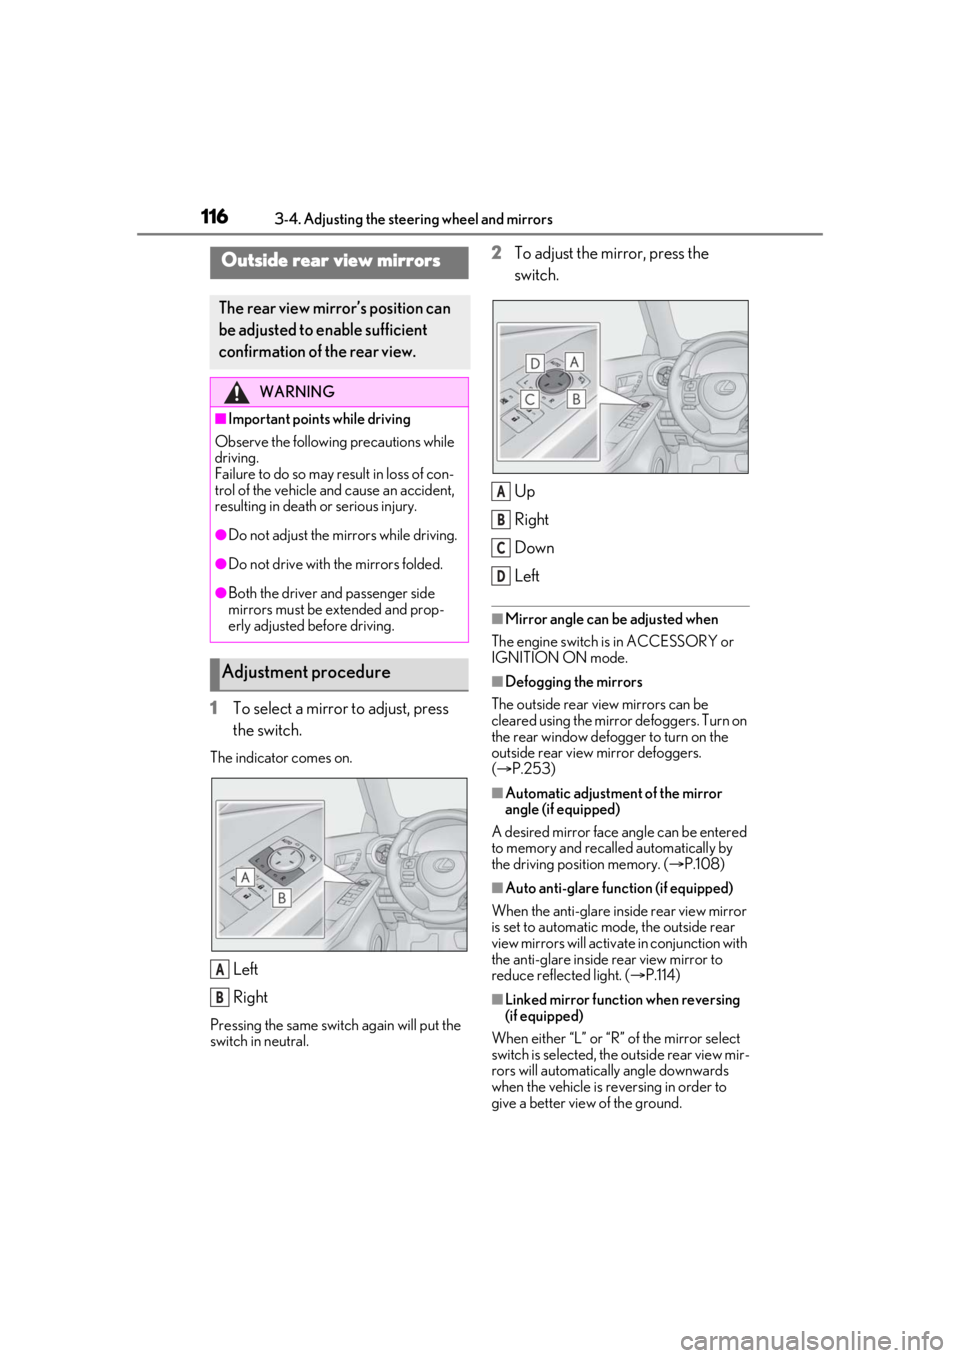
1To select a mirror to adjust, press
the switch.
The indicator comes on.
Left
Right
Pressing the same switch again will put the
switch in neutral.
2To adjust the mirror, press the
switch.
Up
Right
Down
Left
■Mirror angle can be adjusted when
The engine switch is in ACCESSORY or
IGNITION ON mode.
■Defogging the mirrors
The outside rear view mirrors can be
cleared using the mirror defoggers. Turn on
the rear window defogger to turn on the
outside rear view mirror defoggers.
( P.253)
■Automatic adjustment of the mirror
angle (if equipped)
A desired mirror face angle can be entered
to memory and recalled automatically by
the driving position memory. ( P.108)
■Auto anti-glare function (if equipped)
When the anti-glare inside rear view mirror
is set to automatic mode, the outside rear
view mirrors will activate in conjunction with
the anti-glare inside rear view mirror to
reduce reflec ted light. (P.114)
■Linked mirror function when reversing
(if equipped)
When either “L” or “R” of the mirror select
switch is selected, the outside rear view mir-
rors will automatically angle downwards
when the vehicle is re versing in order to
give a better view of the ground.
Outside rear view mirrors
The rear view mirror’s position can
be adjusted to enable sufficient
confirmation of the rear view.
WARNING
■Important points while driving
Observe the following precautions while
driving.
Failure to do so may result in loss of con-
trol of the vehicle and cause an accident,
resulting in death or serious injury.
●Do not adjust the mirrors while driving.
●Do not drive with the mirrors folded.
●Both the driver and passenger side
mirrors must be extended and prop-
erly adjusted before driving.
Adjustment procedure
A
B
A
B
C
D
Page 117 of 436
1173-4. Adjusting the steering wheel and mirrors
3
Before driving
To disable this function, select neither “L”
nor “R”.
To set the mirror angle used when the vehi-
cle is reversing, adjust the mirror angle at a
desired position with the shift position in R.
The adjusted angle will be memorized and
the mirror will automatically tilt to the mem-
orized angle whenever the shift lever is
shifted to R from next time.
The memorized downward tilt position of
the mirror is linked to the normal position
(angle adjusted with th e shift lever in other
than R). Therefore, if the normal position is
changed after adjustment, the tilt position
will also change.
When the normal position is changed, read-
just the angle in reversing.
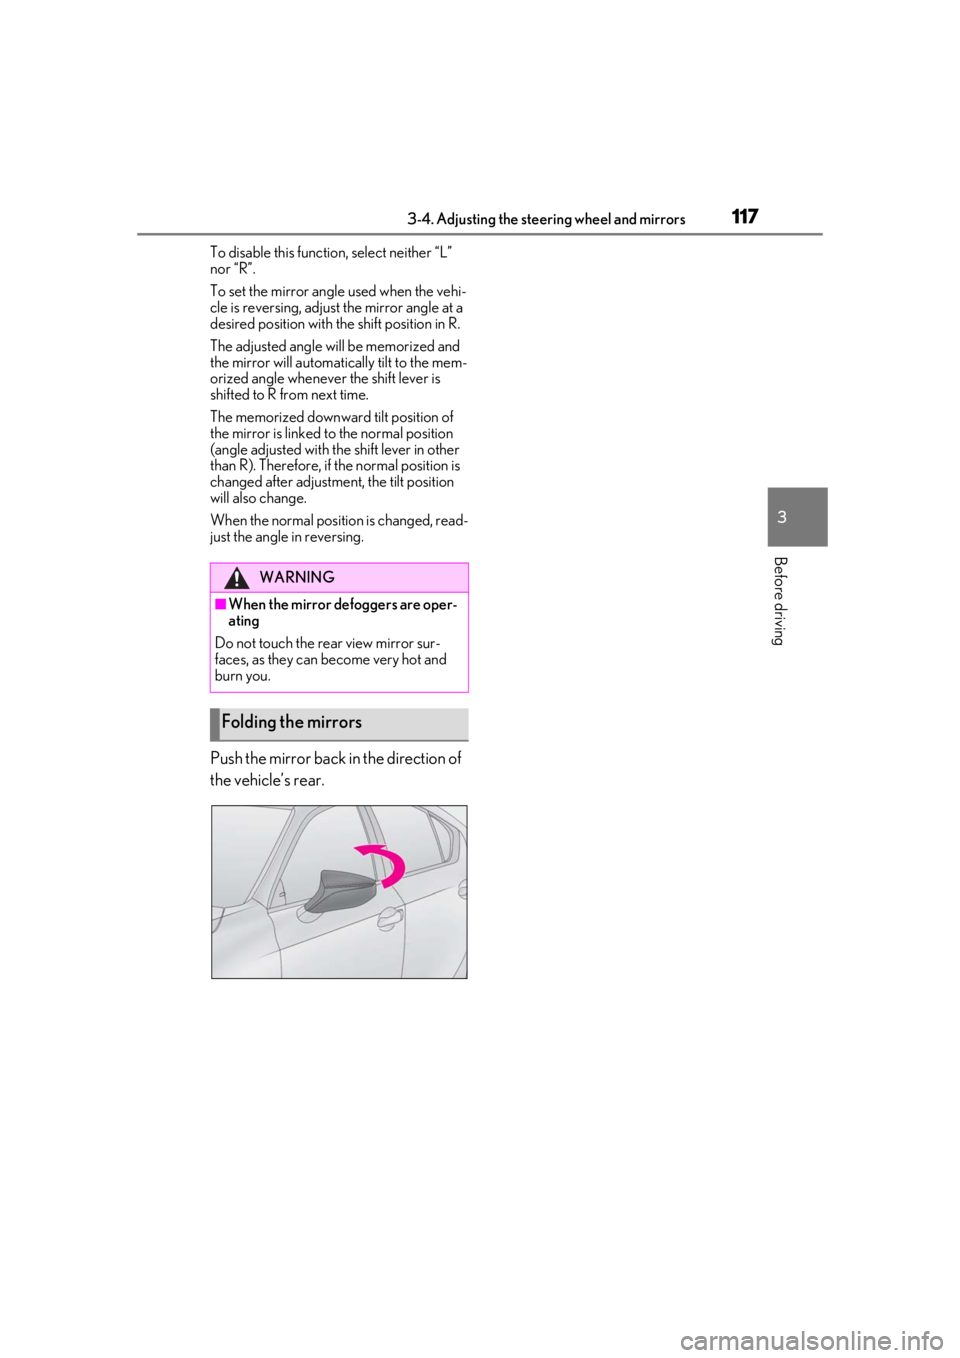
Push the mirror back in the direction of
the vehicle’s rear.
WARNING
■When the mirror defoggers are oper-
ating
Do not touch the rear view mirror sur-
faces, as they can become very hot and
burn you.
Folding the mirrors
Page 124 of 436

1244-1. Before driving
4-1.Before driving
■Starting the engine
P.134
■Driving
1 With the brake pedal depressed,
shift the shift lever to D. ( P.138)
2 If the parking brake is in manual
mode, release the parking brake.
(P.143)
3 Gradually release the brake pedal
and gently depress the accelerator
pedal to accelerate the vehicle.
■Stopping
1 With the shift lever in D, depress the
brake pedal.
2 If necessary, set the parking brake.
If the vehicle is to be stopped for an
extended period of time, shift the shift lever
to P or N. ( P.138)
■Parking the vehicle
1 With the shift lever in D, depress the
brake pedal.
2 Set the parking brake ( P.143),
and shift the shift lever to P
( P.138).
Check that the parking brake indicator is
illuminated.
If parking on a hill, block the wheels as
needed.
3 Press the engine switch to stop the
engine. 4
Lock the door, making sure that you
have the electronic key on your
person.
■Starting off on a steep uphill
1 With the brake pedal depressed,
shift the shift lever to D. ( P.139)
2 Pull the parking brake switch to set
the parking brake manually.
(P.143)
3 Release the brake pedal and gently
depress the accelerator pedal to
accelerate the vehicle.
4 Press the parking brake switch to
release the parking brake manually.
■When starting off on an uphill
The hill-start assist control will activate.
( P.238)
■Driving in the rain
●Drive carefully when it is raining, because
visibility will be reduced, the windows
may become fogged-up, and the road
will be slippery.
●Drive carefully when it starts to rain,
because the road surface will be espe-
cially slippery.
●Refrain from high speeds when driving on
an expressway in the rain, because there
may be a layer of wa ter between the tires
and the road surface, preventing the
steering and brakes from operating prop-
erly.
■Engine speed while driving
In the following conditions, the engine
speed may become high while driving. This
is due to automatic up-shifting control or
down-shifting implementation to meet driv-
ing conditions. It does not indicate sudden
acceleration.
●The vehicle is judged to be driving uphill
or downhill
●When the accelerato r pedal is released
●When the brake pedal is depressed while
Driving the vehicle
The following procedures should be
observed to ensure safe driving:
Driving procedure
Page 152 of 436

1524-3. Operating the lights and wipers
●The high beams may be turned off if a
vehicle ahead that is using fog lights with-
out its headlights turned on is detected.
●House lights, street lights, traffic signals,
and illuminated billboards or signs and
other reflective objects may cause the
high beams to change to the low beams,
or the low beams to remain on.
●The following factors may affect the
amount of time taken for the high beams
to turn on or off:
• The brightness of the headlights, fog lights, and tail lights of vehicles ahead
• The movement and direction of vehicles ahead
• When a vehicle ahead only has opera-
tional lights on one side
• When a vehicle ahead is a two-wheeled vehicle
• The condition of the road (gradient, curve, condition of th e road surface, etc.)
• The number of passengers and amount of
luggage in the vehicle
●The high beams may turn on or off unex-
pectedly.
●Bicycles or similar vehicles may not be
detected.
●In the following situations the system may
not be able to correctly detect the sur-
rounding brightness le vel. This may cause
the low beams to remain on or the high
beams to flash or dazzle pedestrians or
vehicles ahead. In such a case, it is neces-
sary to manually switch between the high
and low beams.
• When driving in inclement weather
(heavy rain, snow, fog, sandstorms, etc.)
• When the windshield is obscured by fog, mist, ice, dirt, etc.
• When the windshield is cracked or dam-
aged
• When the camera sensor is deformed or dirty
• When the temperature of the camera sensor is extremely high
• When the surrounding brightness level is equal to that of head lights, tail lights or
fog lights
• When headlights or tail lights of vehicles ahead are turned off, dirty, changing
color, or not aimed properly
• When the vehicle is hit by water, snow, dust, etc. from a preceding vehicle
• When driving through an area of inter- mittently changing brightness and dark-
ness
• When frequently and repeatedly driving ascending/descending roads, or roads
with rough, bumpy or uneven surfaces
(such as stone-paved roads, gravel roads,
etc.)
• When frequently and repeatedly taking curves or driving on a winding road
• When there is a highly reflective object
ahead of the vehicle, such as a sign or
mirror
• When the back of a preceding vehicle is
highly reflective, such as a container on a
truck
• When the vehicle’s headlights are dam-
aged or dirty, or are not aimed properly
• When the vehicle is listing or titling due to a flat tire, a trailer being towed, etc.
• When the headlights are changed between the high beams and low beams
repeatedly in an abnormal manner
• When the driver believes that the high beams may be flashing or dazzling
pedestrians or other drivers
■Temporarily lowering sensor sensitivity
The sensitivity of the sensor can be tempo-
rarily lowered.
1 Turn the engine switch off while the fol-
lowing conditions are met.
●The headlight switch is in or .
●The headlight switch lever is in the origi-
nal position.
●Automatic High Beam switch is on.
2 Turn the engine switch to IGNITION
ON mode.
3 Within 60 seconds after step 2 , repeat
pushing the headlight switch lever to the
high beam position then pulling it to the
original position quickly 10 times, then
leave the lever in the original position.
4 If the sensitivity is changed, the Auto-
matic High Beam indicator is turn on
and off 3 times.
Page 166 of 436
1664-5. Using the driving support systems
WARNING
●If the part of the windshield in front of
the front camera is fogged up or cov-
ered with condensation or ice, use the
windshield defogger to remove the
fog, condensation or ice. (P.255)
●If water droplets cannot be properly
removed from the area of the wind-
shield in front of the front camera by
the windshield wipers, replace the
wiper insert or wiper blade.
●Do not attach window tint to the wind-
shield.
●Replace the windshield if it is damaged
or cracked.
After replacing the windshield, the
front camera must be recalibrated.
Contact your Lexus dealer for details.
●Do not allow liquids to contact the
front camera.
●Do not allow bright lights to shine into
the front camera.
●Do not dirty or damage the front cam-
era.
When cleaning the inside of the wind-
shield, do not allow glass cleaner to
contact the lens of the front camera.
Also, do not touch the lens.
If the lens is dirty or damaged, contact
your Lexus dealer.
●Do not subject the front camera to a
strong impact.
●Do not change the installation position
or direction of the front camera or
remove it.
●Do not disassemble the front camera.
●Do not modify any components of the
vehicle around the front camera
(inside rear view mirror, etc.) or ceiling.
●Do not attach any accessories to the
hood, front grille or front bumper that
may obstruct the front camera. Con-
tact your Lexus dealer for details.
●If a surfboard or other long object is to
be mounted on the roof, make sure
that it will not obstruct the front cam-
era.
●Do not modify the headlights or other
lights.