Page 352 of 436
3527-2. Steps to take in an emergency
use the wrench or other tools.)
1Chock the tires. 2
Using a wheel bolt wrench, slightly
loosen the wheel bolts (approxi-
mately one turn).
3 Turn the tire jack portion by
hand until the notch of the jack is in
contact with the jack point.
The jack point guides are located under
the rocker panel. They indicate the jack
point positions.
4 Raise the vehicle until the tire is
slightly raised off the ground.
5 Remove the uppermost wheel bolt
and install the guide pin by
hand.
WARNING
■When storing the spare tire
Be careful not to catch fingers or other
body parts between the spare tire and
the body of the vehicle.
Replacing a flat tire
Flat tireWheel chock posi- tions
Front left-hand sideBehind the rear
right-hand side tire
Front right-hand
sideBehind the rear
left-hand side tire
Rear left-hand sideIn front of the front
right-hand side tire
Rear right-hand sideIn front of the front
left-hand side tire
A
A
Page 353 of 436

3537-2. Steps to take in an emergency
7
When trouble arises
Turn the guide pin clockwise to tighten it
until it stops.
6Remove all the wheel bolts and the
tire.
When resting the tire on the ground, place
the tire so that the wh eel design faces up to
avoid scratching the wheel surface.
1 Remove any dirt or foreign matter
from the wheel contact surfaces
and wheel bolts.
If foreign matter is on the wheel contact
surface, the wheel bolt s may loosen while the vehicle is in motion, causing the tire to
come off.
2
Align a wheel bolt hole on the spare
tire with the guide pin, and set the
spare tire on the guide pin.
Securely set the spare tire so that its wheel
is touching the contact surface.
3Loosely tighten each wheel bolt by
hand or using a wheel bolt socket
.
Push the spare tire to prevent it from falling.
Do not use the wheel bolt socket for any-
thing other than loosely tightening the
wheel bolts by hand.
WARNING
■Replacing a flat tire
Do not touch the disc wheels or the area
around the brakes immediately after the
vehicle has been driven. After the vehicle
has been driven the disc wheels and the
area around the brakes will be extremely
hot. Touching these areas with hands,
feet or other body pa rts while changing a
tire, etc. may result in burns.
Installing the spare tire
A
Page 354 of 436

3547-2. Steps to take in an emergency
4Remove the guide pin and loosely
tighten the wheel bolt as in step 3.
5 Lower the vehicle.
6 Firmly tighten each wheel bolt in
the order shown in the illustration
two or three times.
Tightening torque:
103 ft•lbf (140 N•m, 14.3 kgf•m)
7Stow the flat tire, tire jack and all
tools.
■The compact spare tire
●The compact spare tire is identified by the
label “TEMPORARY USE ONLY” on the tire sidewall.
●Use the compact spar
e tire temporarily,
and only in an emergency.
●Make sure to check the tire inflation pres-
sure of the compact spare tire. ( P.379)
■When using the compact spare tire
As the compact spare tire is not equipped
with a tire pressure warning valve and trans-
mitter, low inflation pressure of the spare
tire will not be indicated by the tire pressure
warning system. Also, if you replace the
compact spare tire afte r the tire pressure
warning light comes on, the light remains
on.
■When the compact spare tire is
equipped
The vehicle becomes lower when driving
with the compact spare tire compared to
when driving with standard tires.
■If you have a flat rear tire on a road cov-
ered with snow or ice (vehicles with
front and rear tires of the same size)
Install the compact spare tire on one of the
front wheels of the vehicle. Perform the fol-
lowing steps and fit tire chains to the rear
tires:
1 Replace a front tire with the compact
spare tire.
2 Replace the flat rear tire with the tire
removed from the front of the vehicle.
3 Fit tire chains to the rear tires.
WARNING
■Installing the compact spare tire
Failure to follow these precautions could
cause the wheel bolts to loosen and the
tire to fall off, result ing in death or serious
injury.
Page 379 of 436

3798-1. Specifications
8
Vehicle specifications
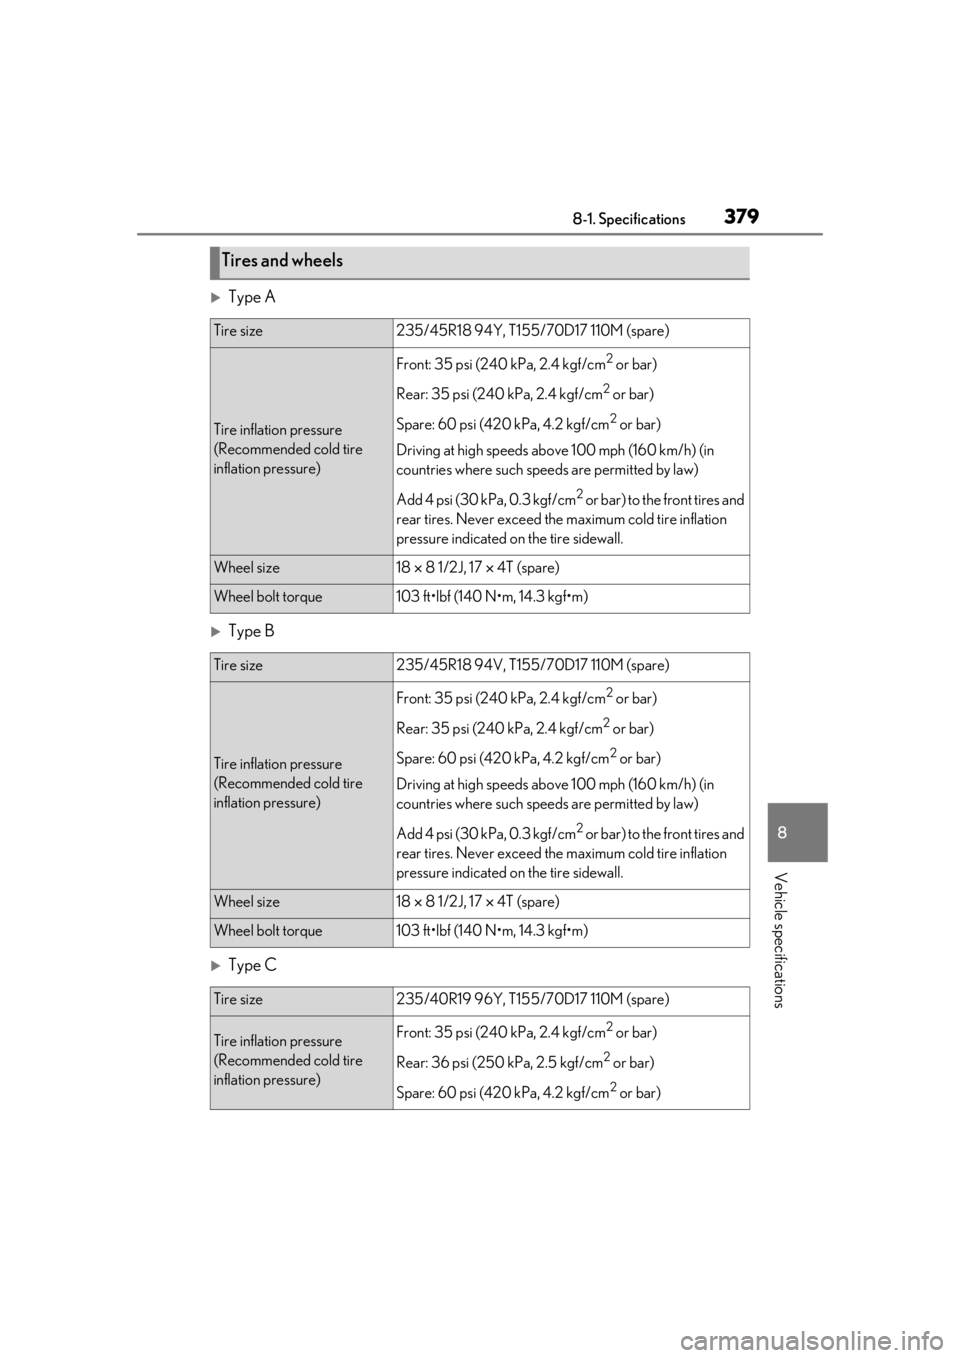
Type A
Type B
Type C
Tires and wheels
Tire size235/45R18 94Y, T155/70D17 110M (spare)
Tire inflation pressure
(Recommended cold tire
inflation pressure)
Front: 35 psi (240 kPa, 2.4 kgf/cm2 or bar)
Rear: 35 psi (240 kPa, 2.4 kgf/cm
2 or bar)
Spare: 60 psi (420 kPa, 4.2 kgf/cm
2 or bar)
Driving at high speeds above 100 mph (160 km/h) (in
countries where such speeds are permitted by law)
Add 4 psi (30 kPa, 0.3 kgf/cm
2 or bar) to the front tires and
rear tires. Never exceed the maximum cold tire inflation
pressure indicated on the tire sidewall.
Wheel size18 8 1/2J, 17 4T (spare)
Wheel bolt torque103 ft•lbf (140 N•m, 14.3 kgf•m)
Tire size235/45R18 94V, T155/70D17 110M (spare)
Tire inflation pressure
(Recommended cold tire
inflation pressure)
Front: 35 psi (240 kPa, 2.4 kgf/cm2 or bar)
Rear: 35 psi (240 kPa, 2.4 kgf/cm
2 or bar)
Spare: 60 psi (420 kPa, 4.2 kgf/cm
2 or bar)
Driving at high speeds above 100 mph (160 km/h) (in
countries where such speeds are permitted by law)
Add 4 psi (30 kPa, 0.3 kgf/cm
2 or bar) to the front tires and
rear tires. Never exceed the maximum cold tire inflation
pressure indicated on the tire sidewall.
Wheel size18 8 1/2J, 17 4T (spare)
Wheel bolt torque103 ft•lbf (140 N•m, 14.3 kgf•m)
Tire size235/40R19 96Y, T155/70D17 110M (spare)
Tire inflation pressure
(Recommended cold tire
inflation pressure)Front: 35 psi (240 kPa, 2.4 kgf/cm2 or bar)
Rear: 36 psi (250 kPa, 2.5 kgf/cm
2 or bar)
Spare: 60 psi (420 kPa, 4.2 kgf/cm
2 or bar)
Page 380 of 436

3808-1. Specifications
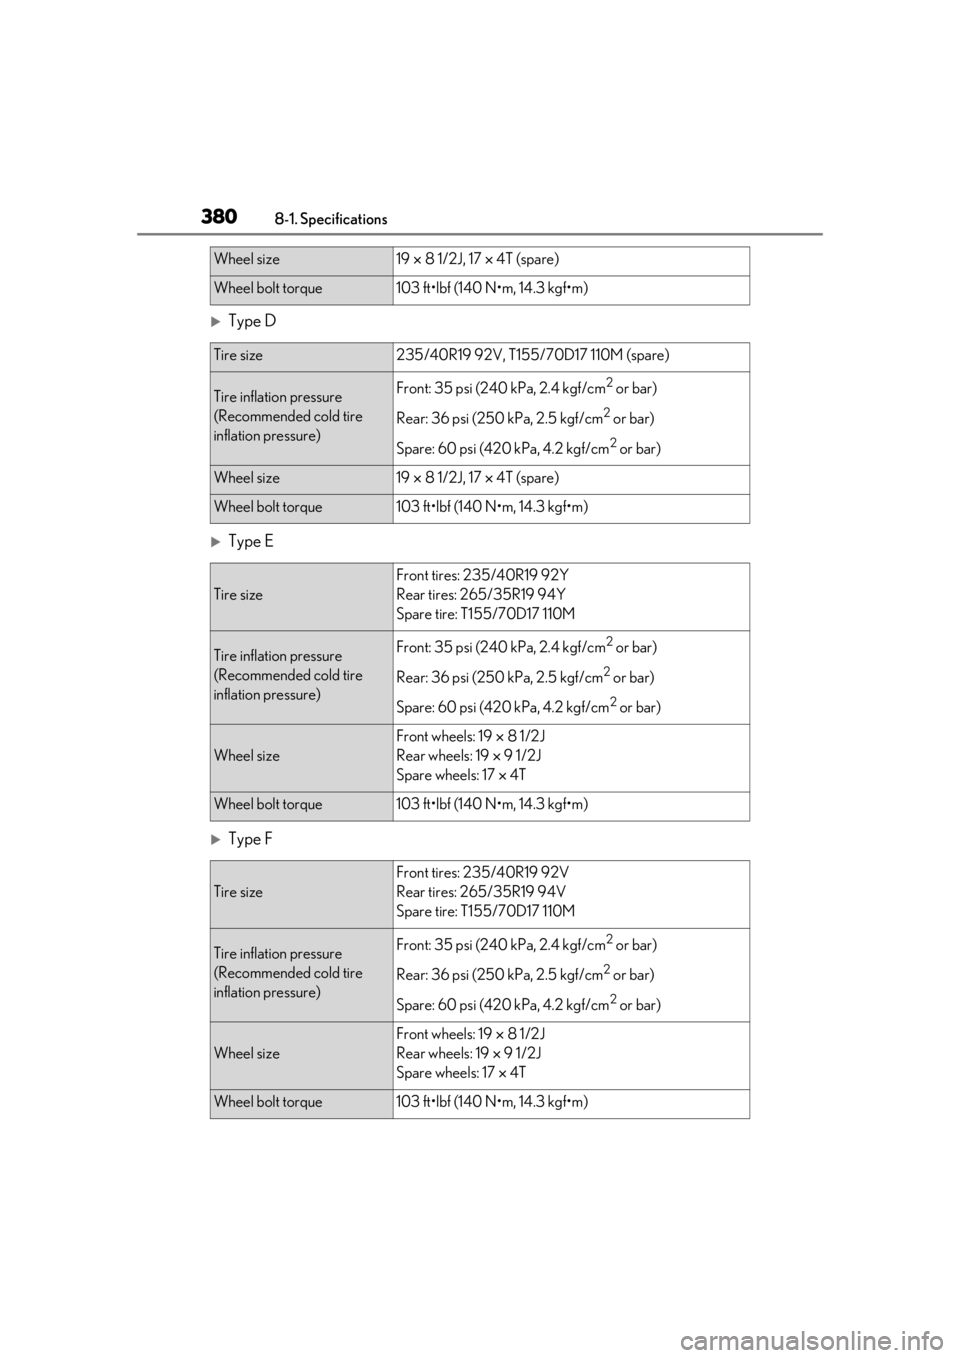
Type D
Type E
Type F
Wheel size19 8 1/2J, 17 4T (spare)
Wheel bolt torque103 ft•lbf (140 N•m, 14.3 kgf•m)
Tire size235/40R19 92V, T155/70D17 110M (spare)
Tire inflation pressure
(Recommended cold tire
inflation pressure)Front: 35 psi (240 kPa, 2.4 kgf/cm2 or bar)
Rear: 36 psi (250 kPa, 2.5 kgf/cm
2 or bar)
Spare: 60 psi (420 kPa, 4.2 kgf/cm
2 or bar)
Wheel size19 8 1/2J, 17 4T (spare)
Wheel bolt torque103 ft•lbf (140 N•m, 14.3 kgf•m)
Tire size
Front tires: 235/40R19 92Y
Rear tires: 265/35R19 94Y
Spare tire: T155/70D17 110M
Tire inflation pressure
(Recommended cold tire
inflation pressure)Front: 35 psi (240 kPa, 2.4 kgf/cm2 or bar)
Rear: 36 psi (250 kPa, 2.5 kgf/cm
2 or bar)
Spare: 60 psi (420 kPa, 4.2 kgf/cm
2 or bar)
Wheel size
Front wheels: 19 8 1/2J
Rear wheels: 19 9 1/2J
Spare wheels: 17 4T
Wheel bolt torque103 ft•lbf (140 N•m, 14.3 kgf•m)
Tire size
Front tires: 235/40R19 92V
Rear tires: 265/35R19 94V
Spare tire: T155/70D17 110M
Tire inflation pressure
(Recommended cold tire
inflation pressure)Front: 35 psi (240 kPa, 2.4 kgf/cm2 or bar)
Rear: 36 psi (250 kPa, 2.5 kgf/cm
2 or bar)
Spare: 60 psi (420 kPa, 4.2 kgf/cm
2 or bar)
Wheel size
Front wheels: 19 8 1/2J
Rear wheels: 19 9 1/2J
Spare wheels: 17 4T
Wheel bolt torque103 ft•lbf (140 N•m, 14.3 kgf•m)
Page 384 of 436

3848-1. Specifications
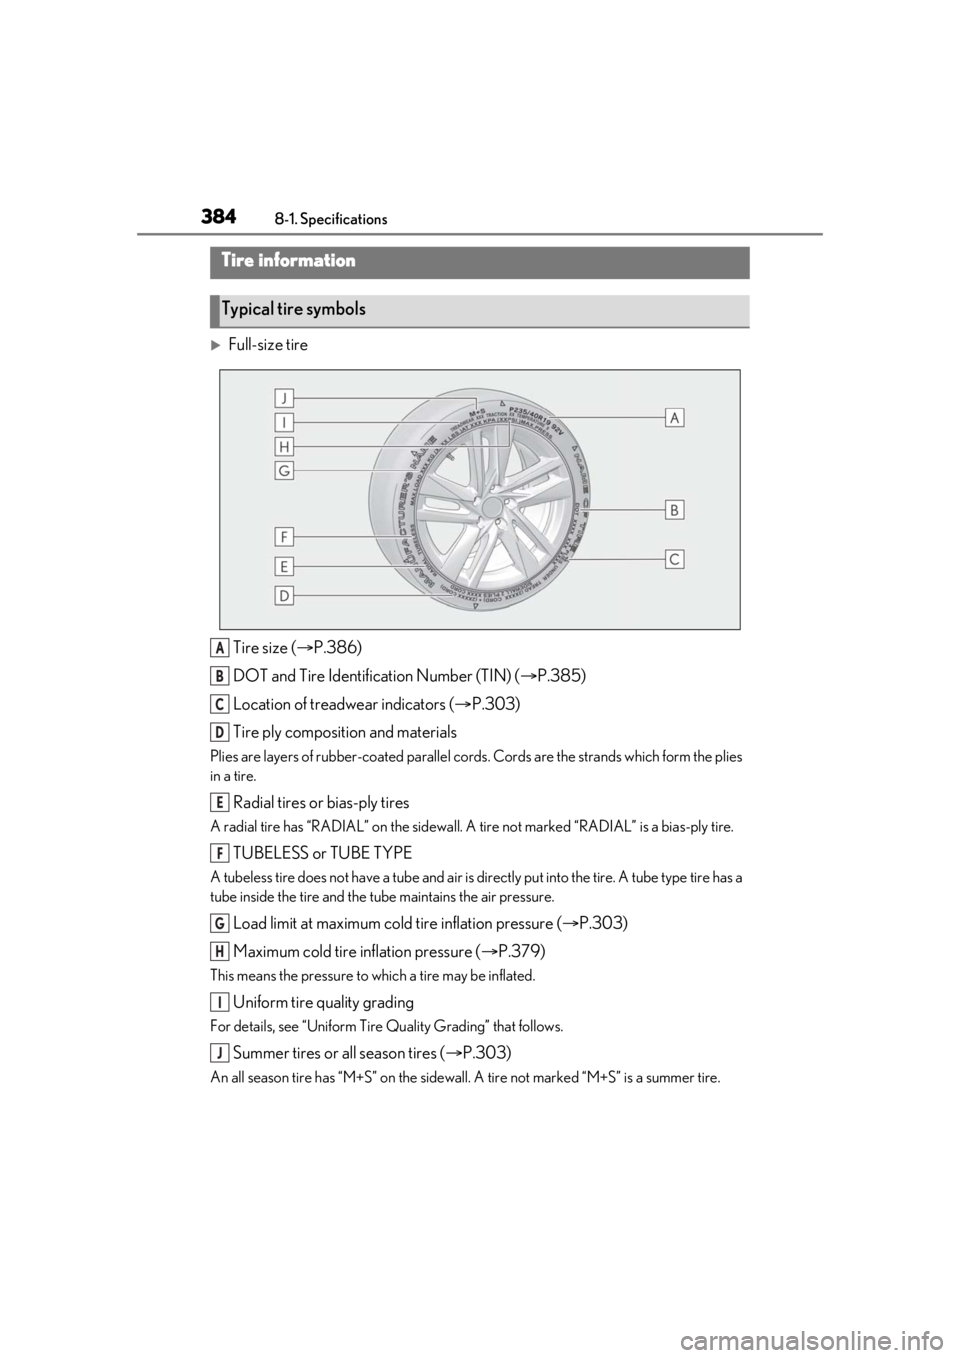
Full-size tireTire size ( P.386)
DOT and Tire Identification Number (TIN) ( P.385)
Location of treadwear indicators ( P.303)
Tire ply composition and materials
Plies are layers of rubber-coated parallel cords. Cords are the strands which form the plies
in a tire.
Radial tires or bias-ply tires
A radial tire has “RADIAL” on the sidewall. A tire not marked “RADIAL” is a bias-ply tire.
TUBELESS or TUBE TYPE
A tubeless tire does not have a tube and air is directly put into the tire. A tube type tire has a
tube inside the tire and the tube maintains the air pressure.
Load limit at maximum cold tire inflation pressure ( P.303)
Maximum cold tire inflation pressure ( P.379)
This means the pressure to which a tire may be inflated.
Uniform tire quality grading
For details, see “Uniform Tire Quality Grading” that follows.
Summer tires or all season tires ( P.303)
An all season tire has “M+S” on the sidewall. A tire not marked “M+S” is a summer tire.
Tire information
Typical tire symbols
A
B
C
D
E
F
G
H
I
J
Page 385 of 436
3858-1. Specifications
8
Vehicle specifications
Compact spare tireLocation of treadwear indicators ( P.303)
Load limit at maximum cold tire inflation pressure ( P.303)
Maximum cold tire inflation pressure ( P.379)
This means the pressure to which a tire may be inflated.
DOT and Tire Identification Number (TIN) ( P.385)
Tire ply composition and materials
Plies are layers of rubber-coated parallel cords. Cords are the strands which form the plies
in a tire.
“TEMPORARY USE ONLY”
A compact spare tire is identified by the phrase “TEMPORARY USE ONLY” molded on its
sidewall. This tire is designed for temporary emergency use only.
Tire size ( P.386)
TUBELESS or TUBE TYPE
A tubeless tire does not have a tube and air is directly put into the tire. A tube type tire has a
tube inside the tire and the tube maintains the air pressure.
Type A
A
B
C
D
E
F
G
H
Typical DOT and Tire Identifica-
tion Number (TIN)
Page 388 of 436

3888-1. Specifications
cornering (turning) traction.
■Temperature A, B, C
The temperature grades are A (the
highest), B, and C, representing the
tire’s resistance to the generation of
heat and its ability to dissipate heat
when tested under controlled condi-
tions on a specified indoor laboratory
test wheel.
Sustained high temperature can cause the
material of the tire to degenerate and
reduce tire life, and excessive temperature
can lead to sudden tire failure. Grade C corresponds to
a level of perfor-
mance which all passenger car tires must
meet under the Fede ral Motor Vehicle
Safety Standard No. 109.
Grades B and A represent higher levels of
performance on the laboratory test wheel
than the minimum required by law.
Warning: The temperature grades of a tire
assume that it is properly inflated and not
overloaded.
Excessive speed, unde rinflation, or exces-
sive loading, either separately or in combi-
nation, can cause heat buildup and
possible tire failure.
Glossary of tire terminology
Tire related termMeaning
Cold tire inflation pressure
Tire pressure when the vehicle has been parked for
three hours or more, or has not been driven more
than 1 mile or 1.5 km under that condition
Maximum inflation pressureThe maximum cold inflated pressure to which a tire
may be inflated, shown on the sidewall of the tire
Recommended inflation pressureCold tire inflation pressure recommended by a
manufacturer
Accessory weight
The combined weight (in excess of those standard
items which may be replaced) of automatic trans-
mission, power steering, power brakes, power win-
dows, power seats, radio and heater, to the extent
that these items are available as factory-installed
equipment (whether installed or not)
Curb weight
The weight of a motor vehicle with standard equip-
ment, including the maximum capacity of fuel, oil
and coolant, and if so equipped, air conditioning
and additional weight optional engine