2021 Lexus IS350 warning lights
[x] Cancel search: warning lightsPage 261 of 436
2615-2. Using the air conditioning system and defogger
5
Interior features
*:If equipped
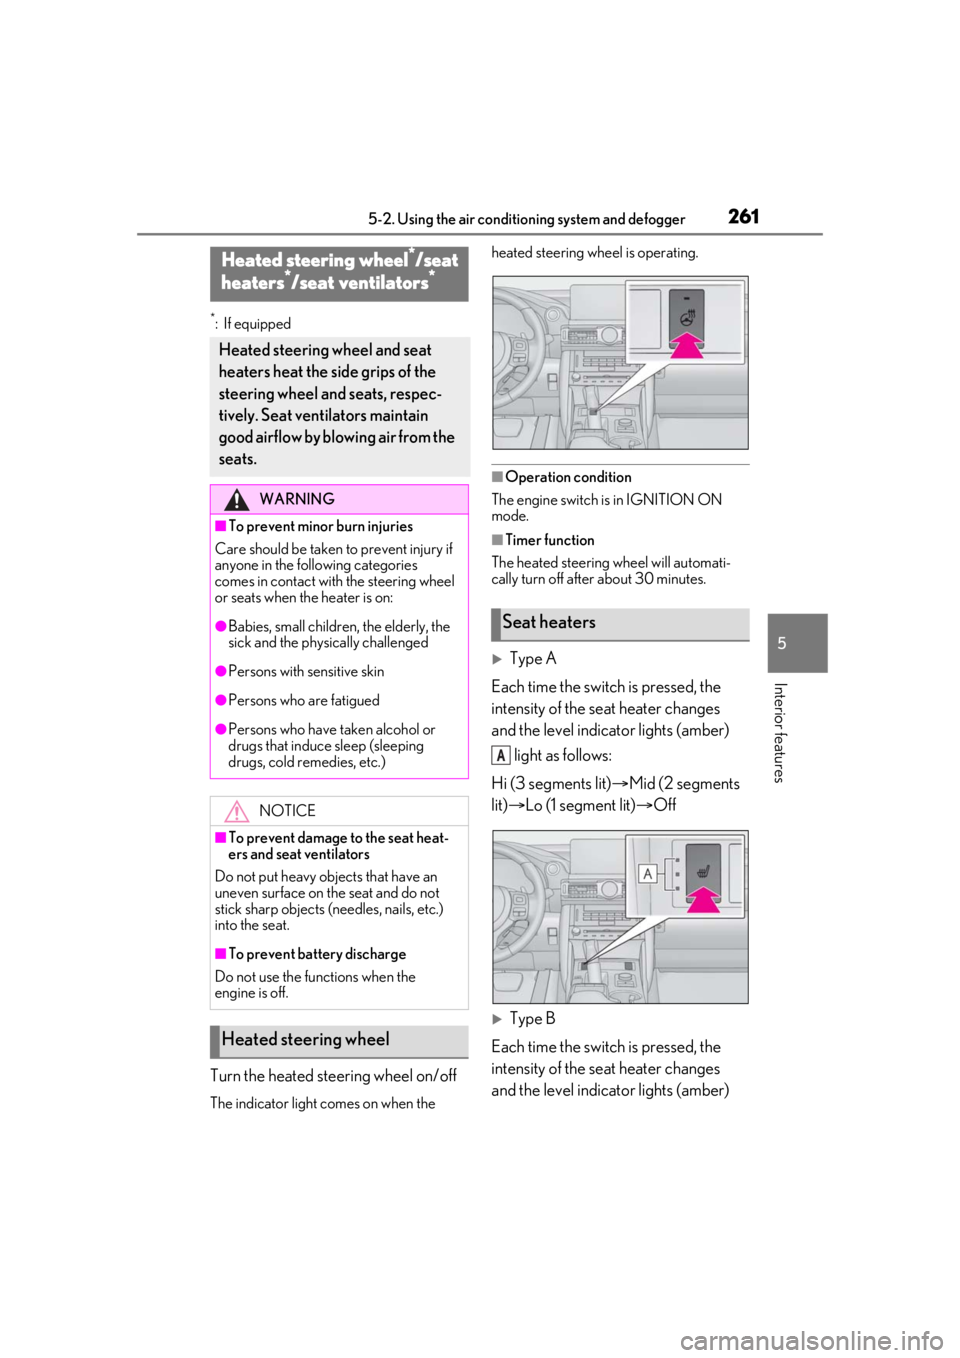
Turn the heated steering wheel on/off
The indicator light comes on when the heated steering wheel is operating.
■Operation condition
The engine switch is in IGNITION ON
mode.
■Timer function
The heated steering wheel will automati-
cally turn off after about 30 minutes.
Type A
Each time the switch is pressed, the
intensity of the seat heater changes
and the level indicator lights (amber) light as follows:
Hi (3 segments lit) Mid (2 segments
lit) Lo (1 segment lit) Off
Type B
Each time the switch is pressed, the
intensity of the seat heater changes
and the level indicator lights (amber)
Heated steering wheel*/seat
heaters*/seat ventilators*
Heated steering wheel and seat
heaters heat the side grips of the
steering wheel and seats, respec-
tively. Seat ventilators maintain
good airflow by blowing air from the
seats.
WARNING
■To prevent minor burn injuries
Care should be taken to prevent injury if
anyone in the following categories
comes in contact with the steering wheel
or seats when the heater is on:
●Babies, small children, the elderly, the
sick and the phys ically challenged
●Persons with sensitive skin
●Persons who are fatigued
●Persons who have taken alcohol or
drugs that induce sleep (sleeping
drugs, cold remedies, etc.)
NOTICE
■To prevent damage to the seat heat-
ers and seat ventilators
Do not put heavy objects that have an
uneven surface on the seat and do not
stick sharp objects (needles, nails, etc.)
into the seat.
■To prevent battery discharge
Do not use the functions when the
engine is off.
Heated steering wheel
Seat heaters
A
Page 262 of 436
2625-2. Using the air conditioning system and defogger
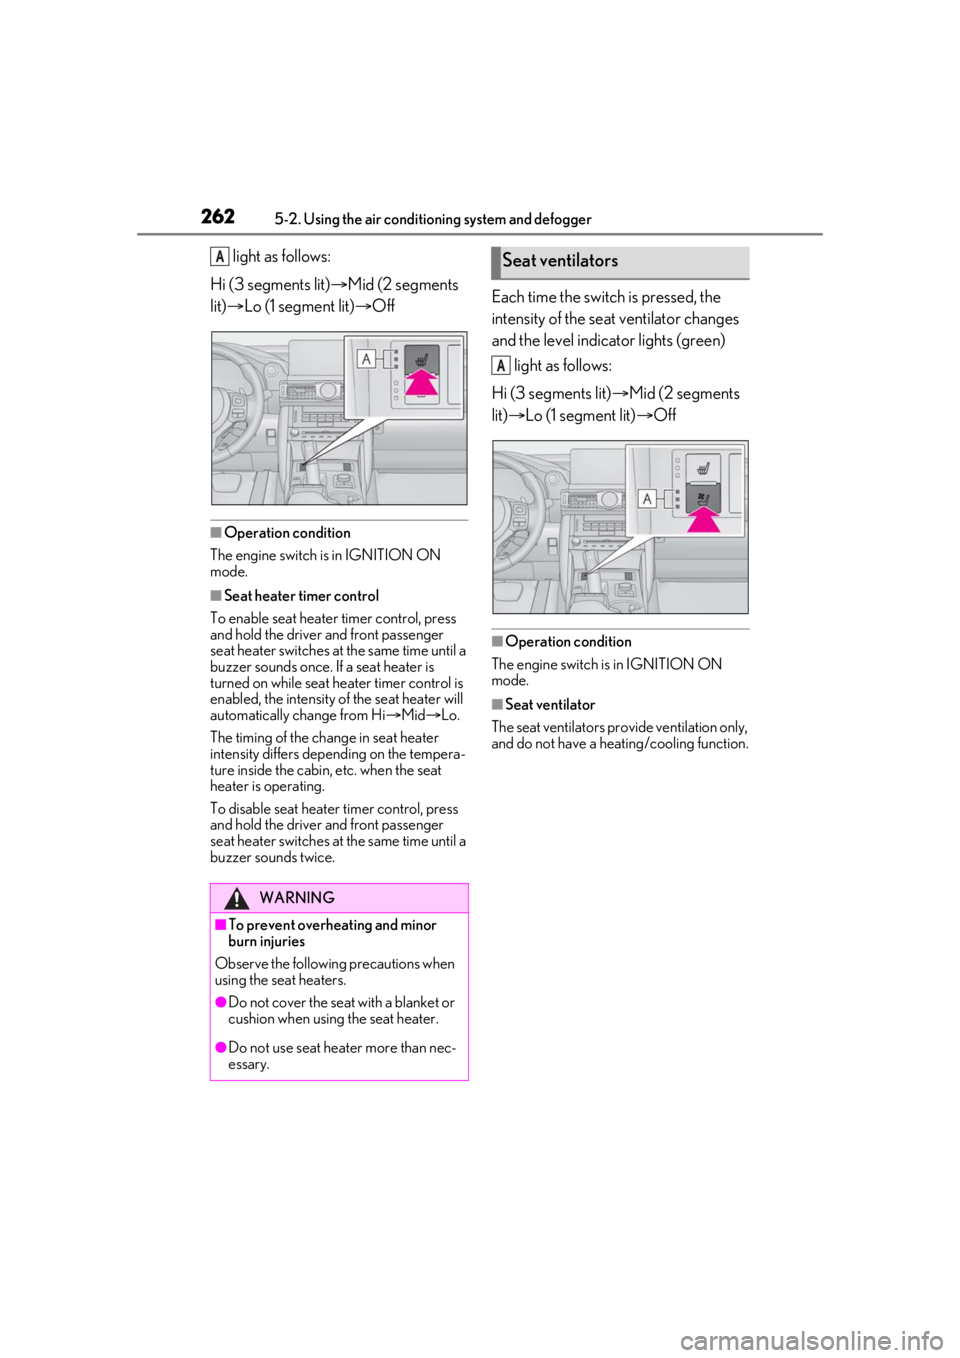
light as follows:
Hi (3 segments lit) Mid (2 segments
lit) Lo (1 segment lit) Off
■Operation condition
The engine switch is in IGNITION ON
mode.
■Seat heater timer control
To enable seat heater timer control, press
and hold the driver and front passenger
seat heater switches at the same time until a
buzzer sounds once. If a seat heater is
turned on while seat he ater timer control is
enabled, the intensity of the seat heater will
automatically change from Hi Mid Lo.
The timing of the change in seat heater
intensity differs depending on the tempera-
ture inside the cabin, etc. when the seat
heater is operating.
To disable seat heater timer control, press
and hold the driver and front passenger
seat heater switches at the same time until a
buzzer sounds twice.
Each time the switch is pressed, the
intensity of the seat ventilator changes
and the level indicator lights (green) light as follows:
Hi (3 segments lit) Mid (2 segments
lit) Lo (1 segment lit) Off
■Operation condition
The engine switch is in IGNITION ON
mode.
■Seat ventilator
The seat ventilators pr ovide ventilation only,
and do not have a heating/cooling function.
WARNING
■To prevent overheating and minor
burn injuries
Observe the following precautions when
using the seat heaters.
●Do not cover the seat with a blanket or
cushion when using the seat heater.
●Do not use seat heater more than nec-
essary.
ASeat ventilators
A
Page 272 of 436
2725-5. Using the other interior features
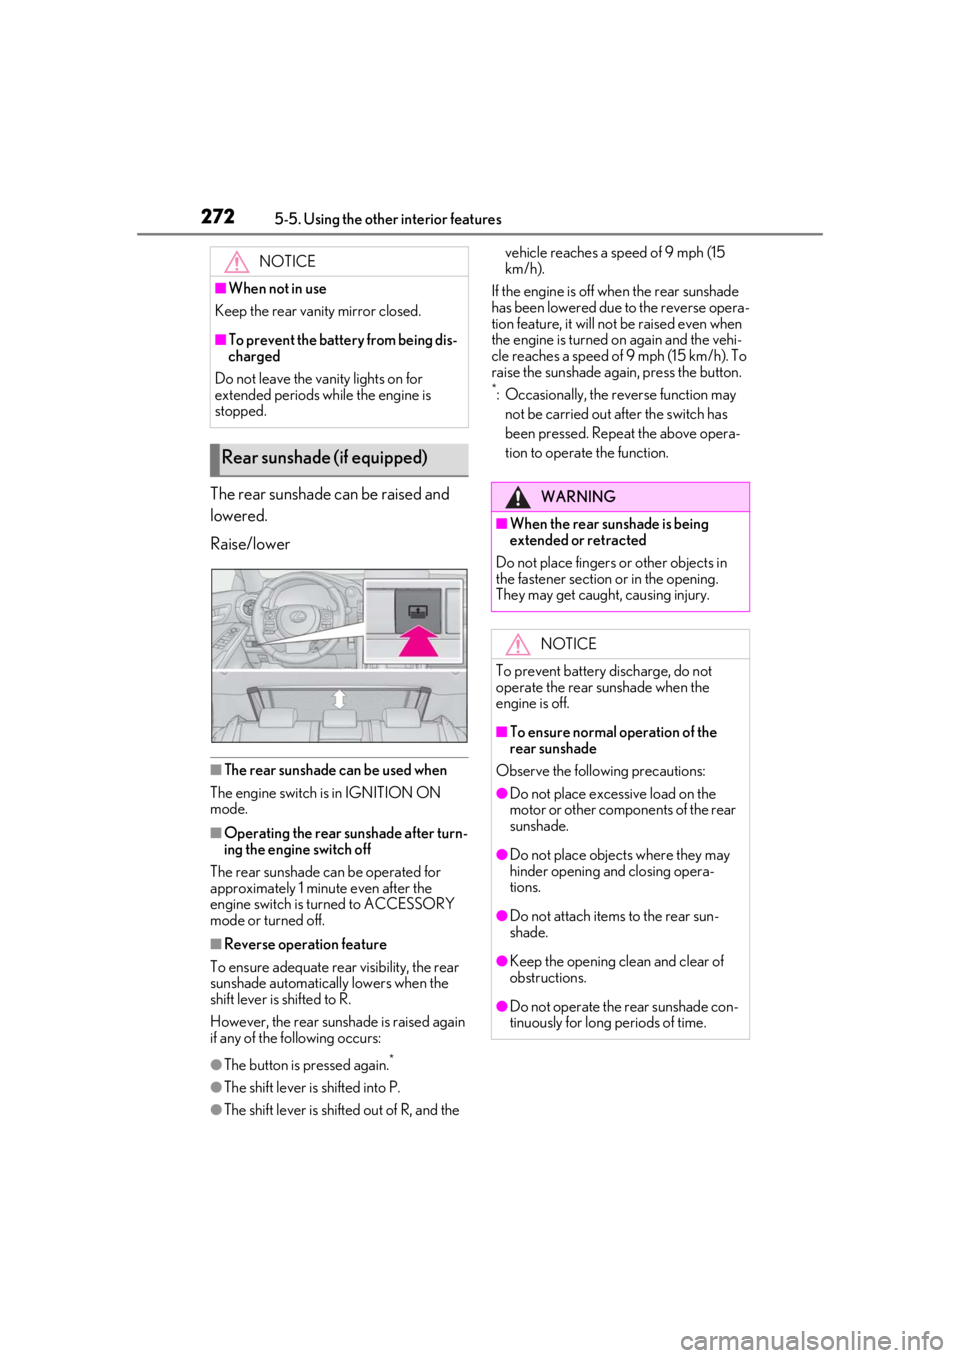
The rear sunshade can be raised and
lowered.
Raise/lower
■The rear sunshade can be used when
The engine switch is in IGNITION ON
mode.
■Operating the rear sunshade after turn-
ing the engine switch off
The rear sunshade can be operated for
approximately 1 minute even after the
engine switch is turned to ACCESSORY
mode or turned off.
■Reverse operation feature
To ensure adequate rear visibility, the rear
sunshade automatically lowers when the
shift lever is shifted to R.
However, the rear suns hade is raised again
if any of the following occurs:
●The button is pressed again.*
●The shift lever is shifted into P.
●The shift lever is shifted out of R, and the vehicle reaches a speed of 9 mph (15
km/h).
If the engine is off when the rear sunshade
has been lowered due to the reverse opera-
tion feature, it will not be raised even when
the engine is turned on again and the vehi-
cle reaches a speed of 9 mph (15 km/h). To
raise the sunshade again, press the button.
*: Occasionally, the reverse function may not be carried out after the switch has
been pressed. Repeat the above opera-
tion to operate the function.
NOTICE
■When not in use
Keep the rear vani ty mirror closed.
■To prevent the battery from being dis-
charged
Do not leave the vanity lights on for
extended periods while the engine is
stopped.
Rear sunshade (if equipped)
WARNING
■When the rear sunshade is being
extended or retracted
Do not place fingers or other objects in
the fastener section or in the opening.
They may get caught, causing injury.
NOTICE
To prevent battery discharge, do not
operate the rear sunshade when the
engine is off.
■To ensure normal operation of the
rear sunshade
Observe the following precautions:
●Do not place excessive load on the
motor or other components of the rear
sunshade.
●Do not place objects where they may
hinder opening and closing opera-
tions.
●Do not attach items to the rear sun-
shade.
●Keep the opening clean and clear of
obstructions.
●Do not operate the rear sunshade con-
tinuously for long periods of time.
Page 282 of 436
2826-1. Maintenance and care
WARNING
■Precautions regarding the exhaust
pipes and rear bumper diffusers
Exhaust gases cause the exhaust pipes
and rear bumper diffusers to become
quite hot.
When washing the vehicle, be careful not
to touch the pipes and diffusers until they
have cooled sufficiently, as touching hot
exhaust pipes and rear bumper diffusers
can cause burns.
■Precaution regarding the rear
bumper
If the paint of the rear bumper is chipped
or scratched, the fo llowing systems may
not function correctly. If this occurs, con-
sult your Lexus dealer.
●Lexus Safety System + 2.5
●BSM (if equipped)
●RCTA (if equipped)
●PKSB (if equipped)
NOTICE
■To prevent paint deterioration and
corrosion on the body and compo-
nents (aluminum wheels, etc.)
●Wash the vehicle immediately in the
following cases:
• After driving near the sea coast
• After driving on salted roads
• If coal tar or tree sap is present on the paint surface
• If dead insects, in sect droppings or
bird droppings are present on the
paint surface
• After driving in an area contaminated with soot, oily smoke, mine dust, iron
powder or chemical substances
• If the vehicle becomes heavily soiled with dust or mud
• If liquids such as benzene and gasoline are spilled on the paint surface
●If the paint is chipped or scratched,
have it repaired immediately.
●To prevent the wheels from corroding,
remove any dirt and store in a place
with low humidity when storing the
wheels.
■Cleaning the exterior lights
●Wash carefully. Do not use organic
substances or scrub with a hard brush.
This may damage the surfaces of the
lights.
●Do not apply wax to the surfaces of the
lights.
Wax may cause damage to the lenses.
■When using an automatic car wash
(vehicles with rain-sensing windshield
wipers)
Set the wiper switch to the off position.
(
P.154)
If the wiper switch is in “AUTO”, the wip-
ers may operate and the wiper blades
may be damaged.
■When using a high pressure car wash
●When washing the vehicle, do not let
water of the high pressure washer hit
directly or the vicinity of the camera.
Due to the shock from the high pres-
sure water, it is possible the device may
not operate as normal.
●Do not spray water directly on the
radar which is equipped behind the
emblem. Otherwise it may cause the
device to be damaged.
●Do not bring the nozzle tip close to
boots (rubber or resin manufactured
cover), connectors or the following
parts. The parts may be damaged if
they come into contact with high-pres-
sure water.
• Traction related parts
•Steering parts
• Suspension parts
Page 319 of 436

3196-3. Do-it-yourself maintenance
6
Maintenance and care
Blown fuse
Type BNormal fuse
Blown fuse
Type CNormal fuse
Blown fuse
Type DNormal fuse
Blown fuse
■After a fuse is replaced
●If the lights do not turn on even after the
fuse has been replaced, a bulb may need
replacement.
●If the replaced fuse blows again, have the
vehicle inspected by your Lexus dealer.
■If there is an overload in a circuit
The fuses are designed to blow, protecting
the wiring harness from damage.
■When replacing light bulbs
Lexus recommends that you use genuine
Lexus products designed for this vehicle.
Because certain bulbs are connected to cir-
cuits designed to prevent overload,
non-genuine parts or parts not designed for
this vehicle may be unusable.
B
A
B
A
B
A
B
WARNING
■To prevent system breakdowns and
vehicle fire
Observe the following precautions.
Failure to do so may cause damage to
the vehicle, and possibly a fire or injury.
●Never use a fuse of a higher amperage
rating than that indicated, or use any
other object in place of a fuse.
●Always use a genuine Lexus fuse or
equivalent.
Never replace a fuse with a wire, even
as a temporary fix.
●Do not modify the fuses or fuse boxes.
NOTICE
■Before replacing fuses
Have the cause of electrical overload
determined and repaired by your Lexus
dealer as soon as possible.
Page 325 of 436
3256-3. Do-it-yourself maintenance
6
Maintenance and care
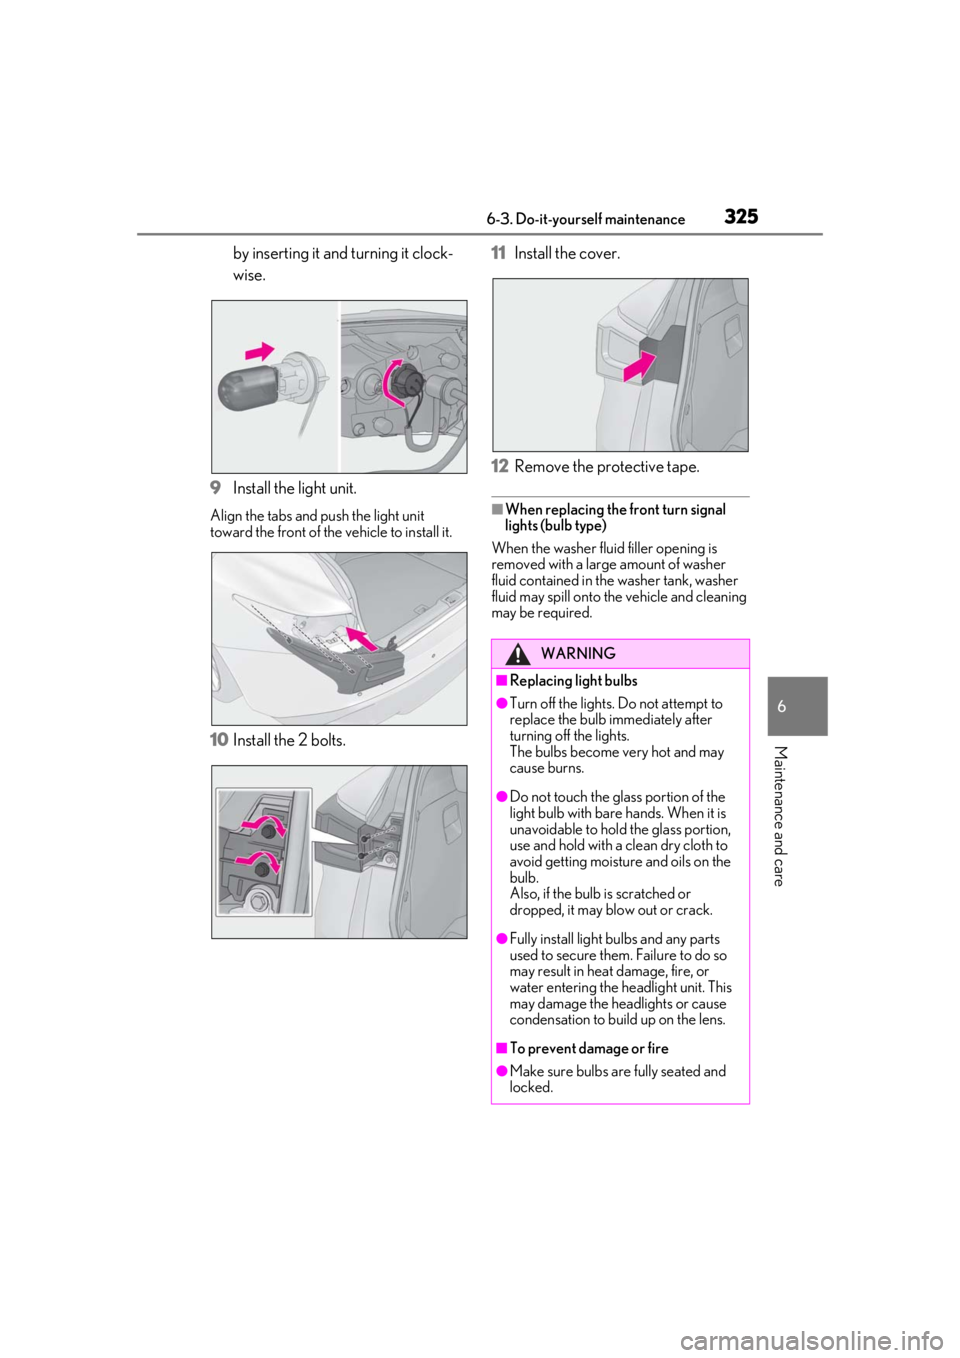
by inserting it and turning it clock-
wise.
9 Install the light unit.
Align the tabs and push the light unit
toward the front of the vehicle to install it.
10Install the 2 bolts. 11
Install the cover.
12 Remove the protective tape.
■When replacing the front turn signal
lights (bulb type)
When the washer fluid filler opening is
removed with a large amount of washer
fluid contained in the washer tank, washer
fluid may spill onto the vehicle and cleaning
may be required.
WARNING
■Replacing light bulbs
●Turn off the lights. Do not attempt to
replace the bulb immediately after
turning off the lights.
The bulbs become very hot and may
cause burns.
●Do not touch the glass portion of the
light bulb with bare hands. When it is
unavoidable to hold the glass portion,
use and hold with a clean dry cloth to
avoid getting moisture and oils on the
bulb.
Also, if the bulb is scratched or
dropped, it may blow out or crack.
●Fully install light bulbs and any parts
used to secure them. Failure to do so
may result in heat damage, fire, or
water entering the he adlight unit. This
may damage the headlights or cause
condensation to build up on the lens.
■To prevent damage or fire
●Make sure bulbs are fully seated and
locked.
Page 337 of 436

3377-2. Steps to take in an emergency
7
When trouble arises
■Brake system warning light (warning buzzer)
■Brake system warning light (warning buzzer)
■High coolant temperature warning light* (warning buzzer)
*: This light illuminates on the multi-information display.
If a warning light turns on or a warning buzzer sounds
Calmly perform the following actions if any of the warning lights comes on or
flashes. If a light comes on or flashes, bu t then goes off, this does not necessar-
ily indicate a malfunction in the system. However, if this continues to occur,
have the vehicle inspected by your Lexus dealer.
Actions to the warning lights or warning buzzers
Warning lightDetails/Actions
(U.S.A.)
or
(red)
(Canada)
Indicates that:
The brake fluid level is low; or
The brake system is malfunctioning
Immediately stop the vehicle in a safe place and contact your Lexus
dealer. Continuing to drive the vehicle may be dangerous.
Warning lightDetails/Actions
(yellow)
Indicates a malfunction in the parking brake system
Have the vehicle inspected by your Lexus dealer immediately.
Warning lightDetails/Actions
Indicates that the engine coolant temperature is too high
Immediately stop the vehicle in a safe place.
Handling method ( P.365)
Page 340 of 436
3407-2. Steps to take in an emergency
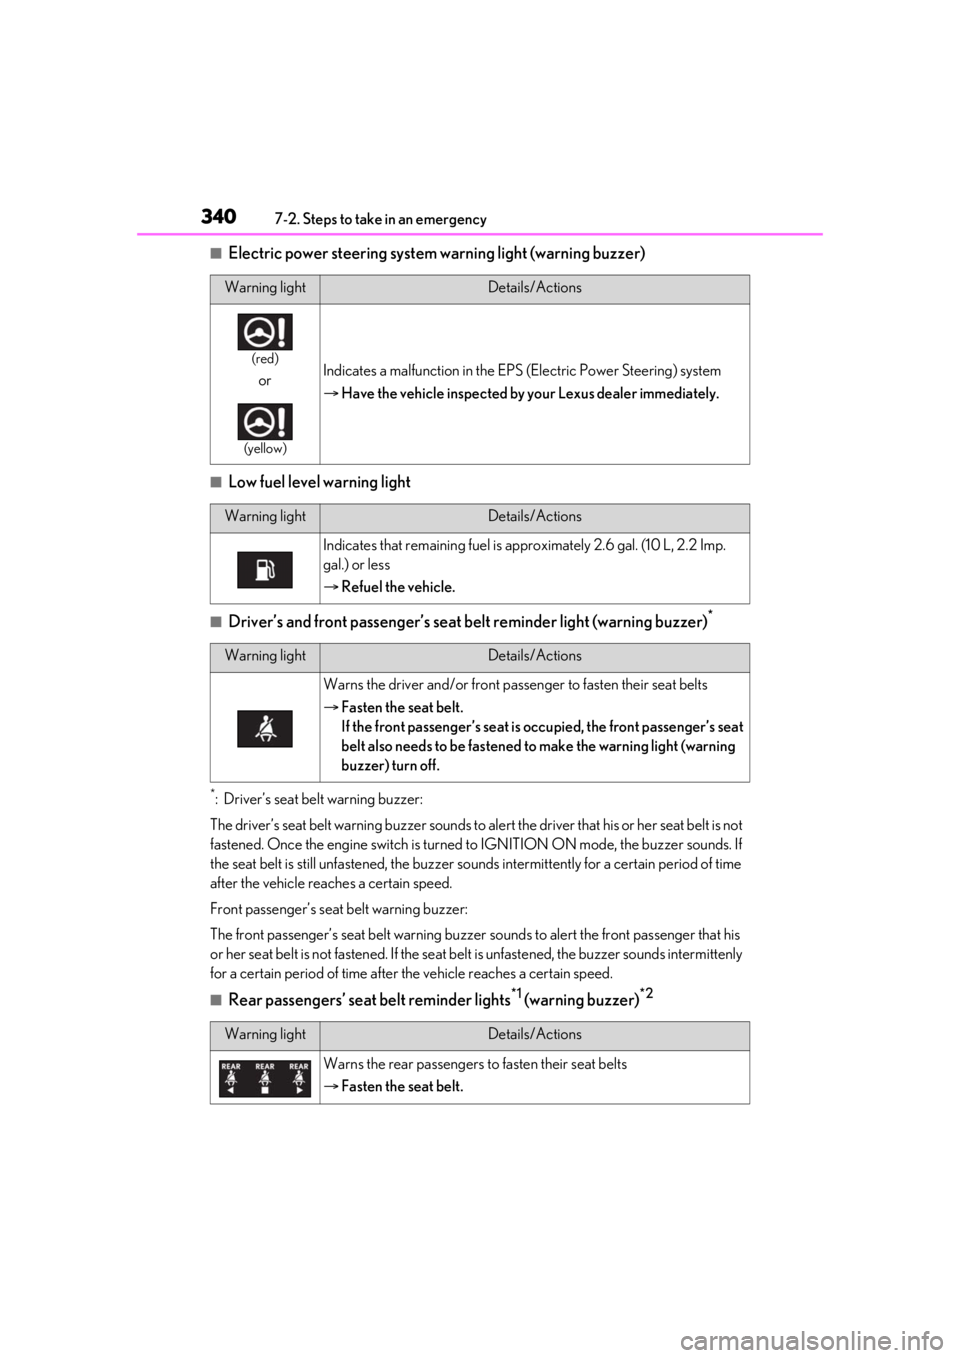
■Electric power steering system warning light (warning buzzer)
■Low fuel level warning light
■Driver’s and front passenger’s seat belt reminder light (warning buzzer)*
*: Driver’s seat belt warning buzzer:
The driver’s seat belt warning buzzer sounds to al ert the driver that his or her seat belt is not
fastened. Once the engine switch is turned to IGNITION ON mode, the buzzer sounds. If
the seat belt is still unfastened, the buzzer sounds intermittently for a certain period of time
after the vehicle reaches a certain speed.
Front passenger’s seat belt warning buzzer:
The front passenger’s seat belt warning buzzer sounds to alert the front passenger that his
or her seat belt is not fastened. If the seat be lt is unfastened, the buzzer sounds intermittenly
for a certain period of time after the vehicle reaches a certain speed.
■Rear passengers’ seat belt reminder lights*1 (warning buzzer)*2
Warning lightDetails/Actions
(red)
or
(yellow)
Indicates a malfunction in the EPS (Electric Power Steering) system
Have the vehicle inspected by your Lexus dealer immediately.
Warning lightDetails/Actions
Indicates that remaining fuel is approximately 2.6 gal. (10 L, 2.2 Imp.
gal.) or less
Refuel the vehicle.
Warning lightDetails/Actions
Warns the driver and/or front pass enger to fasten their seat belts
Fasten the seat belt.
If the front passenger’s seat is occupied, the front passenger’s seat
belt also needs to be fastened to make the warning light (warning
buzzer) turn off.
Warning lightDetails/Actions
Warns the rear passengers to fasten their seat belts
Fasten the seat belt.