2021 Lexus IS350 panel
[x] Cancel search: panelPage 147 of 436

1474-2. Driving procedures
4
Driving
■If “Brake Hold Malfunction Press Brake
to Deactivate Visit Your Dealer” or
“Brake Hold Malfunction Visit Your
Dealer” is displayed on the multi-infor-
mation display
The system may be malfunctioning. Have
the vehicle inspected by your Lexus dealer.
■Warning messages and buzzers
Warning messages and buzzers are used to
indicate a system malfunction or to inform
the driver of the need for caution. If a warn-
ing message is shown on the multi-informa-
tion display, read the message and follow
the instructions.
■If the brake hold operated indicator
flashes
P.343
*: If equipped
1 Louder
2 Lower
When the dial is turned to the lowest
volume, driving sound will be turned off
and the indicator will go off.
■ASC is enabled when
The vehicle is being driven in normal mode
or sport mode. ( P.236)
WARNING
■When the vehicle is on a steep incline
When using the brake hold system on a
steep incline, exercise caution. The brake
hold function may not hold the vehicle in
such a situation.
■When stopped on a slippery road
The system cannot stop the vehicle when
the gripping ability of the tires has been
exceeded. Do not use the system when
stopped on a slippery road.
NOTICE
■When parking the vehicle
The brake hold system is not designed
for use when parking the vehicle for a
long period of time. Turning the engine
switch off while the system is holding the
brake may release the brake, which
would cause the vehicle to move. When
operating the engine switch, depress the
brake pedal, shift the shift lever to P and
set the parking brake.
ASC (Active Sound Con-
trol)*
The ASC system is an electronic
sound system that generates driv-
ing sound, conveying the kinetic sit-
uations of the vehi cle’s acceleration
and deceleration to the driver
through the speakers behind the
instrument panel. The vehicle’s
response to the driver’s accelera-
tion behavior and shift operations
are also conveyed in sound. When
sport mode is selected, the sound
conveyed to the driver will be
louder.
Controlling volume
Page 149 of 436

1494-3. Operating the lights and wipers
4
Driving
4-3.Operating the lights and wipers
Operating the switch turns on
the lights as follows:U.S.A.
Canada
1 The side marker, parking, tail,
license plate, instrument panel
lights, and daytime running lights
( P.149) turn on.
2 The headlights and all lights
listed above (except daytime run-
ning lights) turn on.
3 The headlights, parking lights,
daytime running lights ( P.149) and all the lights listed above turn
on and off automatically. (When the
engine switch is in IGNITION ON
mode.)
4 (U.S.A.) Off
■Daytime running light system
●The daytime running lights illuminate
using the same lights as the parking lights
and illuminate brighter than the parking
lights.
●To make your vehicle more visible to
other drivers during daytime driving, the
daytime running lights turn on automati-
cally when all of the following conditions
are met. (The daytime running lights are
not designed for use at night.)
• The engine is running
• The parking brake is released
• The headlight switch is in the or
* position
*: When the surroundings are bright
The daytime running lights remain on after
they illuminate, even if the parking brake is
set again.
●For the U.S.A.: Daytime running lights
can be turned off by operating the switch.
●Compared to turning on the headlights,
the daytime running light system offers
greater durability and consumes less
electricity, so it can help improve fuel
economy.
■Headlight control sensor
The sensor may not function properly if an
object is placed on the sensor, or anything
that blocks the sensor is affixed to the wind-
shield.
Headlight switch
The headlights can be operated
manually or automatically.
Operating instructions
A
B
Page 260 of 436

2605-2. Using the air conditioning system and defogger
according to the selected air flow
mode.
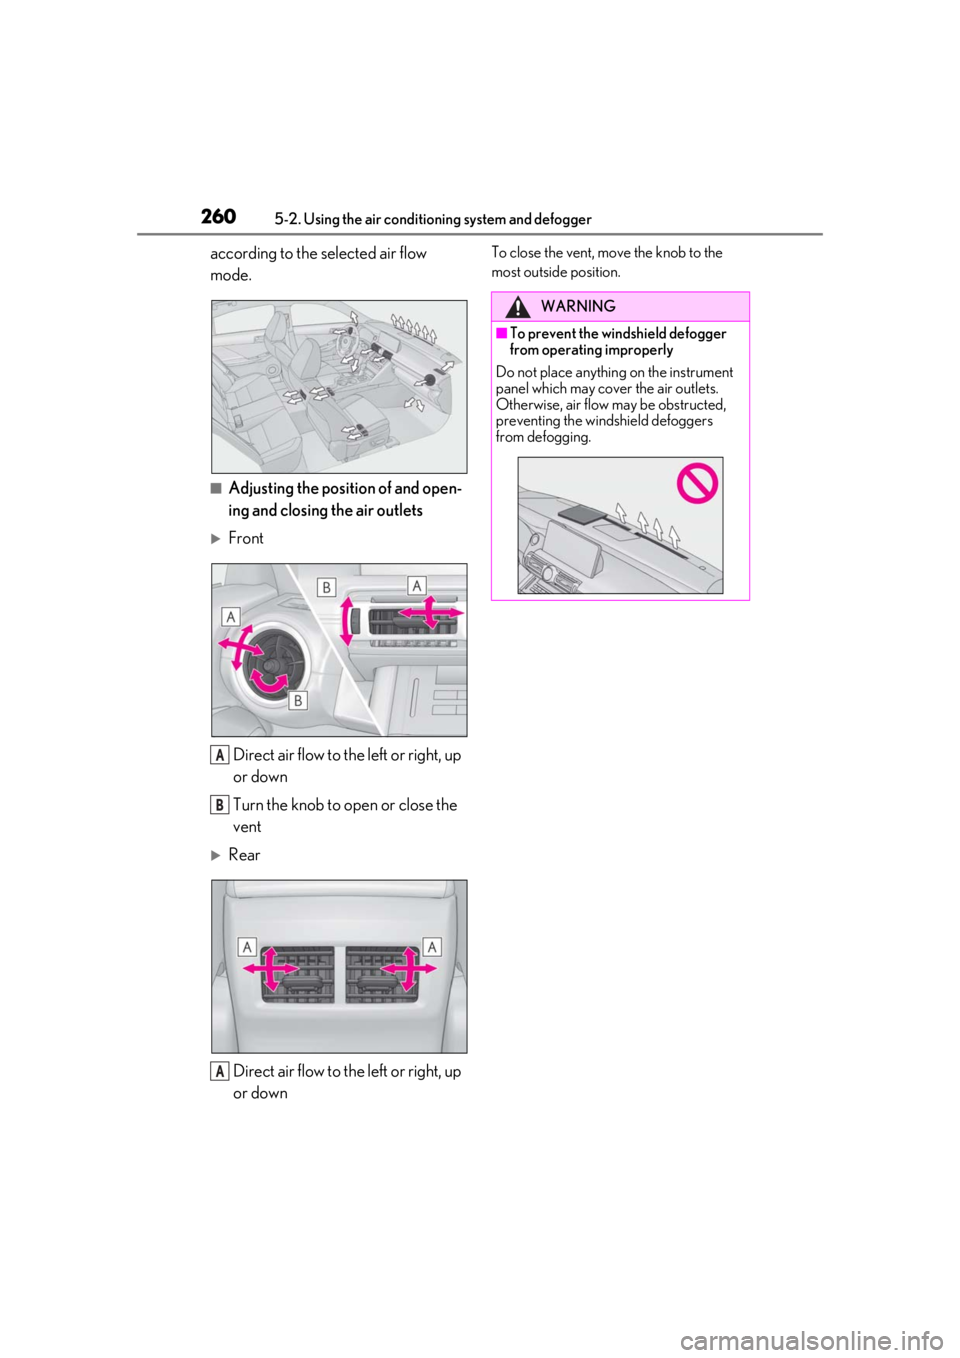
■Adjusting the position of and open-
ing and closing the air outlets
Front
Direct air flow to the left or right, up
or down
Turn the knob to open or close the
vent
RearDirect air flow to the left or right, up
or down
To close the vent, move the knob to the
most outside position.
A
B
A
WARNING
■To prevent the windshield defogger
from operating improperly
Do not place anything on the instrument
panel which may cover the air outlets.
Otherwise, air flow may be obstructed,
preventing the windshield defoggers
from defogging.
Page 284 of 436

2846-1. Maintenance and care
WARNING
■Water in the vehicle
●Do not splash or spill liquid in the vehi-
cle.
Doing so may cause electrical compo-
nents, etc. to malfunction or catch fire.
●Do not get any of the SRS components
or wiring in the vehicle interior wet.
( P.28)
An electrical malfunction may cause
the airbags to deploy or not function
properly, resulting in death or serious
injury.
■Cleaning the interior (especially
instrument panel)
Do not use polish wax or polish cleaner.
The instrument panel may reflect off the
windshield, obstructing the driver’s view
and leading to an accident, resulting in
death or serious injury.
NOTICE
■Cleaning detergents
●Do not use the following liquids, as
they may discolor the vehicle interior
or cause streaks or damage to painted
surfaces:
• Audio system screen: Organic sub- stances such as benzine or gasoline,
alkaline solutions, and alcohol
• Seats: Alkaline solutions, organic sub- stances such as thinner or benzine,
and alcohol
• Other parts: Organic substances such as benzine or gasoline, alkaline or
acidic solutions, dye, and bleach
●Do not use polish wax or polish
cleaner. The instrument panel’s or
other interior part’s painted surface
may be damaged.
■Preventing damage to leather sur-
faces
Observe the following precautions to
avoid damage to and deterioration of
leather surfaces:
●Remove any dust or dirt from leather
surfaces immediately.
●Do not expose the vehicle to direct
sunlight for extended periods of time.
Park the vehicle in the shade, espe-
cially during summer.
●Do not place items made of vinyl, plas-
tic, or containing wax on the uphol-
stery, as they may stick to the leather
surface if the vehicle interior heats up
significantly.
■Water on the floor
Do not wash the vehicle floor with water.
Vehicle systems such as the audio system
may be damaged if water comes into
contact with electrical components such
as the audio system above or under the
floor of the vehicle. Water may also
cause the body to rust.
■When cleaning the inside of the wind-
shield
Do not allow glass cleaner to contact the
lens. Also, do not touch the lens.
(
P.164)
■Cleaning the inside of the rear win-
dow
●Do not use glass cleaner to clean the
rear window, as this may cause dam-
age to the rear window defogger
heater wires or antenna. Use a cloth
dampened with lukewarm water to
gently wipe the window clean. Wipe
the window in strokes running parallel
to the heater wires or antenna.
●Be careful not to scratch or damage
the heater wires or antenna.
Page 318 of 436

3186-3. Do-it-yourself maintenance
1Turn the engine switch off.
2 Open the fuse box cover.
Engine compartment: type A fuse
box
Push the tab in and lift the lid off.
Engine compartment: type B fuse
box
Push the tab in and lift the lid off.
Driver’s side instrument panel
Remove the lid.
3Remove the fuse with the pullout
tool.
Only type A fuses can be removed
using the pullout tool.
4 Check if the fuse is blown.
Type A and B:
Replace the blown fuse with a new fuse of
an appropriate amperage rating. The
amperage rating can be found on the fuse
box lid.
Type C and D:
Contact your Lexus dealer.
Type A
Normal fuse
Checking and replacing
fuses
If any of the electrical components
do not operate, a fuse may have
blown. If this happens, check and
replace the fuses as necessary.
Checking and replacing fuses
A
Page 341 of 436

3417-2. Steps to take in an emergency
7
When trouble arises
*1: This light illuminates on the center panel.
*2: Rear passengers’ seat belt warning buzzer:
The rear passengers’ seat belt warning buzzer sounds to alert the rear passenger that his or
her seat belt is not fastened. If the seat belt is unfastened, the buzzer sounds intermittently
for a certain period of time, af ter the seat belt is fastened and unfastened and the vehicle
reaches a certain speed.
■Tire pressure warning light
■LTA indicator (warning buzzer)
■Intuitive parking assist OFF indicator (warning buzzer)
Warning lightDetails/Actions
When the light comes on after blinking for approximately 1 minute:
Malfunction in the tire pressure warning system
Have the system checked by your Lexus dealer.
When the light comes on:
Low tire inflation pressure such as
Natural causes
Flat tire
Immediately stop the vehicle in a safe place.
Handling method ( P.344)
Warning lightDetails/Actions
(orange)
Indicates a malfunction in th e LTA (Lane Tracing Assist)
Follow the instructions displayed on the multi-information display.
( P.189)
Warning lightDetails/Actions
(flashes)
(if equipped)
Indicates a malfunction in the in tuitive parking assist function
Have the vehicle inspected by your Lexus dealer immediately.
Indicates that the system is temporarily unavailable, possibly due to a
sensor being dirty or covered with ice, etc.
Follow the instructions displayed on the multi-information display.
( P.212)
Page 352 of 436

3527-2. Steps to take in an emergency
use the wrench or other tools.)
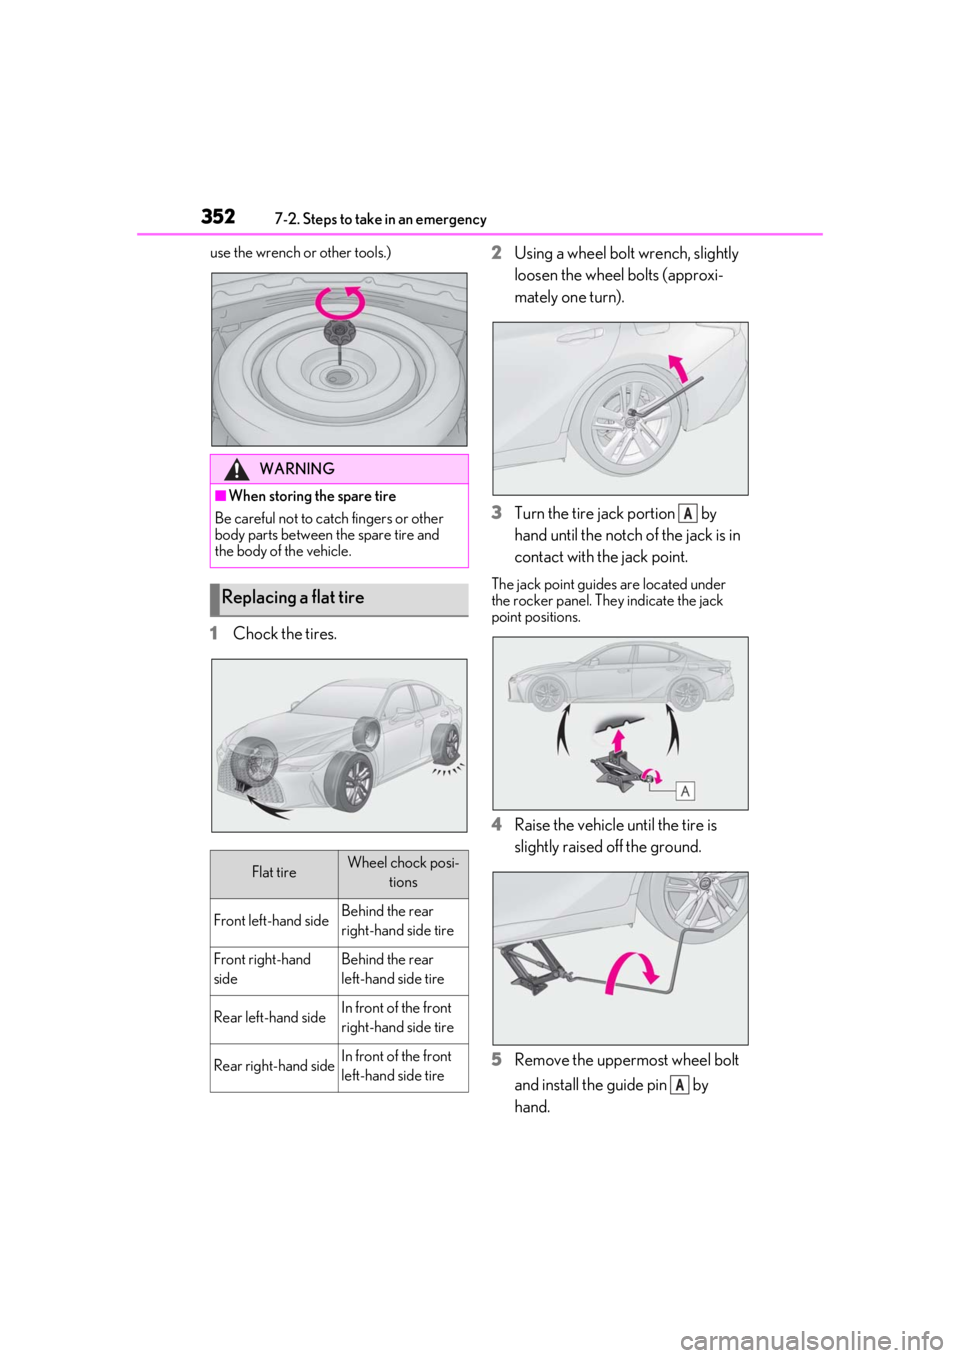
1Chock the tires. 2
Using a wheel bolt wrench, slightly
loosen the wheel bolts (approxi-
mately one turn).
3 Turn the tire jack portion by
hand until the notch of the jack is in
contact with the jack point.
The jack point guides are located under
the rocker panel. They indicate the jack
point positions.
4 Raise the vehicle until the tire is
slightly raised off the ground.
5 Remove the uppermost wheel bolt
and install the guide pin by
hand.
WARNING
■When storing the spare tire
Be careful not to catch fingers or other
body parts between the spare tire and
the body of the vehicle.
Replacing a flat tire
Flat tireWheel chock posi- tions
Front left-hand sideBehind the rear
right-hand side tire
Front right-hand
sideBehind the rear
left-hand side tire
Rear left-hand sideIn front of the front
right-hand side tire
Rear right-hand sideIn front of the front
left-hand side tire
A
A
Page 372 of 436

3728-1. Specifications
8-1.Specifications
*1: Unladen vehicles
*2:2WD models
*3:AWD models
*4: Vehicles with 235/45R18 or 235/40R19 rear tires
*5: Vehicles with 265/35R19 rear tires
■Vehicle identification number
The vehicle identification number
(VIN) is the legal identifier for your
vehicle. This is the primary identifica-
tion number for your Lexus. It is used in
registering the ownership of your vehi-
cle.
This number is stamped on the top left
of the instrument panel and in the engine compartment.
Maintenance data (fuel, oil level, etc.)
Dimensions and weight
Overall length185.4 in. (4710 mm)
Overall width72.4 in. (1840 mm)
Overall height*156.5 in. (1435 mm)*2
56.7 in. (1440 mm)*3
Wheelbase110.2 in. (2800 mm)
Tread*1
Front62.2 in. (1580 mm)
Rear63.0 in. (1600 mm)*4
61.8 in. (1570 mm)*5
Vehicle capacity weight
(Occupants + luggage)825 lb. (375 kg)
Seating capacity
Seating capacity5 (Front 2, Rear 3)
Vehicle identification