2021 Lexus IS350 air conditioning
[x] Cancel search: air conditioningPage 259 of 436

2595-2. Using the air conditioning system and defogger
5
Interior features
pollen filter is turned off.
1Press the automatic mode switch or
select “AUTO” on the sub function
menu. ( P.257)
2 Adjust the temperature setting.
3 To stop the operation, press the off
switch or select “OFF” on the sub
function menu. ( P.257)
If the fan speed settin g or air flow modes
are operated, the automatic mode indica-
tor goes off. However, automatic mode for
functions other than th at operated is main-
tained.
■Using automatic mode
Fan speed is adjusted automatically accord-
ing to the temperature setting and the
ambient conditions.
Therefore, the fan may stop for a while until
warm or cool air is ready to flow immedi-
ately after the automatic mode switch is
pressed or “AUTO” is selected.
Cool air may blow around the upper body
even when the heater is on due to sunlight.
This feature is used to prevent ice from
building up on the windshield and
wiper blades.
Turns on/off.
The indicator comes on when the wind-
shield wiper de-icer is on. The windshield de-icer will automatically
turn off after a period of time.
To turn on the “DUAL” mode, perform
any of the following procedures:
Press the DUAL switch.
Select “DUAL” on the sub function
menu.
Select “DUAL” on the option con-
trol screen.
Select “DUAL” on the side display.
Adjust the passenger’s side tem-
perature setting.
The indicator on the main control screen
comes on when the “DUAL” mode is on.
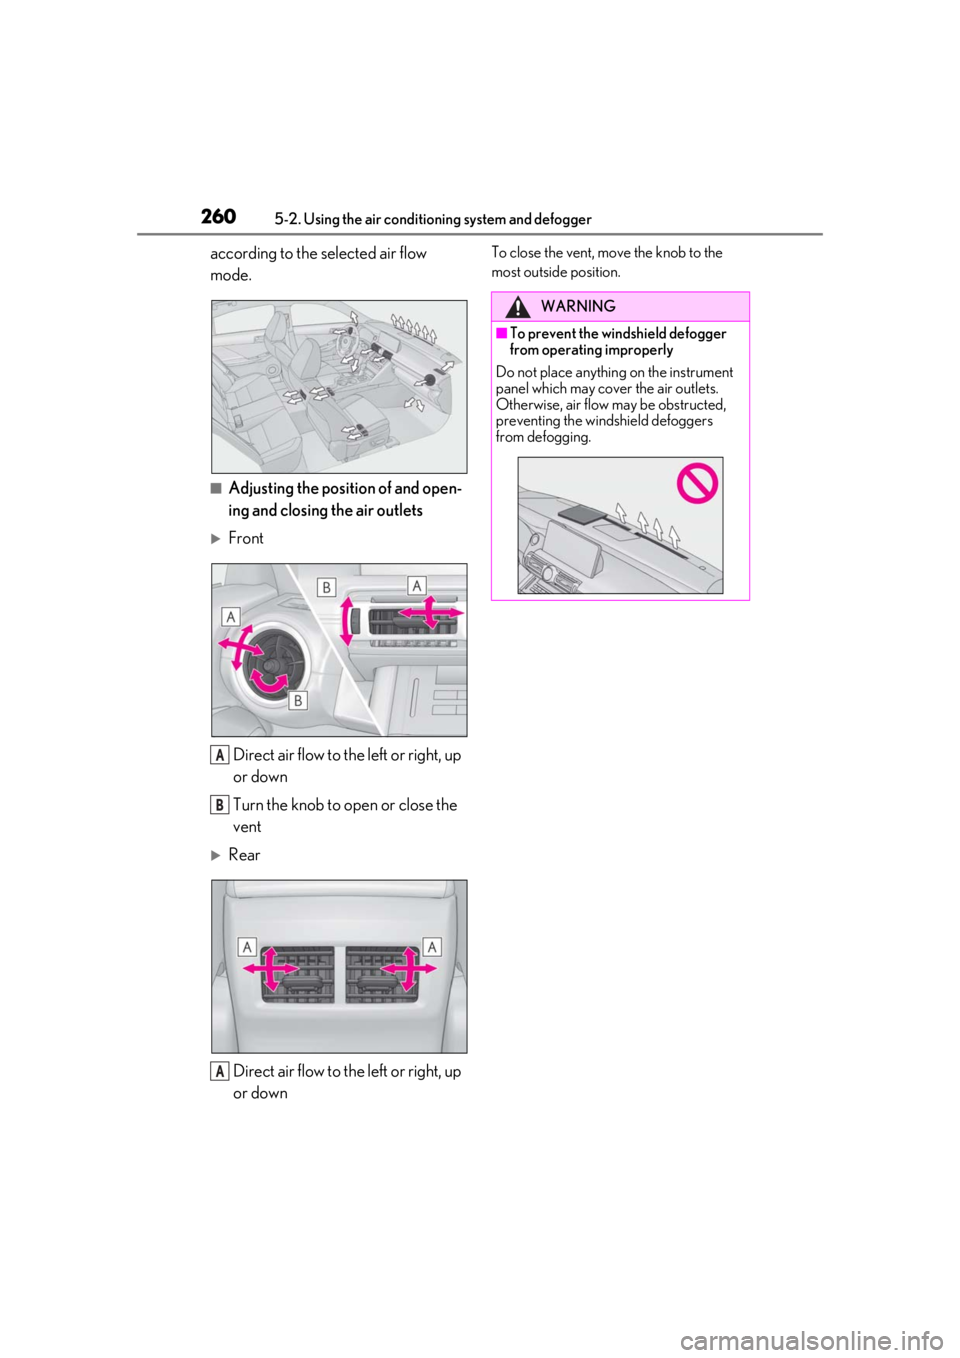
■Location of air outlets
The air outlets and air volume changes
Using automatic mode
Windshield wiper de-icer (if
equipped)
WARNING
■To prevent burns
Do not touch the glass at lower part of
the windshield or to the side of the front
pillars when the windshield wiper de-icer
is on.
Adjusting the temperature for
the driver and passenger seats
separately
Air outlet layout and operations
Page 260 of 436

2605-2. Using the air conditioning system and defogger
according to the selected air flow
mode.
■Adjusting the position of and open-
ing and closing the air outlets
Front
Direct air flow to the left or right, up
or down
Turn the knob to open or close the
vent
RearDirect air flow to the left or right, up
or down
To close the vent, move the knob to the
most outside position.
A
B
A
WARNING
■To prevent the windshield defogger
from operating improperly
Do not place anything on the instrument
panel which may cover the air outlets.
Otherwise, air flow may be obstructed,
preventing the windshield defoggers
from defogging.
Page 261 of 436

2615-2. Using the air conditioning system and defogger
5
Interior features
*:If equipped
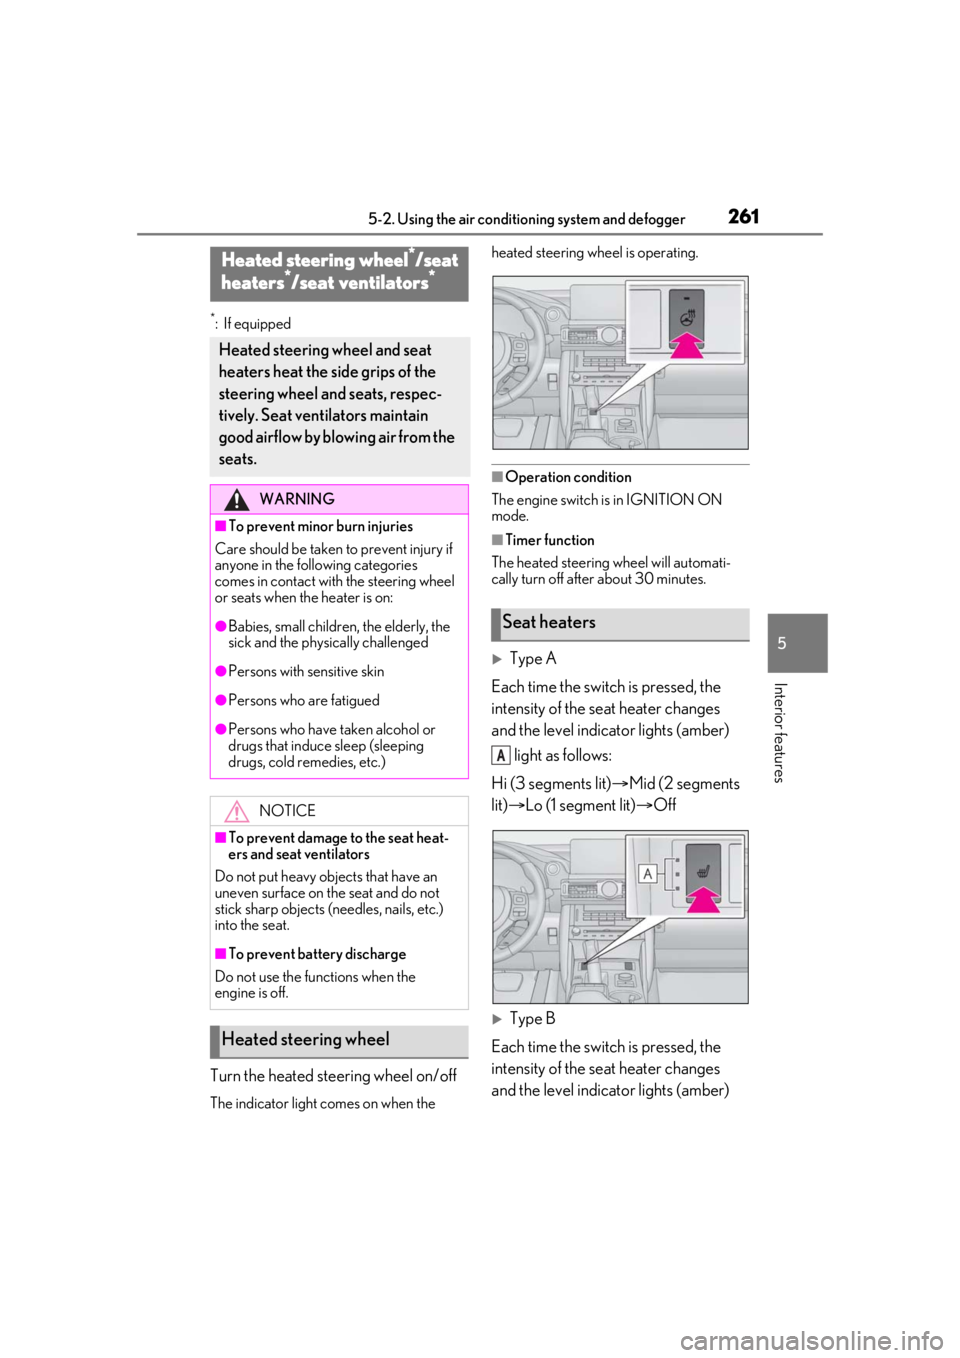
Turn the heated steering wheel on/off
The indicator light comes on when the heated steering wheel is operating.
■Operation condition
The engine switch is in IGNITION ON
mode.
■Timer function
The heated steering wheel will automati-
cally turn off after about 30 minutes.
Type A
Each time the switch is pressed, the
intensity of the seat heater changes
and the level indicator lights (amber) light as follows:
Hi (3 segments lit) Mid (2 segments
lit) Lo (1 segment lit) Off
Type B
Each time the switch is pressed, the
intensity of the seat heater changes
and the level indicator lights (amber)
Heated steering wheel*/seat
heaters*/seat ventilators*
Heated steering wheel and seat
heaters heat the side grips of the
steering wheel and seats, respec-
tively. Seat ventilators maintain
good airflow by blowing air from the
seats.
WARNING
■To prevent minor burn injuries
Care should be taken to prevent injury if
anyone in the following categories
comes in contact with the steering wheel
or seats when the heater is on:
●Babies, small children, the elderly, the
sick and the phys ically challenged
●Persons with sensitive skin
●Persons who are fatigued
●Persons who have taken alcohol or
drugs that induce sleep (sleeping
drugs, cold remedies, etc.)
NOTICE
■To prevent damage to the seat heat-
ers and seat ventilators
Do not put heavy objects that have an
uneven surface on the seat and do not
stick sharp objects (needles, nails, etc.)
into the seat.
■To prevent battery discharge
Do not use the functions when the
engine is off.
Heated steering wheel
Seat heaters
A
Page 262 of 436

2625-2. Using the air conditioning system and defogger
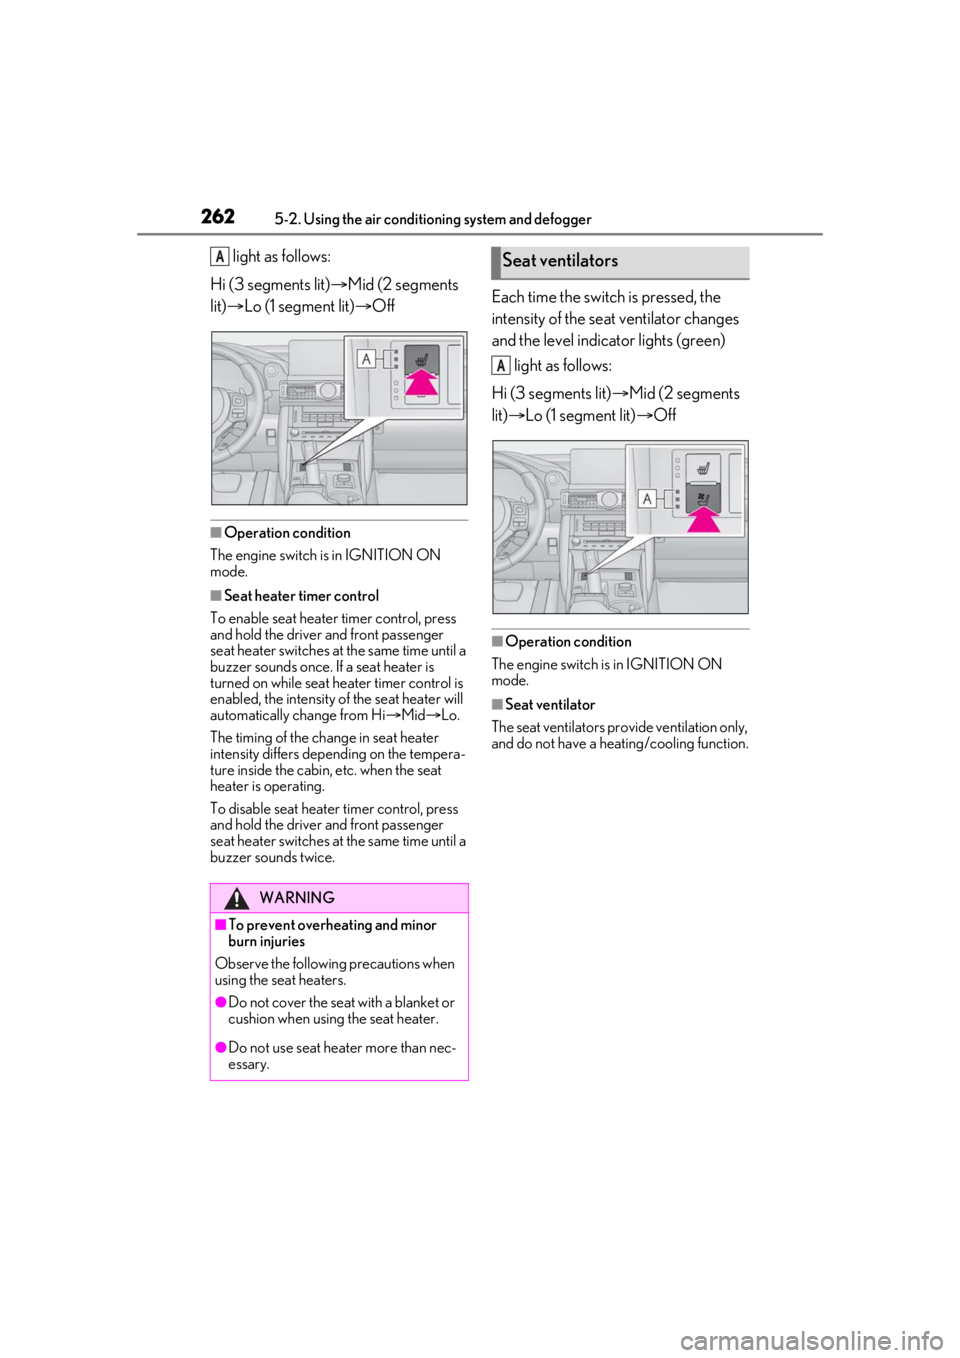
light as follows:
Hi (3 segments lit) Mid (2 segments
lit) Lo (1 segment lit) Off
■Operation condition
The engine switch is in IGNITION ON
mode.
■Seat heater timer control
To enable seat heater timer control, press
and hold the driver and front passenger
seat heater switches at the same time until a
buzzer sounds once. If a seat heater is
turned on while seat he ater timer control is
enabled, the intensity of the seat heater will
automatically change from Hi Mid Lo.
The timing of the change in seat heater
intensity differs depending on the tempera-
ture inside the cabin, etc. when the seat
heater is operating.
To disable seat heater timer control, press
and hold the driver and front passenger
seat heater switches at the same time until a
buzzer sounds twice.
Each time the switch is pressed, the
intensity of the seat ventilator changes
and the level indicator lights (green) light as follows:
Hi (3 segments lit) Mid (2 segments
lit) Lo (1 segment lit) Off
■Operation condition
The engine switch is in IGNITION ON
mode.
■Seat ventilator
The seat ventilators pr ovide ventilation only,
and do not have a heating/cooling function.
WARNING
■To prevent overheating and minor
burn injuries
Observe the following precautions when
using the seat heaters.
●Do not cover the seat with a blanket or
cushion when using the seat heater.
●Do not use seat heater more than nec-
essary.
ASeat ventilators
A
Page 279 of 436

279
6
6
Maintenance and care
Maintenance and care
.6-1. Maintenance and careCleaning and protecting the vehi-cle exterior ................................ 280
Cleaning and protecting the vehi- cle interior ................................. 283
6-2. Maintenance Maintenance requirements........................................................ 286
General maintenance ............. 287
Emission inspection and mainte- nance (I/M) programs ......... 290
6-3. Do-it-yourself maintenance Do-it-yourself service precautions......................................................... 291
Hood............................................... 293
Positioning a floor jack............ 293
Engine compartment............... 295
Tires ................................................ 303
Tire inflation pressure ............... 312
Wheels............................................ 313
Air conditioning filter................315
Electronic key battery .............. 316
Checking and replacing fuses ......................................................... 318
Headlight aim.............................. 320
Light bulbs ..................................... 321
Page 283 of 436

2836-1. Maintenance and care
6
Maintenance and care
Remove dirt and dust using a vac-
uum cleaner. Wipe dirty surfaces
with a cloth dampened with luke-
warm water.
If dirt cannot be removed, wipe it off
with a soft cloth dampened with
neutral detergent diluted to approx-
imately 1%.
Wring out any excess water from
the cloth and thoroughly wipe off
remaining traces of detergent and
water.
■Shampooing the carpets
There are several commercial foaming-type
cleaners available. Use a sponge or brush
to apply the foam. Rub in overlapping cir-
cles. Do not use water. Wipe dirty surfaces
and let them dry. Excellent results are
obtained by keeping the carpet as dry as
possible.
■Handling the seat belts
Clean with mild soap and lukewarm water
using a cloth or sponge. Also check the
belts periodically for excessive wear, fraying
or cuts.
■When cleaning the carpeted portions of
the glove box, console box, etc.
If a strong adhesive ta pe is used, there is a
possibility that the su rface of the carpet
could be damaged.
NOTICE
• Brake parts
●Keep the cleaning nozzle at least 11.9
in. (30 cm) away from the vehicle
body. Otherwise resin section, such as
moldings and bumpers, may be
deformed and damaged.
Also, do not continuously hold the nozzle
in the same place.
●Do not spray the lower part of the
windshield continuously.
If water enters the air conditioning sys-
tem intake located near the lower part of
the windshield, the ai r conditioning sys-
tem may not operate correctly.
●Do not wash the underside of the vehi-
cle using a high pressure car washer.
Cleaning and protecting the
vehicle interior
The following procedures will help
protect your vehicle’s interior and
keep it in top condition:
Protecting the vehicle interior
Page 315 of 436

3156-3. Do-it-yourself maintenance
6
Maintenance and care
1Turn the engine switch off.
2 Open the glove box. Lift up the side
with the stay, disconnect the stay
tabs and remove the partition by
pulling horizontally.
3 Press the tabs and remove the filter
cover. 4
Press the tabs and remove the filter
case.
5 Remove the air conditioning filter
from the filter case and replace it
with a new one.
The “ UP” marks shown on the filter
and the filter case sh ould be pointing up.
■Checking interval
Inspect and replace the air conditioning fil-
ter according to the maintenance schedule.
In dusty areas or areas with heavy traffic
flow, early replacement may be required.
(For scheduled maintenance information,
please refer to the “Owner’s Manual Sup-
plement” or “Scheduled Maintenance”.)
■If air flow from the vents decreases dra-
matically
The filter may be clogged. Check the filter
and replace if necessary.
■Air conditioning filt er with deodorizing
function
When fragrances are placed in your vehi-
cle, the deodorizing effect may become
significantly weakened in a short period.
Air conditioning filter
The air conditioning filter must be
changed regularly to maintain air
conditioning efficiency.
Removal method
Page 316 of 436

3166-3. Do-it-yourself maintenance
When an air conditioning odor comes out
continuously, replace the air conditioning
filter.
■If the electronic key battery is depleted
The following symptoms may occur:
●The smart access system with push-but-
ton start and wireless remote control will
not function properly.
●The operationa l range will be reduced.
■When the card key battery needs to be
replaced (if equipped)
The battery for the card key is available only
at Lexus dealers. Your Lexus dealer can
replace the battery for you.
Flathead screwdriver
Small flathead screwdriver
Lithium battery CR2032
■Use a CR2032 lithium battery
●Batteries can be purchased at your Lexus
dealer, local electrical appliance shops or
camera stores.
●Replace only with the same or equivalent
type recommended by the manufacturer.
●Dispose of used batteries according to
local laws.
NOTICE
■When using the air conditioning sys-
tem
Make sure that a filter is always installed.
Using the air conditioning system without
a filter may cause damage to the system.
Electronic key battery
Replace the battery with a new one
if it is depleted.
As the key may be damaged if the
following procedure is not per-
formed properly, it is recom-
mended that key battery
replacement be performed by your
Lexus dealer.
Items to prepare