2021 LEXUS ES350 air condition
[x] Cancel search: air conditionPage 306 of 464
3066-1. Maintenance and care
WARNING
■Precaution regarding the rear
bumper with Blind Spot Monitor (if
equipped)
If the paint of the rear bumper is chipped
or scratched, the system may malfunc-
tion. If this occurs, consult your Lexus
dealer.
NOTICE
■To prevent paint deterioration and
corrosion on the body and compo-
nents (aluminum wheels etc.)
●Wash the vehicle immediately in the
following cases:
• After driving near the sea coast
• After driving on salted roads
• If coal tar, pollen or tree sap is present on the paint surface
• If dead insects, in sect droppings or
bird droppings are present on the
paint surface
• After driving in an area contaminated with soot, oily smoke, mine dust, iron
powder or chemical substances
• If the vehicle becomes heavily soiled with dust or mud
• If liquids such as benzene and gasoline are spilled on the paint surface
●If the paint is chip ped or scratched,
have it repaired immediately.
●To prevent the wheels from corroding,
remove any dirt and store in a place
with low humidity when storing the
wheels.
■Cleaning the exterior lights
●Wash carefully. Do not use organic
substances or scrub with a hard brush.
This may damage the surfaces of the
lights.
●Do not apply wax to the surfaces of the
lights.
Wax may cause damage to the lenses.
■When using an automatic car wash
(vehicles with rain-sensing windshield
wipers)
Set the wiper switch to the off position.
If the wiper switch is in “AUTO”, the wip-
ers may operate and the wiper blades
may be damaged.
■When using a high-pressure car wash
●When washing the vehicle, do not let
water of the high-p ressure washer hit
directly or the vicinity of the camera.
Due to the shock from the high-pres-
sure water, it is possible the device
may not operate as normal.
●Do not bring the nozzle tip close to
boots (rubber or resin manufactured
cover), connectors or the following
parts. The parts may be damaged if
they come into contact with high-pres-
sure water.
• Traction related parts
•Steering parts
• Suspension parts
• Brake parts
●Keep the cleaning nozzle at least 11.9
in. (30 cm) away from the vehicle
body. Otherwise resin section, such as
moldings and bumpers, may be
deformed and damaged.
Also, do not continuously hold the
nozzle in the same place.
●Do not spray the lower part of the
windshield continuously.
If water enters the air conditioning sys-
tem intake located ne ar the lower part
of the windshield, th e air conditioning
system may not operate correctly.
●Do not wash the underside of the vehi-
cle using a high pressure car washer.
Page 326 of 464
3266-3. Do-it-yourself maintenance
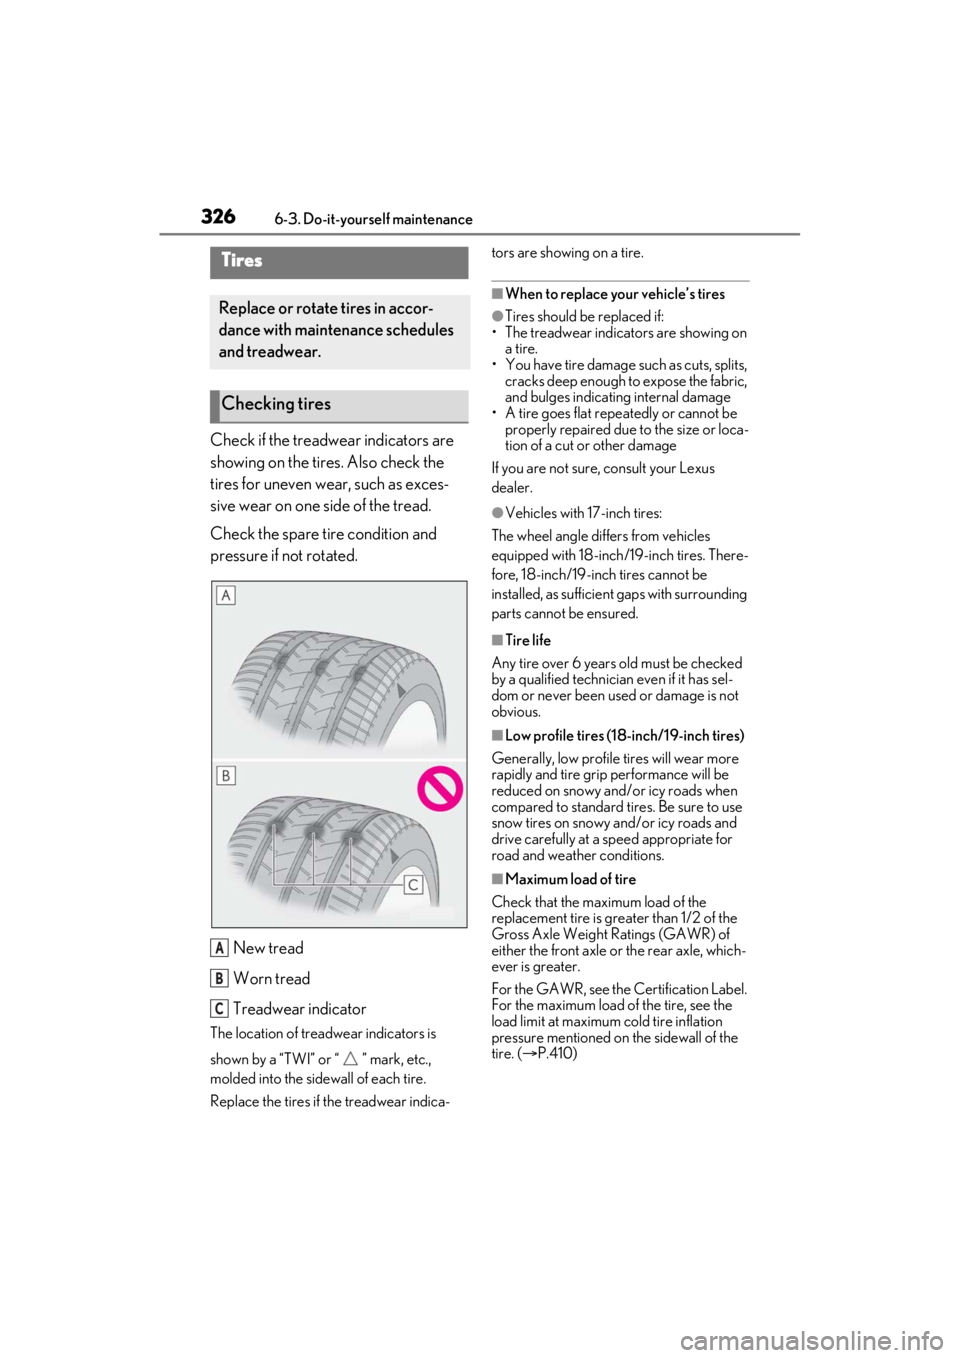
Check if the treadwear indicators are
showing on the tires. Also check the
tires for uneven wear, such as exces-
sive wear on one side of the tread.
Check the spare tire condition and
pressure if not rotated.New tread
Worn tread
Treadwear indicator
The location of treadwear indicators is
shown by a “TWI” or “ ” mark, etc.,
molded into the sidewall of each tire.
Replace the tires if the treadwear indica- tors are showing on a tire.
■When to replace your vehicle’s tires
●Tires should be replaced if:
• The treadwear indicators are showing on a tire.
• You have tire damage such as cuts, splits,
cracks deep enough to expose the fabric,
and bulges indicating internal damage
• A tire goes flat repeatedly or cannot be
properly repaired due to the size or loca-
tion of a cut or other damage
If you are not sure, consult your Lexus
dealer.
●Vehicles with 17-inch tires:
The wheel angle differs from vehicles
equipped with 18-inch/19-inch tires. There-
fore, 18-inch/19-inch tires cannot be
installed, as sufficient gaps with surrounding
parts cannot be ensured.
■Tire life
Any tire over 6 years old must be checked
by a qualified technician even if it has sel-
dom or never been used or damage is not
obvious.
■Low profile tires (18-inch/19-inch tires)
Generally, low profile tires will wear more
rapidly and tire grip performance will be
reduced on snowy and/or icy roads when
compared to standard tires. Be sure to use
snow tires on snowy and/or icy roads and
drive carefully at a speed appropriate for
road and weather conditions.
■Maximum load of tire
Check that the maximum load of the
replacement tire is greater than 1/2 of the
Gross Axle Weight Ratings (GAWR) of
either the front axle or the rear axle, which-
ever is greater.
For the GAWR, see the Certification Label.
For the maximum load of the tire, see the
load limit at maximum cold tire inflation
pressure mentioned on the sidewall of the
tire. ( P.410)
Tires
Replace or rotate tires in accor-
dance with maintenance schedules
and treadwear.
Checking tires
A
B
C
Page 329 of 464

3296-3. Do-it-yourself maintenance
6
Maintenance and care
●Tire inflation pressure changes with tem-
perature. The displayed values may also
be different from the values measured
using a tire pressure gauge.
■Situations in which the tire pressure
warning system may not operate prop-
erly
●In the following cases, the tire pressure
warning system may not operate prop-
erly.
• If non-genuine Lexus wheels are used.
• A tire has been replaced with a tire that is
not an OE (Original Equipment) tire.
• A tire has been replaced with a tire that is
not of the specified size.
• Tire chains etc. are equipped.
• An auxiliary-supported run-flat tire is equipped.
• If a window tint that affects the radio wave signals is installed.
• If there is a lot of snow or ice on the vehi-
cle, particularly around the wheels or
wheel housings.
• If the tire inflation pressure is extremely
higher than the specified level.
• If wheel without tire pressure warning valves and transmitters are used.
• If the ID code on the tire pressure warn- ing valves and transmitters is not regis-
tered in the tire pressure warning
computer.
●Performance may be af fected in the fol-
lowing situations.
• Near a TV tower, electric power plant,
gas station, radio stat ion, large display,
airport or other fac ility that generates
strong radio waves or electrical noise
• When carrying a portable radio, cellular phone, cordless phone or other wireless
communication device
If tire position information is not correctly
displayed due to the radio wave conditions,
the display may be corrected by driving and
changing the radio wave conditions.
●When the vehicle is parked, the time
taken for the warning to start or go off
could be extended.
●When tire inflation pr essure declines rap-
idly for example when a tire has burst, the
warning may not function.
■Warning performance of the tire pres-
sure warning system
The warning of the tire pressure warning
system will change in accordance with driv-
ing conditions. For this reason, the system
may give a warning even if the tire pressure
does not reach a low enough level, or if the
pressure is higher than the pressure that
was adjusted to when the system was initial-
ized.
■Tire pressure warning system certification
For vehicles sold in the U.S.A., Hawaii, Guam and Puerto Rico
Page 337 of 464
3376-3. Do-it-yourself maintenance
6
Maintenance and care
more than 1 mile or 1.5 km, you will get an
accurate cold tire inflation pressure read-
ing.
●Always use a tire pressure gauge.
It is difficult to judge if a tire is properly
inflated based only on its appearance.
●It is normal for the tire inflation pressure
to be higher after driving as heat is gener-
ated in the tire. Do not reduce tire infla-
tion pressure after driving.
●Never exceed the vehicle capacity
weight.
Passengers and luggage weight should
be placed so that the vehicle is balanced.
WARNING
■Proper inflation is critical to save tire
performance
Keep your tires properly inflated.
If the tires are not properly inflated, the
following conditions may occur which
could lead to an accident resulting in
death or serious injury:
●Excessive wear
●Uneven wear
●Poor handling
●Possibility of blowouts resulting from
overheated tires
●Air leaking from between tire and
wheel
●Wheel deformation and/or tire dam-
age
●Greater possibility of tire damage
while driving (due to road hazards,
expansion joints, sharp edges in the
road, etc.)
NOTICE
■When inspecting and adjusting tire
inflation pressure
Be sure to put the tire valve caps back
on.
If a valve cap is not installed, dirt or mois-
ture may get into the valve and cause an
air leak, resulting in decreased tire infla-
tion pressure.
Page 339 of 464
3396-3. Do-it-yourself maintenance
6
Maintenance and care
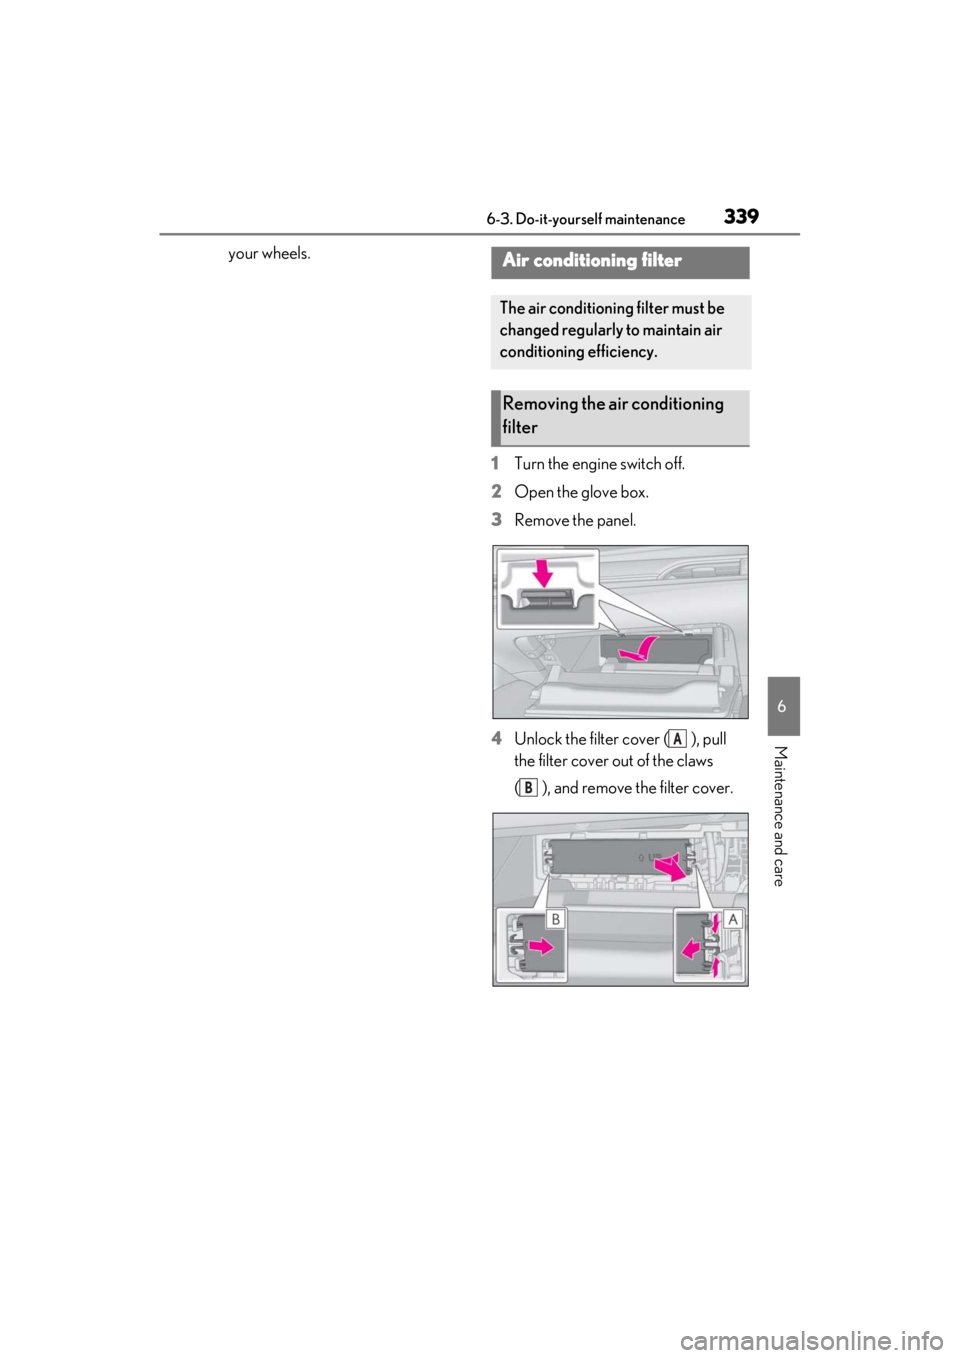
your wheels.1Turn the engine switch off.
2 Open the glove box.
3 Remove the panel.
4 Unlock the filter cover ( ), pull
the filter cover out of the claws
( ), and remove the filter cover.Air conditioning filter
The air conditioning filter must be
changed regularly to maintain air
conditioning efficiency.
Removing the air conditioning
filter
A
B
Page 340 of 464
3406-3. Do-it-yourself maintenance
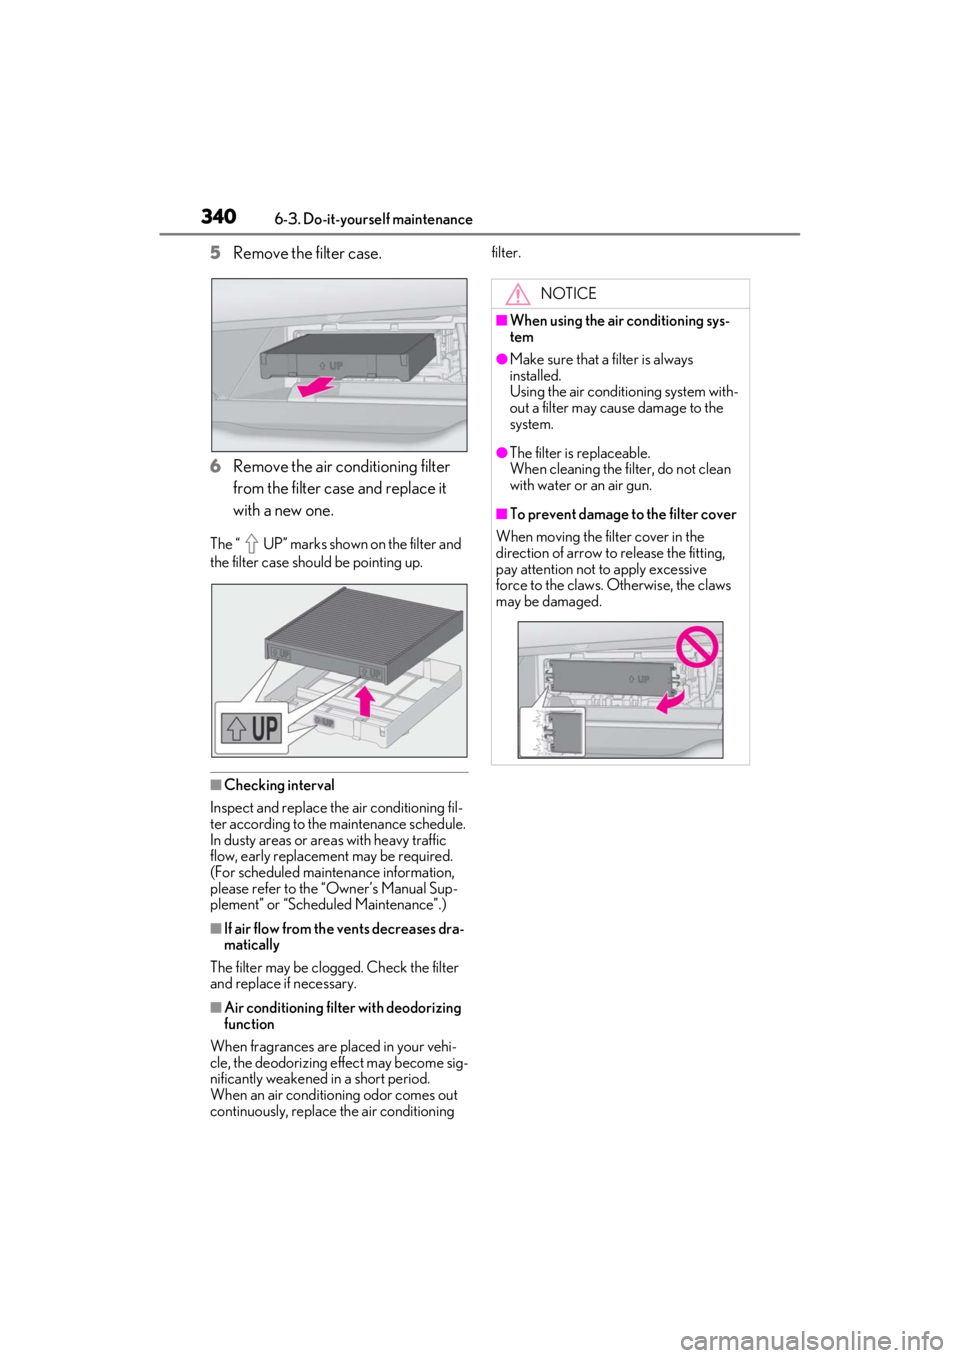
5Remove the filter case.
6 Remove the air conditioning filter
from the filter case and replace it
with a new one.
The “ UP” marks shown on the filter and
the filter case shou ld be pointing up.
■Checking interval
Inspect and replace the air conditioning fil-
ter according to the maintenance schedule.
In dusty areas or area s with heavy traffic
flow, early replacement may be required.
(For scheduled mainte nance information,
please refer to the “Owner’s Manual Sup-
plement” or “Scheduled Maintenance”.)
■If air flow from th e vents decreases dra-
matically
The filter may be clogged. Check the filter
and replace if necessary.
■Air conditioning filter with deodorizing
function
When fragrances are placed in your vehi-
cle, the deodorizing effect may become sig-
nificantly weakened in a short period.
When an air conditioning odor comes out
continuously, replace the air conditioning filter.
NOTICE
■When using the air conditioning sys-
tem
●Make sure that a filter is always
installed.
Using the air conditioning system with-
out a filter may cause damage to the
system.
●The filter is replaceable.
When cleaning the filter, do not clean
with water or an air gun.
■To prevent damage to the filter cover
When moving the filter cover in the
direction of arrow to release the fitting,
pay attention not to apply excessive
force to the claws. Otherwise, the claws
may be damaged.
Page 352 of 464
3527-1. Essential information
7-1.Essential information
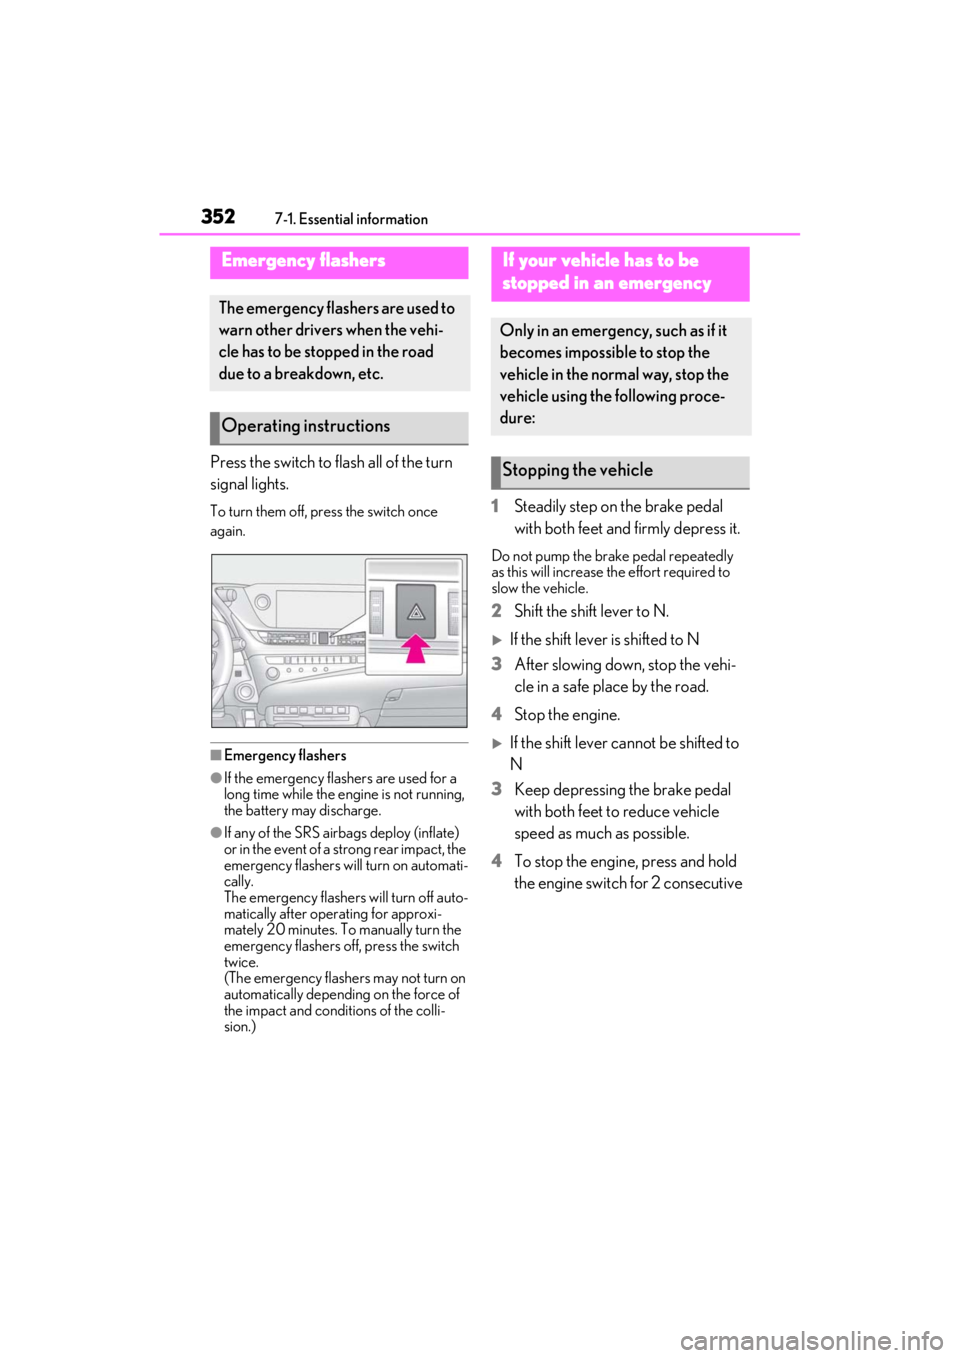
Press the switch to flash all of the turn
signal lights.
To turn them off, press the switch once
again.
■Emergency flashers
●If the emergency flashers are used for a
long time while the engine is not running,
the battery may discharge.
●If any of the SRS airbags deploy (inflate)
or in the event of a strong rear impact, the
emergency flashers will turn on automati-
cally.
The emergency flashers will turn off auto-
matically after operating for approxi-
mately 20 minutes. To manually turn the
emergency flashers off, press the switch
twice.
(The emergency flashers may not turn on
automatically depending on the force of
the impact and conditions of the colli-
sion.)
1 Steadily step on the brake pedal
with both feet and firmly depress it.
Do not pump the brake pedal repeatedly
as this will increase the effort required to
slow the vehicle.
2Shift the shift lever to N.
If the shift lever is shifted to N
3 After slowing down, stop the vehi-
cle in a safe place by the road.
4 Stop the engine.
If the shift lever cannot be shifted to
N
3 Keep depressing the brake pedal
with both feet to reduce vehicle
speed as much as possible.
4 To stop the engine, press and hold
the engine switch for 2 consecutive
Emergency flashers
The emergency flashers are used to
warn other drivers when the vehi-
cle has to be stopped in the road
due to a breakdown, etc.
Operating instructions
If your vehicle has to be
stopped in an emergency
Only in an emergency, such as if it
becomes impossible to stop the
vehicle in the normal way, stop the
vehicle using the following proce-
dure:
Stopping the vehicle
Page 369 of 464
3697-2. Steps to take in an emergency
7
When trouble arises
leaks and tire inflation pressure changes
caused by temperature. In this case, adjust-
ing the tire inflation pressure will turn off the
warning light (after a few minutes).
■When a tire is replaced with a spare tire
The compact spare tire is not equipped with
a tire pressure warning valve and transmit-
ter. If a tire goes flat, the tire pressure warn-
ing light will not turn off even though the flat
tire has been replaced with the spare tire.
Replace the spare tire with the repaired tire
and adjust the tire inflation pressure. The
tire pressure warning lig ht will go off after a
few minutes.
■Conditions that the tire pressure warn-
ing system may not function properly
P.329
WARNING
■If both the ABS and the brake system
warning lights remain on
Stop your vehicle in a safe place immedi-
ately and contact your Lexus dealer.
The vehicle will become extremely
unstable during braking, and the ABS
system may fail, which could cause an
accident resulting in death or serious
injury.
■When the electric power steering
system warning light comes on
When the light comes on yellow, the
assist to the power steering is restricted.
When the light comes on red, the assist
to the power steering is lost and handling
operations of the steering wheel become
extremely heavy.
When steering wheel operations are
heavier than usual, grip the steering
wheel firmly and operate it using more
force than usual.
■If the tire pressure warning light
comes on
Be sure to observe the following precau-
tions.
Failure to do so could cause a loss of
vehicle control and result in death or
serious injury.
●Stop your vehicle in a safe place as
soon as possible. Check and adjust the
tire inflation pre ssure immediately.
●If the tire pressure warning light comes
on even after tire inflation pressure
adjustment, it is prob able that you have
a flat tire. Check the tire s. If a tire is flat,
change it with the spare tire and have
the flat tire repaired by the nearest
Lexus dealer.
●Avoid abrupt maneuvering and brak-
ing.
If the vehicle tires deteriorate, you
could lose control of the steering
wheel or the brakes.
■If a blowout or sudden air leakage
should occur
The tire pressure warning system may
not activate immediately.
■Maintenance of the tires
Each tire, including the spare (if pro-
vided), should be checked monthly when
cold and inflated to the inflation pressure
recommended by the vehicle manufac-
turer on the vehicle pl acard or tire infla-
tion pressure label (tire and load
information label). (If your vehicle has
tires of a different size than the size indi-
cated on the vehicle placard or tire infla-
tion pressure label [tire and load
information label], you should determine
the proper tire inflation pressure for
those tires.)