2021 LEXUS ES350 steering wheel
[x] Cancel search: steering wheelPage 121 of 464
1213-4. Adjusting the steering wheel and mirrors
3
Before driving
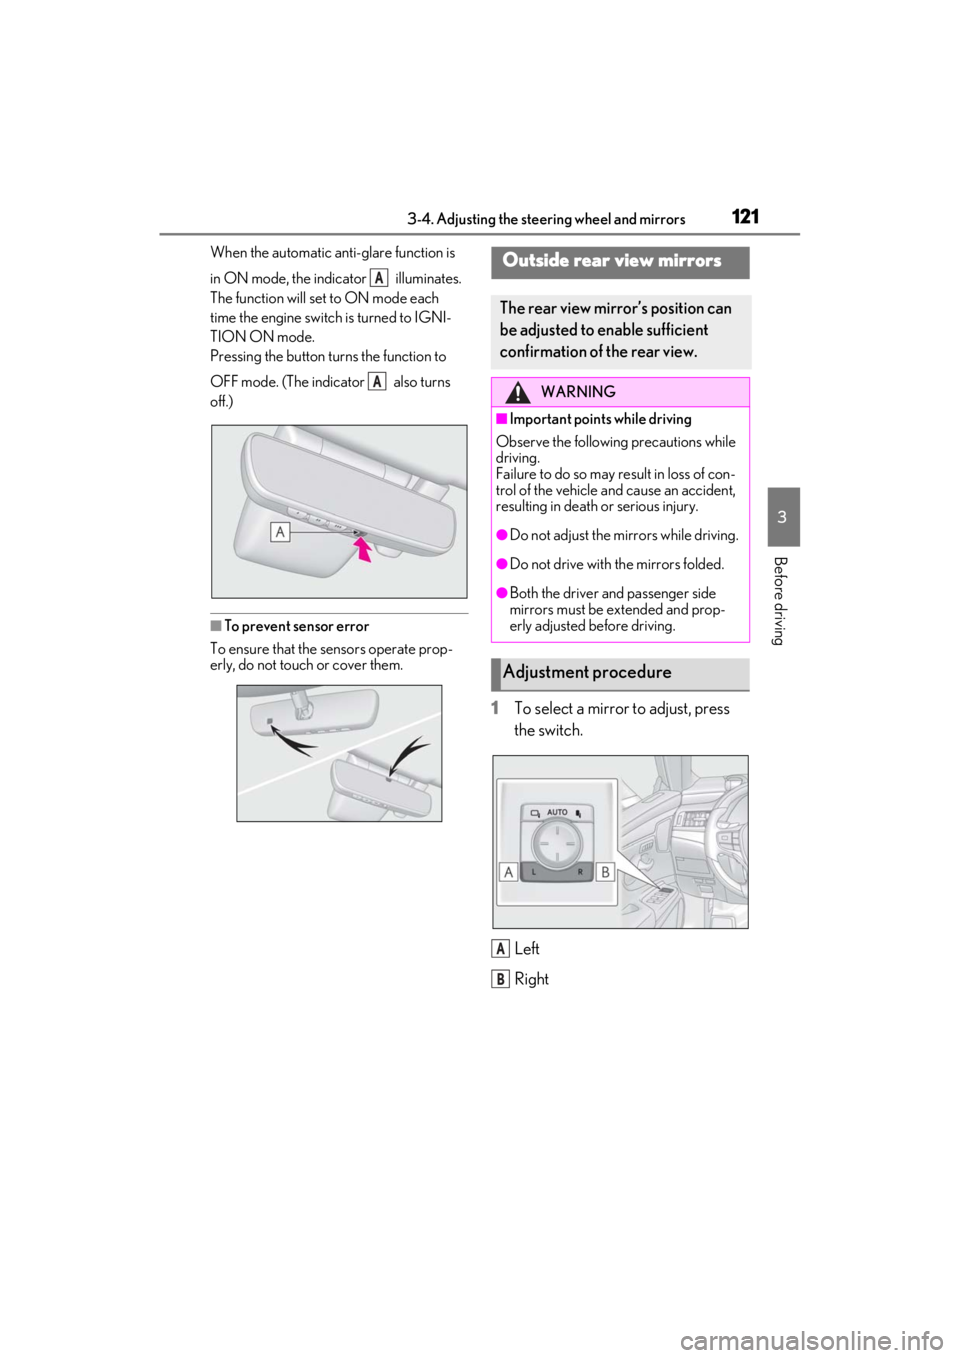
When the automatic anti-glare function is
in ON mode, the indicator illuminates.
The function will set to ON mode each
time the engine switch is turned to IGNI-
TION ON mode.
Pressing the button turns the function to
OFF mode. (The indicator also turns
off.)
■To prevent sensor error
To ensure that the sensors operate prop-
erly, do not touch or cover them.
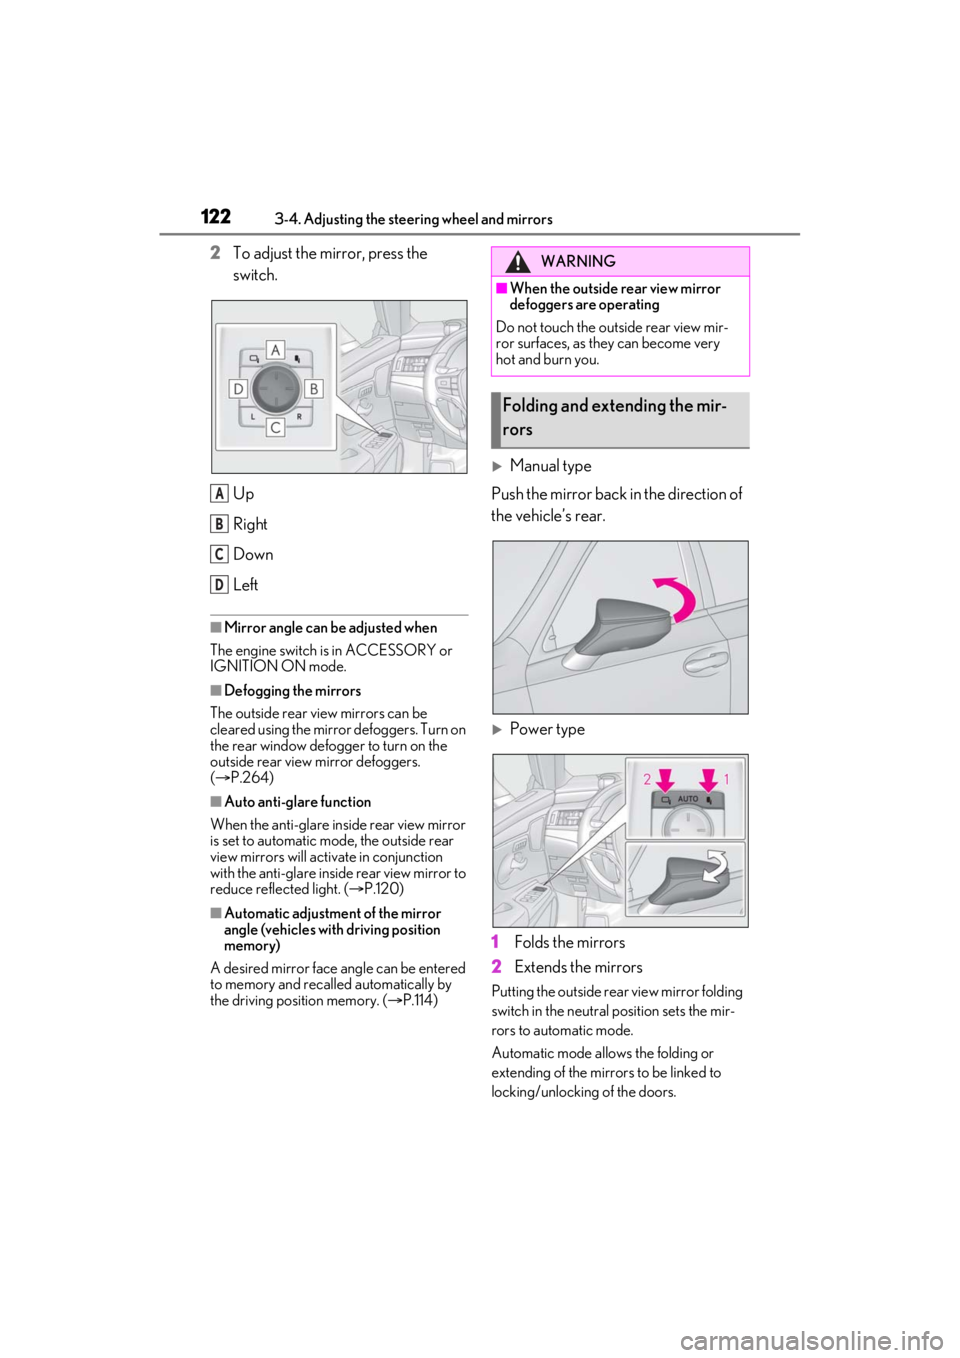
1 To select a mirror to adjust, press
the switch.
Left
Right
A
A
Outside rear view mirrors
The rear view mirror’s position can
be adjusted to enable sufficient
confirmation of the rear view.
WARNING
■Important points while driving
Observe the following precautions while
driving.
Failure to do so may result in loss of con-
trol of the vehicle and cause an accident,
resulting in death or serious injury.
●Do not adjust the mirrors while driving.
●Do not drive with the mirrors folded.
●Both the driver and passenger side
mirrors must be ex tended and prop-
erly adjusted before driving.
Adjustment procedure
A
B
Page 122 of 464
1223-4. Adjusting the steering wheel and mirrors
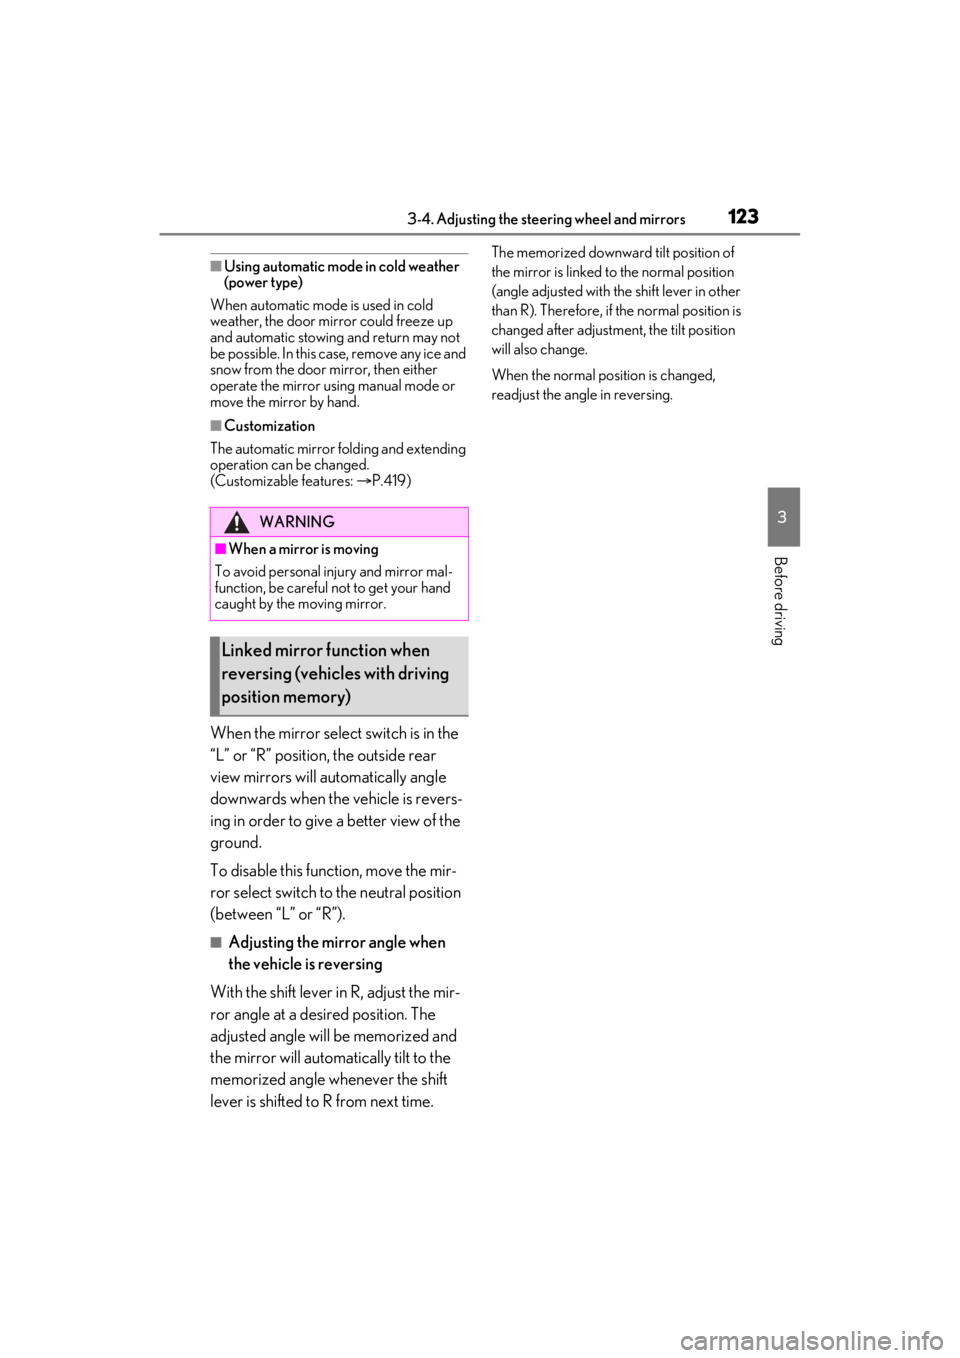
2To adjust the mirror, press the
switch.
Up
Right
Down
Left
■Mirror angle can be adjusted when
The engine switch is in ACCESSORY or
IGNITION ON mode.
■Defogging the mirrors
The outside rear view mirrors can be
cleared using the mirror defoggers. Turn on
the rear window defogger to turn on the
outside rear view mirror defoggers.
( P.264)
■Auto anti-glare function
When the anti-glare insi de rear view mirror
is set to automatic mode, the outside rear
view mirrors will activate in conjunction
with the anti-glare inside rear view mirror to
reduce reflected light. ( P.120)
■Automatic adjustment of the mirror
angle (vehicles with driving position
memory)
A desired mirror face angle can be entered
to memory and recalled automatically by
the driving position memory. ( P.114)
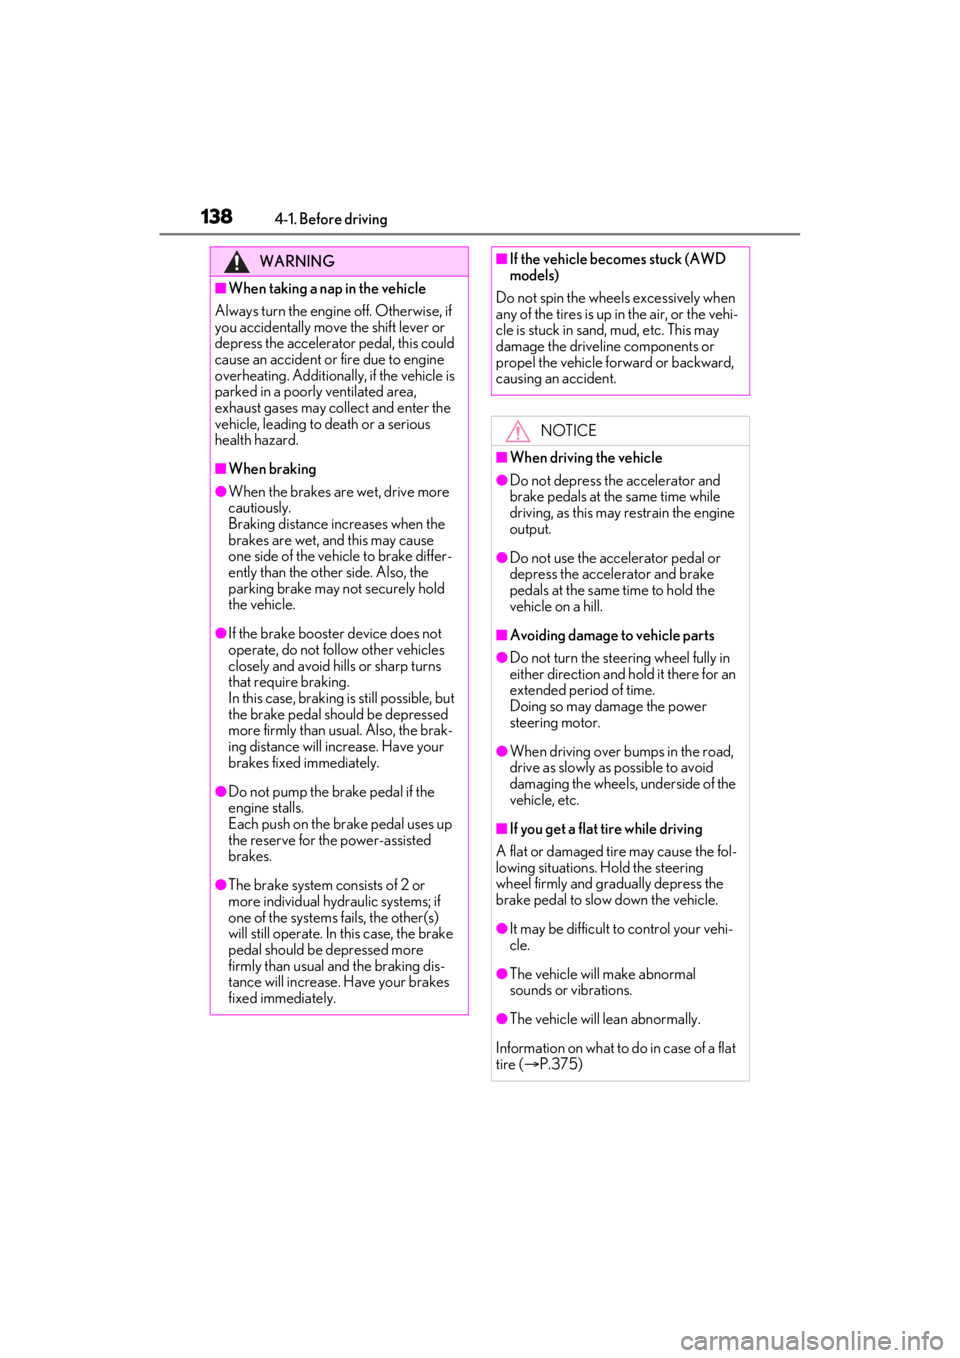
Manual type
Push the mirror back in the direction of
the vehicle’s rear.
Power type
1 Folds the mirrors
2 Extends the mirrors
Putting the outside rear view mirror folding
switch in the neutral position sets the mir-
rors to automatic mode.
Automatic mode allows the folding or
extending of the mirrors to be linked to
locking/unlocking of the doors.
A
B
C
D
WARNING
■When the outside rear view mirror
defoggers are operating
Do not touch the outside rear view mir-
ror surfaces, as they can become very
hot and burn you.
Folding and extending the mir-
rors
Page 123 of 464
1233-4. Adjusting the steering wheel and mirrors
3
Before driving
■Using automatic mode in cold weather
(power type)
When automatic mode is used in cold
weather, the door mirror could freeze up
and automatic stowing and return may not
be possible. In this case, remove any ice and
snow from the door mirror, then either
operate the mirror using manual mode or
move the mirror by hand.
■Customization
The automatic mirror fo lding and extending
operation can be changed.
(Customizable features: P.419)
When the mirror select switch is in the
“L” or “R” position, the outside rear
view mirrors will automatically angle
downwards when the vehicle is revers-
ing in order to give a better view of the
ground.
To disable this function, move the mir-
ror select switch to the neutral position
(between “L” or “R”).
■Adjusting the mirror angle when
the vehicle is reversing
With the shift lever in R, adjust the mir-
ror angle at a desired position. The
adjusted angle will be memorized and
the mirror will automatically tilt to the
memorized angle whenever the shift
lever is shifted to R from next time.
The memorized downward tilt position of
the mirror is linked to the normal position
(angle adjusted with th e shift lever in other
than R). Therefore, if the normal position is
changed after adjustment, the tilt position
will also change.
When the normal position is changed,
readjust the angle in reversing.
WARNING
■When a mirror is moving
To avoid personal injury and mirror mal-
function, be careful not to get your hand
caught by the moving mirror.
Linked mirror function when
reversing (vehicles with driving
position memory)
Page 134 of 464

1344-1. Before driving
4-1.Before driving
■Starting the engine
P.144
■Driving
1 With the brake pedal depressed,
shift the shift lever to D. ( P.150)
2 If the parking brake is in manual
mode, release the parking brake.
(P.154)
3 Gradually release the brake pedal
and gently depress the accelerator
pedal to accelerate the vehicle.
■Stopping
1 With the shift lever in D, depress
the brake pedal.
2 If necessary, set the parking brake.
If the vehicle is to be stopped for an
extended period of time, shift the shift lever
to P or N. ( P.150)
■Parking the vehicle
1 With the shift lever in D, depress
the brake pedal.
2 Set the parking brake ( P.154),
and shift the shift lever to P
( P.150).
3 Press the engine switch to stop the
engine.
4 Lock the door, making sure that
you have the electronic key on your
person.
If parking on a hill, block the wheels as
needed.
■Starting off on a steep uphill
1 Make sure that the parking brake is
set with the brake pedal depressed,
and then shift the shift lever to D.
2 Release the brake pedal and gently
depress the accelerator pedal.
3 Release the parking brake.
■When starting off on a uphill
The hill-start assist control will activate.
( P.246)
■Driving in the rain
●Drive carefully when it is raining, because
visibility will be reduced, the windows
may become fogged-up, and the road
will be slippery.
●Drive carefully when it starts to rain,
because the road surface will be espe-
cially slippery.
●Refrain from high speeds when driving on
an expressway in the rain, because there
may be a layer of wa ter between the tires
and the road surface, preventing the
steering and brakes from operating
properly.
■Engine speed while driving
In the following conditions, the engine
speed may become high while driving. This
is due to automatic up-shifting control or
down-shifting implementation to meet driv-
ing conditions. It does not indicate sudden
acceleration.
●The vehicle is judged to be driving uphill
or downhill
●When the accelerato r pedal is released
●When the brake pedal is firmly or quickly
depressed
■Restraining the engine output (Brake
Override System)
●When the accelerator and brake pedals
are depressed at the same time, the
engine output may be restrained.
Driving the vehicle
The following procedures should be
observed to ensure safe driving:
Driving procedure
Page 136 of 464

1364-1. Before driving
WARNING
●Use engine braking (downshift) to
maintain a safe speed when driving
down a steep hill.
Using the brakes continuously may
cause the brakes to overheat and lose
effectiveness. (P.149)
●Do not adjust the positions of the
steering wheel, the seat, or the inside
or outside rear view mirrors while driv-
ing.
Doing so may result in a loss of vehicle
control.
●Always check that all passengers’
arms, heads or other parts of their
body are not outside the vehicle.
●AWD models: Do not drive the vehicle
off-road. This is not an AWD vehicle
designed for off-road driving. Proceed
with all due caution if it becomes
unavoidable to drive off-road.
●Do not drive across a river or through
other bodies of water. This may cause
electric/electronic components to
short circuit, damage the engine or
cause other serious damage to the
vehicle.
●Do not drive in excess of the speed
limit. Even if the legal speed limit per-
mits it, do not drive over 85 mph (140
km/h) unless your vehicle has high-
speed capability tires. Driving over 85
mph (140 km/h) may result in tire fail-
ure, loss of control and possible injury.
Be sure to consult a tire dealer to
determine whether the tires on your
vehicle are high-speed capability tires
or not before driving at such speeds.
■When driving on slippery road sur-
faces
●Sudden braking, acceleration and
steering may cause tire slippage and
reduce your ability to control the vehi-
cle.
●Sudden acceleration, engine braking
due to shifting, or changes in engine
speed could cause the vehicle to skid,
resulting in an accident.
●After driving through a puddle, lightly
depress the brake pedal to make sure
that the brakes are functioning prop-
erly. Wet brake pads may prevent the
brakes from functioning properly. If
the brakes on only one side are wet
and not functioning properly, steering
control may be affected.
■When shifting the shift lever
●Do not let the vehicle roll backward
while the shift lever is in a driving posi-
tion or roll forward while the shift lever
is in R.
Doing so may cause the engine to stall
or lead to poor brake and steering
performance, resulting in an accident
or damage to the vehicle.
●Do not shift the shif t lever to P while
the vehicle is moving.
Doing so can damage the transmission
and may result in a loss of vehicle con-
trol.
●Do not shift the shift lever to R while
the vehicle is moving forward.
Doing so can damage the transmission
and may result in a loss of vehicle con-
trol.
●Do not shift the shift lever to a driving
position while the vehicle is moving
backward.
Doing so can damage the transmission
and may result in a loss of vehicle con-
trol.
●Shifting the shift lever to N while the
vehicle is moving will disengage the
engine from the transmission. Engine
braking is not available when N is
selected.
Page 138 of 464
1384-1. Before driving
WARNING
■When taking a nap in the vehicle
Always turn the engine off. Otherwise, if
you accidentally move the shift lever or
depress the accelerator pedal, this could
cause an accident or fire due to engine
overheating. Additionally, if the vehicle is
parked in a poorly ventilated area,
exhaust gases may collect and enter the
vehicle, leading to death or a serious
health hazard.
■When braking
●When the brakes are wet, drive more
cautiously.
Braking distance increases when the
brakes are wet, and this may cause
one side of the vehicle to brake differ-
ently than the other side. Also, the
parking brake may not securely hold
the vehicle.
●If the brake booster device does not
operate, do not follow other vehicles
closely and avoid hills or sharp turns
that require braking.
In this case, braking is still possible, but
the brake pedal should be depressed
more firmly than usual. Also, the brak-
ing distance will increase. Have your
brakes fixed immediately.
●Do not pump the brake pedal if the
engine stalls.
Each push on the brake pedal uses up
the reserve for the power-assisted
brakes.
●The brake system consists of 2 or
more individual hydraulic systems; if
one of the systems fails, the other(s)
will still operate. In this case, the brake
pedal should be depressed more
firmly than usual and the braking dis-
tance will increase. Have your brakes
fixed immediately.
■If the vehicle becomes stuck (AWD
models)
Do not spin the wheels excessively when
any of the tires is up in the air, or the vehi-
cle is stuck in sand, mud, etc. This may
damage the driveline components or
propel the vehicle forward or backward,
causing an accident.
NOTICE
■When driving the vehicle
●Do not depress the accelerator and
brake pedals at th e same time while
driving, as this may restrain the engine
output.
●Do not use the accelerator pedal or
depress the accelerator and brake
pedals at the same time to hold the
vehicle on a hill.
■Avoiding damage to vehicle parts
●Do not turn the steering wheel fully in
either direction and hold it there for an
extended period of time.
Doing so may damage the power
steering motor.
●When driving over bumps in the road,
drive as slowly as possible to avoid
damaging the wheels, underside of the
vehicle, etc.
■If you get a flat tire while driving
A flat or damaged tire may cause the fol-
lowing situations. Hold the steering
wheel firmly and gradually depress the
brake pedal to slow down the vehicle.
●It may be difficult to control your vehi-
cle.
●The vehicle will make abnormal
sounds or vibrations.
●The vehicle will lean abnormally.
Information on what to do in case of a flat
tire ( P.375)
Page 145 of 464

1454-2. Driving procedures
4
Driving
■If the battery is discharged
The engine cannot be started using the
smart access system with push-button start.
Refer to P.389 to restart the engine.
■Electronic key battery depletion
P.92
■Conditions affe cting operation
P.108
■Notes for the entry function
P.108
■Steering lock function
●After turning the engine switch off and
opening and closing the doors, the steer-
ing wheel will be lock ed due to the steer-
ing lock function. Operating the engine
switch again automatically cancels the
steering lock.
●When the steering lock cannot be
released, “Push Engine Switch while
Turning Steering Whee l in Either Direc-
tion” will be displayed on the multi-infor-
mation display.
Check that the shift leve r is set in P. Press
the engine switch shor tly and firmly while
turning the steering wheel left and right.
●To prevent the steering lock motor from
overheating, operation of the motor may
be suspended if the engine is turned on
and off repeatedly in a short period of
time. In this case, refrain from operating
the engine switch. After about 10 sec-
onds, the steering lock motor will resume
functioning.
■If there is a malfun ction in the smart
access system with push-button start
If “Access System with Elec. Key Malfunc-
tion See Owner’s Manual” is displayed on
the multi-information display, the system
may be malfunctioning. Have the vehicle inspected by your Lexus dealer immedi-
ately.
■Electronic key battery
P.341
■Operation of the engine switch
●If the switch is no t pressed shortly and
firmly, the engine switch mode may not
change or the engine may not start.
●If attempting to restart the engine imme-
diately after turning th e engine switch off,
the engine may not start in some cases.
After turning the engine switch off, please
wait a few seconds be fore restarting the
engine.
■Customization
If the smart access system with push-button
start has been deactivated in a customized
setting, refer to P.419.
WARNING
■When starting the engine
Always start the engine while sitting in
the driver’s seat. Do not depress the
accelerator pedal while starting the
engine under any circumstances.
Doing so may cause an accident result-
ing in death or serious injury.
■Caution while driving
If engine failure occurs while the vehicle
is moving, do not lock or open the doors
until the vehicle reaches a safe and com-
plete stop. Activation of the steering lock
in this circumstance may lead to an acci-
dent, resulting in death or serious injury.
NOTICE
■When starting the engine
●Do not race a cold engine.
●If the engine becomes difficult to start
or stalls frequently, have your vehicle
checked by your Lexus dealer imme-
diately.
Page 160 of 464
1604-3. Operating the lights and wipers
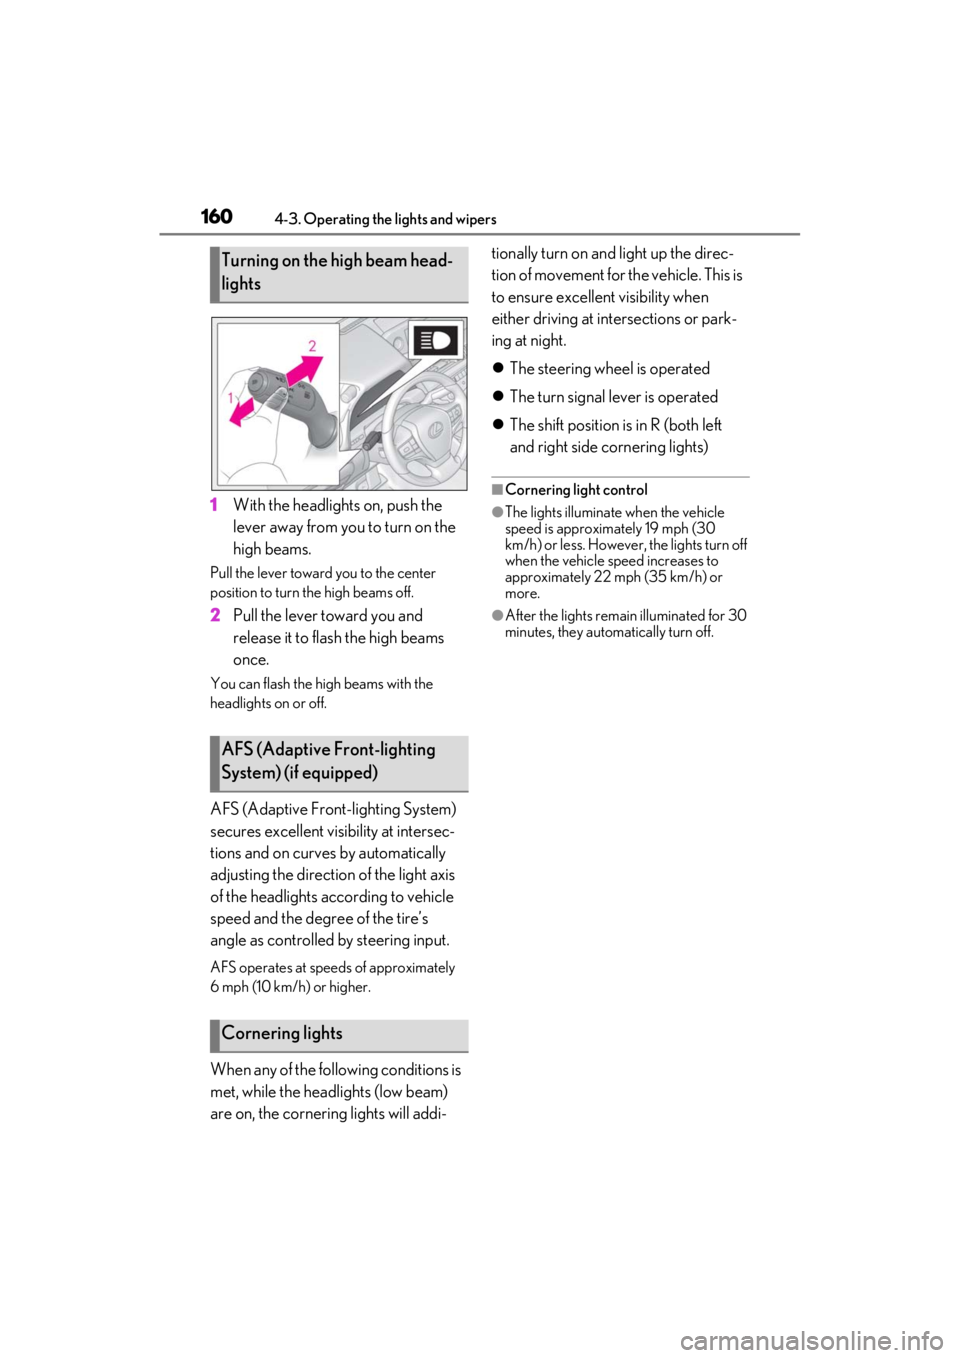
1With the headlights on, push the
lever away from you to turn on the
high beams.
Pull the lever toward you to the center
position to turn the high beams off.
2Pull the lever toward you and
release it to flash the high beams
once.
You can flash the high beams with the
headlights on or off.
AFS (Adaptive Front-lighting System)
secures excellent visibility at intersec-
tions and on curves by automatically
adjusting the direction of the light axis
of the headlights according to vehicle
speed and the degree of the tire’s
angle as controlled by steering input.
AFS operates at speed s of approximately
6 mph (10 km/h) or higher.
When any of the following conditions is
met, while the headlights (low beam)
are on, the cornering lights will addi- tionally turn on and light up the direc-
tion of movement for the vehicle. This is
to ensure excellent visibility when
either driving at intersections or park-
ing at night.
The steering wheel is operated
The turn signal lever is operated
The shift position is in R (both left
and right side cornering lights)
■Cornering light control
●The lights illuminate when the vehicle
speed is approximately 19 mph (30
km/h) or less. However, the lights turn off
when the vehicle speed increases to
approximately 22 mph (35 km/h) or
more.
●After the lights remain illuminated for 30
minutes, they automatically turn off.
Turning on the high beam head-
lights
AFS (Adaptive Front-lighting
System) (if equipped)
Cornering lights