2021 KIA SPORTAGE service
[x] Cancel search: servicePage 4 of 58

2*IF EQUIPPED SPORTAGE FEATURES & FUNCTIONS GUIDE
TABLE OF CONTENTS
VIDEOS & QR CODES .....Inside Front Cover
INSTRUMENT CLUSTER
Instrument Cluster Overview ................03Indicators & Warning Lights ................04Tire Pressure Monitoring System ( TPMS) ......05Fuel Economy ...........................05Drive Mode Integrated Control System ........06ECO Mode (Active ECO) ....................06
VEHICLE SETTINGS
LCD Instrument Cluster Modes* .............07Trip Modes / Trip Computer .................07Instant Fuel Consumption Mode* ............07User Settings Mode .......................08Service Interval Mode .....................08
ADVANCED DRIVER ASSISTANCE SYSTEMS (ADAS)
Blind-Spot Collision Warning (BCW )* ..........09Rear Cross-Traffic Collision Warning (RCCW )* ..09Forward Collision-Avoidance Assist (FCA)* .....10Lane Keeping Assist (LK A)* .................11Driver Attention Warning (DAW )* .............12
DRIVER’S PANEL
Instrument Cluster Control .................13Electronic Stability Control (ESC) ............13Hill-Start Assist Control (HAC) ...............13Power Liftgate Open/Close Button* ...........13Power Windows, Window Lock & Central Door Lock ....................14Automatic Door Lock /Unlock. . . . . . . . . . . . . . . . 14Power Folding Outside Mirrors* ..............14Heated Outside Mirrors* ...................14Engine Start /Stop Button* ..................15
STEERING WHEEL CONTROLS
Headlights & High Beams ..................16Turn Signals & Fog Lights* .................17Windshield Wipers & Washers ...............17Rear Wiper & Washer .....................17Smart Cruise Control (SCC)* ................18Cruise Control (CC) .......................19Tilt / Telescoping Steering Wheel .............20Heated Steering Wheel* ...................20
AUDIO SYSTEMS
Audio Controls ...........................21Bluetooth® Wireless Technology .............22Android Auto™ / Apple CarPlay® Setup ........24Standard Audio System* ...................25UVO link Activation* / UVO Assistance* ........26Kia Access with UVO link App Download .......27Kia Access with UVO link App Features Guide ...27UVO link* ...............................28UVO link with Navigation* ..................29
CENTER PANEL
Multimedia USB Port, Power Outlets & USB Charger Port .....................30Digital Clock ............................30Wireless Smartphone Charging System* .......31Automatic Climate Control* .................32Manual Climate Control* ...................33Automatic Gear Shift with Sportmatic® Shifting .34Paddle Shifters* .........................34Electronic Parking Brake (EPB)* .............35Auto Hold* ..............................35Downhill Brake Control ....................36AWD (All-Wheel Drive) Lock* ...............36Forward/Reverse Parking Distance Warning (PDW ) 36Rear View Monitor (RVM) ..................37Seat Warmers* / Ventilated Seats* ...........37
S E AT I N G
Power Adjustable Driver’s Seat* .............386-Way Manual Adjustable Driver’s Seat* .......38Reclining/Folding Rear Seats ...............39Unfastening Center Seat Belt ...............39Front Seat Headrest Adjustment .............39
OTHER KEY FEATURES
Smart Key* .............................40Remote Keyless Entry (Folding Key)* ..........41Double-Turn Lock /Unlock All ................41Fuel Cap / Malfunction Indicator .............42Fuel Filler Lid Release .....................42HomeLink® with Auto-Dimming Rearview Mirror* 43Map/Room Lamps ........................44Panoramic Sunroof with Power Sunshade* .....44Power Liftgate* ..........................45Smart Power Liftgate* .....................46 Liftgate Release Button ....................46Sunvisor ...............................47Hood Release Lever and Latch ..............47Tire Mobility Kit .........................48
SAFETY FEATURES
Seat Belts ..............................49Child-Protector Rear Door Lock ..............49Occupant Detection System (ODS) / Passenger Airbag Off Indicator ...........49
NORMAL MAINTENANCE - TURBO ..50
NORMAL MAINTENANCE - NON-TURBO .................Back Cover
LEGAL DISCLAIMERS ....Inside Back Cover
Page 7 of 58

5
INSTRUMENT CLUSTER
ALWAYS CHECK THE OWNER’S MANUAL FOR COMPLETE OPER ATING INFORMATION AND SAFET Y WARNINGS. *IF EQUIPPED
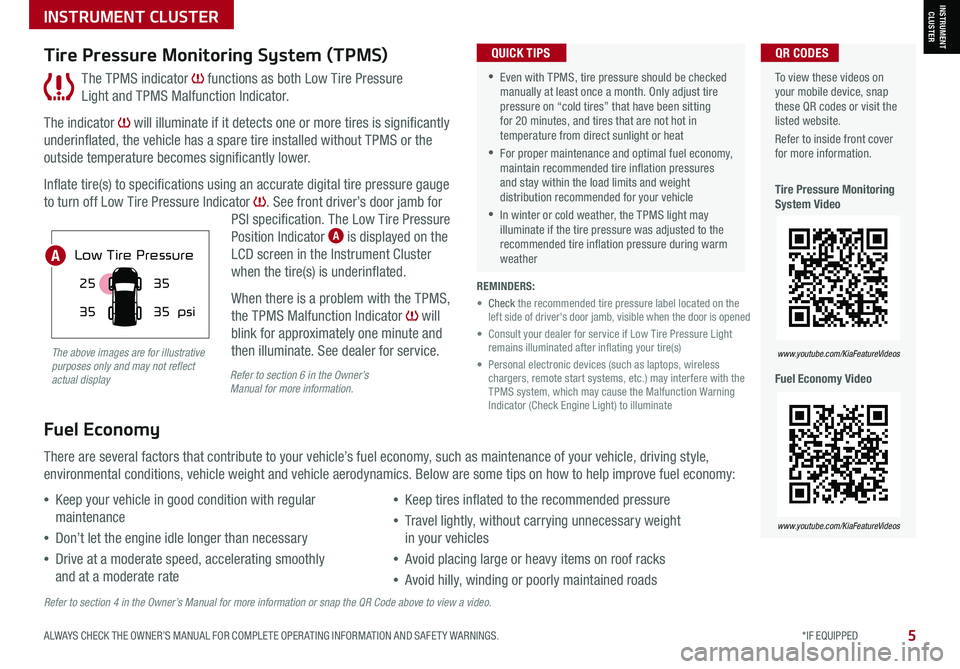
The TPMS indicator functions as both Low Tire Pressure
Light and TPMS Malfunction Indicator.
The indicator will illuminate if it detects one or more tires is significantly
underinflated, the vehicle has a spare tire installed without TPMS or the
outside temperature becomes significantly lower.
Inflate tire(s) to specifications using an accurate digital tire pressure gauge
to turn off Low Tire Pressure Indicator . See front driver’s door jamb for
PSI specification. The Low Tire Pressure
Position Indicator A is displayed on the
LCD screen in the Instrument Cluster
when the tire(s) is underinflated.
When there is a problem with the TPMS,
the TPMS Malfunction Indicator will
blink for approximately one minute and
then illuminate. See dealer for service.
Tire Pressure Monitoring System (TPMS)
REMINDERS:
• Check the recommended tire pressure label located on the left side of driver's door jamb, visible when the door is opened
• Consult your dealer for service if Low Tire Pressure Light remains illuminated after inflating your tire(s)
• Personal electronic devices (such as laptops, wireless chargers, remote start systems, etc.) may interfere with the TPMS system, which may cause the Malfunction Warning Indicator (Check Engine Light) to illuminate
Fuel Economy
There are several factors that contribute to your vehicle’s fuel economy, such as maintenance of your vehicle, driving style,
environmental conditions, vehicle weight and vehicle aerodynamics. Below are some tips on how to help improve fuel economy:
Refer to section 4 in the Owner’s Manual for more information or snap the QR Code above to view a video.
The above images are for illustrative purposes only and may not reflect actual displayRefer to section 6 in the Owner’sManual for more information.
•Keep your vehicle in good condition with regular
maintenance
•Don’t let the engine idle longer than necessary
•Drive at a moderate speed, accelerating smoothly
and at a moderate rate
•Keep tires inflated to the recommended pressure
•Travel lightly, without carrying unnecessary weight
in your vehicles
•Avoid placing large or heavy items on roof racks
•Avoid hilly, winding or poorly maintained roads
To view these videos on your mobile device, snap these QR codes or visit the listed website.
Refer to inside front cover for more information.
Tire Pressure Monitoring System Video
Fuel Economy Video
www.youtube.com/KiaFeatureVideos
www.youtube.com/KiaFeatureVideos
25
35 35
35
psi
Low Tire Pressure
35
25
35
35
psi
Low Tire Pressure
QR CODES
•Even with TPMS, tire pressure should be checked manually at least once a month. Only adjust tire pressure on “cold tires” that have been sitting for 20 minutes, and tires that are not hot in temperature from direct sunlight or heat
•For proper maintenance and optimal fuel economy, maintain recommended tire inflation pressures and stay within the load limits and weight distribution recommended for your vehicle
•In winter or cold weather, the TPMS light may illuminate if the tire pressure was adjusted to the recommended tire inflation pressure during warm weather
QUICK TIPS
A
INSTRUMENT CLUSTER
Page 9 of 58

*IF EQUIPPED 7ALWAYS CHECK THE OWNER’S MANUAL FOR COMPLETE OPER ATING INFORMATION AND SAFET Y WARNINGS.
VEHICLE SETTINGS
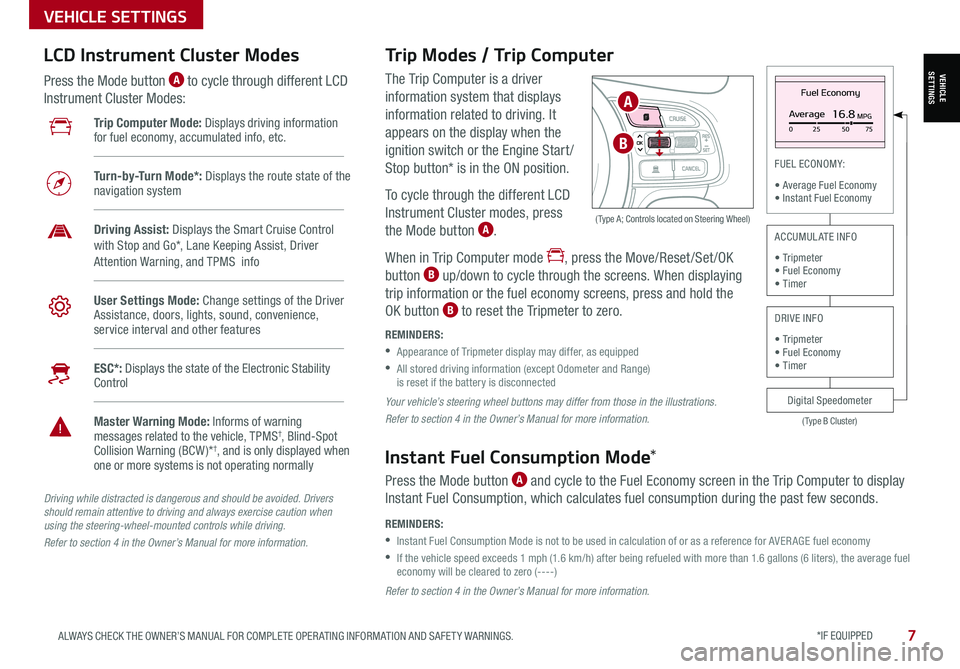
The Trip Computer is a driver
information system that displays
information related to driving. It
appears on the display when the
ignition switch or the Engine Start /
Stop button* is in the ON position.
To cycle through the different LCD
Instrument Cluster modes, press
the Mode button A.
When in Trip Computer mode , press the Move/Reset /Set /OK
button B up/down to cycle through the screens. When displaying
trip information or the fuel economy screens, press and hold the
OK button B to reset the Tripmeter to zero.
REMINDERS:
•
Appearance of Tripmeter display may differ, as equipped
•
All stored driving information (except Odometer and Range) is reset if the battery is disconnected
OK
Trip Modes / Trip Computer LCD Instrument Cluster Modes
Press the Mode button A to cycle through different LCD
Instrument Cluster Modes:
Your vehicle’s steering wheel buttons may differ from those in the illustrations.
Refer to section 4 in the Owner’s Manual for more information.
Driving while distracted is dangerous and should be avoided. Drivers should remain attentive to driving and always exercise caution when using the steering-wheel-mounted controls while driving.
Refer to section 4 in the Owner’s Manual for more information.
Refer to section 4 in the Owner’s Manual for more information.
( Type A; Controls located on Steering Wheel)
Instant Fuel Consumption Mode*
Press the Mode button A and cycle to the Fuel Economy screen in the Trip Computer to display
Instant Fuel Consumption, which calculates fuel consumption during the past few seconds.
REMINDERS:
•
Instant Fuel Consumption Mode is not to be used in calculation of or as a reference for AVER AGE fuel economy
•
If the vehicle speed exceeds 1 mph (1.6 km/h) after being refueled with more than 1.6 gallons (6 liters), the average fuel economy will be cleared to zero (----)
Fuel Economy
Average16.8MPG025 5075
(Type B Cluster)
FUEL ECONOMY:
• Average Fuel Economy• Instant Fuel Economy
Digital Speedometer
ACCUMULATE INFO
• Tripmeter• Fuel Economy• Timer
DRIVE INFO
• Tripmeter • Fuel Economy • Timer
Trip Computer Mode: Displays driving information for fuel economy, accumulated info, etc.
Turn-by-Turn Mode*: Displays the route state of the navigation system
Driving Assist: Displays the Smart Cruise Control with Stop and Go*, Lane Keeping Assist, Driver
Attention Warning, and TPMS info
User Settings Mode: Change settings of the Driver Assistance, doors, lights, sound, convenience, service interval and other features
ESC*: Displays the state of the Electronic Stability Control
Master Warning Mode: Informs of warning messages related to the vehicle, TPMS†, Blind-Spot Collision Warning (BCW )*†, and is only displayed when one or more systems is not operating normally
A
B
VEHICLESETTINGS
Page 10 of 58

8*IF EQUIPPED SPORTAGE FEATURES & FUNCTIONS GUIDE
VEHICLE SETTINGS
Service Interval Mode
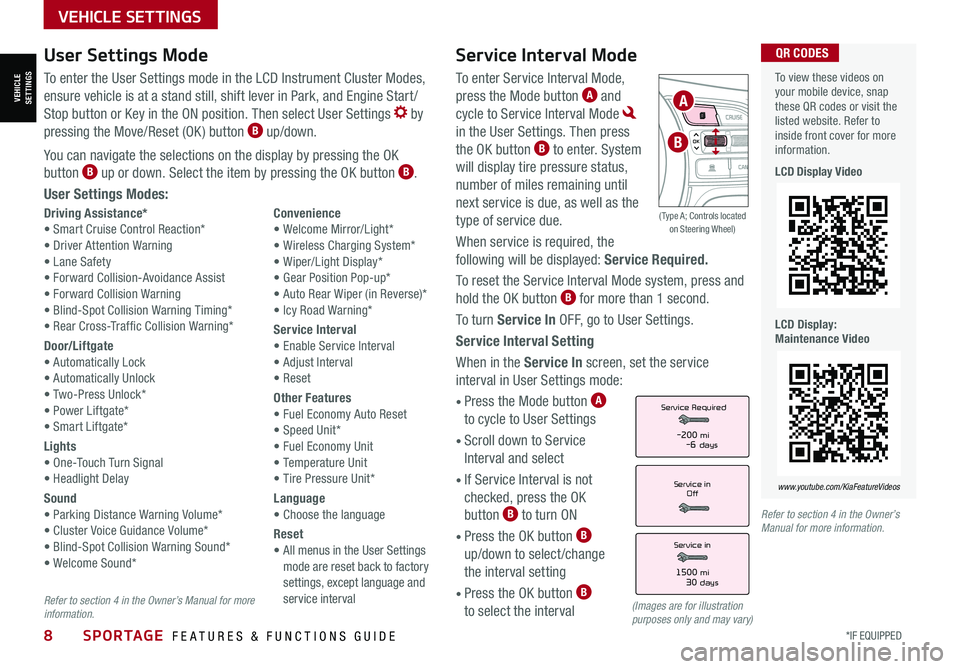
To enter Service Interval Mode,
press the Mode button A and
cycle to Service Interval Mode
in the User Settings. Then press
the OK button B to enter. System
will display tire pressure status,
number of miles remaining until
next service is due, as well as the
type of service due.
When service is required, the
following will be displayed: Service Required.
To reset the Service Interval Mode system, press and
hold the OK button B for more than 1 second.
To turn Service In OFF, go to User Settings.
Service Interval Setting
When in the Service In screen, set the service
interval in User Settings mode:
• Press the Mode button A
to cycle to User Settings
• Scroll down to Service
Interval and select
•
If Service Interval is not
checked, press the OK
button B to turn ON
• Press the OK button B
up/down to select /change
the interval setting
•
Press the OK button B
to select the interval
Driving Assistance*• Smart Cruise Control Reaction*• Driver Attention Warning• Lane Safety• Forward Collision-Avoidance Assist• Forward Collision Warning• Blind-Spot Collision Warning Timing*• Rear Cross-Traffic Collision Warning*
Door/Liftgate• Automatically Lock• Automatically Unlock• Two-Press Unlock*• Power Liftgate*• Smart Liftgate*
Lights• One-Touch Turn Signal• Headlight Delay
Sound• Parking Distance Warning Volume*• Cluster Voice Guidance Volume*• Blind-Spot Collision Warning Sound*• Welcome Sound*
Convenience• Welcome Mirror/Light*• Wireless Charging System*• Wiper/Light Display*• Gear Position Pop-up*• Auto Rear Wiper (in Reverse)*• Icy Road Warning*
Service Interval• Enable Service Interval• Adjust Interval• Reset
Other Features• Fuel Economy Auto Reset• Speed Unit*• Fuel Economy Unit• Temperature Unit• Tire Pressure Unit*
Language• Choose the language
Reset•
All menus in the User Settings mode are reset back to factory settings, except language and service interval
Service in
Off
Service Required
Service in
1500 mi30 days
-200 mi-6 days
To view these videos on your mobile device, snap these QR codes or visit the listed website. Refer to inside front cover for more information.
LCD Display Video
LCD Display: Maintenance Video
www.youtube.com/KiaFeatureVideos
QR CODESUser Settings Mode
To enter the User Settings mode in the LCD Instrument Cluster Modes,
ensure vehicle is at a stand still, shift lever in Park, and Engine Start /
Stop button or Key in the ON position. Then select User Settings by
pressing the Move/Reset (OK ) button B up/down.
You can navigate the selections on the display by pressing the OK
button B up or down. Select the item by pressing the OK button B.
User Settings Modes:
(Images are for illustration purposes only and may vary)
Refer to section 4 in the Owner’s Manual for more information.
Refer to section 4 in the Owner’s Manual for more information.
OK
A
B
( Type A; Controls located on Steering Wheel)
VEHICLESETTINGS
Page 18 of 58

Headlight ON position
Parking light position
AUTOAuto Light* / DRL / HBA
OFFLights OFF
AUTO
OF F
OFF
Headlights & High Beams
To o p e r a t e :
•Rotate lever to change the Headlight function
•Push lever to turn High Beams ON
•Pull lever to flash Headlights / High Beams
AUTO Light* — When the light switch is in the AUTO Light position, the
tail lights and headlights will turn ON/OFF automatically, depending on
the amount of light outside the vehicle.
Refer to section 4 in the Owner’s Manual for more information.
Daytime Running Lights (DRL)
DRL may help others to see the front of your vehicle during the day. The
lights will be on automatically when the ignition or Engine Start /Stop
button is ON and the headlight switch is in the AUTO position, unless one
of the following occurs:
•Headlights are on
•Parking brake is applied
•Fog lights are on
•Engine is turned off
•Switch is in the OFF position
REMINDER: DRL only operates during the daytime.
High Beam Assist (HBA)
High Beam Assist is designed to automatically adjust the headlight range
by switching between high and low beams based on light detected from
other vehicles and road conditions.
To enable HBA, toggle the light switch to the AUTO Light position and turn
on the high beams by pushing the lever away from you. The High
Beam Assist indicator will illuminate.
REMINDERS:
• HBA will operate when vehicle speed exceeds 25 mph
• If the lever is pushed away from you while HBA is operational, HBA will turn off and the high beams will be on continuously
• If the light switch is switched to the headlight position, HBA will turn off and the low beams will be on continuously
• When the HBA indicator illuminates on the instrument cluster, the HBA is not working properly. See an authorized Kia dealer for service
Refer to section 4 in the Owner’s Manual for more information.
STEERING WHEEL CONTROLS
STEERING WHEEL CONTROLS
16*IF EQUIPPED SPORTAGE FEATURES & FUNCTIONS GUIDE
Page 24 of 58

22SPORTAGE FEATURES & FUNCTIONS GUIDE*IF EQUIPPED †LEGAL DISCL AIMERS ON BACK INSIDE COVER
AUDIO SYSTEMS
AUDIOSYSTEMS
TH E S YSTE M
OK
A Talk button: Press to activate voice recognition/bring up menus/place
calls with minimal voice command prompts from the system. Press
and hold to exit voice recognition
B Volume button: Press up/down to raise/lower speaker volume
Mute button: Press to mute the microphone during a call and to mute
the audio system speakers, or to pause Bluetooth® streaming media
UVO link with Navigation system* – When enrolled with a UVO link
subscription, press this button to activate the UVO Voice Assist to use
navigation guidance and search destinations
C Receive/Place Call button: Press to receive/place calls. If no phone
is paired, press button to pair a phone
D End Call button: Press to end a call, reject an incoming call or cancel
a function
For Bluetooth® Wireless Technology FAQs, go to www.kia.com, or call Consumer Information for Bluetooth® Technology at (800) 333-4KIA.
Refer to your Owner’s Manual for more specific Bluetooth® Wireless Technology phone pairing and operation instructions.
Your vehicle’s steering wheel buttons may differ from those in the illustrations. See your Owner’s Manual for more details.
Driving while distracted is dangerous and should be avoided. Drivers should remain attentive to driving and always exercise caution when using the steering-wheel-mounted controls while driving.
•
•
When using the voice command feature, wait for the system BEEP before speaking the command
•Phone book transfer upload time varies by phone model and with number of phone book entries
•Because of differences in phone quality, service providers and Bluetooth® Wireless Technology chip programming, functionality may differ from one phone to another
QUICK TIPS
Bluetooth® Wireless Technology†5,23
DC
A
B
Page 28 of 58

AUDIO SYSTEMS
AUDIOSYSTEMS
(Buttons on rearview mirror*)
UVO
26SPORTAGE FEATURES & FUNCTIONS GUIDE*IF EQUIPPED
UVO link Activation*†1
Follow these steps to activate your UVO link system:
1. Enter the activation screen on your vehicle’s head unit:
a. Press SETUP key
b. Press UVO icon
c. Press Activate UVO
2. Read and agree to Terms of Service and Privacy Policy and press SUBMIT
3. Enter smartphone number or email address to receive a verification code,
then press SUBMIT
4. Follow these steps to receive your verification code using your phone SMS
or email:
a. Check your phone SMS or email for verification code
b. Open the link in your SMS or email. A page will open requesting that you
create your account
Note: If you already have a Kia Owners
Portal account using the phone number
as your login ID, you will need to provide
your password prior to receiving the
verification code
c. Enter your first name, last name, email,
phone number, an account password,
and click CRE ATE ACCOUNT. A page will
open displaying your verification code
d. Enter the code in the head unit and press ACTIVATE
e. Go back to the page with your verification code and press
“I have entered my PIN.” A link will be provided to download
the Kia Access with UVO link app from your app store. After
installing the app, log in and enjoy
REMINDER: This vehicle is not equipped with over-the-air system updates.
Virtual Assistant A – Press to connect to the UVO Center to hear information about the UVO features
UVO Voice Local Search B – Press to connect to the search function to find points of interest or
other locations, like “cafe”
Roadside Assist C – Press to connect to the UVO Center where you can request vehicle towing services
REMINDER: These buttons may be located in the rearview mirror or the overhead console.
For more information, refer to the Car Infotainment System Quick Reference Guide. On certain models, UVO Assistance buttons are located on the Rearview Mirror.
UVO Assistance*†1
For further UVO link operations, refer to the Car Infotainment System Quick Reference Guide. For other audio system information, refer to pages 21-29.
Driving while distracted can result in a loss of vehicle control that may lead to an accident, severe bodily injury, and death. The driver’s primary responsibility is in the safe and legal operation of a vehicle, and any handheld devices, other equipment, or vehicle systems which take the driver’s eyes, attention and focus away from the safe operation of a vehicle or which are not permissible by law should never be used during operation of the vehicle.
ACB
Page 29 of 58

AUDIO SYSTEMS
AUDIOSYSTEMS
27ALWAYS CHECK THE OWNER’S MANUAL FOR COMPLETE OPER ATING INFORMATION AND SAFET Y WARNINGS. *IF EQUIPPED
Kia Access with UVO link App DownloadQR CODES
Kia Access with UVO link App Features Guide. Click this dynamic QR code to access the guide. Some phone’s operating systems may need to be updated to scan dynamic QR codes
Download the Kia Access with UVO link App by clicking this dynamic QR code. Some phone’s operating systems may need to be updated to scan dynamic QR codes.
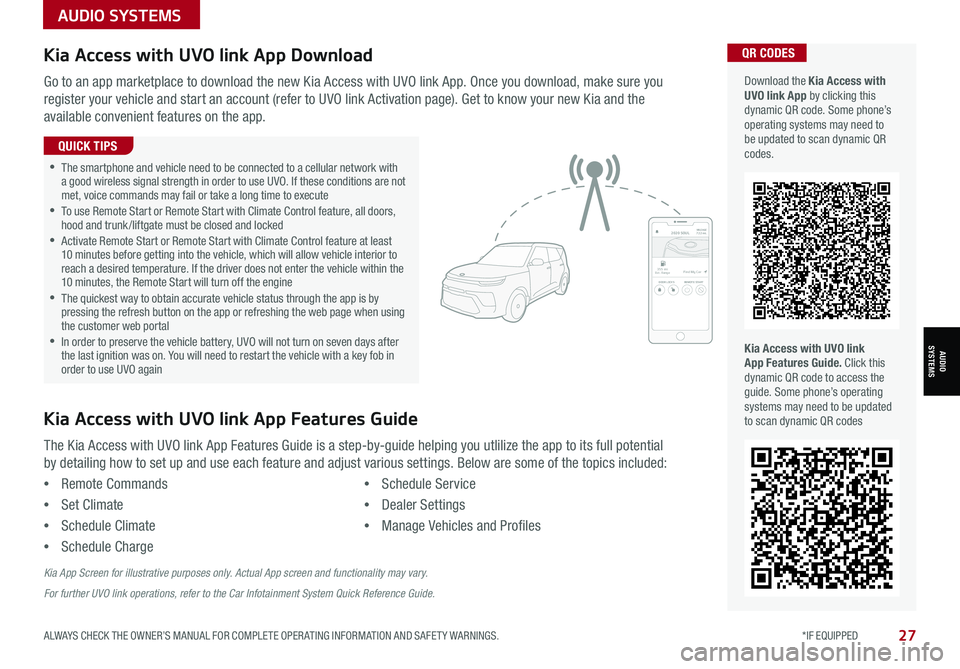
Go to an app marketplace to download the new Kia Access with UVO link App. Once you download, make sure you
register your vehicle and start an account (refer to UVO link Activation page). Get to know your new Kia and the
available convenient features on the app.
The Kia Access with UVO link App Features Guide is a step-by-guide helping you utlilize the app to its full potential
by detailing how to set up and use each feature and adjust various settings. Below are some of the topics included:
•Remote Commands
•Set Climate
•Schedule Climate
•Schedule Charge
•Schedule Service
•Dealer Settings
•Manage Vehicles and Profiles
Kia Access with UVO link App Features Guide
2020 SOULMILEAGE722 mi.
355 miEst. RangeDOOR LOCKSREMOTE STARTFind My Car
•The smartphone and vehicle need to be connected to a cellular network with a good wireless signal strength in order to use UVO. If these conditions are not met, voice commands may fail or take a long time to execute •
To use Remote Start or Remote Start with Climate Control feature, all doors, hood and trunk /liftgate must be closed and locked •
Activate Remote Start or Remote Start with Climate Control feature at least 10 minutes before getting into the vehicle, which will allow vehicle interior to reach a desired temperature. If the driver does not enter the vehicle within the 10 minutes, the Remote Start will turn off the engine •
The quickest way to obtain accurate vehicle status through the app is by pressing the refresh button on the app or refreshing the web page when using the customer web portal •In order to preserve the vehicle battery, UVO will not turn on seven days after the last ignition was on. You will need to restart the vehicle with a key fob in order to use UVO again
QUICK TIPS
Kia App Screen for illustrative purposes only. Actual App screen and functionality may vary.
For further UVO link operations, refer to the Car Infotainment System Quick Reference Guide.