2021 KIA NIRO HYBRID EV larm
[x] Cancel search: larmPage 387 of 667
561
Driving your vehicle
WARNING
FCA system is only a supple-
mental system for the driver’s
convenience. The driver has
the ultimate responsibility to
control and operate the vehi-
cle safely. Do not solely
depend on FCA system.
Rather, maintain a safe brak-
ing distance, and, if neces-
sary, depress the brake pedal
to lower the driving speed.
In certain instances and
under certain driving condi-
tions, FCA system may acti-
vate unintentionally. This ini-
tial warning message appears
on the LCD display with a
warning chime.
(Continued)
(Continued)
Also, in certain instances the
front radar sensor or camera
recognition system may not
detect the vehicle, pedestrian
or cyclist (if equipped) ahead.
FCA system may not activate
and the warning message will
not be displayed.
FCA system may unnecessar-
ily produce the warning mes-
sage and the warning alarms.
Also, due to the sensing limi-
tation, FCA system may not
produce the warning message
and the warning alarm at all.
When there is a malfunction
with FCA system, the braking
control does not operate upon
detecting a collision risk even
with other braking systems
normally operating.
(Continued)(Continued)
FCA system operates only for
the vehicle/pedestrian in
front, while driving forward. It
does not operate for any ani-
mals or vehicles in the oppo-
site direction.
FCA system does not recog-
nize the vehicle, which trans-
versally drives across the
crossroad, or the vehicle,
which is parked in the trans-
versal direction.
If the vehicle in front stops
suddenly, you may have less
control of the brake system.
Therefore, always keep safe
distance between your vehicle
and the vehicle in front of you.
FCA system may activate dur-
ing braking and the vehicle
may stop suddenly. And the
load in the vehicle may endan-
ger passengers. Therefore,
always be mindful of the load
volume in the vehicle.
(Continued)
Page 391 of 667
565
Driving your vehicle
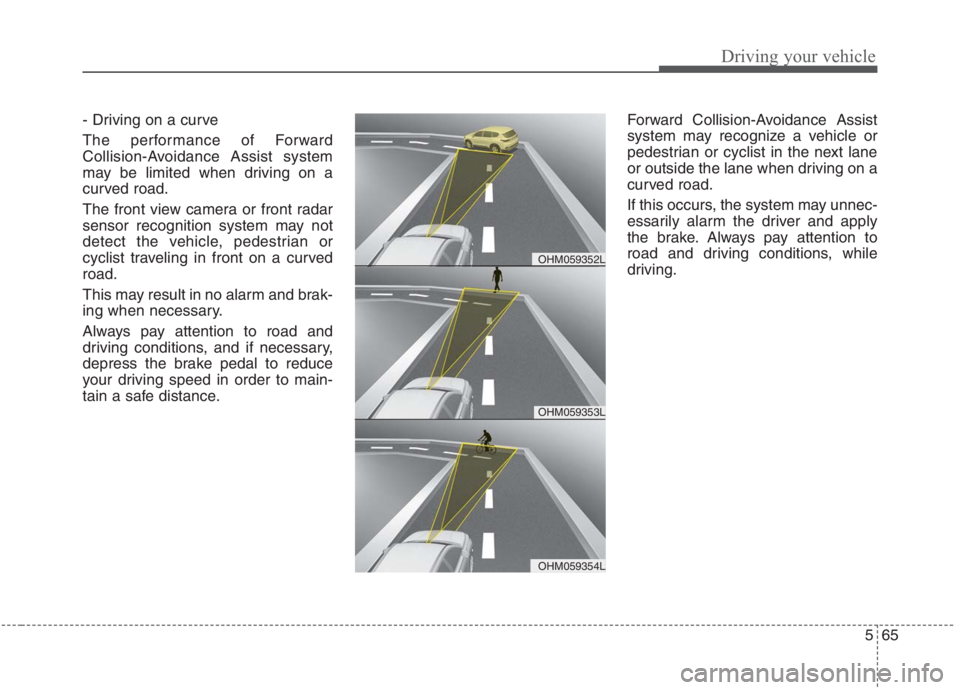
- Driving on a curve
The performance of Forward
Collision-Avoidance Assist system
may be limited when driving on a
curved road.
The front view camera or front radar
sensor recognition system may not
detect the vehicle, pedestrian or
cyclist traveling in front on a curved
road.
This may result in no alarm and brak-
ing when necessary.
Always pay attention to road and
driving conditions, and if necessary,
depress the brake pedal to reduce
your driving speed in order to main-
tain a safe distance.Forward Collision-Avoidance Assist
system may recognize a vehicle or
pedestrian or cyclist in the next lane
or outside the lane when driving on a
curved road.
If this occurs, the system may unnec-
essarily alarm the driver and apply
the brake. Always pay attention to
road and driving conditions, while
driving.
OHM059353L
OHM059352L
OHM059354L
Page 392 of 667
Driving your vehicle
66 5
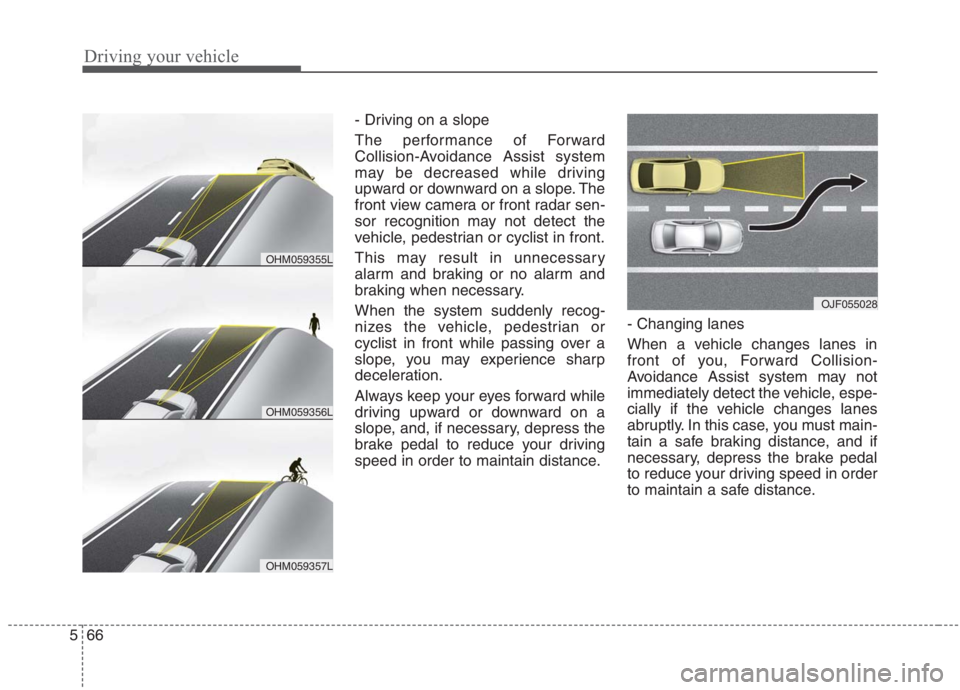
- Driving on a slope
The performance of Forward
Collision-Avoidance Assist system
may be decreased while driving
upward or downward on a slope. The
front view camera or front radar sen-
sor recognition may not detect the
vehicle, pedestrian or cyclist in front.
This may result in unnecessary
alarm and braking or no alarm and
braking when necessary.
When the system suddenly recog-
nizes the vehicle, pedestrian or
cyclist in front while passing over a
slope, you may experience sharp
deceleration.
Always keep your eyes forward while
driving upward or downward on a
slope, and, if necessary, depress the
brake pedal to reduce your driving
speed in order to maintain distance.- Changing lanes
When a vehicle changes lanes in
front of you, Forward Collision-
Avoidance Assist system may not
immediately detect the vehicle, espe-
cially if the vehicle changes lanes
abruptly. In this case, you must main-
tain a safe braking distance, and if
necessary, depress the brake pedal
to reduce your driving speed in order
to maintain a safe distance.
OJF055028
OHM059356L
OHM059355L
OHM059357L
Page 397 of 667
571
Driving your vehicle
(Continued)
The system detects lane
markers and controls the
steering wheel by a front view
camera, therefore, if the lane
markers are hard to detect,
the system may not work
properly. Always be cautious
when using the system.
When the lane markers are
hard to detect, please refer to
“DRIVER’S ATTENTION”.
Do not remove or damage the
related parts of the front view
camera system.
Do not place objects on the
crash pad that reflect light
such as mirrors, white paper,
etc. it may cause malfunction
of LKA system if sunlight is
reflected.
(Continued)(Continued)
You may not hear warning
sound of LKA system because
of the excessive audio sound.
If other beeps such as the
seat belt warning sound are in
operation and override LKA
alarming system, LKA beeps
may not occur.
At high vehicle speeds, the
steering torque needed for
assistance may not be suffi-
cient to keep your vehicle
within the lane. If so, the vehi-
cle may move out of its lane.
Always obey the speed limit
when using LKA system.
(Continued)(Continued)
If you attach objects to the
steering wheel, the system
may not assist steering.
If you attach objects to the
steering wheel, hands off
alarm may not work properly.
Page 410 of 667
Driving your vehicle
84 5
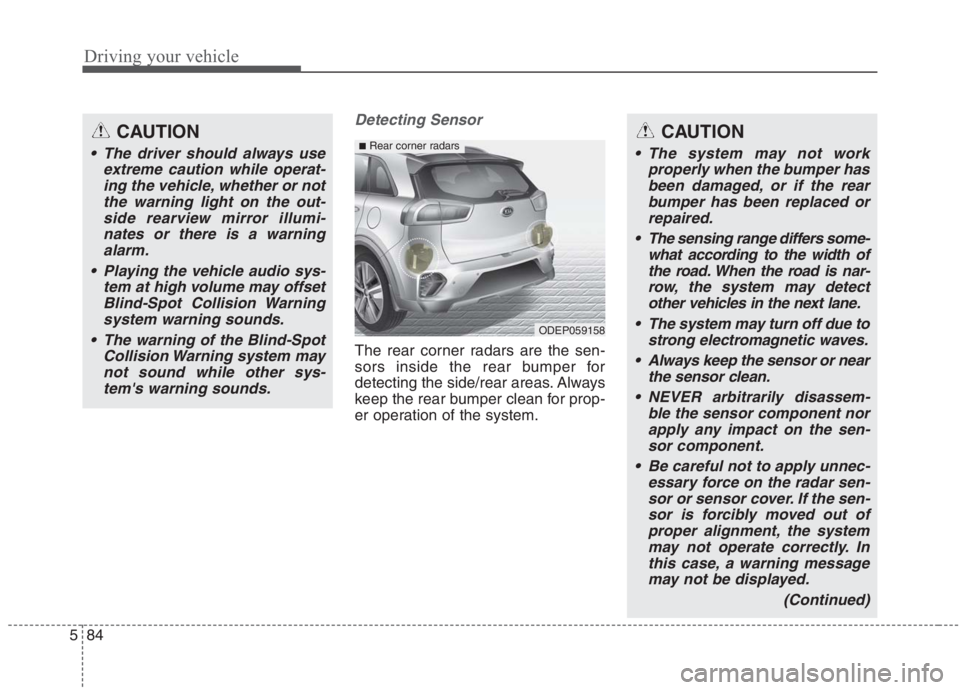
Detecting Sensor
The rear corner radars are the sen-
sors inside the rear bumper for
detecting the side/rear areas. Always
keep the rear bumper clean for prop-
er operation of the system.
CAUTION
The driver should always use
extreme caution while operat-
ing the vehicle, whether or not
the warning light on the out-
side rearview mirror illumi-
nates or there is a warning
alarm.
Playing the vehicle audio sys-
tem at high volume may offset
Blind-Spot Collision Warning
system warning sounds.
The warning of the Blind-Spot
Collision Warning system may
not sound while other sys-
tem's warning sounds.
ODEP059158
■Rear corner radarsCAUTION
The system may not work
properly when the bumper has
been damaged, or if the rear
bumper has been replaced or
repaired.
The sensing range differs some-
what according to the width of
the road. When the road is nar-
row, the system may detect
other vehicles in the next lane.
The system may turn off due to
strong electromagnetic waves.
Always keep the sensor or near
the sensor clean.
NEVER arbitrarily disassem-
ble the sensor component nor
apply any impact on the sen-
sor component.
Be careful not to apply unnec-
essary force on the radar sen-
sor or sensor cover. If the sen-
sor is forcibly moved out of
proper alignment, the system
may not operate correctly. In
this case, a warning message
may not be displayed.
(Continued)
Page 452 of 667
Driving your vehicle
126 5
LFA system operation
To use Lane Following Assist two
steps are necessary:
(1) LFA system has to be enabled,
and
(2) SCC system has to be activated
With the ignition switch or ENGINE
START/STOP button in the [ON],
select or release the setting from
“User setting →Driver Assistance →
Driving Assist →Lane Following
Assist”.
Select LFA system in the user setting
of the instrument panel.
The LFA system status is remem-
bered by the system and therefore
does not need to be enabled again
for each new journey.
(Continued)
- Depending on your surround-
ings and road conditions, LFA
system could fail to recognize
the lane and stop working. In
turn, extra caution is required
while driving with LFA system
on.
- Be sure to check the non-
operating conditions and cau-
tions for the driver before
using LFA system.
- Do not place reflective materi-
als such as white paper or
mirror on the crash pad.
Sunlight reflections can cause
a malfunction in LFA system.
- Too big sound from the sound
system can interrupt the
alarming sound from LFA sys-
tem.
(Continued)(Continued)
- Keeping your hands off the
wheel while driving will trigger
the hands-off warning and
deactivate the steering-assist
system. Put your hands back
on the wheel, then the steer-
ing-assist system will be re-
activated.
- When driving at a high speed,
the steering assist force can
become weak and the vehicle
can drive out of its lane. Extra
caution is required, and com-
ply with the speed limit.
- Attaching an object to the
steering wheel could deter
steering assistance.
- Attaching an object to the
steering wheel could deter the
hands-off alarming system.
Page 460 of 667
Driving your vehicle
134 5
Warning message and system
control
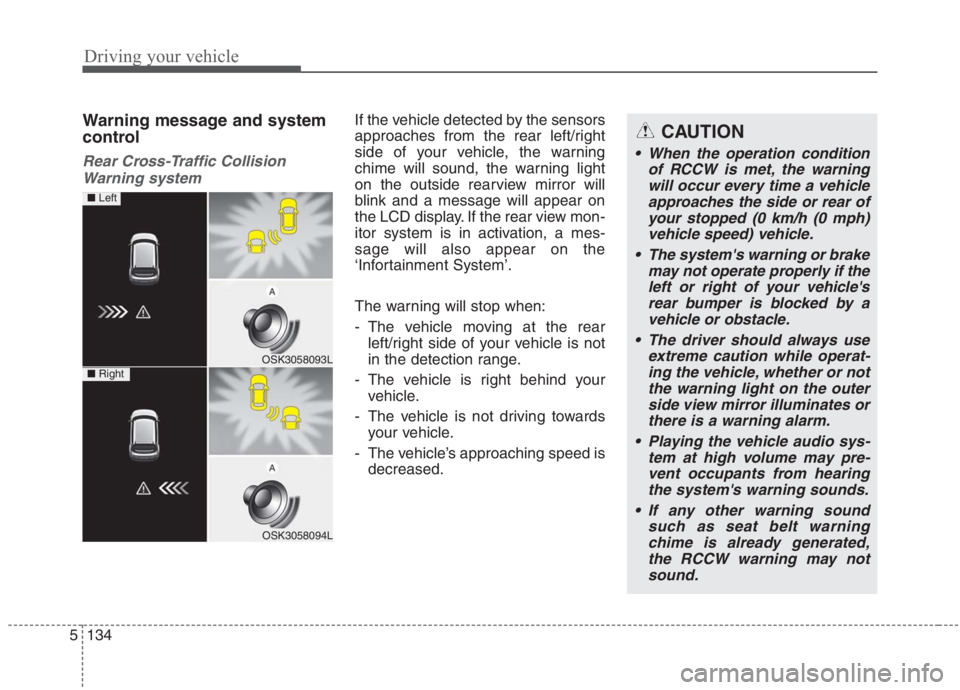
Rear Cross-Traffic Collision
Warning system
If the vehicle detected by the sensors
approaches from the rear left/right
side of your vehicle, the warning
chime will sound, the warning light
on the outside rearview mirror will
blink and a message will appear on
the LCD display. If the rear view mon-
itor system is in activation, a mes-
sage will also appear on the
‘Infortainment System’.
The warning will stop when:
- The vehicle moving at the rear
left/right side of your vehicle is not
in the detection range.
- The vehicle is right behind your
vehicle.
- The vehicle is not driving towards
your vehicle.
- The vehicle’s approaching speed is
decreased.CAUTION
When the operation condition
of RCCW is met, the warning
will occur every time a vehicle
approaches the side or rear of
your stopped (0 km/h (0 mph)
vehicle speed) vehicle.
The system's warning or brake
may not operate properly if the
left or right of your vehicle's
rear bumper is blocked by a
vehicle or obstacle.
The driver should always use
extreme caution while operat-
ing the vehicle, whether or not
the warning light on the outer
side view mirror illuminates or
there is a warning alarm.
Playing the vehicle audio sys-
tem at high volume may pre-
vent occupants from hearing
the system's warning sounds.
If any other warning sound
such as seat belt warning
chime is already generated,
the RCCW warning may not
sound.
OSK3058093L
OSK3058094L
■ Left
■ Right
Page 589 of 667
763
Maintenance
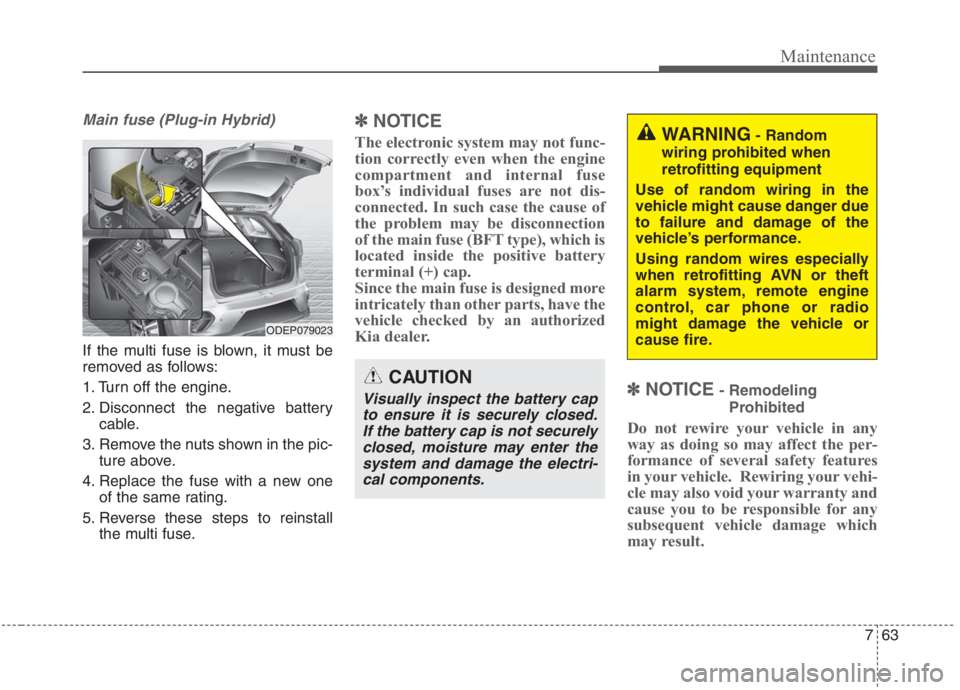
Main fuse (Plug-in Hybrid)
If the multi fuse is blown, it must be
removed as follows:
1. Turn off the engine.
2. Disconnect the negative battery
cable.
3. Remove the nuts shown in the pic-
ture above.
4. Replace the fuse with a new one
of the same rating.
5. Reverse these steps to reinstall
the multi fuse.
✽ ✽
NOTICE
The electronic system may not func-
tion correctly even when the engine
compartment and internal fuse
box’s individual fuses are not dis-
connected. In such case the cause of
the problem may be disconnection
of the main fuse (BFT type), which is
located inside the positive battery
terminal (+) cap.
Since the main fuse is designed more
intricately than other parts, have the
vehicle checked by an authorized
Kia dealer.
✽ ✽
NOTICE- Remodeling
Prohibited
Do not rewire your vehicle in any
way as doing so may affect the per-
formance of several safety features
in your vehicle. Rewiring your vehi-
cle may also void your warranty and
cause you to be responsible for any
subsequent vehicle damage which
may result.
CAUTION
Visually inspect the battery cap
to ensure it is securely closed.
If the battery cap is not securely
closed, moisture may enter the
system and damage the electri-
cal components.
WARNING- Random
wiring prohibited when
retrofitting equipment
Use of random wiring in the
vehicle might cause danger due
to failure and damage of the
vehicle’s performance.
Using random wires especially
when retrofitting AVN or theft
alarm system, remote engine
control, car phone or radio
might damage the vehicle or
cause fire.
ODEP079023