2021 KIA NIRO HYBRID EV stop start
[x] Cancel search: stop startPage 585 of 667
759
Maintenance
✽ ✽
NOTICE
• When replacing fuse, turn the
ignition “OFF” and turn off
switches of all electrical devices
then remove battery (-) terminal.
• The actual fuse/relay panel label
may differ from equipped items.
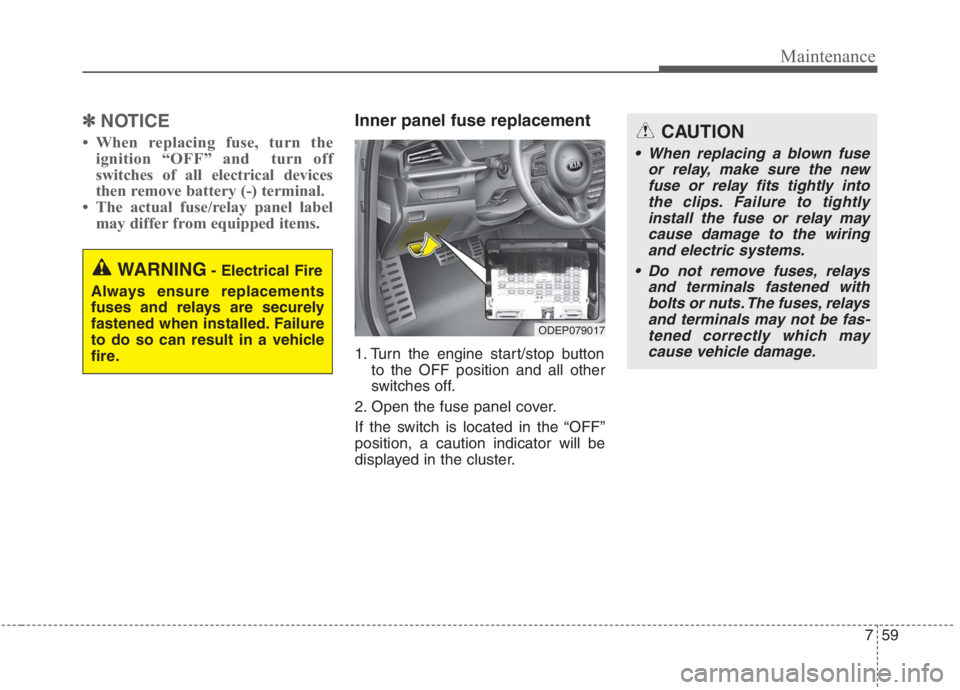
Inner panel fuse replacement
1. Turn the engine start/stop button
to the OFF position and all other
switches off.
2. Open the fuse panel cover.
If the switch is located in the “OFF”
position, a caution indicator will be
displayed in the cluster.
WARNING- Electrical Fire
Always ensure replacements
fuses and relays are securely
fastened when installed. Failure
to do so can result in a vehicle
fire.
CAUTION
When replacing a blown fuse
or relay, make sure the new
fuse or relay fits tightly into
the clips. Failure to tightly
install the fuse or relay may
cause damage to the wiring
and electric systems.
Do not remove fuses, relays
and terminals fastened with
bolts or nuts. The fuses, relays
and terminals may not be fas-
tened correctly which may
cause vehicle damage.
ODEP079017
Page 587 of 667
761
Maintenance
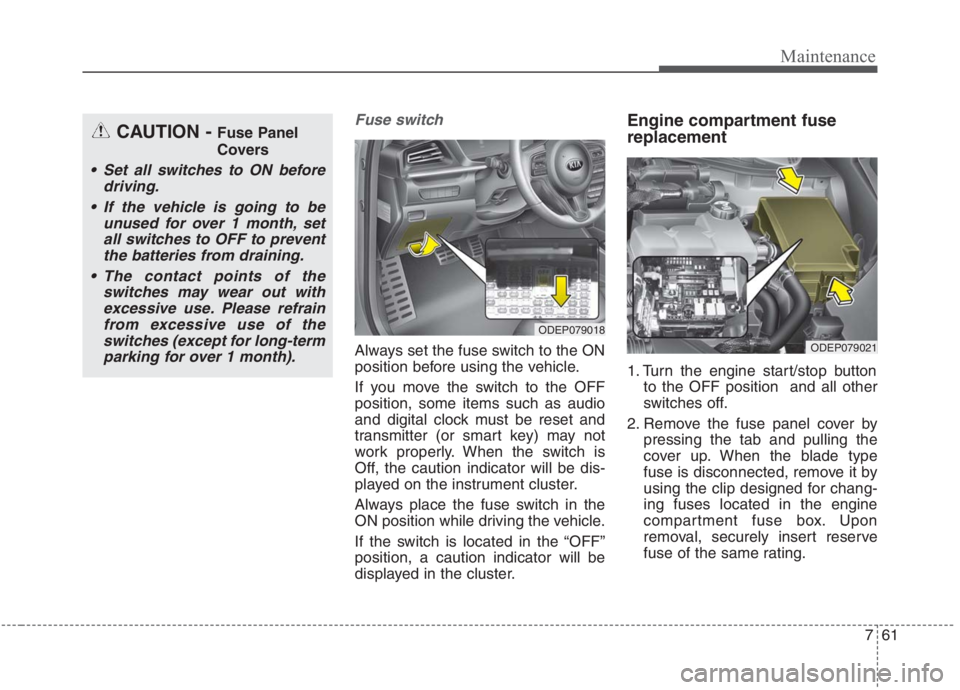
Fuse switch
Always set the fuse switch to the ON
position before using the vehicle.
If you move the switch to the OFF
position, some items such as audio
and digital clock must be reset and
transmitter (or smart key) may not
work properly. When the switch is
Off, the caution indicator will be dis-
played on the instrument cluster.
Always place the fuse switch in the
ON position while driving the vehicle.
If the switch is located in the “OFF”
position, a caution indicator will be
displayed in the cluster.
Engine compartment fuse
replacement
1. Turn the engine start/stop button
to the OFF position and all other
switches off.
2. Remove the fuse panel cover by
pressing the tab and pulling the
cover up. When the blade type
fuse is disconnected, remove it by
using the clip designed for chang-
ing fuses located in the engine
compartment fuse box. Upon
removal, securely insert reserve
fuse of the same rating.
ODEP079018
ODEP079021
CAUTION - Fuse Panel
Covers
Set all switches to ON before
driving.
If the vehicle is going to be
unused for over 1 month, set
all switches to OFF to prevent
the batteries from draining.
The contact points of the
switches may wear out with
excessive use. Please refrain
from excessive use of the
switches (except for long-term
parking for over 1 month).
Page 592 of 667
Maintenance
66 7
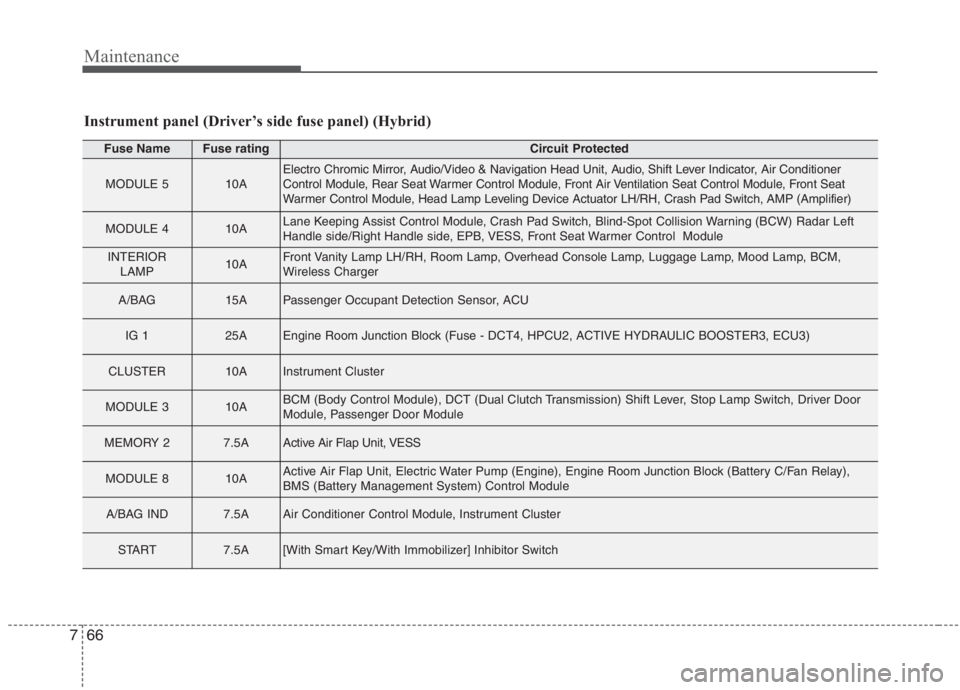
Instrument panel (Driver’s side fuse panel) (Hybrid)
Fuse NameFuse ratingCircuit Protected
MODULE 510AElectro Chromic Mirror, Audio/Video & Navigation Head Unit, Audio, Shift Lever Indicator, Air Conditioner
Control Module, Rear Seat Warmer Control Module, Front Air Ventilation Seat Control Module, Front Seat
Warmer Control Module, Head Lamp Leveling Device Actuator LH/RH, Crash Pad Switch, AMP (Amplifier)
MODULE 410ALane Keeping Assist Control Module, Crash Pad Switch, Blind-Spot Collision Warning (BCW) Radar Left
Handle side/Right Handle side, EPB, VESS, Front Seat Warmer Control Module
INTERIOR
LAMP10AFront Vanity Lamp LH/RH, Room Lamp, Overhead Console Lamp, Luggage Lamp, Mood Lamp, BCM,
Wireless Charger
A/BAG15APassenger Occupant Detection Sensor, ACU
IG 125AEngine Room Junction Block (Fuse - DCT4, HPCU2, ACTIVE HYDRAULIC BOOSTER3, ECU3)
CLUSTER10AInstrument Cluster
MODULE 310ABCM (Body Control Module), DCT (Dual Clutch Transmission) Shift Lever, Stop Lamp Switch, Driver Door
Module, Passenger Door Module
MEMORY 27.5AActive Air Flap Unit, VESS
MODULE 810AActive Air Flap Unit, Electric Water Pump (Engine), Engine Room Junction Block (Battery C/Fan Relay),
BMS (Battery Management System) Control Module
A/BAG IND7.5AAir Conditioner Control Module, Instrument Cluster
START7.5A[With Smart Key/With Immobilizer] Inhibitor Switch
Page 594 of 667
Maintenance
68 7
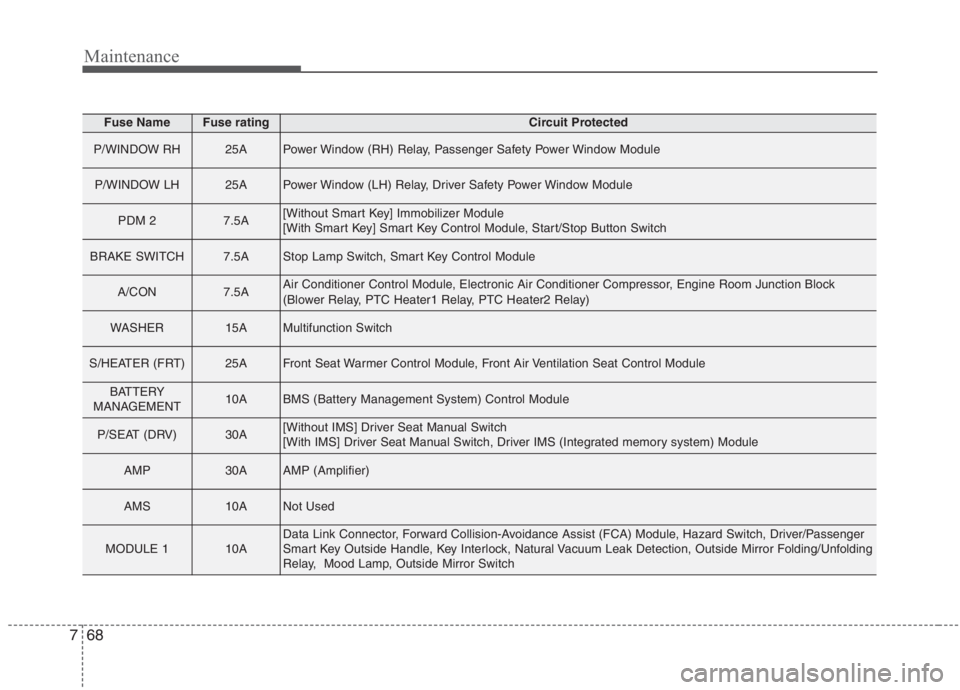
Fuse NameFuse ratingCircuit Protected
P/WINDOW RH25APower Window (RH) Relay, Passenger Safety Power Window Module
P/WINDOW LH25APower Window (LH) Relay, Driver Safety Power Window Module
PDM 27.5A[Without Smart Key] Immobilizer Module
[With Smart Key] Smart Key Control Module, Start/Stop Button Switch
BRAKE SWITCH7.5AStop Lamp Switch, Smart Key Control Module
A/CON7.5AAir Conditioner Control Module, Electronic Air Conditioner Compressor, Engine Room Junction Block
(Blower Relay, PTC Heater1 Relay, PTC Heater2 Relay)
WASHER15AMultifunction Switch
S/HEATER (FRT)25AFront Seat Warmer Control Module, Front Air Ventilation Seat Control Module
BATTERY
MANAGEMENT10ABMS (Battery Management System) Control Module
P/SEAT (DRV)30A[Without IMS] Driver Seat Manual Switch
[With IMS] Driver Seat Manual Switch, Driver IMS (Integrated memory system) Module
AMP30AAMP (Amplifier)
AMS10ANot Used
MODULE 110AData Link Connector, Forward Collision-Avoidance Assist (FCA) Module, Hazard Switch, Driver/Passenger
Smart Key Outside Handle, Key Interlock, Natural Vacuum Leak Detection, Outside Mirror Folding/Unfolding
Relay, Mood Lamp, Outside Mirror Switch
Page 598 of 667
Maintenance
72 7
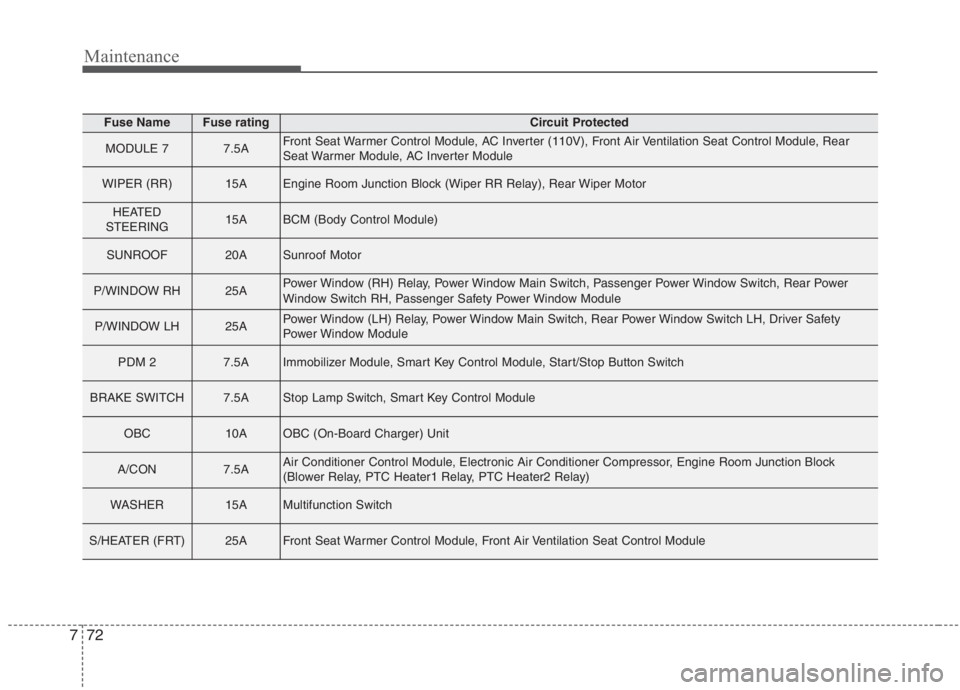
Fuse NameFuse ratingCircuit Protected
MODULE 77.5AFront Seat Warmer Control Module, AC Inverter (110V), Front Air Ventilation Seat Control Module, Rear
Seat Warmer Module, AC Inverter Module
WIPER (RR)15AEngine Room Junction Block (Wiper RR Relay), Rear Wiper Motor
HEATED
STEERING15ABCM (Body Control Module)
SUNROOF20ASunroof Motor
P/WINDOW RH25APower Window (RH) Relay, Power Window Main Switch, Passenger Power Window Switch, Rear Power
Window Switch RH, Passenger Safety Power Window Module
P/WINDOW LH25APower Window (LH) Relay, Power Window Main Switch, Rear Power Window Switch LH, Driver Safety
Power Window Module
PDM 27.5AImmobilizer Module, Smart Key Control Module, Start/Stop Button Switch
BRAKE SWITCH7.5AStop Lamp Switch, Smart Key Control Module
OBC10AOBC (On-Board Charger) Unit
A/CON7.5AAir Conditioner Control Module, Electronic Air Conditioner Compressor, Engine Room Junction Block
(Blower Relay, PTC Heater1 Relay, PTC Heater2 Relay)
WASHER15AMultifunction Switch
S/HEATER (FRT)25AFront Seat Warmer Control Module, Front Air Ventilation Seat Control Module
Page 612 of 667
Maintenance
86 7
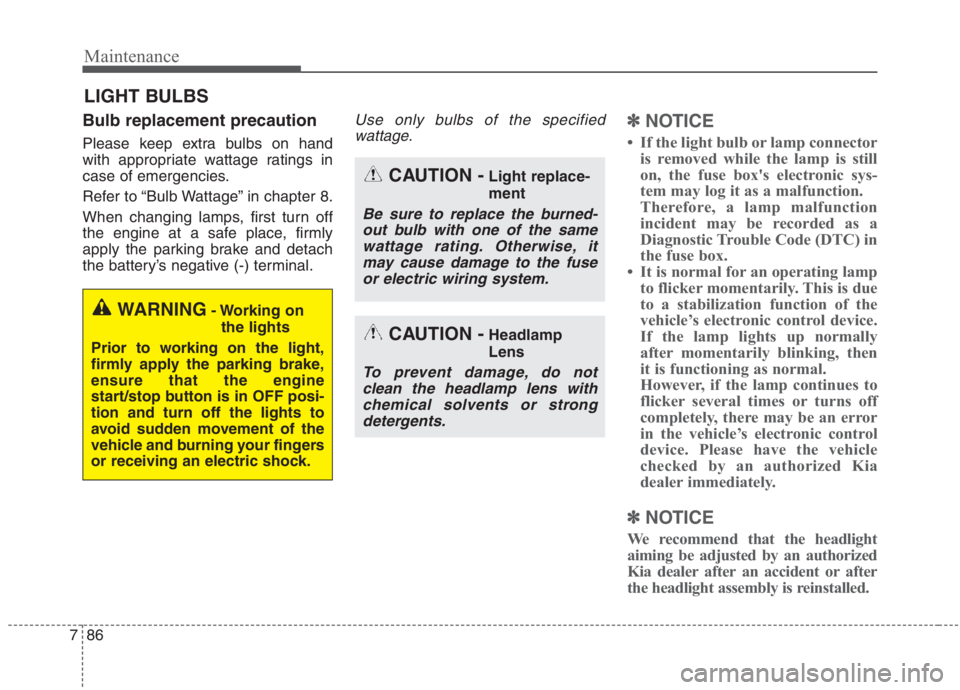
LIGHT BULBS
Bulb replacement precaution
Please keep extra bulbs on hand
with appropriate wattage ratings in
case of emergencies.
Refer to “Bulb Wattage” in chapter 8.
When changing lamps, first turn off
the engine at a safe place, firmly
apply the parking brake and detach
the battery’s negative (-) terminal.
Use only bulbs of the specified
wattage.✽ ✽
NOTICE
• If the light bulb or lamp connector
is removed while the lamp is still
on, the fuse box's electronic sys-
tem may log it as a malfunction.
Therefore, a lamp malfunction
incident may be recorded as a
Diagnostic Trouble Code (DTC) in
the fuse box.
• It is normal for an operating lamp
to flicker momentarily. This is due
to a stabilization function of the
vehicle’s electronic control device.
If the lamp lights up normally
after momentarily blinking, then
it is functioning as normal.
However, if the lamp continues to
flicker several times or turns off
completely, there may be an error
in the vehicle’s electronic control
device. Please have the vehicle
checked by an authorized Kia
dealer immediately.
✽ ✽
NOTICE
We recommend that the headlight
aiming be adjusted by an authorized
Kia dealer after an accident or after
the headlight assembly is reinstalled.
WARNING- Working on
the lights
Prior to working on the light,
firmly apply the parking brake,
ensure that the engine
start/stop button is in OFF posi-
tion and turn off the lights to
avoid sudden movement of the
vehicle and burning your fingers
or receiving an electric shock.
CAUTION -Light replace-
ment
Be sure to replace the burned-
out bulb with one of the same
wattage rating. Otherwise, it
may cause damage to the fuse
or electric wiring system.
CAUTION -Headlamp
Lens
To prevent damage, do not
clean the headlamp lens with
chemical solvents or strong
detergents.
Page 642 of 667
Maintenance
116 7
Do not operate the engine in con-
fined or closed areas (such as
garages) any more than what is
necessary to move the vehicle in or
out of the area.
When the vehicle is stopped in an
open area for more than a short
time with the engine running,
adjust the ventilation system (as
needed) to draw outside air into the
vehicle.
Never sit in a parked or stopped
vehicle for any extended time with
the engine running.
When the engine stalls or fails to
start, excessive attempts to restart
the engine may cause damage to
the emission control system.Operating precautions for catalyt-
ic converters (if equipped)
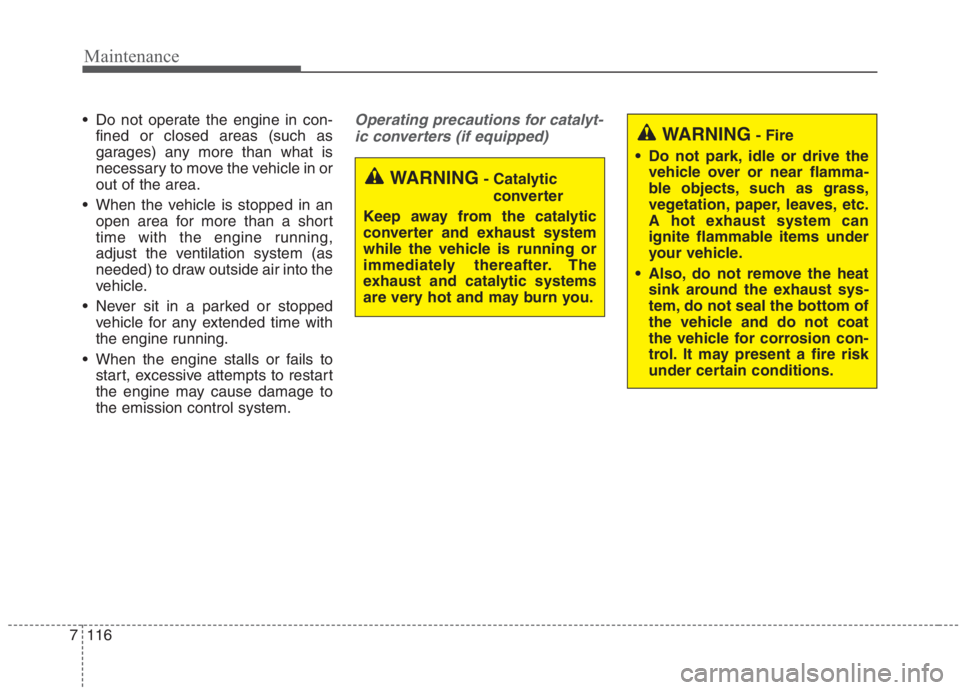
WARNING- Catalytic
converter
Keep away from the catalytic
converter and exhaust system
while the vehicle is running or
immediately thereafter. The
exhaust and catalytic systems
are very hot and may burn you.
WARNING- Fire
Do not park, idle or drive the
vehicle over or near flamma-
ble objects, such as grass,
vegetation, paper, leaves, etc.
A hot exhaust system can
ignite flammable items under
your vehicle.
Also, do not remove the heat
sink around the exhaust sys-
tem, do not seal the bottom of
the vehicle and do not coat
the vehicle for corrosion con-
trol. It may present a fire risk
under certain conditions.
Page 660 of 667
Index
4I
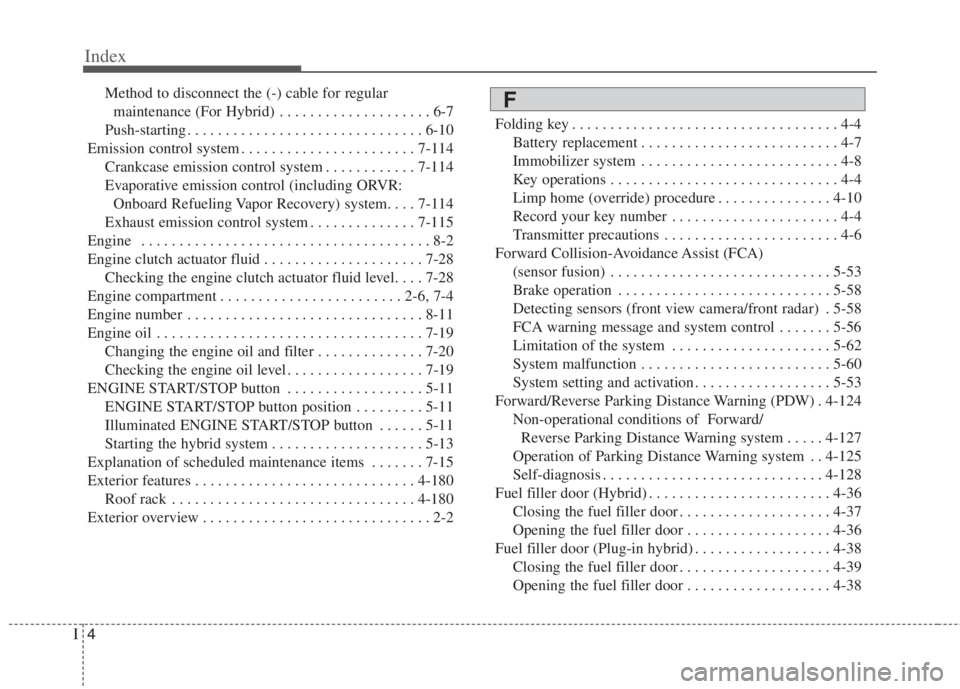
Method to disconnect the (-) cable for regular
maintenance (For Hybrid) . . . . . . . . . . . . . . . . . . . . 6-7
Push-starting . . . . . . . . . . . . . . . . . . . . . . . . . . . . . . . 6-10
Emission control system . . . . . . . . . . . . . . . . . . . . . . . 7-114
Crankcase emission control system . . . . . . . . . . . . 7-114
Evaporative emission control (including ORVR:
Onboard Refueling Vapor Recovery) system. . . . 7-114
Exhaust emission control system . . . . . . . . . . . . . . 7-115
Engine . . . . . . . . . . . . . . . . . . . . . . . . . . . . . . . . . . . . . . 8-2
Engine clutch actuator fluid . . . . . . . . . . . . . . . . . . . . . 7-28
Checking the engine clutch actuator fluid level. . . . 7-28
Engine compartment . . . . . . . . . . . . . . . . . . . . . . . . 2-6, 7-4
Engine number . . . . . . . . . . . . . . . . . . . . . . . . . . . . . . . 8-11
Engine oil . . . . . . . . . . . . . . . . . . . . . . . . . . . . . . . . . . . 7-19
Changing the engine oil and filter . . . . . . . . . . . . . . 7-20
Checking the engine oil level . . . . . . . . . . . . . . . . . . 7-19
ENGINE START/STOP button . . . . . . . . . . . . . . . . . . 5-11
ENGINE START/STOP button position . . . . . . . . . 5-11
Illuminated ENGINE START/STOP button . . . . . . 5-11
Starting the hybrid system . . . . . . . . . . . . . . . . . . . . 5-13
Explanation of scheduled maintenance items . . . . . . . 7-15
Exterior features . . . . . . . . . . . . . . . . . . . . . . . . . . . . . 4-180
Roof rack . . . . . . . . . . . . . . . . . . . . . . . . . . . . . . . . 4-180
Exterior overview . . . . . . . . . . . . . . . . . . . . . . . . . . . . . . 2-2Folding key . . . . . . . . . . . . . . . . . . . . . . . . . . . . . . . . . . . 4-4
Battery replacement . . . . . . . . . . . . . . . . . . . . . . . . . . 4-7
Immobilizer system . . . . . . . . . . . . . . . . . . . . . . . . . . 4-8
Key operations . . . . . . . . . . . . . . . . . . . . . . . . . . . . . . 4-4
Limp home (override) procedure . . . . . . . . . . . . . . . 4-10
Record your key number . . . . . . . . . . . . . . . . . . . . . . 4-4
Transmitter precautions . . . . . . . . . . . . . . . . . . . . . . . 4-6
Forward Collision-Avoidance Assist (FCA)
(sensor fusion) . . . . . . . . . . . . . . . . . . . . . . . . . . . . . 5-53
Brake operation . . . . . . . . . . . . . . . . . . . . . . . . . . . . 5-58
Detecting sensors (front view camera/front radar) . 5-58
FCA warning message and system control . . . . . . . 5-56
Limitation of the system . . . . . . . . . . . . . . . . . . . . . 5-62
System malfunction . . . . . . . . . . . . . . . . . . . . . . . . . 5-60
System setting and activation . . . . . . . . . . . . . . . . . . 5-53
Forward/Reverse Parking Distance Warning (PDW) . 4-124
Non-operational conditions of Forward/
Reverse Parking Distance Warning system . . . . . 4-127
Operation of Parking Distance Warning system . . 4-125
Self-diagnosis . . . . . . . . . . . . . . . . . . . . . . . . . . . . . 4-128
Fuel filler door (Hybrid) . . . . . . . . . . . . . . . . . . . . . . . . 4-36
Closing the fuel filler door . . . . . . . . . . . . . . . . . . . . 4-37
Opening the fuel filler door . . . . . . . . . . . . . . . . . . . 4-36
Fuel filler door (Plug-in hybrid) . . . . . . . . . . . . . . . . . . 4-38
Closing the fuel filler door . . . . . . . . . . . . . . . . . . . . 4-39
Opening the fuel filler door . . . . . . . . . . . . . . . . . . . 4-38F