2021 KIA NIRO HYBRID EV turn signal
[x] Cancel search: turn signalPage 115 of 667
Safety features of your vehicle
48 3
How does the air bag system
operate?
Air bags are activated (able to
inflate if necessary) only when the
ignition switch is turned to the ON
or START position or when engine
start/stop button has been
changed to ON position.
The appropriate air bags inflate
instantly in the event of a serious
frontal collision or side collision in
order to help protect the occupants
from serious physical injury.
There is no single speed at which
the air bags will inflate.
Generally, air bags are designed to
inflate based upon the severity of a
collision and its direction. These
two factors determine whether the
sensors produce an electronic
deployment/ inflation signal.
Air bag deployment depends on a
number of factors including vehicle
speed, angles of impact, and, the
density and stiffness of the vehi-
cles or objects which your vehicle
hits in the collision. The determin-
ing factors are not limited to those
mentioned above. The front air bags will completely
inflate and deflate in an instant.
It is virtually impossible for you to
see the air bags inflate during an
accident.
It is much more likely that you will
simply see the deflated air bags
hanging out of their storage com-
partments after the collision.
In addition to inflating in serious
side collisions, side and/or curtain
air bags will inflate if the sensing
system detects a rollover.
When a rollover is detected, side
and/or curtain air bags will remain
inflated longer to help provide pro-
tection from ejection, especially
when used in conjunction with the
seat belts. In order to help provide protection,
the air bags must inflate rapidly.
The speed of the air bag inflation is
a consequence of extremely short
time in which to inflate the air bag
between the occupant and the
vehicle structures before the occu-
pant impacts those structures. This
speed of inflation reduces the risk
of serious or life-threatening
injuries and is thus a necessary
part of the air bag design.
However, air bag inflation can also
cause injuries which can include
facial abrasions, bruises and bro-
ken bones because the inflation
speed also causes the air bags to
expand with a great deal of force.
There are even circumstances
under which contact with the
steering wheel or passenger air
bag can cause fatal injuries,
especially if the occupant is
positioned excessively close to
the steering wheel or passenger
air bag.
Page 149 of 667
49
Features of your vehicle
To activate the immobilizer sys-
tem:
Turn the ignition key to the OFF posi-
tion. The immobilizer system acti-
vates automatically. Without a valid
ignition key for your vehicle, the
engine will not start.
To deactivate the immobilizer
system:
Insert the ignition key into the key
cylinder and turn it to the ON position.
In order to prevent theft of your vehi-
cle, do not leave spare keys anywhere
in your vehicle. Your Immobilizer pass-
word is a customer unique password
and should be kept confidential. Do
not leave this number anywhere in
your vehicle.
✽ ✽
NOTICE
When starting the engine, do not use
the key with other immobilizer keys
around. Otherwise the engine may
not start or may stop soon after it
starts. Keep each key separate in
order to avoid a starting malfunction.
Do not put metal accessories near
the ignition switch.
Metal accessories may interrupt the
transponder signal and may prevent
the engine from being started.
✽ ✽
NOTICE
If you need additional keys or lose
your keys, contact an authorized
Kia dealer.
CAUTION- Immobilizer
damage
Do not expose your immobilizer
system to moisture, static elec-
tricity or rough handling. This
may damage your immobilizer.
CAUTION- Immobilizer
alterations
Do not change, alter or adjust
the immobilizer system because
it could cause the immobilizer
system to malfunction.
Page 156 of 667
Features of your vehicle
16 4
Smart key immobilizer system
Your vehicle is equipped with an
electronic engine immobilizer system
to reduce the risk of unauthorized
vehicle use.
Your immobilizer system is com-
prised of a small transponder in the
smart key and electronic devices
inside the vehicle.
With the immobilizer system, whenev-
er you turn the ENGINE START/STOP
button to the ON position by pressing
the button while carrying the smart
key, it verifies if the smart key is valid.
If the key is determined to be valid,
the engine will start.
If the key is determined to be invalid,
the engine will not start.
✽ ✽
NOTICE
Do not put metal accessories near
the ignition switch.
Metal accessories may interrupt the
transponder signal and may prevent
the engine from being started.
To deactivate the immobilizer
system:
Turn the ENGINE START/STOP but-
ton to the ON position by pressing
the button while carrying the smart
key.
In order to prevent theft of your vehi-
cle, do not leave spare keys any-
where in your vehicle.
To activate the immobilizer system:
Turn the ENGINE START/STOP but-
ton to the OFF position. The immobi-
lizer system activates automatically.
Without a valid smart key for your
vehicle, the engine will not start.
✽ ✽
NOTICE
When starting the engine, do not use
the key with other immobilizer keys
around. Otherwise the engine may
not start or may stop soon after it
starts. Keep each key separate in
order to avoid a starting malfunction.
✽ ✽
NOTICE
If you need additional keys or lose
your keys, contact an authorized
Kia dealer.
IC WARNING
This device complies with
Industry Canada licence-
exempt RSS standard(s).
Operation is subject to the fol-
lowing two conditions: (1) this
device may not cause interfer-
ence, and (2) this device must
accept any interference, includ-
ing interference that may cause
undesired operation of the
device.
Page 196 of 667
Features of your vehicle
56 4
Programming HomeLink®
✽
✽
NOTICE
• When programming a garage
door opener, it is advised to park
the vehicle outside of the garage.
• It is recommended that a new bat-
tery be placed in the hand-held
transmitter of the device being pro-
grammed to HomeLink
®for quick-
er training and accurate transaxle of
the radio-frequency signal.
• Some vehicles may require the igni-
tion switch or ENGINE
START/STOP button to be turned
to ACC position for programming
and/or operation of HomeLink
®.
• In the event that there are still pro-
gramming difficulties or questions
after following the programming
steps listed below, contact
HomeLink
®at: www.homelink.com
or 1-800-355-3515.
Standard programming
To program most devices, follow
these instructions:
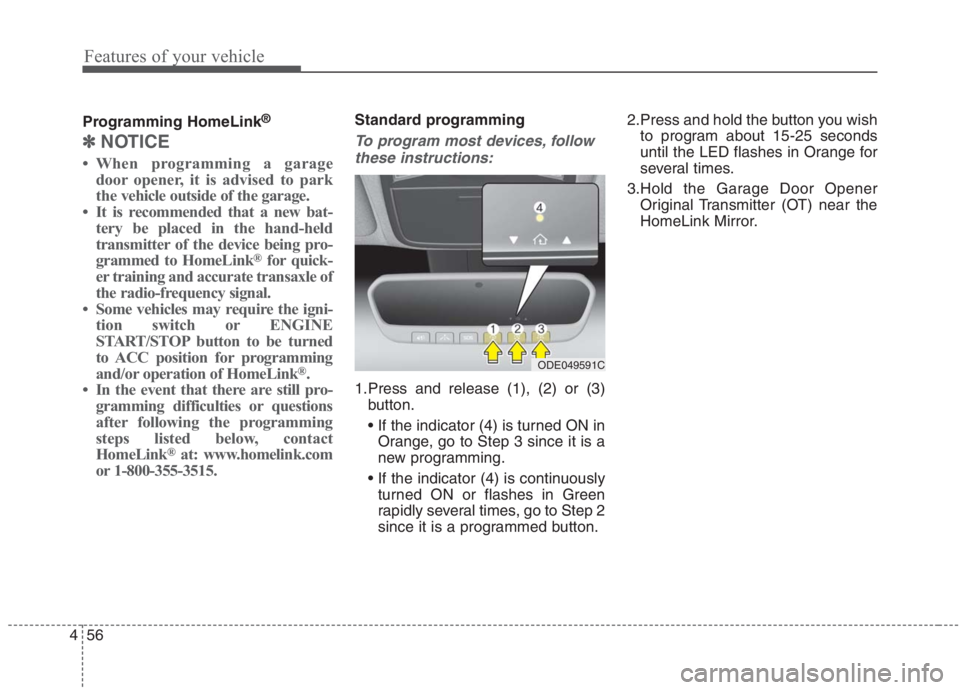
1.Press and release (1), (2) or (3)
button.
Orange, go to Step 3 since it is a
new programming.
turned ON or flashes in Green
rapidly several times, go to Step 2
since it is a programmed button.2.Press and hold the button you wish
to program about 15-25 seconds
until the LED flashes in Orange for
several times.
3.Hold the Garage Door Opener
Original Transmitter (OT) near the
HomeLink Mirror.
ODE049591C
Page 197 of 667
457
Features of your vehicle
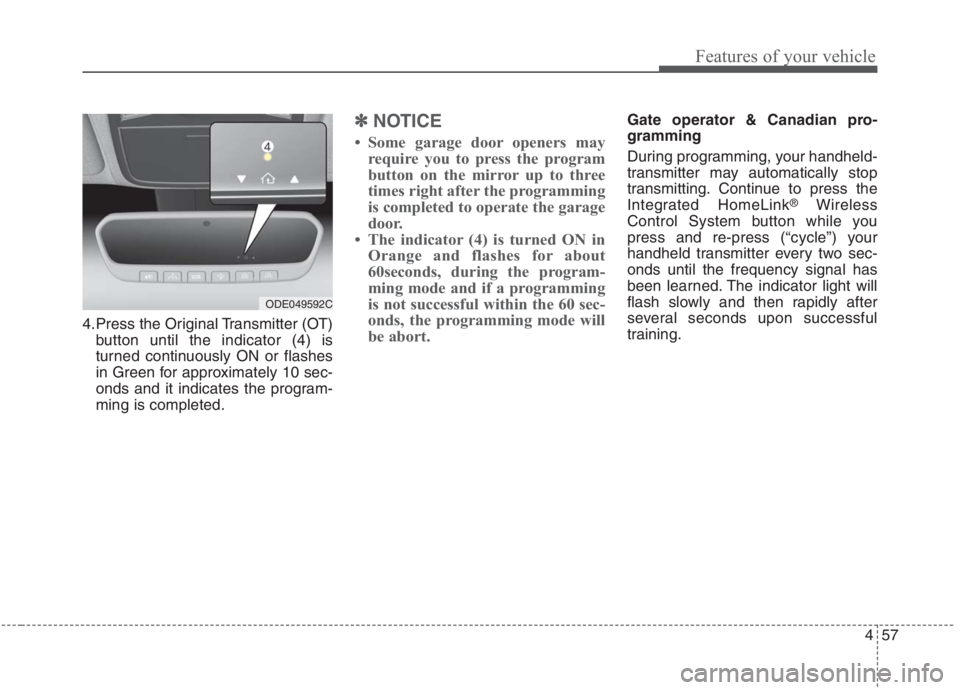
4.Press the Original Transmitter (OT)
button until the indicator (4) is
turned continuously ON or flashes
in Green for approximately 10 sec-
onds and it indicates the program-
ming is completed.
✽ ✽
NOTICE
• Some garage door openers may
require you to press the program
button on the mirror up to three
times right after the programming
is completed to operate the garage
door.
• The indicator (4) is turned ON in
Orange and flashes for about
60seconds, during the program-
ming mode and if a programming
is not successful within the 60 sec-
onds, the programming mode will
be abort.
Gate operator & Canadian pro-
gramming
During programming, your handheld-
transmitter may automatically stop
transmitting. Continue to press the
Integrated HomeLink
®Wireless
Control System button while you
press and re-press (“cycle”) your
handheld transmitter every two sec-
onds until the frequency signal has
been learned. The indicator light will
flash slowly and then rapidly after
several seconds upon successful
training.
ODE049592C
Page 224 of 667
Features of your vehicle
84 4
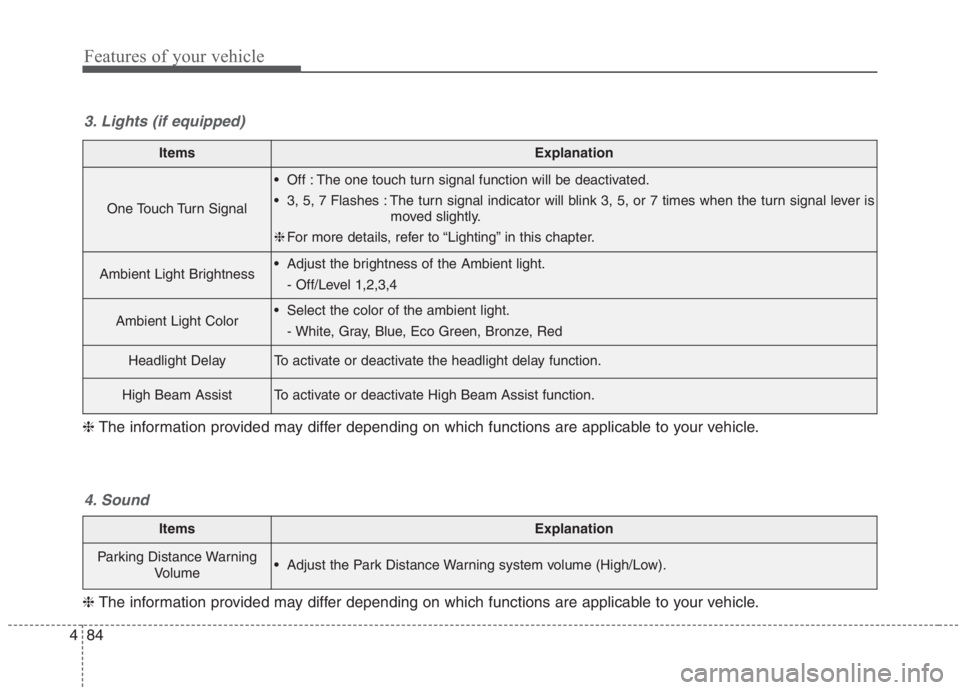
ItemsExplanation
One Touch Turn Signal
Off : The one touch turn signal function will be deactivated.
3, 5, 7 Flashes : The turn signal indicator will blink 3, 5, or 7 times when the turn signal lever is
moved slightly.
❈For more details, refer to “Lighting” in this chapter.
Ambient Light Brightness Adjust the brightness of the Ambient light.
- Off/Level 1,2,3,4
Ambient Light Color Select the color of the ambient light.
- White, Gray, Blue, Eco Green, Bronze, Red
Headlight DelayTo activate or deactivate the headlight delay function.
High Beam AssistTo activate or deactivate High Beam Assist function.
3. Lights (if equipped)
❈The information provided may differ depending on which functions are applicable to your vehicle.
ItemsExplanation
Parking Distance Warning
Volume Adjust the Park Distance Warning system volume (High/Low).
4. Sound
❈The information provided may differ depending on which functions are applicable to your vehicle.
Page 256 of 667
Features of your vehicle
116 4
This indicator light illuminates for 2
seconds and goes off:
When the vehicle cannot detect the
smart key which is in the vehicle
while the ENGINE START/STOP
button is ON.
In this case, have your vehicle
inspected by an authorized Kia
dealer.
This indicator light blinks:
When the battery of the smart key
is weak.
- At this time, you cannot start the
engine. However, you can start
the engine if you press the
ENGINE START/STOP button
with the smart key. (For more
details, refer to “Starting the
hybrid system” in chapter 5.)
When there is a malfunction with
the immobilizer system.
In this case, have your vehicle
inspected by an authorized Kia
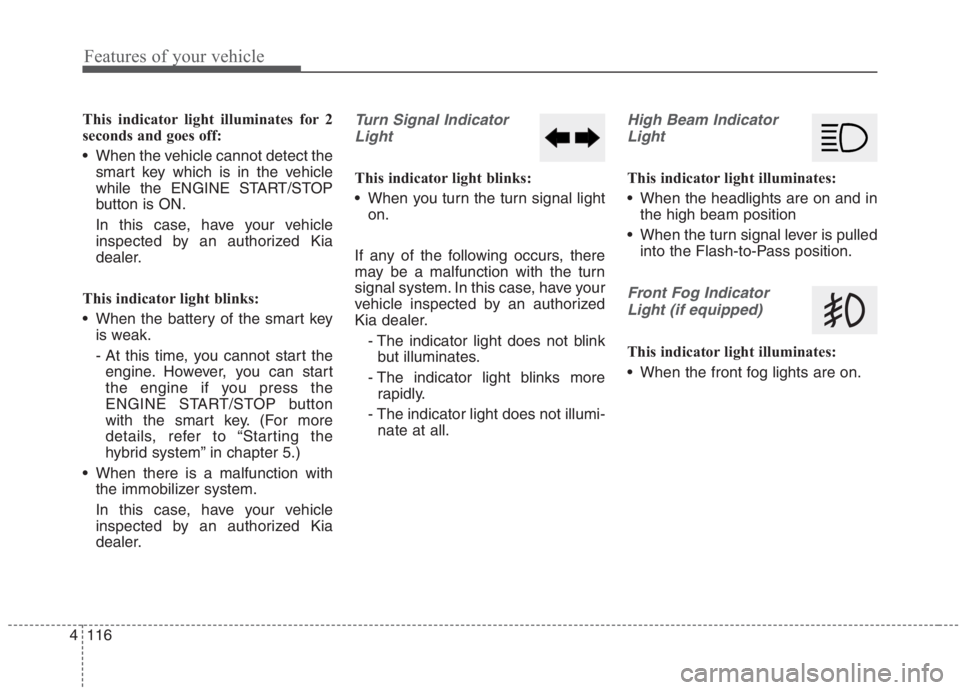
dealer.Turn Signal Indicator
Light
This indicator light blinks:
When you turn the turn signal light
on.
If any of the following occurs, there
may be a malfunction with the turn
signal system. In this case, have your
vehicle inspected by an authorized
Kia dealer.
- The indicator light does not blink
but illuminates.
- The indicator light blinks more
rapidly.
- The indicator light does not illumi-
nate at all.
High Beam Indicator
Light
This indicator light illuminates:
When the headlights are on and in
the high beam position
When the turn signal lever is pulled
into the Flash-to-Pass position.
Front Fog Indicator
Light (if equipped)
This indicator light illuminates:
When the front fog lights are on.
Page 274 of 667
Features of your vehicle
134 4
When driving downhill or uphill.
When only part of the vehicle in
front is visible on a crossroad or
curved road.
When there is a traffic light, reflect-
ing sign, flashing sign or mirror.
When the road conditions are bad
such as being wet or covered with
snow.
When the front vehicle’s head-
lamps are off but the fog lamps on.
When a vehicle suddenly appears
from a curve.
When the vehicle is tilted from a
flat tire or being towed.
When the Lane Keeping Assist
system warning light illuminates. (if
equipped)✽ ✽
NOTICE
• Do not place any accessories,
stickers or tint the windshield.
• Have the windshield glass replaced
from an authorized dealer.
• Do not remove or damage related
parts of High Beam Assist system.
• Be careful that water doesn’t get
into the High Beam Assist unit.
• Do not place objects on the dash-
board that reflect light such as
mirrors, white paper, etc. The sys-
tem may malfunction if sunlight is
reflected.
• At times, High Beam Assist sys-
tem may not work properly,
always check the road conditions
for your safety. When the system
does not operate normally, manu-
ally change between the high
beam and low beam.
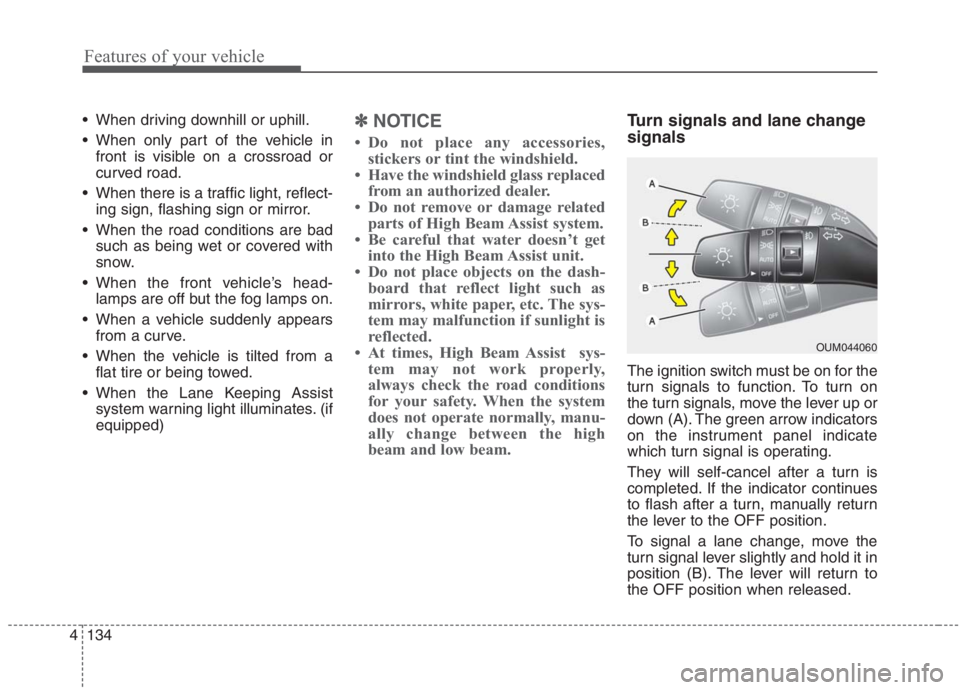
Turn signals and lane change
signals
The ignition switch must be on for the
turn signals to function. To turn on
the turn signals, move the lever up or
down (A). The green arrow indicators
on the instrument panel indicate
which turn signal is operating.
They will self-cancel after a turn is
completed. If the indicator continues
to flash after a turn, manually return
the lever to the OFF position.
To signal a lane change, move the
turn signal lever slightly and hold it in
position (B). The lever will return to
the OFF position when released.
OUM044060