2021 KIA NIRO lights
[x] Cancel search: lightsPage 24 of 66

Blind-Spot Collision Warning (BCW)*†6a
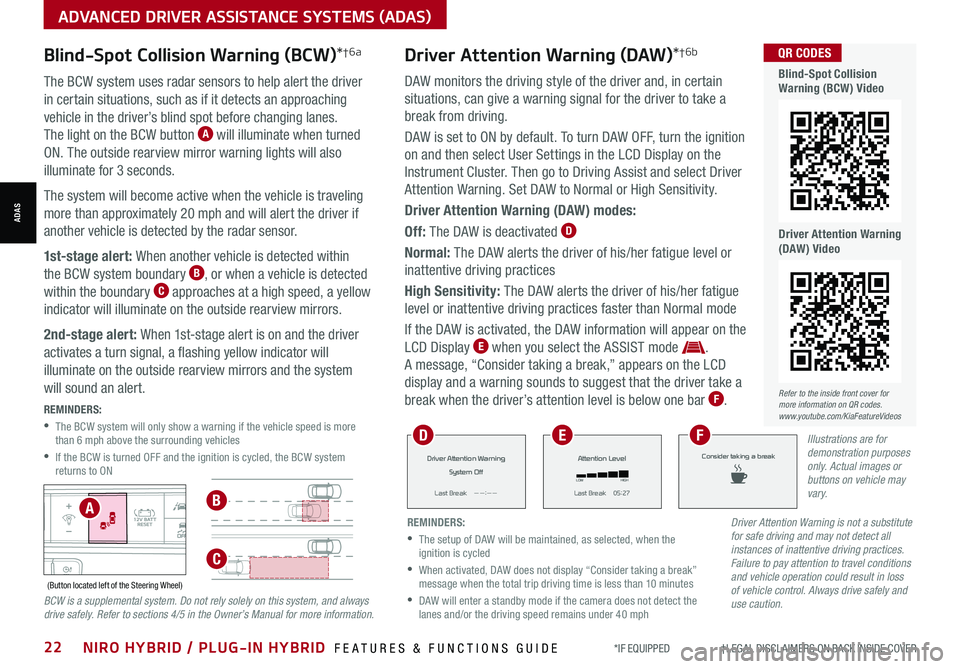
The BCW system uses radar sensors to help alert the driver
in certain situations, such as if it detects an approaching
vehicle in the driver’s blind spot before changing lanes.
The light on the BCW button A will illuminate when turned
ON. The outside rearview mirror warning lights will also
illuminate for 3 seconds.
The system will become active when the vehicle is traveling
more than approximately 20 mph and will alert the driver if
another vehicle is detected by the radar sensor.
1st-stage alert: When another vehicle is detected within
the BCW system boundary B, or when a vehicle is detected
within the boundary C approaches at a high speed, a yellow
indicator will illuminate on the outside rearview mirrors.
2nd-stage alert: When 1st-stage alert is on and the driver
activates a turn signal, a flashing yellow indicator will
illuminate on the outside rearview mirrors and the system
will sound an alert.
REMINDERS:
•
The BCW system will only show a warning if the vehicle speed is more than 6 mph above the surrounding vehicles
•
If the BCW is turned OFF and the ignition is cycled, the BCW system returns to ON
AUTOOFF(Button located left of the Steering Wheel)
Refer to the inside front cover for more information on QR codes.www.youtube.com/KiaFeatureVideos
QR CODES
Blind-Spot Collision Warning (BCW) Video
Driver Attention Warning (DAW) Video
AB
C
Driver Attention Warning is not a substitute for safe driving and may not detect all instances of inattentive driving practices. Failure to pay attention to travel conditions and vehicle operation could result in loss of vehicle control. Always drive safely and use caution.BCW is a supplemental system. Do not rely solely on this system, and always drive safely. Refer to sections 4/5 in the Owner’s Manual for more information.
Driver Attention Warning (DAW)*†6b
DAW monitors the driving style of the driver and, in certain
situations, can give a warning signal for the driver to take a
break from driving.
DAW is set to ON by default. To turn DAW OFF, turn the ignition
on and then select User Settings in the LCD Display on the
Instrument Cluster. Then go to Driving Assist and select Driver
Attention Warning. Set DAW to Normal or High Sensitivity.
Driver Attention Warning (DAW) modes:
Off: The DAW is deactivated D
Normal: The DAW alerts the driver of his/her fatigue level or
inattentive driving practices
High Sensitivity: The DAW alerts the driver of his/her fatigue
level or inattentive driving practices faster than Normal mode
If the DAW is activated, the DAW information will appear on the
LCD Display E when you select the ASSIST mode .
A message, “Consider taking a break,” appears on the LCD
display and a warning sounds to suggest that the driver take a
break when the driver’s attention level is below one bar F.
*IF EQUIPPED †LEGAL DISCL AIMERS ON BACK INSIDE COVER22NIRO HYBRID / PLUG-IN HYBRID FEATURES & FUNCTIONS GUIDE
ADVANCED DRIVER ASSISTANCE SYSTEMS (ADAS)
ADAS
REMINDERS:
•
The setup of DAW will be maintained, as selected, when the ignition is cycled
•
When activated, DAW does not display “Consider taking a break” message when the total trip driving time is less than 10 minutes
•
DAW will enter a standby mode if the camera does not detect the lanes and/or the driving speed remains under 40 mph
Driver Attention Warning
System Off
L ast Break
Page 32 of 66

*IF EQUIPPED †LEGAL DISCL AIMERS ON BACK INSIDE COVER30NIRO HYBRID / PLUG-IN HYBRID FEATURES & FUNCTIONS GUIDE
Electronic Stability Control (ESC)†7
The ESC system is designed to help stabilize the vehicle during certain cornering
maneuvers. It is a good idea to keep the ESC turned ON whenever possible.
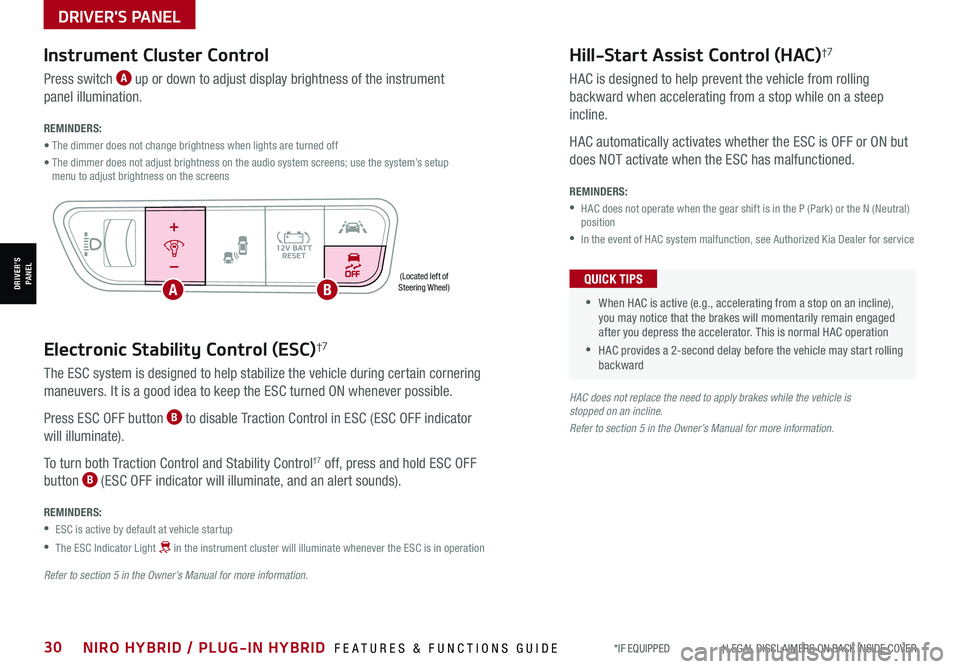
Press ESC OFF button B to disable Traction Control in ESC (ESC OFF indicator
will illuminate).
To turn both Traction Control and Stability Control†7 off, press and hold ESC OFF
button B (ESC OFF indicator will illuminate, and an alert sounds).
REMINDERS:
•ESC is active by default at vehicle startup
•
The ESC Indicator Light in the instrument cluster will illuminate whenever the ESC is in operation
Refer to section 5 in the Owner’s Manual for more information.
HAC does not replace the need to apply brakes while the vehicle is stopped on an incline.
Refer to section 5 in the Owner’s Manual for more information.
(Located left of Steering Wheel)
Instrument Cluster Control
Press switch A up or down to adjust display brightness of the instrument
panel illumination.
REMINDERS:
• The dimmer does not change brightness when lights are turned off
• The dimmer does not adjust brightness on the audio system screens; use the system’s setup menu to adjust brightness on the screens
Hill-Start Assist Control (HAC)†7
HAC is designed to help prevent the vehicle from rolling
backward when accelerating from a stop while on a steep
incline.
HAC automatically activates whether the ESC is OFF or ON but
does NOT activate when the ESC has malfunctioned.
REMINDERS:
•
HAC does not operate when the gear shift is in the P (Park) or the N (Neutral) position
•In the event of HAC system malfunction, see Authorized Kia Dealer for service
•
•When HAC is active (e.g., accelerating from a stop on an incline), you may notice that the brakes will momentarily remain engaged after you depress the accelerator. This is normal HAC operation
•HAC provides a 2-second delay before the vehicle may start rolling backward
QUICK TIPS
AUTOOFF
DRIVER'S PANEL
DRIVER’SPANELAB
Page 35 of 66

ALWAYS CHECK THE OWNER’S MANUAL FOR COMPLETE OPER ATING INFORMATION AND SAFET Y WARNINGS. *IF EQUIPPED33
Refer to section 4 in the Owner’s Manual for more information.
Headlight position
Parking light position
AUTO*Auto Light Position / DRL / HBA*
OFFOFF position
Headlights & High Beams
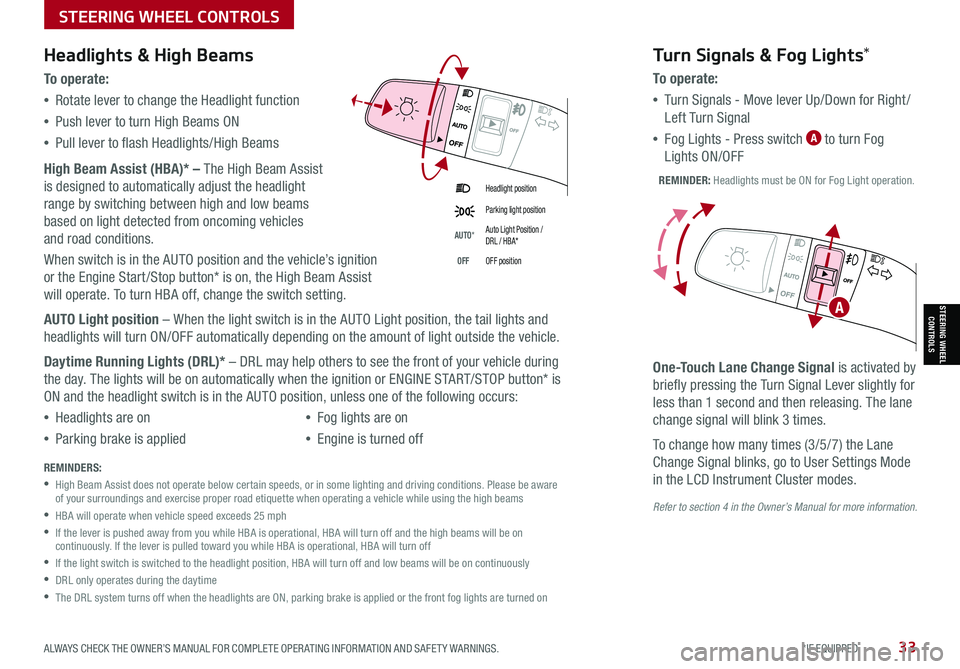
To o p e rate:
•Rotate lever to change the Headlight function
•Push lever to turn High Beams ON
•Pull lever to flash Headlights/High Beams
High Beam Assist (HBA)* – The High Beam Assist
is designed to automatically adjust the headlight
range by switching between high and low beams
based on light detected from oncoming vehicles
and road conditions.
When switch is in the AUTO position and the vehicle’s ignition
or the Engine Start /Stop button* is on, the High Beam Assist
will operate. To turn HBA off, change the switch setting.
AUTO Light position – When the light switch is in the AUTO Light position, the tail lights and
headlights will turn ON/OFF automatically depending on the amount of light outside the vehicle.
Daytime Running Lights (DRL)* – DRL may help others to see the front of your vehicle during
the day. The lights will be on automatically when the ignition or ENGINE START/STOP button* is
ON and the headlight switch is in the AUTO position, unless one of the following occurs:
•Headlights are on
•Parking brake is applied
•Fog lights are on
•Engine is turned off
Turn Signals & Fog Lights*
To o p e r a t e :
•Tu r n Signals - Move lever Up/Down for Right /
Left Turn Signal
•Fog Lights - Press switch A to turn Fog
Lights ON/OFF
One-Touch Lane Change Signal is activated by
briefly pressing the Turn Signal Lever slightly for
less than 1 second and then releasing. The lane
change signal will blink 3 times.
To change how many times (3/5/7) the Lane
Change Signal blinks, go to User Settings Mode
in the LCD Instrument Cluster modes.REMINDERS:
•
High Beam Assist does not operate below certain speeds, or in some lighting and driving conditions. Please be aware of your surroundings and exercise proper road etiquette when operating a vehicle while using the high beams
•HBA will operate when vehicle speed exceeds 25 mph
•
If the lever is pushed away from you while HBA is operational, HBA will turn off and the high beams will be on continuously. If the lever is pulled toward you while HBA is operational, HBA will turn off
•If the light switch is switched to the headlight position, HBA will turn off and low beams will be on continuously
•DRL only operates during the daytime
•
The DRL system turns off when the headlights are ON, parking brake is applied or the front fog lights are turned on
REMINDER: Headlights must be ON for Fog Light operation.
ASTEERING WHEEL CONTROLS
STEERING WHEEL CONTROLS
Page 58 of 66

*IF EQUIPPED56NIRO HYBRID / PLUG-IN HYBRID FEATURES & FUNCTIONS GUIDE
OTHER KEY FEATURES
OTHER KEY FEATURES
Map/Room Lamps
Automatic turn off function*
The interior lights automatically turn
off approximately 30 seconds after
the Engine Start /Stop button is OFF.
Map Lamp/Room Lamp Operation
Push the lens A to turn the map
lamp ON/OFF. This light produces a
spot beam for convenient use as a
map lamp or as a personal lamp for
the driver or the front passenger.
Map/Room Lamp Button – Press
button B to turn the front and rear
room lamps on and off.
Door Mode Button – Press button C
to enable or disable Door Mode. In Door
Mode the map and room lamps turn on when any door is
opened. When all doors are locked or the ignition is on,
the map and room lamp will turn off immediately.
Rear Room Lamps – Press the button D to turn the
rear passenger lamp ON/OFF.
•When doors are unlocked by the Smart Key*, the lamp turns ON for approximately 30 seconds
•If your vehicle is equipped with the theft alarm system, the interior lights automatically turn off approximately 3 seconds after the system is in armed stage
•Using interior lights for an extended period of time may cause battery discharge
QUICK TIPS
Sunroof Operation*
The Sunroof and Sunshade operation is controlled
through a multidirectional switch/lever, and the
ignition needs to be in the ON position to operate
the Sunroof/Sunshade.
Slide the Sunshade and Sunroof:
•
Auto Open: Slide lever E backward to the
farthest position and release
•
Auto Close (Sunroof only): Slide the lever E
forward to the farthest position and release
Slide the Sunroof (with Sunshade open):
•
Open: Press the Sunroof lever E backward
and press again forward/backward until you
reach the desired detent position (manual
slide feature)
• Close: Press the Sunroof lever E forward and press again forward/backward
until you reach the desired detent position (manual slide feature)
Tilt the Sunroof:
•Raise: Push lever E upward
•Lower: Push lever E forward
REMINDER: Sunshade needs to remain OPEN while Sunroof is open and vehicle is moving.
To stop the Sunroof at any position, push or pull the Sunroof control lever in any direction.
QUICK TIP
Do not adjust the Sunroof or Sunshade while driving. This could result in loss of control of the vehicle.
( Type A )
( Type B)
D
C
Refer to the inside front cover for more information on QR codes.www.youtube.com/KiaFeatureVideos
QR CODES
Sunroof Video
Refer to section 4 in the Owner’s Manual for more information.
AA
B
E