2021 KIA NIRO EV trunk
[x] Cancel search: trunkPage 13 of 66

ALWAYS CHECK THE OWNER’S MANUAL FOR COMPLETE OPER ATING INFORMATION AND SAFET Y WARNINGS. *IF EQUIPPED11
Service Interval Mode
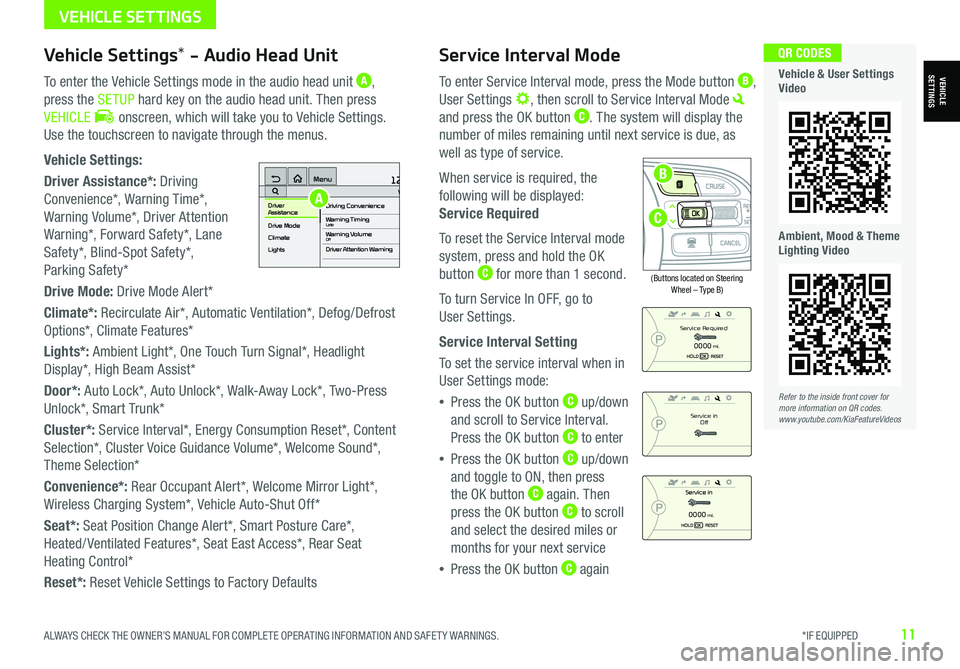
To enter Service Interval mode, press the Mode button B,
User Settings , then scroll to Service Interval Mode
and press the OK button C. The system will display the
number of miles remaining until next service is due, as
well as type of service.
When service is required, the
following will be displayed:
Service Required
To reset the Service Interval mode
system, press and hold the OK
button C for more than 1 second.
To turn Service In OFF, go to
User Settings.
Service Interval Setting
To set the service interval when in
User Settings mode:
•Press the OK button C up/down
and scroll to Service Interval.
Press the OK button C to enter
•Press the OK button C up/down
and toggle to ON, then press
the OK button C again. Then
press the OK button C to scroll
and select the desired miles or
months for your next service
•Press the OK button C again
(Buttons located on Steering Wheel – Type B)
MODE
RES
CRUISE
CAN CELOKSET
MODE
RES
CRUISE
CAN CELOKSET
MODE
Service in
Off
Service Required
0000mi.
0000mi.
Refer to the inside front cover for more information on QR codes.www.youtube.com/KiaFeatureVideos
QR CODES
Vehicle & User Settings Video
Ambient, Mood & Theme Lighting Video
VEHICLESETTINGSVehicle Settings* - Audio Head Unit
To enter the Vehicle Settings mode in the audio head unit A,
press the SETUP hard key on the audio head unit. Then press
VEHICLE onscreen, which will take you to Vehicle Settings.
Use the touchscreen to navigate through the menus.
Vehicle Settings:
Driver Assistance*: Driving
Convenience*, Warning Time*,
Warning Volume*, Driver Attention
Warning*, Forward Safety*, Lane
Safety*, Blind-Spot Safety*,
Parking Safety*
Drive Mode: Drive Mode Alert*
Climate*: Recirculate Air*, Automatic Ventilation*, Defog/Defrost
Options*, Climate Features*
Lights*: Ambient Light*, One Touch Turn Signal*, Headlight
Display*, High Beam Assist*
Door*: Auto Lock*, Auto Unlock*, Walk-Away Lock*, Two-Press
Unlock*, Smart Trunk*
Cluster*: Service Interval*, Energy Consumption Reset*, Content
Selection*, Cluster Voice Guidance Volume*, Welcome Sound*,
Theme Selection*
Convenience*: Rear Occupant Alert*, Welcome Mirror Light*,
Wireless Charging System*, Vehicle Auto-Shut Off*
Seat*: Seat Position Change Alert*, Smart Posture Care*,
Heated/ Ventilated Features*, Seat East Access*, Rear Seat
Heating Control*
Reset*: Reset Vehicle Settings to Factory Defaults
12:00 AM Jan. 1MenuVehicle SettingsDriving Convenience
Drive Mode
Climate
LightsDriver
AssistanceWarning TimingLateWarning VolumeOffDriver Attention Warning
A
C
B
VEHICLE SETTINGS
Page 42 of 66

*IF EQUIPPED40NIRO EV FEATURES & FUNCTIONS GUIDE
QR CODES
Kia Access with UVO link App Features Guide. Click this dynamic QR code to access the guide. Some phone’s operating systems may need to be updated to scan dynamic QR codes.
Download the Kia Access with UVO link App by clicking this dynamic QR code. Some phone’s operating systems may need to be updated to scan dynamic QR codes.
Go to an app marketplace to download the new Kia Access with UVO link App. Once you download, make sure you
register your vehicle and start an account (refer to UVO link Activation page). Get to know your new Kia and the
available convenient features on the app.
2020 SOULMILEAGE722 mi.
355 miEst. RangeDOOR LOCKSREMOTE STARTFind My Car
• The smartphone and vehicle need to be connected to a cellular network with a good wireless signal strength in order to use UVO. If these conditions are not met, remote command may not execute or take a long time. It will also effect voice commands
• To use Remote Start or Remote Start with Climate Control feature, all doors, hood and trunk /liftgate must be closed and locked
• Activate Remote Start or Remote Start with Climate Control feature at least 10 minutes before getting into the vehicle, which will allow vehicle interior to reach a desired temperature. If the driver does not enter the vehicle within the 10 minutes, the Remote Start will turn off the engine
• The quickest way to obtain accurate vehicle status through the app is by pressing the refresh button on the app or refreshing the web page when using the customer web portal
• In order to preserve the vehicle battery, UVO will not turn on seven days after the last ignition was on. You will need to restart the vehicle with a key fob in order to use UVO again
QUICK TIPS
The Kia Access with UVO link App Features Guide is a step-by-guide to help you utilize the app to its full potential by
detailing how to set up and use each feature and adjust various settings. Below are some of the topics included:
•Remote Commands
•Set Climate
•Schedule Remote Start /Climate
•Schedule Charge
•Schedule Service
•Dealer Settings
•Manage Vehicles and Profiles
Kia Access with UVO link App Features Guide
Kia App Screen for illustrative purposes only. Actual App screen and functionality may vary.
For further UVO link operations, refer to the Car Infotainment System Quick Reference Guide.
Kia Access with UVO link App Download
AUDIO SYSTEMS
AUDIOSYSTEMS
Page 49 of 66

CENTER PANEL
CENTERPANEL
(Located below left of Rotary Dial Shifter Knob)
Electronic Parking Brake (EPB)Auto Hold
The Electronic Parking Brake (EPB) system utilizes an electric
motor to engage the parking brake.
Applying the Parking Brake
Pull up the EPB switch A. Ensure that the indicator light
is illuminated on the instrument cluster.
Releasing the Parking Brake
The EPB will automatically release when the shifter is placed
in Reverse or Drive.
To release EPB manually, depress the brake pedal, then press
the EPB switch A down, with the ignition switch in the ON
position. Ensure that the indicator light i s O F F.
REMINDERS:
•
As a bulb check, the EPB malfunction indicator will illuminate for approximately 3 seconds when the ignition switch is turned ON
•
If the warning light does not illuminate temporarily, or continues to remain lit, take your vehicle to an authorized Kia dealer and have the system checked
•The EPB should not be operated while the vehicle is moving
•
A click or electric brake motor sound may be heard while operating or releasing the EPB, but these conditions are normal and indicate that the EPB is functioning properly
REMINDERS:
•
To reduce the risk of an accident, do not activate Auto Hold while driving downhill, backing up or parking your vehicle
•
Do not solely rely on the Auto Hold system to keep the vehicle stopped. Always pay attention to traf fic and road conditions, and be prepared to depress the brakes
•Auto Hold turns off when ignition is cycled
•
•When leaving your keys with parking lot attendants or valet, make sure to inform them how to operate the EPB
•If parked on a steep incline/decline, pull up the EPB switch for more than 3 seconds for a firmer EPB application
•Pull up and hold EPB switch again to increase brake pressure if parked on a decline or incline
QUICK TIPS
NP
PRELEASE
AUTO
HOLD
DRIVE
MODE
D
R
Auto Hold temporarily maintains the vehicle at a standstill
even if the brake pedal is released. Auto Hold can be
turned ON/OFF using the AUTO HOLD switch B on the
center panel. Before Auto Hold will operate, the driver’s
door, engine hood and trunk must be closed, and the
driver’s seat belt must be fastened.
The Auto Hold indicator has four states:
Standby (white): With vehicle in Park and at a standstill,
and AUTO HOLD switch B turned ON, the indicator will
illuminate white. While driving the vehicle (vehicle is not
at a standstill), the Auto Hold indicator will remain white.
Engaged (green): When coming to a complete stop and depressing the brake pedal, the
Auto Hold indicator changes from white to green.
OFF (not illuminated): The indicator will turn OFF when the AUTO HOLD switch B is
turned OFF or when the EPB is manually turned ON.
Malfunction (yellow): When the indicator is illuminated yellow, there may be a system
malfunction. Take your vehicle to a local Kia dealer.
Refer to the inside front cover for more information on QR codes.www.youtube.com/KiaFeatureVideos
QR CODES
Electronic Parking Brake Video
Refer to section 5 in the Owner’s Manual for more information.
Refer to section 5 in the Owner’s Manual for more information.
ALWAYS CHECK THE OWNER’S MANUAL FOR COMPLETE OPER ATING INFORMATION AND SAFET Y WARNINGS. *IF EQUIPPED47
A
B