2021 KIA NIRO EV charging
[x] Cancel search: chargingPage 16 of 66
*IF EQUIPPED14NIRO EV FEATURES & FUNCTIONS GUIDE
A
Level 1 Charging – “Trickle” Charge
A Level 1 or “trickle” charger is the most common type of charging system for an electric vehicle.
This type of charger uses 120 volts/12 amps of household electricity and takes up to 60 hours for a
full charge.
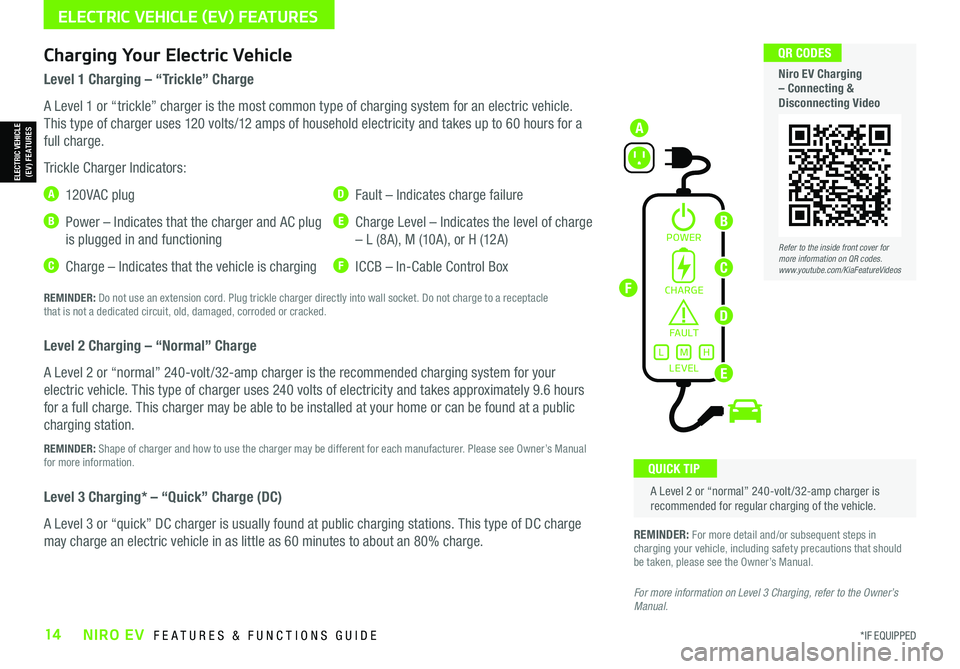
Trickle Charger Indicators:
A 12 0 VA C plug
B Power – Indicates that the charger and AC plug
is plugged in and functioning
C Charge – Indicates that the vehicle is charging
D Fault – Indicates charge failure
E Charge Level – Indicates the level of charge
– L (8A), M (10A), or H (12A)
F ICCB – In-Cable Control Box
REMINDER: Do not use an extension cord. Plug trickle charger directly into wall socket. Do not charge to a receptacle that is not a dedicated circuit, old, damaged, corroded or cracked.
Level 2 Charging – “Normal” Charge
A Level 2 or “normal” 240-volt /32-amp charger is the recommended charging system for your
electric vehicle. This type of charger uses 240 volts of electricity and takes approximately 9.6 hours
for a full charge. This charger may be able to be installed at your home or can be found at a public
charging station.
REMINDER: Shape of charger and how to use the charger may be different for each manufacturer. Please see Owner’s Manual for more information.
Level 3 Charging* – “Quick” Charge (DC)
A Level 3 or “quick” DC charger is usually found at public charging stations. This type of DC charge
may charge an electric vehicle in as little as 60 minutes to about an 80% charge.
Charging Your Electric Vehicle
A Level 2 or “normal” 240-volt /32-amp charger is recommended for regular charging of the vehicle.
QUICK TIP
REMINDER: For more detail and/or subsequent steps in charging your vehicle, including safety precautions that should be taken, please see the Owner’s Manual.
For more information on Level 3 Charging, refer to the Owner’s Manual.
POWER
CHARGE
FA U LT!
LEVELLMH
Refer to the inside front cover for more information on QR codes.www.youtube.com/KiaFeatureVideos
QR CODES
Niro EV Charging – Connecting & Disconnecting Video
ELECTRIC VEHICLE (EV) FEATURES
ELECTRIC VEHICLE (EV) FEATURES
C
D
E
F
B
Page 17 of 66
ALWAYS CHECK THE OWNER’S MANUAL FOR COMPLETE OPER ATING INFORMATION AND SAFET Y WARNINGS. *IF EQUIPPED15
Zero Emission
POWER
CHARGE
FAULT
Zero Emission
POWER
CHARGE
FAULT
Zero Emission
POWER
CHARGE
FAULT
Zero Emission
POWER
CHARGE
FAULT
( Trickle / normal charge shown)
Charging Your Electric Vehicle (Continued)
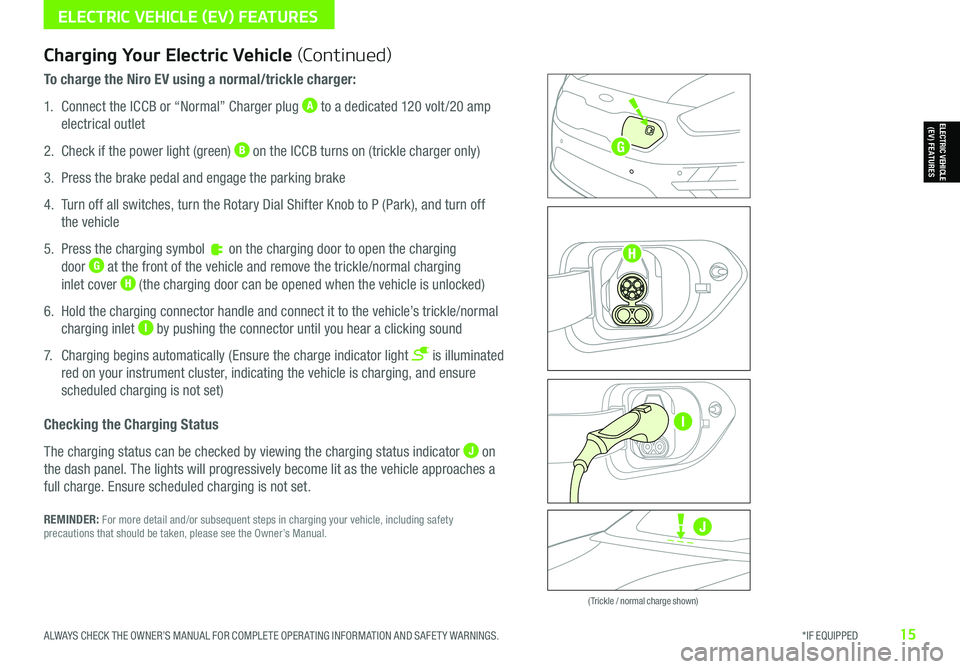
To charge the Niro EV using a normal/trickle charger:
1. Connect the ICCB or “Normal” Charger plug A to a dedicated 120 volt /20 amp
electrical outlet
2. Check if the power light (green) B on the ICCB turns on (trickle charger only)
3. Press the brake pedal and engage the parking brake
4. Turn off all switches, turn the Rotary Dial Shifter Knob to P (Park), and turn off
the vehicle
5. Press the charging symbol on the charging door to open the charging
door G at the front of the vehicle and remove the trickle/normal charging
inlet cover H (the charging door can be opened when the vehicle is unlocked)
6. Hold the charging connector handle and connect it to the vehicle’s trickle/normal
charging inlet I by pushing the connector until you hear a clicking sound
7. Charging begins automatically (Ensure the charge indicator light is illuminated
red on your instrument cluster, indicating the vehicle is charging, and ensure
scheduled charging is not set)
Checking the Charging Status
The charging status can be checked by viewing the charging status indicator J on
the dash panel. The lights will progressively become lit as the vehicle approaches a
full charge. Ensure scheduled charging is not set.
REMINDER: For more detail and/or subsequent steps in charging your vehicle, including safety precautions that should be taken, please see the Owner’s Manual.
ELECTRIC VEHICLE (EV) FEATURES
ELECTRIC VEHICLE (EV) FEATURES
J
G
H
I
Page 18 of 66
*IF EQUIPPED16NIRO EV FEATURES & FUNCTIONS GUIDE
ELECTRIC VEHICLE (EV) FEATURES
EV Mode - UVO link with Navigation*
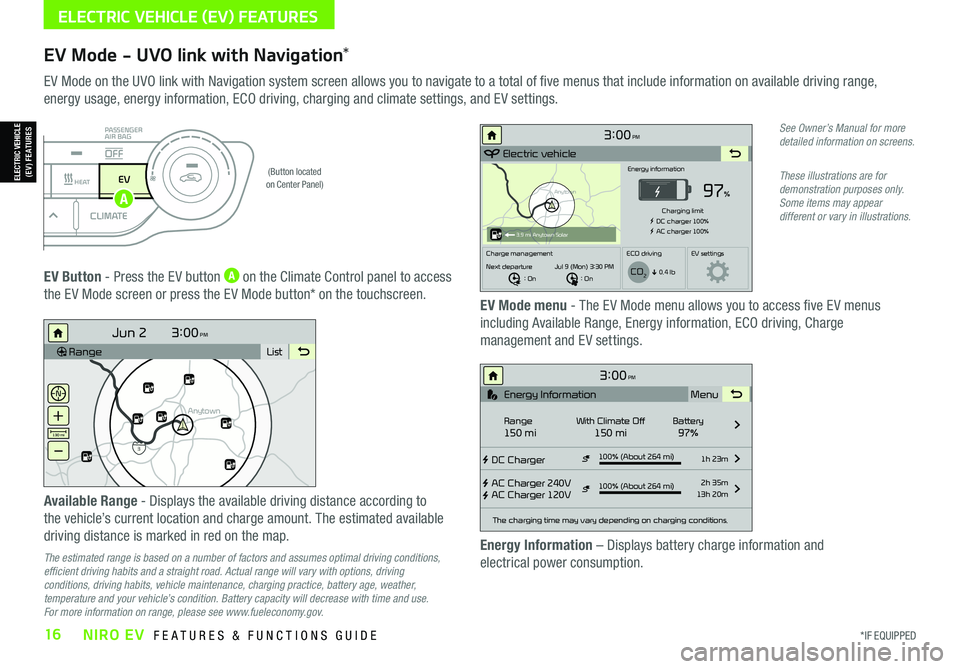
EV Mode on the UVO link with Navigation system screen allows you to navigate to a total of five menus that include information on available driving range,
energy usage, energy information, ECO driving, charging and climate settings, and EV settings.
(Button located on Center Panel)
EV Button - Press the EV button A on the Climate Control panel to access
the EV Mode screen or press the EV Mode button* on the touchscreen.EV Mode menu - The EV Mode menu allows you to access five EV menus
including Available Range, Energy information, ECO driving, Charge
management and EV settings.
Available Range - Displays the available driving distance according to
the vehicle’s current location and charge amount. The estimated available
driving distance is marked in red on the map.
The estimated range is based on a number of factors and assumes optimal driving conditions, efficient driving habits and a straight road. Actual range will vary with options, driving conditions, driving habits, vehicle maintenance, charging practice, battery age, weather, temperature and your vehicle’s condition. Battery capacity will decrease with time and use. For more information on range, please see www.fueleconomy.gov.
Energy Information – Displays battery charge information and
electrical power consumption.
See Owner’s Manual for more detailed information on screens.
These illustrations are for demonstration purposes only. Some items may appear different or vary in illustrations.
3:00PM
RangeList
Anytown
3
Jun 2
+
–
130 mi
Anytown
3:00PM
Electric vehicle
97%
Energy information
Charging limit
DC charger 100% AC charger 100%
Charge management ECO drivingEV settings
Next departure : On : On
Jul 9 (Mon) 3:30 PM
0.4 lb
3.9 mi Anytown Solar
CO2
3:00PM
DC Charger
AC Charger 240V
AC Charger 120V100% (About 264 mi) 1h 23m
2h 35m
13h 20m
The charging time may vary depending on charging conditions.
Range150 miWith Climate Off150 miBattery97% Menu
Energy Information
100% (About 264 mi)
i
DRIVERAUTOACHEAT
CLIMATEOFF
ONLYEV
PASSENGER
AIR BAG
OFF
ELECTRIC VEHICLE (EV) FEATURES
A
Page 19 of 66
ALWAYS CHECK THE OWNER’S MANUAL FOR COMPLETE OPER ATING INFORMATION AND SAFET Y WARNINGS. *IF EQUIPPED17
See Owner’s Manual for more detailed information on screens.
These illustrations are for demonstration purposes only. Some items may appear different or vary in illustrations.
EV Mode - UVO link with Navigation* (Continued)
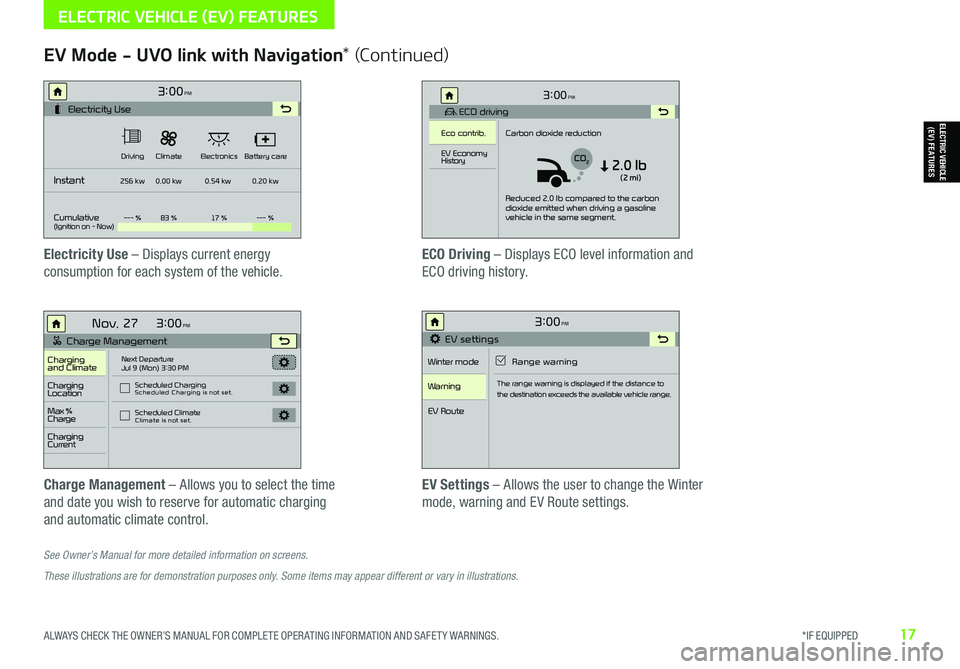
Electricity Use – Displays current energy
consumption for each system of the vehicle.
ECO Driving – Displays ECO level information and
ECO driving history.
Charge Management – Allows you to select the time
and date you wish to reserve for automatic charging
and automatic climate control.
EV Settings – Allows the user to change the Winter
mode, warning and EV Route settings.
3:00PM
Instant
Cumulative(Ignition on - Now)Driving
256 kw
--- % 83 % 17 %--- %
0.00 kw
0.54 kw0.20 kw
Climate
ElectronicsBattery care
Electricity Use
3:00
Nov. 27PM
Charge Management
Charging
and ClimateNext Departure
Jul 9 (Mon) 3:30 PM
Scheduled Charging
Scheduled Charging is not set.
Scheduled ClimateClimate is not set.
Charging
Location
Charging
Current
Max %
Charge
3:00PM
EV settings
Winter mode Range warning
Warning
EV Route
The range warning is displayed if the distance to
the destination exceeds the available vehicle range.
3:00PM
ECO driving
Eco contrib. Carbon dioxide reduction
Reduced 2.0 lb compared to the carbon
dioxide emitted when driving a gasoline
vehicle in the same segment.
EV Economy
History
CO22.0 lb(2 mi)
ELECTRIC VEHICLE (EV) FEATURES
ELECTRIC VEHICLE (EV) FEATURES
Page 46 of 66
*IF EQUIPPED44NIRO EV FEATURES & FUNCTIONS GUIDE
CENTER PANEL
REMINDERS:
• Wireless charging technology allows for a device to be charged using inductive charging.See your Owner’s Manual for more detailed information and the back page for legal disclaimers
•
Inductive charging systems are less ef ficient than conventional charging through cable. As a result, higher device operating temperatures may be experienced during use
•
Charging Performance - Device position on the wireless charging system can affect charging performance. Other factors that may affect the charging rate includes foreign objects, such as coins or pens, and phone case thickness
•If driver door is opened, charging will be disabled
Wireless Smartphone Charging System*
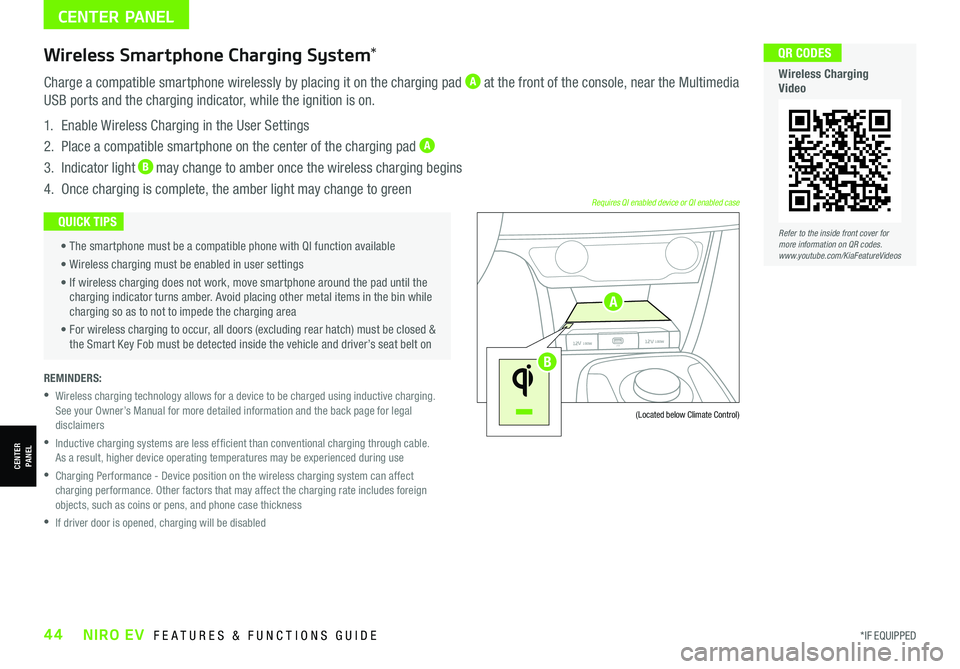
Charge a compatible smartphone wirelessly by placing it on the charging pad A at the front of the console, near the Multimedia
USB ports and the charging indicator, while the ignition is on.
1. Enable Wireless Charging in the User Settings
2. Place a compatible smartphone on the center of the charging pad A
3. Indicator light B may change to amber once the wireless charging begins
4. Once charging is complete, the amber light may change to green
(Located below Climate Control)
Requires QI enabled device or QI enabled case • The smartphone must be a compatible phone with QI function available
• Wireless charging must be enabled in user settings
• If wireless charging does not work, move smartphone around the pad until the charging indicator turns amber. Avoid placing other metal items in the bin while charging so as to not to impede the charging area
• For wireless charging to occur, all doors (excluding rear hatch) must be closed & the Smart Key Fob must be detected inside the vehicle and driver’s seat belt on
QUICK TIPS
USB
12V 180W
12V 180W
12V 180W12V 180WUSB
USB
12V 180W
12V 180W
12V 180W12V 180WUSB
Refer to the inside front cover for more information on QR codes.www.youtube.com/KiaFeatureVideos
QR CODES
Wireless Charging Video
CENTERPANEL
A
B