Page 183 of 300

9-3
Configuring the vehicle settings (Type1)
(if equipped)
You can configure the functions for driving and related environments.
\335Warning
Make sure you stop the vehicle before changing settings to ensure safety.0000
A
Vehicle settings can be changed only when the vehicle is on.
0000
A
Available settings may differ depending on the vehicle model and specifications.
0000
A
Depending on the climate control system, some functions may not be supported.
1 On the All Menus screen, press Setup >
Vehicle.
The vehicle settings screen appears.
2 Configure the settings required:
0000
A
Press Menu >
Search for Settings or press and enter a keyword to search for a
setting item. You can also search for a setting item by voice.
Head-Up Display (if equipped)
You can set to use the head-up display that displays information such as driving speed and
road-related information while driving.
0000
A
The screen may differ depending on the vehicle model and specifications.
Enable Head-Up Display (if equipped)
Can determine whether or not to use the head-up display.
Display Control (if equipped)
Adjust the height, rotation, and brightness of the head-up display.
Content Selection (if equipped)
Select the items to display on the head-up display.
Page 195 of 300

9-15
Rear Seat Heating Control (if equipped)
You can set to enable the warmer for the rear-left and rear-right seats.
Reset (if equipped)
You can initialize all system settings in the vehicle.
0000AThe screen may differ depending on the vehicle model and specifications.
0000
A
The required features cannot be initialize.
Configuring the vehicle settings (Type2)
(if equipped)
You can configure the functions for driving and related environments.
\335Warning
Make sure you stop the vehicle before changing settings to ensure safety.
0000
A
Vehicle settings can be changed only when the vehicle is on.
0000
A
Available settings may differ depending on the vehicle model and specifications.
0000
A
Depending on the climate control system, some functions may not be supported.
1 On the All Menus screen, press Setup >
Vehicle.
The vehicle settings screen appears.
2 Configure the settings required:
0000
A
Press >
Search for Settings or press and enter a keyword to search for a
setting item. You can also search for a setting item by voice.
Page 234 of 300
9-54
Guidance
You can configure the navigation guidance settings.
0000AThe screen may differ depending on the vehicle model and specifications.
Show Guidance Distance
You can configure settings for displaying the distance to the destination during guidance.
\225Interval Distance: Displays the distance as the one between different zones.
\225Cumulative Distance: Displays the distance as the one between the current position and
target position.
Border Crossing Information
You can set whether or not to display the border crossing information on the screen.
Show Route Overview While Stopped.
You can set to display the route overview from the start point to the destination when the
vehicle is stationary.
Alerts
You can set to activate drive assist features when needed for safety.
Page 240 of 300
9-60
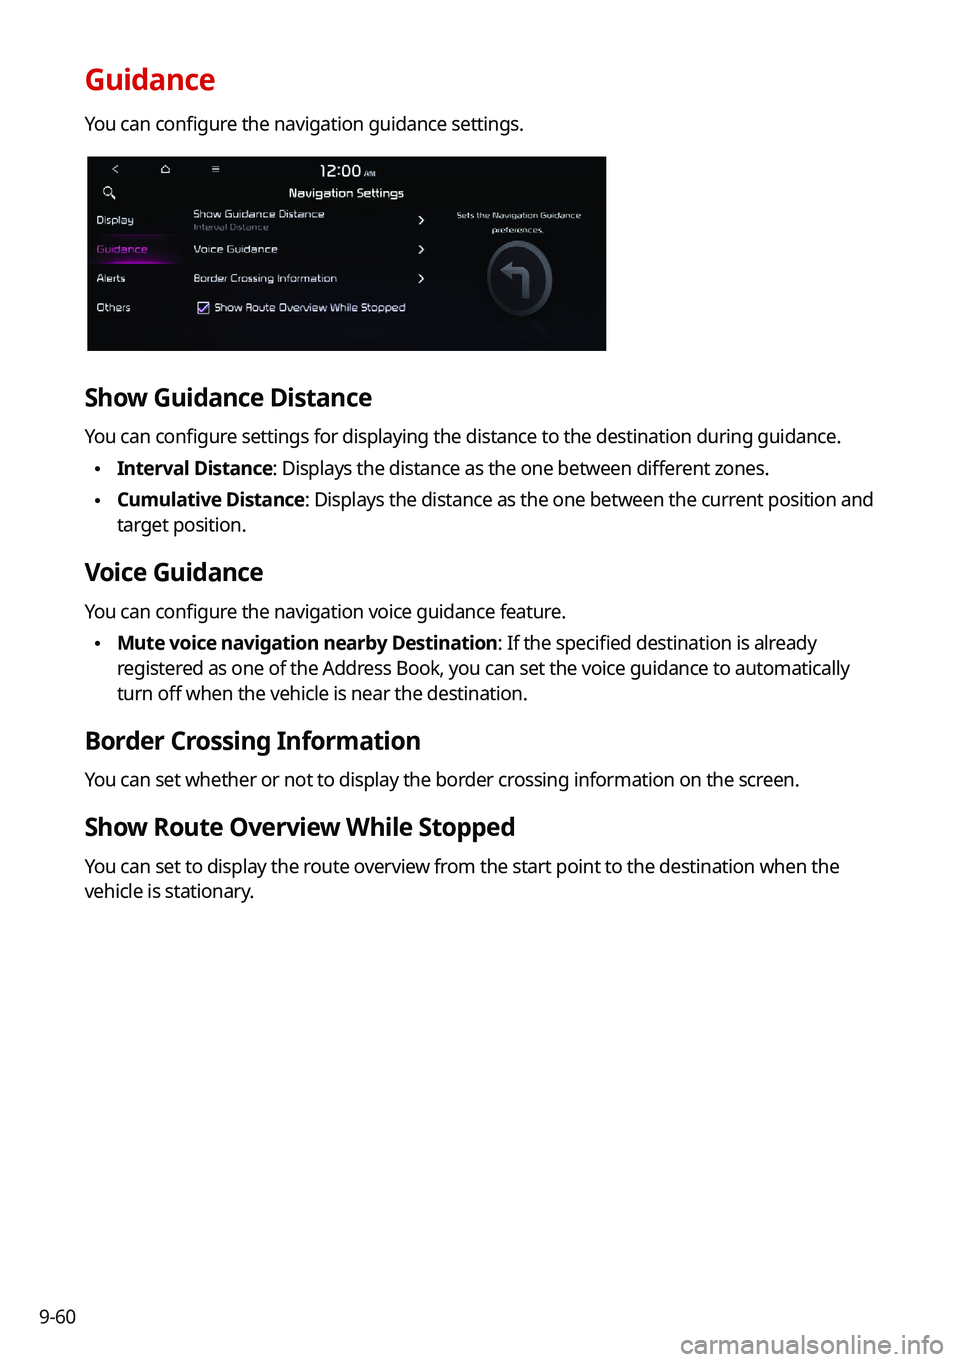
Guidance
You can configure the navigation guidance settings.
Show Guidance Distance
You can configure settings for displaying the distance to the destination during guidance.
\225Interval Distance: Displays the distance as the one between different zones.
\225Cumulative Distance: Displays the distance as the one between the current position and
target position.
Voice Guidance
You can configure the navigation voice guidance feature.
\225Mute voice navigation nearby Destination: If the specified destination is already
registered as one of the Address Book, you can set the voice guidance to automatically
turn off when the vehicle is near the destination.
Border Crossing Information
You can set whether or not to display the border crossing information on the screen.
Show Route Overview While Stopped
You can set to display the route overview from the start point to the destination when the
vehicle is stationary.
Page 271 of 300
9-91
Updating the software and map
1 Connect a USB device to the computer and run Navigation Updater for
downloading the update files.
2 Follow the instructions on the screen to download the update files.
3 Remove the USB device from the computer and then connect it to the
USB port in your vehicle.
4 Start the vehicle to turn on the system.
0000
A
You can perform update without starting the vehicle by simply locating the start
switch to "ON".
\334\334Caution
\225Perform update with the start switch "ON" when the battery is sufficiently charged
by driving the vehicle. When the battery is discharged while updating, the system
may get damaged with the update stopped.
-Note that the battery may be discharged easily in winter.
-The battery may also be discharged easily when the vehicle is not used for a long
time. Caution is required.
\225
When you start the vehicle while updating with the start switch "ON", power supply
to the system may be cut off.
5 On the All Menus screen, press Setup >
General >
SW Info/Update.
0000
A
After the system is turned on, press Yes when a pop-up window appears whether
to proceed with update. In this case, the screen changes to allow you to select the
update method.
[ Updating immediately
You can finish the update quickly.
1 On the SW Info/Update screen, press Update.
2 Press Update Now.
3 Press OK.
The update is performed immediately after the system reboots.
Page 272 of 300
9-92
[Background Update
You can perform update while using the system.
1 On the SW Info/Update screen, press Update.
2 Press Background Update.
3 Press OK.
0000
A
Compared to Update Now, it may take longer.
0000
A
On the All Menus screen, press Setup >
General >
SW Info/Update to see the update
progress.
0000
A
It is possible to start background updates only when the vehicle is on.
0000
A
It is possible to continue to perform updates even after turning off the vehicle while
updates are in progress. On the notification window displayed when the vehicle is
turned off, press Update to perform the remaining updates to complete the process
successfully. For later update, press Later.
0000
A
If the update process is not completed, a notification window appears asking if you want
to perform updates each time you turn off the vehicle.
0000
A
All system functions, including the rear-view camera, are disabled while updates are in
progress.
[Scheduling the update
When you set for scheduled update after downloading the latest data, the navigation map
and infotainment system can be updated while not using the vehicle.
1 On the SW Info/Update screen, press Update.
2 Press Scheduled Update.
3 Set the update time and press OK.
When scheduling the update is finished, the status indicator icon appears.
0000
A
You can set to start the update within 12 hours or less after the vehicle is stopped.
4 Turn off the vehicle (ACC Off).
Page 276 of 300

10-2
Solutions
Before reporting a malfunctioning system, refer to the following table and see if you can
identify and fix the problem. If the problem persists or you are unable to locate your specific
need, contact your place of purchase or dealer.
Sound and display
SymptomPossible causeSolution
A blank screen
appears and sound
is not audible. The system is turned
off.
\225
Check that the start switch is in "ACC" or
"ON."
\225Press the Power button on the control
panel to turn on the system.
Sound volume is too
low. Turn the Volume knob on the control panel
to adjust the volume.
Sound is muted. Press the Mute button on the steering wheel
to unmute.
Sound is audible
from only one side
of the speakers. Sound is
imbalanced.
On the All Menus screen, press Setup
>
Sound >
Position and adjust the sound
outputs for the left and right speakers.
The sound is cut off
or noise is heard. Vibration occurs in
the system.When the system vibrates, the sound may
be cut off or noise may occur. This is not a
system failure. The system is restored as
soon as the vibration stops.
Page 277 of 300
10-3
SymptomPossible causeSolution
The image quality is
poor. Screen adjustment
is required.On the All Menus screen, press Setup
>
Display >
Illumination, and then adjust the
brightness.
Vibration occurs in
the system. The images may get distorted when vibration
occurs in the system. This is not a system
failure. The system is restored as soon as the
vibration stops.
The display is aged
or the system
performance is
degraded. If the problem persists, contact your place of
purchase or dealer.
Small red, blue,
and green dots
are shown on the
screen. LCD has very high-density pixels. For this
reason, there may be dead pixels (that are
always off) or lit pixels (that are always on)
within 0.01 percent of the total pixels.