2021 INFINITI Q50 power
[x] Cancel search: powerPage 51 of 268

from a station transmitter, the signals will
tend to fade and/or drift.
Static and flutter: During signal interference
from buildings, large hills or due to antenna
position, usually in conjunction with in-
creased distance from the station transmit-
ter, static or flutter can be heard. This can be
reduced by lowering the treble setting to
reduce the treble response.
Multipath reception: Because of the reflec-
tive characteristics of FM signals, direct and
reflected signals reach the receiver at the
same time. The signals may cancel each
other, resulting in momentary flutter or loss
of sound.
AM radio reception
AM signals, because of their low frequency,
can bend around objects and skip along the
ground. In addition, the signals can bounce
off the ionosphere and be bent back to
earth. Because of these characteristics, AM
signals are also subject to interference as
they travel from transmitter to receiver.
Fading: Occurs while the vehicle is passing
through freeway underpasses or in areas
with many tall buildings. It can also occur for
several seconds during ionospheric turbu-
lence even in areas where no obstacles exist.Static: Caused by thunderstorms, electrical
power lines, electric signs and even traffic
lights.
HD RadioTMTechnology reception
HD Radio Technology reception needs to be
activated to receive HD Radio broadcasts.
“Radio Menu” (page 3-19)
This enables you to receive radio broadcasts
digitally (where available), providing a better
quality sound with clear reception. When
this feature is not activated or HD Radio
broadcasts are not available, you will receive
analog radio (AM/FM) broadcasts.
Satellite radio reception
When the satellite radio is used for the first
time or the battery has been replaced, the
satellite radio may not work properly. This is
not a malfunction. Wait more than 10
minutes with the satellite radio ON and the
vehicle outside of any metal or large building
for the satellite radio to receive all of the
necessary data.
SiriusXM® services require a subscription
after trial period and are sold separately or
as a package. The satellite service is avail-
able only in the 48 contiguous USA and DC.
SiriusXM® service is also available in Cana- da; see www.siriusxm.ca.
The satellite radio performance may be
affected if cargo carried on the roof blocks
the satellite radio signal.
If possible, do not put cargo near the
satellite antenna.
A buildup of ice on the satellite radio
antenna can affect satellite radio perfor-
mance. Remove the ice to restore satellite
radio reception.
3. Audio system
3-3
Page 96 of 268
3. Audio system
To replace the battery:
1. Open the lid as illustrated above.
2. Replace both batteries with new ones.
.Recommended battery: Size AA x 2
.Be careful not to touch the batteryterminal.
.Make sure that the +and 7ends on
the batteries match the markings in-
side the compartment.
3. Close the lid securely.
.If you will not be using the remote controller for long periods of time,
remove the batteries.
.Replacement of the batteries is
needed when the remote controller
only functions at extremely close
distances to the Mobile Entertain-
ment System or when it does not
function at all.
Headphones
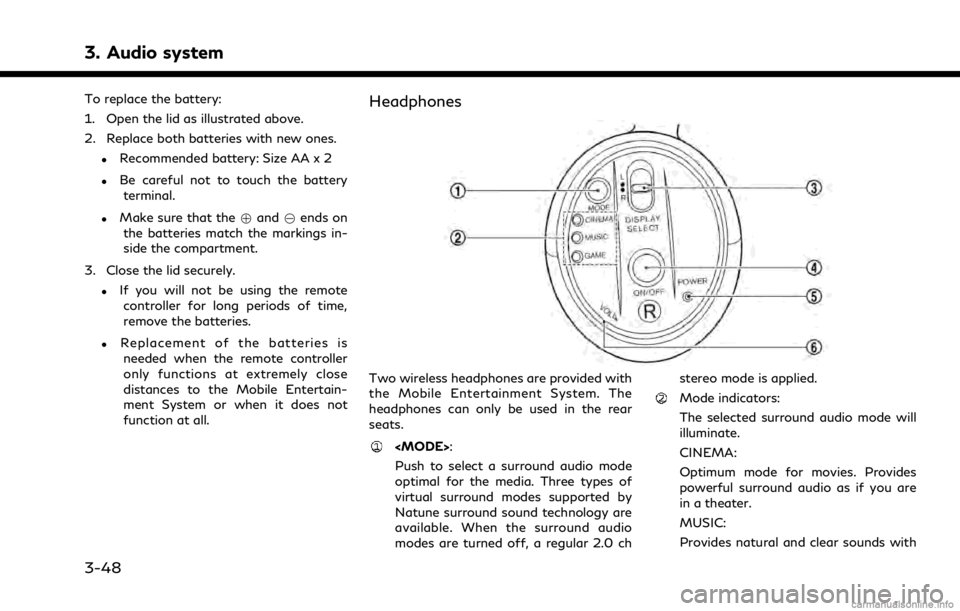
Two wireless headphones are provided with
the Mobile Entertainment System. The
headphones can only be used in the rear
seats.
Push to select a surround audio mode
optimal for the media. Three types of
virtual surround modes supported by
Natune surround sound technology are
available. When the surround audio
modes are turned off, a regular 2.0 ch stereo mode is applied.
Mode indicators:
The selected surround audio mode will
illuminate.
CINEMA:
Optimum mode for movies. Provides
powerful surround audio as if you are
in a theater.
MUSIC:
Provides natural and clear sounds with
3-48
Page 97 of 268

stability optimal for listening to music.
GAME:
Provides realistic sounds for playing
games with bass enhanced sounds.
Slide this switch to select which of the
audio sources to listen to when the rear
displays are playing different sources.
L: The headphone will play audio from thesource playing on the left display.
R: The headphone will play audio from the source playing on the right display.
Push to turn the headphones on or off.
Power ON/OFF indicator:
Illuminates when the headphones are
turned on.
Turn to adjust the volume.
Operating tips: . The headphones will automatically turn
off after several minutes if there is no
audio output during that period. The
headphones will also turn off after
approximately 4 hours of continuous use. To prevent the battery from being
discharged, keep the power turned off
when not in use.
. If the sound from the headphones is not
clear, it may be due to interference from
an infrared communication device or a
cellular phone. If this happens, turn down
the headphone volume or stop using the
headphones. It is also possible that the
headphones may be too far or offset
from the transmitter which is in the rear
display screen. Use the headphones in
front of the rear display.
. The sound may also be interrupted
temporarily when there is something
between the headphones and the trans-
mitter causing interference. Move the
source of interference, such as opaque
materials, hands, hair, etc.
Battery replacement:
CAUTION
. An improperly disposed battery can
harm the environment. Always con-
firm local regulations for battery
disposal. .
When changing the batteries, do not
let dust or oil get on the components.
NOTE:
Change the batteries of the headphones
when they stop functioning while playing or
when noise is produced.
1. Open the lid as illustrated above. Use a flat object, such as a coin, if
necessary, to open the lid located on
the back of the left headphone speaker.
3. Audio system
3-49
Page 98 of 268

3. Audio system
2. Replace both batteries with new ones.
.Recommended battery: Size AAA x 2
.Be careful not to touch the batteryterminal.
.Make sure that the +and 7ends on
the batteries match the markings in-
side the compartment.
3. Close the lid securely.
Audio jacks for wired headphones
Commercially available headphones can also
be used by connecting them to the head-
phone jacks
located at the rear of the
center console box.
To adjust the volume of the wired head-
phone, push
on the corresponding
side (left/right) to pull out the knob which can be rotated to turn up or down the
volume.
Push
back in when it is not in use.
REAR MEDIA INTERFACE
USB connection portand HDMI portare located at the rear of the center console
box.
Only the compatible devices connected to
the rear media interface can be played on the
rear displays.
Turn off the power of the portable device
before connecting to the port.
NOTE:
Do not apply strong pressure to any
portable device (such as a USB memory
device) or cable that is connected to the
USB connection port or the HDMI port. It
could damage the device and the ports.
ACTIVATING REAR DISPLAYS
CAUTION
. The glass on the display screens may
break if hit with a hard or sharp
object. If the glass breaks, do not
touch the liquid crystalline material. In
case of contact with skin, wash im-
mediately with soap and water.
3-50
Page 109 of 268

— Your cellular phone is locked in orderto prevent dialing.
. If Apple CarPlay® or Android Auto is
active, the Bluetooth® Hands-Free
Phone cannot be used.
. When the radio wave condition is not
ideal or ambient sound is too loud, it may
be difficult to hear the other person’s
voice during a call.
. Immediately after the ignition switch is
placed in the ACC or ON position, it may
not be possible to receive a call for a
short period of time.
. Do not place the cellular phone in an area
surrounded by metal or far away from
the in-vehicle phone module to prevent
tone quality degradation and wireless
connection disruption.
. While a cellular phone is connected
through the Bluetooth® wireless con-
nection, the battery power of the cellular
phone may discharge quicker than usual.
. Visit the website below for trouble-
shooting help if the Bluetooth® Hands-
Free Phone System seems to be mal-
functioning.
www.infinitiusa.com/bluetooth/ .
Some cellular phones or other devices
may cause interference or a buzzing
noise to come from the audio system
speakers. Storing the device in a differ-
ent location may reduce or eliminate the
noise.
. Refer to the cellular phone Owner’s
Manual regarding the telephone pairing
procedure specific to your phone, bat-
tery charging, cellular phone antenna,
etc.
. The antenna or battery display on the
monitor may not coincide with the
antenna or battery display of some
cellular phones.
. If reception between callers is unclear,
adjusting the incoming or outgoing call
volume may improve the clarity.
“Volume and Beeps settings”
(page 2-32)
. The microphone is located near the map
light.
. To improve call quality, the microphone is
optimized to recognize the driver’s voice.
Speech from vehicle passengers may not
be captured by the Bluetooth® Hands-
Free Phone System. .
Keep the interior of the vehicle as quiet
as possible to hear the caller’s voice
clearly as well as to minimize echo.
Reduce background noise as much as
possible by closing windows and point-
ing HVAC vents away from the ceiling.
PHONE SCREEN
The phone screen can be displayed by on
both the upper display and the lower display.
. Push <
>on the steering wheel to
display the phone screen on the upper
display.
. Push
Page 142 of 268
5. Information and vehicle settings
Apple CarPlay® SYSTEM LIMITA-
TIONS
For all features of Apple CarPlay® to
operate correctly, it is necessary to have a
compatible iPhone®, a cellular connection
and a data plan.
When Apple CarPlay® is operating, system
performance is affected by the strength of
the cellular connection or performance of
the phone itself. If performance of the
system decreases:. Disconnect and reconnect your phone
. Cycle phone power off/on to restart
Changing government regulations may also
affect operation of Apple CarPlay®.
Android AutoTM
WARNING
. Stop your vehicle in a safe location
and apply the parking brake before
connecting your Android
TMphone to
the vehicle or operating your con-
nected Android phone for setup.
. If you are unable to devote full
attention to vehicle operation while
using Android Auto, pull off the road
to a safe location and stop your
vehicle.
You can use Android Auto by connecting a
compatible Android phone to your vehicle
via a USB cable. It is also recommended to
use the Android phone OEM cable that is
compatible with your phone.
With Android Auto, your in-vehicle system
can be used as a display and a controller for
some of the Android phone functions. Voice
control of some of the Android phone
functions is also possible with Android Auto.
Visit www.android.com/auto for informa-
tion about the functions that are available
and details about Google’s privacy policy. Certain vehicle information (e.g. location and
speed) may be shared with your device while
Android Auto is in use. Carrier charges may
apply to use Android Auto.
COMPATIBILITY
Only Android 5.0 (Lollipop) or later versions
are compatible with Android Auto. Refer to
the Android Auto website for more informa-
tion.
INFO:
. Download the Android Auto App from
Google Play
TMto Android phone in
advance.
. For best results, always update your
device to the latest Android software
and Android Auto App version. When
you connect the Android phone to the in-
vehicle system, it will automatically up-
date the Android software and Android
Auto App version.
. Android Auto will take the place of your
Bluetooth® audio and Bluetooth®
Hands-Free Phone functionality.
. When setting a route with the navigation
system (if so equipped), if you set a
destination with Android Auto, the route
5-22
Page 146 of 268

5. Information and vehicle settings
Android Auto SYSTEM LIMITA-
TIONS
For all features of Android Auto to operate
correctly, it is necessary to have a compa-
tible Android phone, a cellular connection
and a data plan.
When Android Auto is operating, system
performance is affected by the strength of
the cellular connection or performance of
the phone itself. If performance of the
system decreases:. Disconnect and reconnect your phone
. Close all apps and restart them
. Cycle phone power off/on to restart
It should also be confirmed that the latest
version of both Android OS and the Android
Auto App are installed on the cellular phone.
Functionality of Android Auto may decrease
or be lost if there are changes to operating
systems, hardware, software or other tech-
nologies central to supporting the system
that are outside of INFINITI’s control. Chan-
ging government regulations may also affect
the operation of Android Auto.
SIRI® EYES FREE
GENERAL INFORMATION
Apple Siri® Eyes Free personal assistant can
be accessed from the vehicle. Siri® Eyes Free
can be accessed in Siri® Eyes Free mode to
reduce user distraction. In this mode, Siri®
Eyes Free is available for interaction by voice
control. After connecting a compatible Apple
device by using Bluetooth®, Siri® Eyes Free
can be activated by pushing and holding
<
> on the steering wheel.
Siri® is a trademark of Apple Inc., registered
in the U.S. and other countries.
INFO:
. Some Siri® Eyes Free functions, such as
opening apps, may not be available
during driving.
. For best results, always update your
device to the latest software version.
. Keep the interior of the vehicle as quiet
as possible. Close the windows to elim-
inate the surrounding noises (traffic
noises, vibration sounds, etc.), which
may prevent the system from recogniz-
ing the voice commands correctly. .
For functions that can be used in Siri®
Eyes Free, refer to the Apple website.
REQUIREMENTS
Siri® is available on the iPhone® 4S or later.
Devices released before iPhone® 4S are not
supported by the Siri® Eyes Free system.
Visit www.apple.com/ios/siri for details
about device compatibility.
Siri® must be enabled on the phone. Please
check phone settings.
If the device has a lock screen, Siri® must be
accessible from the lock screen. Please check
phone settings.
SIRI® EYES FREE ACTIVATION
Siri® Eyes Free function can be activated
using <>on the steering wheel.“Control buttons and touch screen
display” (page 2-2)
1. Connect a Siri® Eyes Free enabled iPhone® to the vehicle.
“Setting devices” (page 2-28)
2. After the Bluetooth® connection is es- tablished, push and hold <
>on the
steering wheel to activate the Siri® Eyes
Free function.
5-26
Page 217 of 268
![INFINITI Q50 2021 Infiniti Intouch 12. Touch [Information] and then touch[System Information].
13. Touch [Map Update].
14. Touch [Update by USB device].
15. Touch [Install Map Update from USB].
16. Insert the USB memory into the USB co](/manual-img/42/35007/w960_35007-216.png "INFINITI Q50 2021 Infiniti Intouch 12. Touch [Information] and then touch[System Information].
13. Touch [Map Update].
14. Touch [Update by USB device].
15. Touch [Install Map Update from USB].
16. Insert the USB memory into the USB co")
12. Touch [Information] and then touch[System Information].
13. Touch [Map Update].
14. Touch [Update by USB device].
15. Touch [Install Map Update from USB].
16. Insert the USB memory into the USB connection port.
A confirmation message is displayed.
Confirm the contents of the message
and touch [Yes].
17. Touch [OK] after completing the update.
INFO:
.The navigation system cannot be operated while the map updates.
.Map data should be updated while the engine is running to prevent dis-
charge of the vehicle battery.
Updating using wireless LAN (Wi-
Fi) (if so equipped)
The map data can be updated using the
vehicle Wi-Fi connection. Wi-Fi communica-
tions can be made by using a Wi-Fi network,
smartphone, etc.
“Wi-Fi Setting” (page 2-30) 1. Connect the vehicle to an available Wi-Fi
network.
2. Push