2021 HYUNDAI VELOSTER battery replacement
[x] Cancel search: battery replacementPage 88 of 482
3-6
Keep the remote key away from
electromagnetic materials that
block electromagnetic waves to
the key surface.
Battery replacement
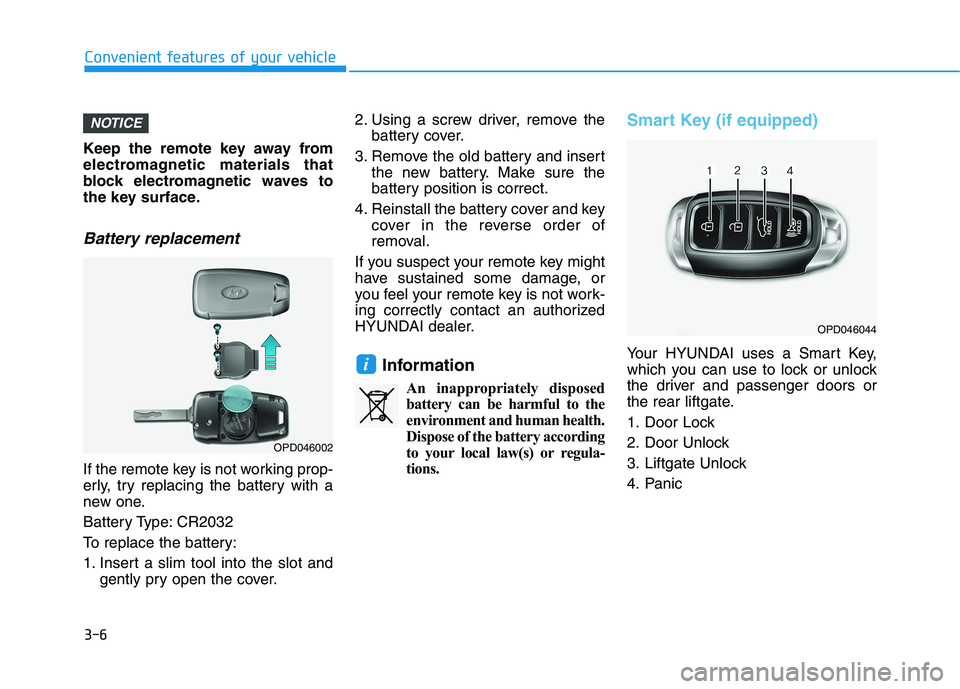
If the remote key is not working prop-
erly, try replacing the battery with a
new one.
Battery Type: CR2032
To replace the battery:
1. Insert a slim tool into the slot and
gently pry open the cover.2. Using a screw driver, remove the
battery cover.
3. Remove the old battery and insert
the new battery. Make sure the
battery position is correct.
4. Reinstall the battery cover and key
cover in the reverse order of
removal.
If you suspect your remote key might
have sustained some damage, or
you feel your remote key is not work-
ing correctly contact an authorized
HYUNDAI dealer.
Information
An inappropriately disposed
battery can be harmful to the
environment and human health.
Dispose of the battery according
to your local law(s) or regula-
tions.
Smart Key (if equipped)
Your HYUNDAI uses a Smart Key,
which you can use to lock or unlock
the driver and passenger doors or
the rear liftgate.
1. Door Lock
2. Door Unlock
3. Liftgate Unlock
4. Panici
NOTICE
Convenient features of your vehicle
OPD046044
OPD046002
Page 93 of 482
3-11
Convenient features of your vehicle
Battery replacement
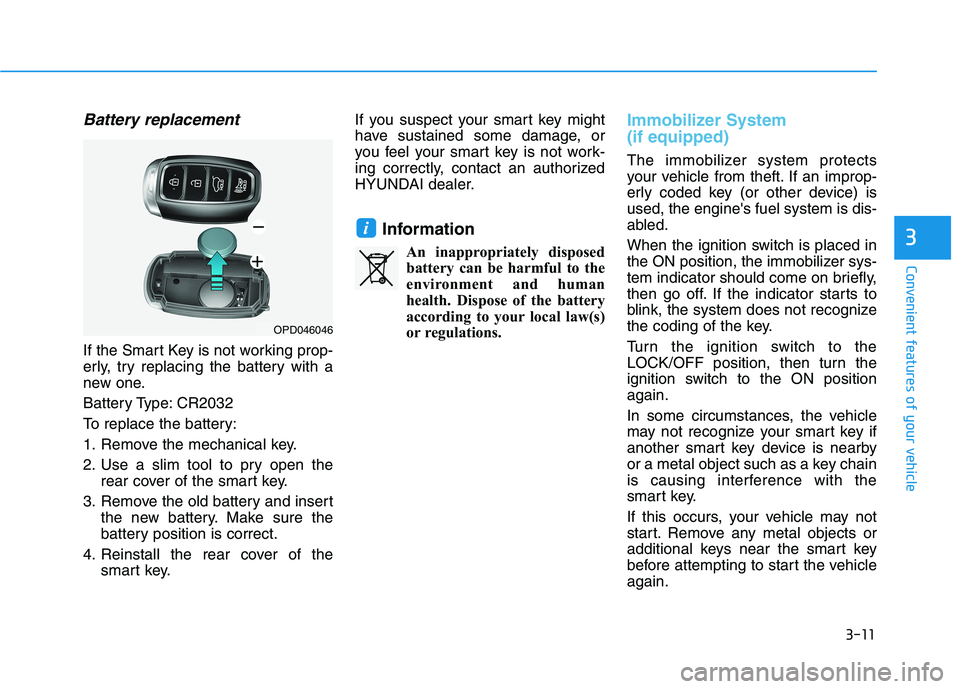
If the Smart Key is not working prop-
erly, try replacing the battery with a
new one.
Battery Type: CR2032
To replace the battery:
1. Remove the mechanical key.
2. Use a slim tool to pry open the
rear cover of the smart key.
3. Remove the old battery and insert
the new battery. Make sure the
battery position is correct.
4. Reinstall the rear cover of the
smart key.If you suspect your smart key might
have sustained some damage, or
you feel your smart key is not work-
ing correctly, contact an authorized
HYUNDAI dealer.
Information
An inappropriately disposed
battery can be harmful to the
environment and human
health. Dispose of the battery
according to your local law(s)
or regulations.
Immobilizer System
(if equipped)
The immobilizer system protects
your vehicle from theft. If an improp-
erly coded key (or other device) is
used, the engine's fuel system is dis-
abled.
When the ignition switch is placed in
the ON position, the immobilizer sys-
tem indicator should come on briefly,
then go off. If the indicator starts to
blink, the system does not recognize
the coding of the key.
Turn the ignition switch to the
LOCK/OFF position, then turn the
ignition switch to the ON position
again.
In some circumstances, the vehicle
may not recognize your smart key if
another smart key device is nearby
or a metal object such as a key chain
is causing interference with the
smart key.
If this occurs, your vehicle may not
start. Remove any metal objects or
additional keys near the smart key
before attempting to start the vehicle
again.
i3
OPD046046
Page 380 of 482
7
Maintenance
7
Maintenance
Engine compartment .............................................7-3
Maintenance services ...........................................7-4
Owner's Responsibility .....................................................7-4
Owner Maintenance Precautions..................................7-4
Owner maintenance ...............................................7-5
Owner Maintenance Schedule .......................................7-6
Scheduled maintenance services.........................7-7
Normal Maintenance Schedule (Nu 2.0 MPI) .............7-8
Maintenance Under Severe Usage Conditions
(Nu 2.0 MPI)......................................................................7-11
Normal Maintenance Schedule (Gamma 1.6 T-GDI) ...7-13
Maintenance Under Severe Usage Conditions
(Gamma 1.6 T-GDI) .........................................................7-16
Explanation of scheduled maintenance items ..7-18
Engine oil ..............................................................7-21
Checking the Engine Oil Level .....................................7-21
Checking the Engine Oil and Filter .............................7-22
Engine coolant......................................................7-23
Checking the Engine Coolant Level ............................7-23
Changing Engine Coolant ..............................................7-26
Brake/clutch fluid ................................................7-27
Checking the brake/clutch Fluid Level ......................7-27
Washer fluid .........................................................7-28
Checking the Washer Fluid Level................................7-28
Parking brake .......................................................7-28
Checking the Parking Brake .........................................7-28
Air cleaner ............................................................7-29
Filter Replacement ..........................................................7-29
Climate control air filter .....................................7-30
Filter Inspection ...............................................................7-30
Wiper blades .........................................................7-31
Blade Inspection ..............................................................7-31
Blade Replacement .........................................................7-31
Battery...................................................................7-34
For Best Battery Service ..............................................7-35
Battery Recharging ........................................................7-35
Reset Features.................................................................7-36
7
Page 431 of 482
7-52
Maintenance
F FU
US
SE
ES
S
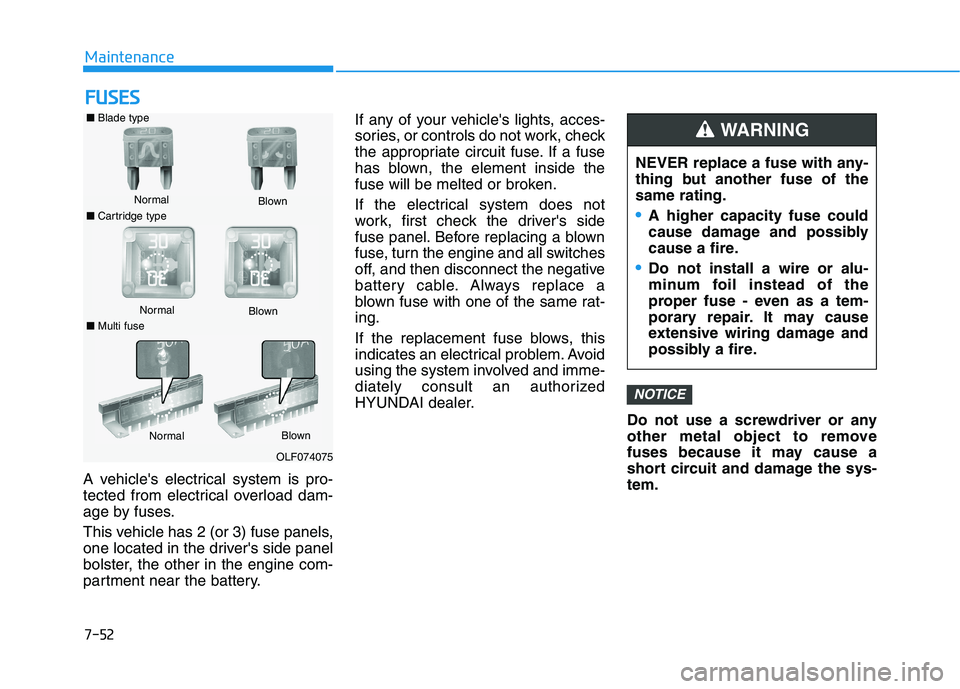
A vehicle's electrical system is pro-
tected from electrical overload dam-
age by fuses.
This vehicle has 2 (or 3) fuse panels,
one located in the driver's side panel
bolster, the other in the engine com-
partment near the battery.If any of your vehicle's lights, acces-
sories, or controls do not work, check
the appropriate circuit fuse. If a fuse
has blown, the element inside the
fuse will be melted or broken.
If the electrical system does not
work, first check the driver's side
fuse panel. Before replacing a blown
fuse, turn the engine and all switches
off, and then disconnect the negative
battery cable. Always replace a
blown fuse with one of the same rat-
ing.
If the replacement fuse blows, this
indicates an electrical problem. Avoid
using the system involved and imme-
diately consult an authorized
HYUNDAI dealer.
Do not use a screwdriver or any
other metal object to remove
fuses because it may cause a
short circuit and damage the sys-
tem.
NOTICE
NEVER replace a fuse with any-
thing but another fuse of the
same rating.
A higher capacity fuse could
cause damage and possibly
cause a fire.
Do not install a wire or alu-
minum foil instead of the
proper fuse - even as a tem-
porary repair. It may cause
extensive wiring damage and
possibly a fire.
WARNING ■Blade type
Normal
■Cartridge typeBlown
Normal
Blown
■Multi fuse
NormalBlown
OLF074075
Page 451 of 482
7-72
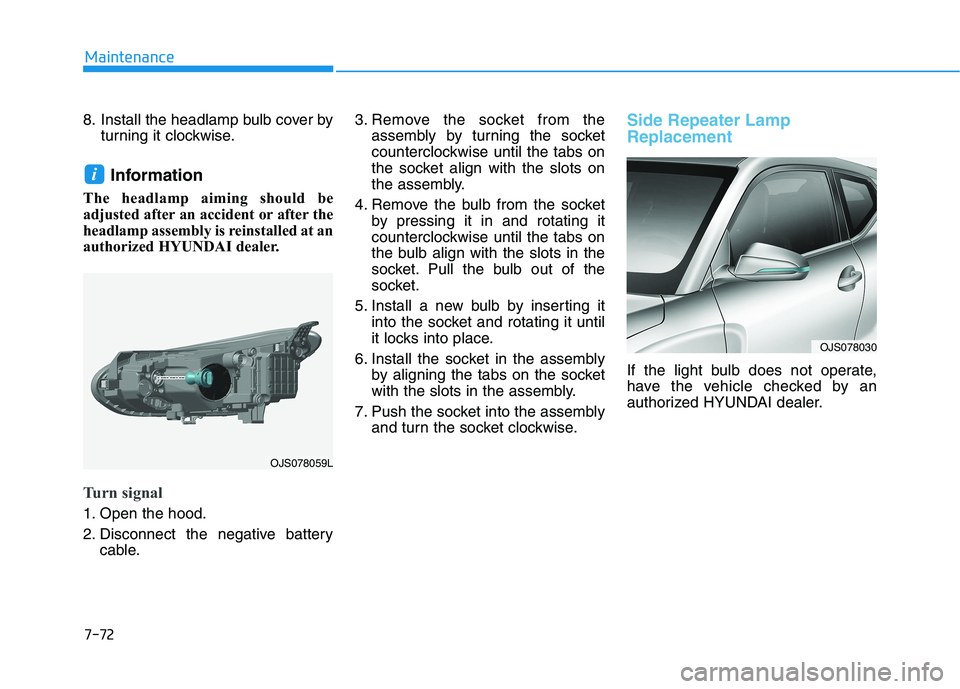
Maintenance
8. Install the headlamp bulb cover by
turning it clockwise.
Information
The headlamp aiming should be
adjusted after an accident or after the
headlamp assembly is reinstalled at an
authorized HYUNDAI dealer.
Turn signal
1. Open the hood.
2. Disconnect the negative battery
cable.3. Remove the socket from the
assembly by turning the socket
counterclockwise until the tabs on
the socket align with the slots on
the assembly.
4. Remove the bulb from the socket
by pressing it in and rotating it
counterclockwise until the tabs on
the bulb align with the slots in the
socket. Pull the bulb out of the
socket.
5. Install a new bulb by inserting it
into the socket and rotating it until
it locks into place.
6. Install the socket in the assembly
by aligning the tabs on the socket
with the slots in the assembly.
7. Push the socket into the assembly
and turn the socket clockwise.
Side Repeater Lamp
Replacement
If the light bulb does not operate,
have the vehicle checked by an
authorized HYUNDAI dealer.
i
OJS078030
OJS078059L