2021 HYUNDAI TUCSON mirror
[x] Cancel search: mirrorPage 13 of 546
1-2
E EX
XT
TE
ER
RI
IO
OR
R
O
OV
VE
ER
RV
VI
IE
EW
W
Your vehicle at a glance
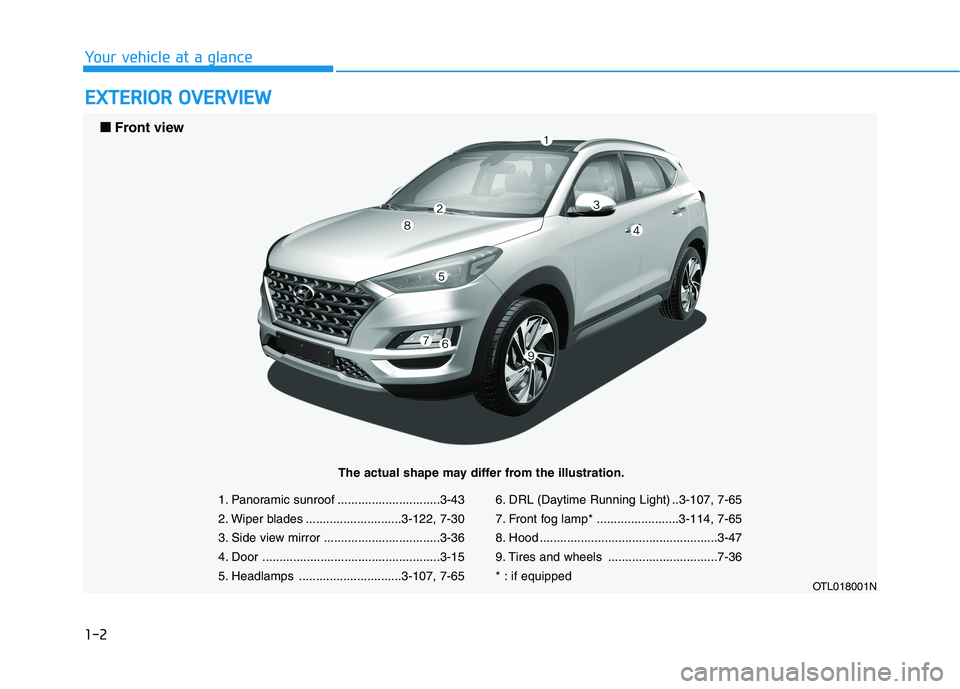
1. Panoramic sunroof ..............................3-43
2. Wiper blades ............................3-122, 7-30
3. Side view mirror ..................................3-36
4. Door ....................................................3-15
5. Headlamps ..............................3-107, 7-656. DRL (Daytime Running Light) ..3-107, 7-65
7. Front fog lamp* ........................3-114, 7-65
8. Hood ....................................................3-47
9. Tires and wheels ................................7-36
* : if equipped
OTL018001N
■ ■
Front view
The actual shape may differ from the illustration.
Page 15 of 546
1-4
Your vehicle at a glance
I IN
NT
TE
ER
RI
IO
OR
R
O
OV
VE
ER
RV
VI
IE
EW
W
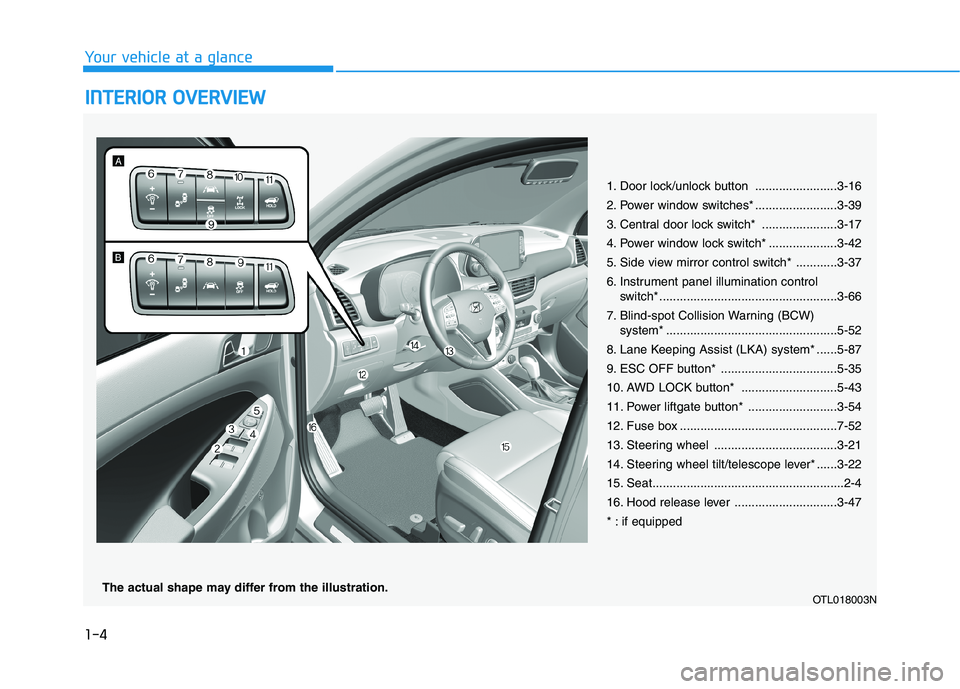
1. Door lock/unlock button ........................3-16
2. Power window switches* ........................3-39
3. Central door lock switch* ......................3-17
4. Power window lock switch* ....................3-42
5. Side view mirror control switch* ............3-37
6. Instrument panel illumination control
switch* ....................................................3-66
7. Blind-spot Collision Warning (BCW)
system* ..................................................5-52
8. Lane Keeping Assist (LKA) system* ......5-87
9. ESC OFF button* ..................................5-35
10. AWD LOCK button* ............................5-43
11. Power liftgate button* ..........................3-54
12. Fuse box ..............................................7-52
13. Steering wheel ....................................3-21
14. Steering wheel tilt/telescope lever* ......3-22
15. Seat........................................................2-4
16. Hood release lever ..............................3-47
* : if equipped
OTL018003NThe actual shape may differ from the illustration.
Page 69 of 546
2-51
Safety system of your vehicle
2
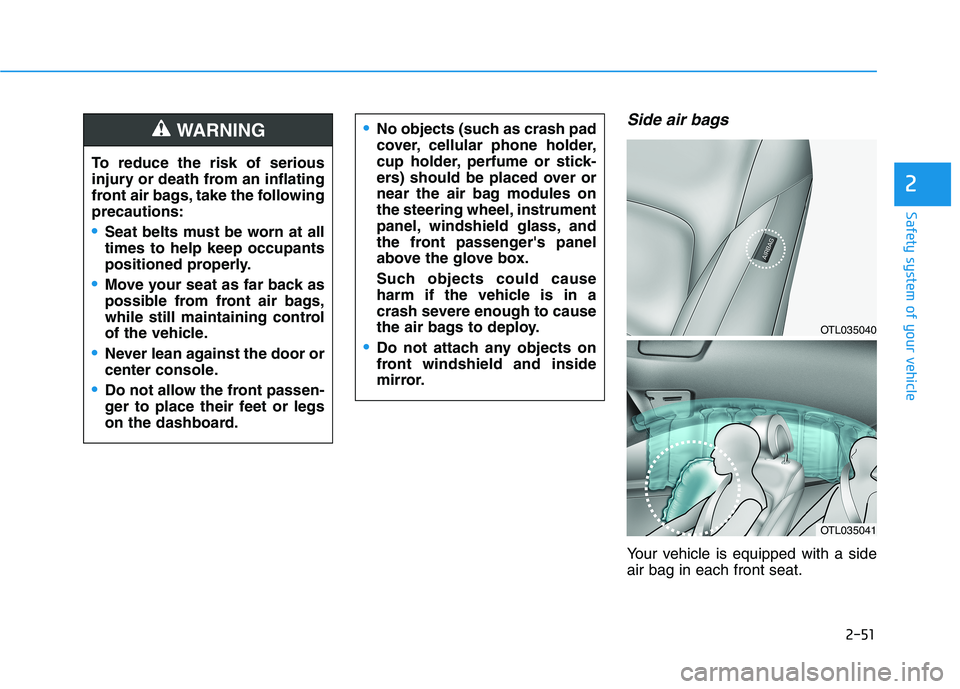
Side air bags
Your vehicle is equipped with a side
air bag in each front seat.
No objects (such as crash pad
cover, cellular phone holder,
cup holder, perfume or stick-
ers) should be placed over or
near the air bag modules on
the steering wheel, instrument
panel, windshield glass, and
the front passenger's panel
above the glove box.
Such objects could cause
harm if the vehicle is in a
crash severe enough to cause
the air bags to deploy.
Do not attach any objects on
front windshield and inside
mirror.
To reduce the risk of serious
injury or death from an inflating
front air bags, take the following
precautions:
Seat belts must be worn at all
times to help keep occupants
positioned properly.
Move your seat as far back as
possible from front air bags,
while still maintaining control
of the vehicle.
Never lean against the door or
center console.
Do not allow the front passen-
ger to place their feet or legs
on the dashboard.
WARNING
OTL035040
OTL035041
Page 92 of 546
Convenient features of your vehicle
Accessing Your Vehicle .........................................3-4
Remote Key.........................................................................3-4
Smart Key ............................................................................3-8
Immobilizer System .........................................................3-13
Door Locks ............................................................3-15
Operating Door Locks from Outside the Vehicle ....3-15
Operating Door Locks from Inside the Vehicle .......3-16
Automatic Door Lock and Unlock Features .............3-18
Child-Protector Rear Door locks ................................3-19
Theft-Alarm System ............................................3-20
Steering Wheel .....................................................3-21
Electric Power Steering (EPS) .....................................3-21
Tilt Steering/Telescope Steering.................................3-22
Heated Steering Wheel ..................................................3-23
Horn ....................................................................................3-23
Mirrors ...................................................................3-24
Inside Rearview Mirror ..................................................3-24
Side View Mirrors ...........................................................3-36
Windows ................................................................3-39
Power Windows ...............................................................3-40
Panoramic Sunroof ..............................................3-43
Sunshade ...........................................................................3-44
Sliding the Sunroof .........................................................3-44
Tilting the Sunroof .........................................................3-45
Closing the Sunroof........................................................3-45
To Reset the Sunroof.....................................................3-46
Exterior Features .................................................3-47
Hood ...................................................................................3-47
Fuel Filler Door ................................................................3-48
Liftgate ..................................................................3-52
Non-Powered liftgate ....................................................3-52
Power Liftgate .................................................................3-54
Smart Liftgate ..................................................................3-61
Instrument Cluster ...............................................3-65
Instrument Cluster Control............................................3-66
Gauges and Meters ........................................................3-67
Icy Road Warning Light .................................................3-70
Warning and Indicator Lights .......................................3-72
LCD Display Messages ...................................................3-84
LCD Display ...........................................................3-91
LCD Display Control ........................................................3-91
LCD Display Modes .........................................................3-92
Trip Computer .....................................................3-103
3
Page 115 of 546
3-24
Convenient features of your vehicle
M MI
IR
RR
RO
OR
RS
S
Inside Rearview Mirror
Before you start driving, adjust the
rearview mirror to center on the view
through the rear window.
When cleaning the mirror, use a
paper towel or similar material
dampened with glass cleaner. Do
not spray glass cleaner directly on
the mirror as this may cause the
liquid cleaner to enter the mirror
housing.
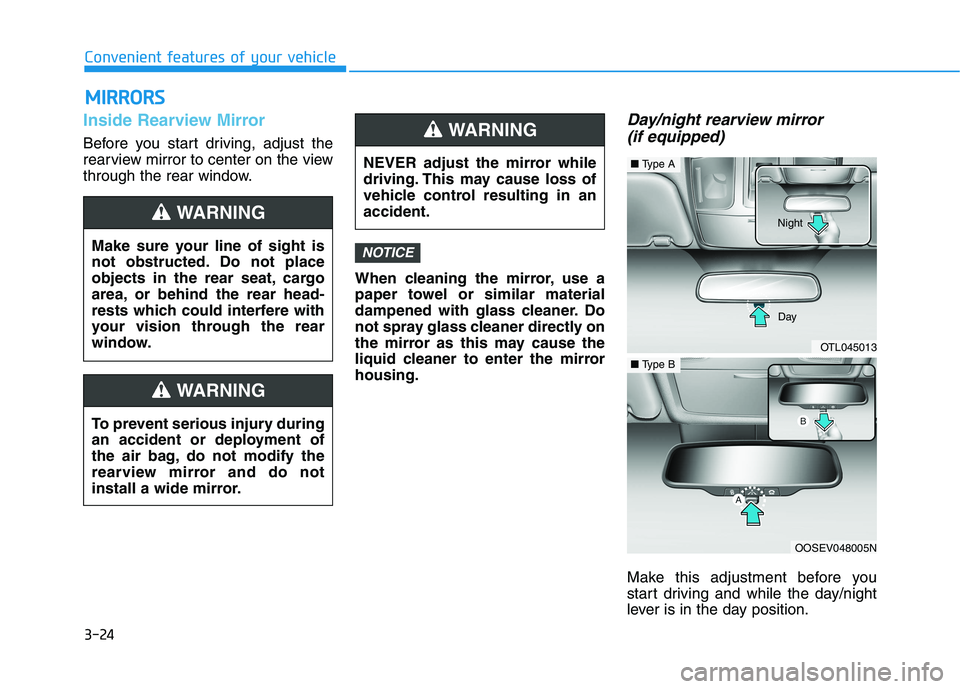
Day/night rearview mirror
(if equipped)
Make this adjustment before you
start driving and while the day/night
lever is in the day position.
NOTICEMake sure your line of sight is
not obstructed. Do not place
objects in the rear seat, cargo
area, or behind the rear head-
rests which could interfere with
your vision through the rear
window.
WARNING
NEVER adjust the mirror while
driving. This may cause loss of
vehicle control resulting in an
accident.
WARNING
To prevent serious injury during
an accident or deployment of
the air bag, do not modify the
rearview mirror and do not
install a wide mirror.
WARNING
OTL045013
■Type A
OOSEV048005N
■Type BDay Night
Page 116 of 546
3-25
Convenient features of your vehicle
3
Pull the day/night lever toward you to
reduce glare from the headlights of
the vehicles behind you during night
driving.
Remember that you lose some
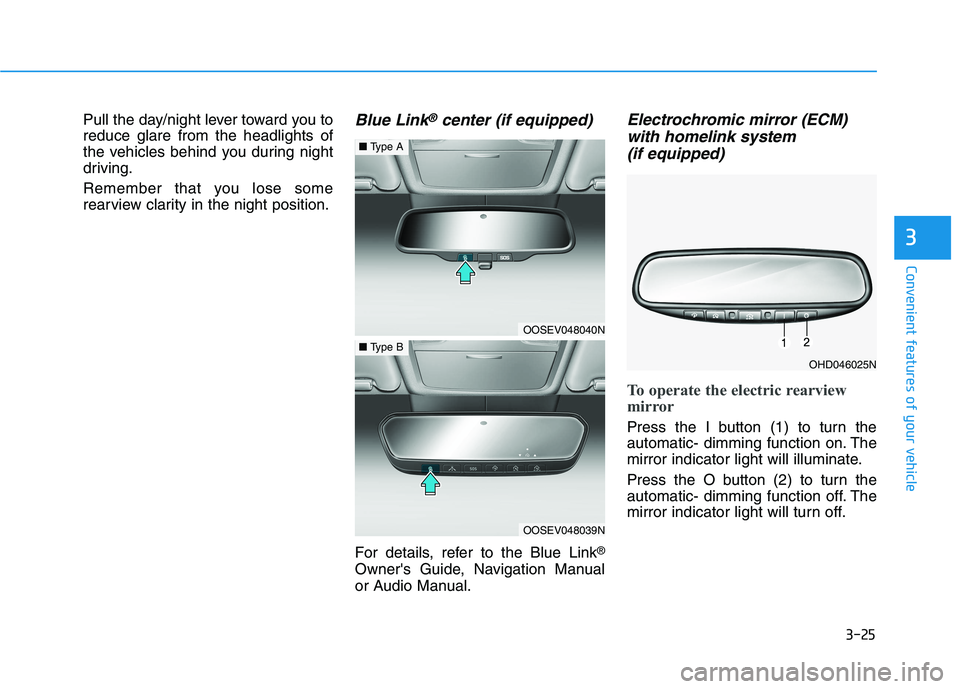
rearview clarity in the night position.Blue Link®center (if equipped)
For details, refer to the Blue Link®
Owner's Guide, Navigation Manual
or Audio Manual.
Electrochromic mirror (ECM)
with homelink system
(if equipped)
To operate the electric rearview
mirror
Press the I button (1) to turn the
automatic- dimming function on. The
mirror indicator light will illuminate.
Press the O button (2) to turn the
automatic- dimming function off. The
mirror indicator light will turn off.
OHD046025N
OOSEV048040N
■Type A
OOSEV048039N
■Type B
Page 117 of 546
3-26
Convenient features of your vehicle
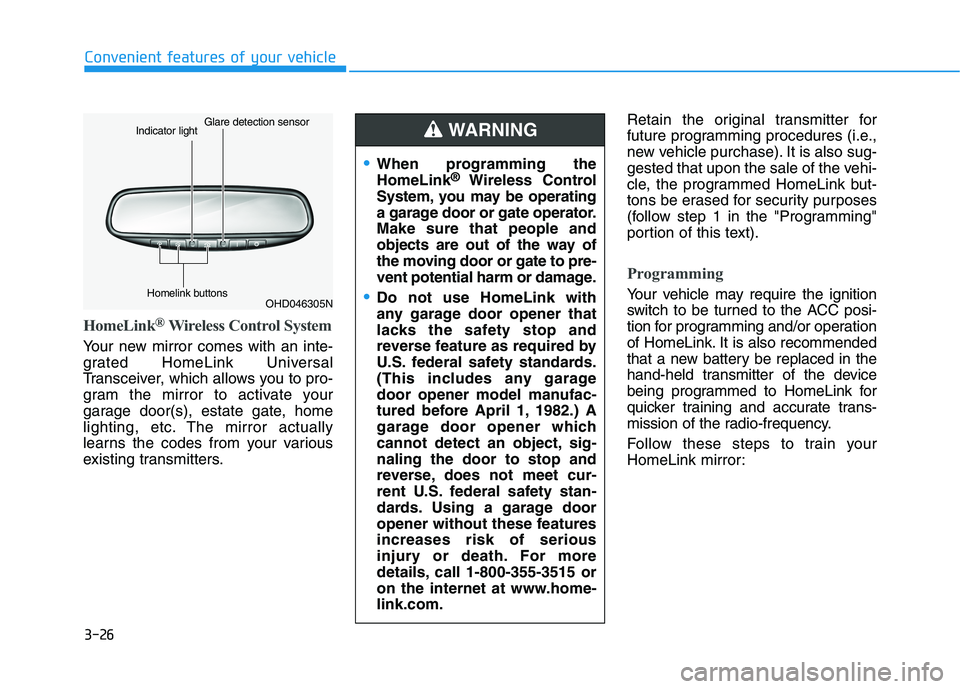
HomeLink®Wireless Control System
Your new mirror comes with an inte-
grated HomeLink Universal
Transceiver, which allows you to pro-
gram the mirror to activate your
garage door(s), estate gate, home
lighting, etc. The mirror actually
learns the codes from your various
existing transmitters.Retain the original transmitter for
future programming procedures (i.e.,
new vehicle purchase). It is also sug-
gested that upon the sale of the vehi-
cle, the programmed HomeLink but-
tons be erased for security purposes
(follow step 1 in the "Programming"
portion of this text).
Programming
Your vehicle may require the ignition
switch to be turned to the ACC posi-
tion for programming and/or operation
of HomeLink. It is also recommended
that a new battery be replaced in the
hand-held transmitter of the device
being programmed to HomeLink for
quicker training and accurate trans-
mission of the radio-frequency.
Follow these steps to train your
HomeLink mirror:
When programming the
HomeLink®Wireless Control
System, you may be operating
a garage door or gate operator.
Make sure that people and
objects are out of the way of
the moving door or gate to pre-
vent potential harm or damage.
Do not use HomeLink with
any garage door opener that
lacks the safety stop and
reverse feature as required by
U.S. federal safety standards.
(This includes any garage
door opener model manufac-
tured before April 1, 1982.) A
garage door opener which
cannot detect an object, sig-
naling the door to stop and
reverse, does not meet cur-
rent U.S. federal safety stan-
dards. Using a garage door
opener without these features
increases risk of serious
injury or death. For more
details, call 1-800-355-3515 or
on the internet at www.home-
link.com.
WARNING
OHD046305N Glare detection sensor
Indicator light
Homelink buttons
Page 118 of 546
3-27
Convenient features of your vehicle
3
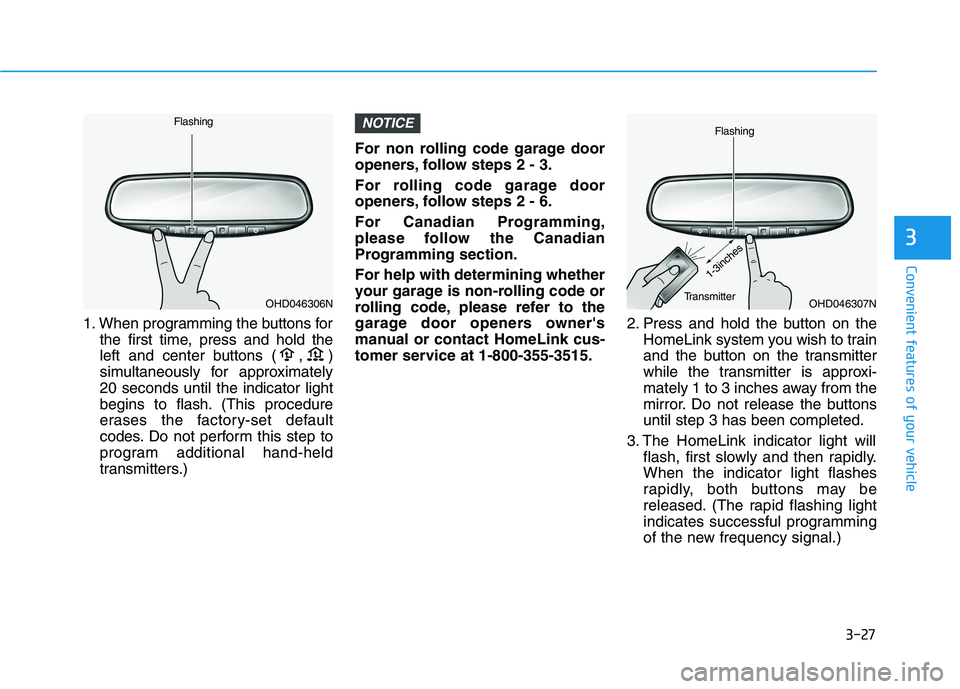
1. When programming the buttons for
the first time, press and hold the
left and center buttons ( , )
simultaneously for approximately
20 seconds until the indicator light
begins to flash. (This procedure
erases the factory-set default
codes. Do not perform this step to
program additional hand-held
transmitters.)For non rolling code garage door
openers, follow steps 2 - 3.
For rolling code garage door
openers, follow steps 2 - 6.
For Canadian Programming,
please follow the Canadian
Programming section.
For help with determining whether
your garage is non-rolling code or
rolling code, please refer to the
garage door openers owner's
manual or contact HomeLink cus-
tomer service at 1-800-355-3515.2. Press and hold the button on the
HomeLink system you wish to train
and the button on the transmitter
while the transmitter is approxi-
mately 1 to 3 inches away from the
mirror. Do not release the buttons
until step 3 has been completed.
3. The HomeLink indicator light will
flash, first slowly and then rapidly.
When the indicator light flashes
rapidly, both buttons may be
released. (The rapid flashing light
indicates successful programming
of the new frequency signal.)
NOTICE
OHD046307N Flashing
1-3inches
TransmitterOHD046306N Flashing