2021 HYUNDAI TUCSON HYBRID light
[x] Cancel search: lightPage 503 of 630
Driver assistance system
7-144
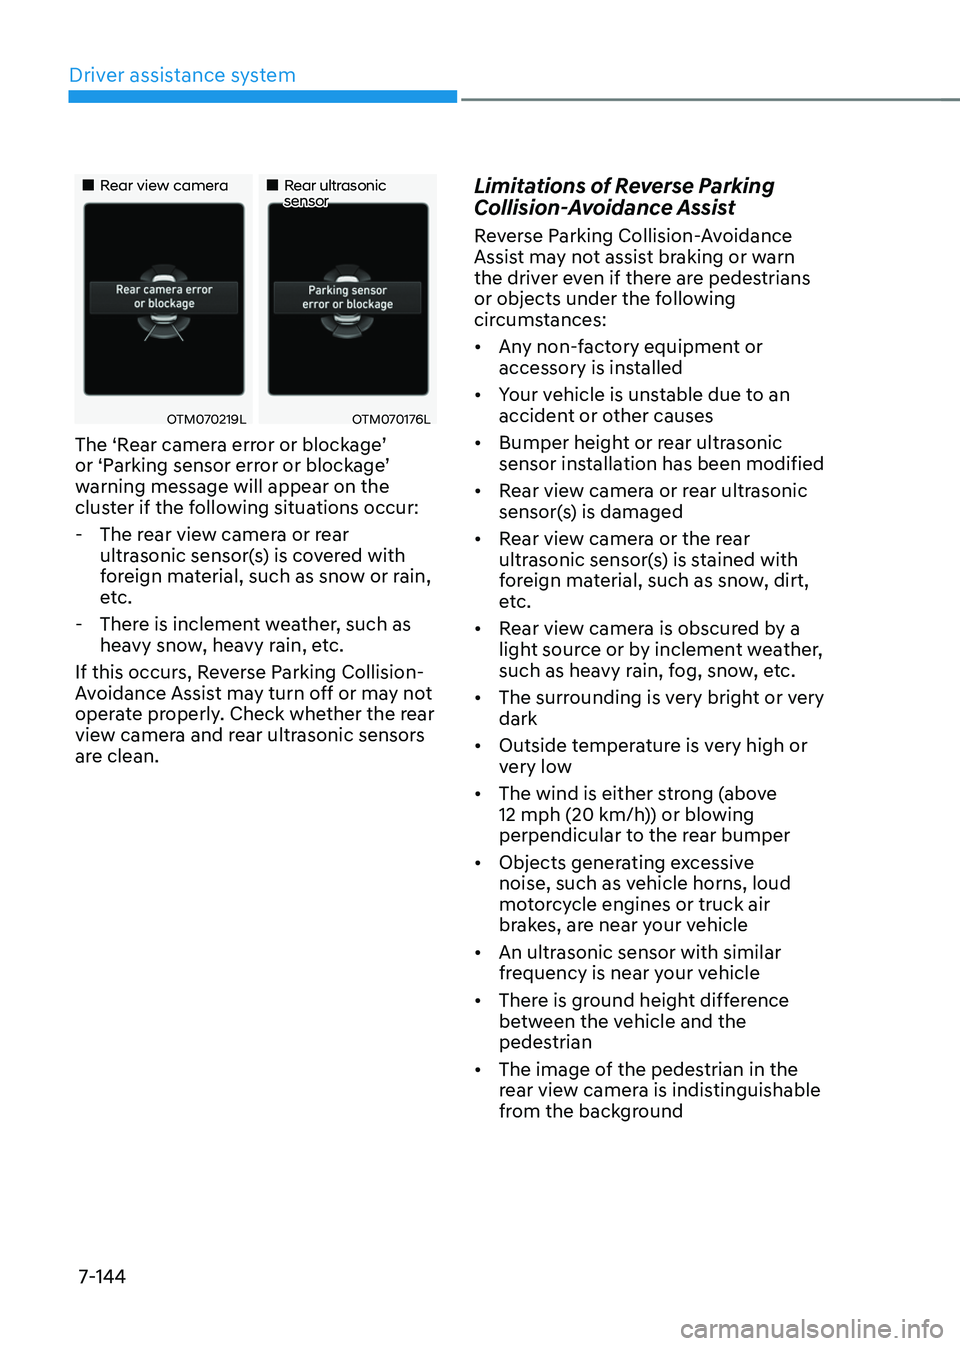
„„Rear view camera„„Rear ultrasonic sensor
OTM070219LOTM070176L
The ‘Rear camera error or blockage’ or ‘P
arking sensor err or or block age’ warning message will appear on the
clus
ter if the following situations occur:
- The rear vie
w camera or rear
ultrasonic sensor(s) is covered with
foreign material, such as snow or rain,
etc.
- There is inclemen
t weather, such as
heavy snow, heavy rain, etc.
If this occurs, Reverse Parking Collision-
Avoidance Assist may turn off or may not
operate properly. Check whether the rear
view camera and rear ultrasonic sensors
are clean.
Limitations of Reverse Parking
Collision-Avoidance Assist
Reverse Parking Collision-Avoidance
Assist may not assist braking or warn
the driver even if there are pedestrians
or objects under the following
circumstances:
• Any non-factory equipment or
accessory is installed
• Your vehicle is unstable due to an
accident or other causes
• Bumper height or rear ultrasonic
sensor installation has been modified
• Rear view camera or rear ultrasonic
sensor(s) is damaged
• Rear view camera or the rear
ultrasonic sensor(s) is stained with
foreign material, such as snow, dirt,
etc.
• Rear view camera is obscured by a
light source or by inclement weather,
such as heavy rain, fog, snow, etc.
• The surrounding is very bright or very
dark
• Outside temperature is very high or
very low
• The wind is either strong (above
12 mph (20 km/h)) or blowing
perpendicular to the rear bumper
• Objects generating excessive
noise, such as vehicle horns, loud
motorcycle engines or truck air
brakes, are near your vehicle
• An ultrasonic sensor with similar
frequency is near your vehicle
• There is ground height difference
between the vehicle and the
pedestrian
• The image of the pedestrian in the
rear view camera is indistinguishable
from the background
Page 504 of 630
07
7-145
• The pedestrian is near the rear edge of
the vehicle
• The pedestrian is not standing upright
• The pedestrian is either very short or
very tall for Reverse Parking Collision-
Avoidance Assist to detect
• The pedestrian or cyclist is wearing
clothing that easily blends into the
background, making it difficult to
detect
• The pedestrian is wearing clothing
that does not reflect ultrasonic waves
well
• Size, thickness, height, or shape of
the object does not reflect ultrasonic
waves well (e.g., pole, bush, curbs,
carts, edge of a wall, etc.)
• The pedestrian or the object is moving
• The pedestrian or the object is very
close to the rear of the vehicle
• A wall is behind the pedestrian or the
object
• The object is not located at the rear
center of your vehicle
• The object is not parallel to the rear
bumper
• The road is slippery or inclined
• The driver backs up the vehicle
immediately after shifting to R
(Reverse)
• The driver accelerates or circles the
vehicle Reverse Parking Collision-Avoidance
Assist may unnecessarily warn the driver
or assist with braking even if there are
no pedestrians or objects under the
following circumstances:
•
Any non-factory equipment or
accessory is installed
• Your vehicle is unstable due to an
accident or other causes
• Bumper height or rear ultrasonic
sensor installation has been modified
• Your vehicle height is low or high
due to heavy loads, abnormal tire
pressure, etc.
• Rear view camera or the rear
ultrasonic sensor(s) is stained with
foreign material, such as snow, dirt,
etc.
• The pattern on the road is mistaken
for a pedestrian
• There is shadow or light reflecting on
the ground
• Pedestrians or objects are around the
path of the vehicle
• Objects generating excessive
noise, such as vehicle horns, loud
motorcycle engines or truck air
brakes, are near your vehicle
• Your vehicle is backing towards a
narrow passage or parking space
• Your vehicle is backing towards an
uneven road surface, such as an
unpaved road, gravel, bump, gradient,
etc.
• A trailer or carrier is installed on the
rear of your vehicle
• An ultrasonic sensor with similar
frequency is near your vehicle
Page 513 of 630

Driver assistance system
7-154
Remote Forward/Backward function
operation status
Operation status Smart key LED Hazard
warning light
Under
control Green LED
continuously
blinks
-
Pause Red LED
continuously
blinks Blinks
Off Red LED
illuminates for
4 seconds and
then turns off Blinks 3
times and
turns off
Complete Green LED
illuminates for
4 seconds and
then turns off Blinks 1
time and
turns off
Ã
Operation status by the hazard
w
arning light may not be applicable
based on the regulation of your
country.
à If the smart ke
y is not within the
operating range from the vehicle
(approximately 13 ft. (4 m)), the
smart key LED will not illuminate or
blink. Use the smart key within the
operating range.
How to turn off Remote Forward/
Backward function while operating
• Press the Parking/View () button
while the infotainment system screen
guides the driver using method 2.
• Shift the gear except to P (Park)
while the infotainment system screen
guides the driver using method 2.
• Press the Parking Safety (
) button
or select ‘Cancel’ on the in
fotainment sy
stem screen.
• Press the Remote Start (
) button
on the smart key while the vehicle is
being controlled by Remote Forward/
Backward function. Remote Forward/
Backward function will turn off. At this
time, the engine will turn off.
• Get on the vehicle with the smart key.
Remote Forward/Backward function
will turn off. At this time, the engine
will remain on.
The function will pause in the
following conditions when:
• There is a pedestrian, animal or object
in the direction the vehicle is moving
• The door or liftgate is open
• The Forward (
) or Backward ()
button is not continuously pressed
• Simultaneously pressing multiple
buttons on a smart key
• The smart key is not operated within
13 ft. (4 m) from the vehicle
• Button of another smart key is pressed
in addition to the operating smart key
• Blind-Spot Collision-Avoidance
Assist or Rear Cross-Traffic Collision-
Avoidance Assist operates while the
vehicle is being controlled in the
reverse direction.
Page 519 of 630
Driver assistance system
7-160
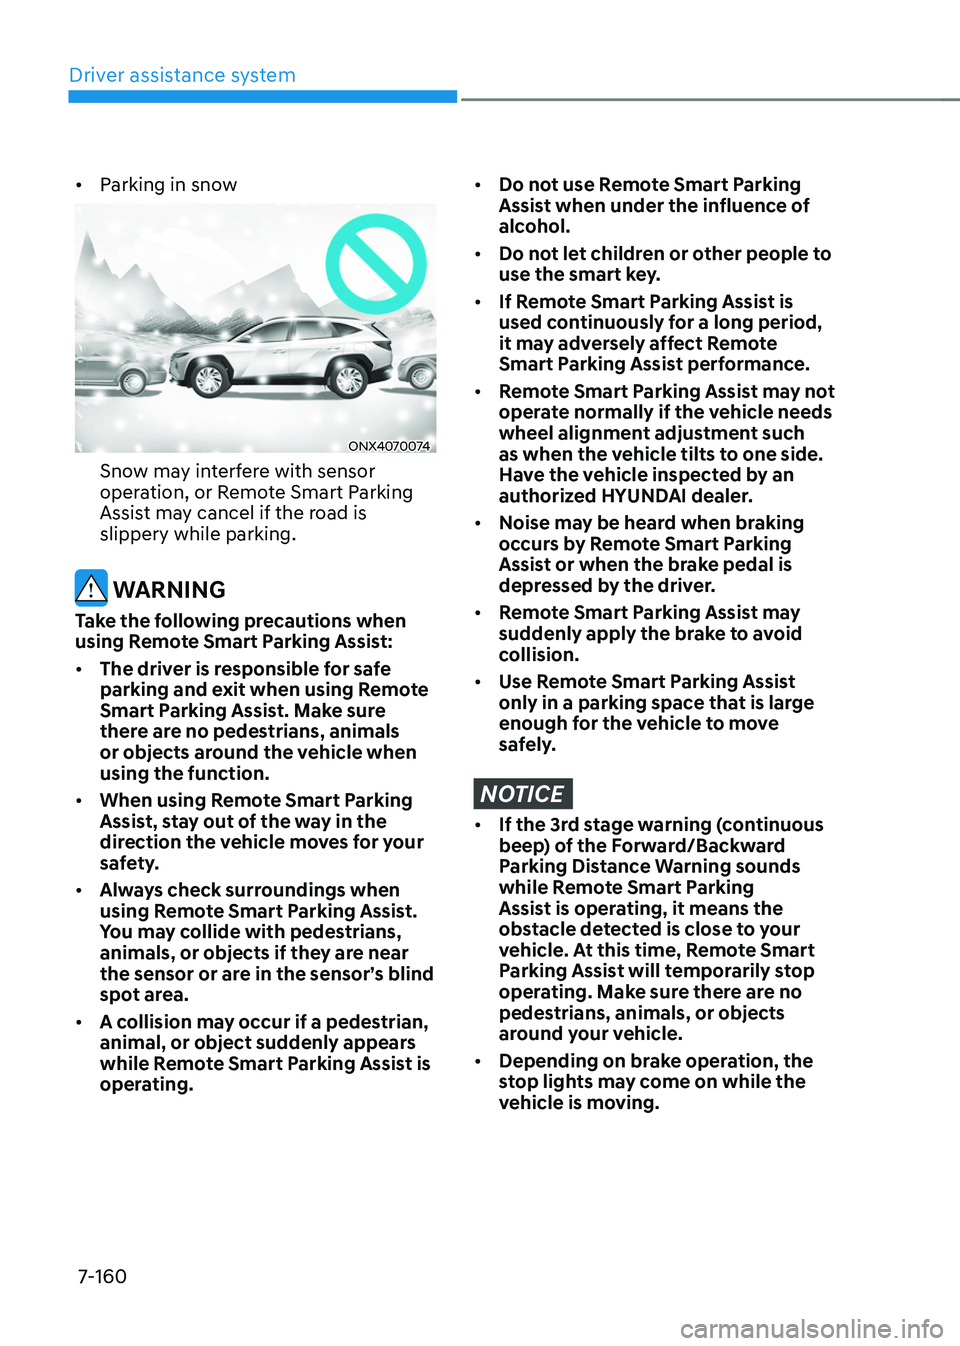
• Parking in snow
ONX4070074
Snow may interfere with sensor
operation, or Remote Smart Parking
Assist may cancel if the road is
slippery while parking.
WARNING
Take the following precautions when
using Remote Smart Parking Assist:
• The driver is responsible for safe
parking and exit when using Remote
Smart Parking Assist. Make sure
there are no pedestrians, animals
or objects around the vehicle when
using the function.
• When using Remote Smart Parking
Assist, stay out of the way in the
direction the vehicle moves for your
safety.
• Always check surroundings when
using Remote Smart Parking Assist.
You may collide with pedestrians,
animals, or objects if they are near
the sensor or are in the sensor’s blind
spot area.
• A collision may occur if a pedestrian,
animal, or object suddenly appears
while Remote Smart Parking Assist is
operating.
• Do not use Remote Smart Parking
Assist when under the influence of
alcohol.
• Do not let children or other people to
use the smart key.
• If Remote Smart Parking Assist is
used continuously for a long period,
it may adversely affect Remote
Smart Parking Assist performance.
• Remote Smart Parking Assist may not
operate normally if the vehicle needs
wheel alignment adjustment such
as when the vehicle tilts to one side.
Have the vehicle inspected by an
authorized HYUNDAI dealer.
• Noise may be heard when braking
occurs by Remote Smart Parking
Assist or when the brake pedal is
depressed by the driver.
• Remote Smart Parking Assist may
suddenly apply the brake to avoid
collision.
• Use Remote Smart Parking Assist
only in a parking space that is large
enough for the vehicle to move
safely.
NOTICE
• If the 3rd stage warning (continuous
beep) of the Forward/Backward
Parking Distance Warning sounds
while Remote Smart Parking
Assist is operating, it means the
obstacle detected is close to your
vehicle. At this time, Remote Smart
Parking Assist will temporarily stop
operating. Make sure there are no
pedestrians, animals, or objects
around your vehicle.
• Depending on brake operation, the
stop lights may come on while the
vehicle is moving.
Page 521 of 630
8. Emergency situations
Hazard warning flasher........................................................................\
.............8-2
In case of an emergency while driving
............................................................ 8
-3
If the engine stalls while driving ........................................................................\
.........8-3
If the engine s talls at a crossroad or crossing ............................................................ 8
-3
If you have a flat tire while driving
........................................................................\
...... 8
-3
If the engine will not start ........................................................................\
........8-4
If the 12 Volt Ba ttery Is Discharged
.................................................................. 8-5
Before Jump Starting ........................................................................\
........................... 8-5
Jump Starting ........................................................................\
...................................... 8-6
If the Engine Overheats ........................................................................\
............8-8
Tire Pr essure Monitoring System (TPMS)
....................................................... 8-
10
Check tire pressure ........................................................................\
............................8-10
Tir e pressure monitoring system ........................................................................\
........ 8-11
L
ow tire pressure warning light
........................................................................\
......... 8-
12
Low tire pressure position and tire pressure indicator
............................................ 8-
12
TPMS (Tire Pressure Monitoring System) malfunction indicator
............................ 8-
13
Changing a tire with TPMS
........................................................................\
................ 8-
13
If you have a flat tire (with Tire Mobility Kit) ..................................................8-15Introduction ........................................................................\
........................................ 8-15
N otes on the safe use of the Tire Mobility Kit .......................................................... 8-
16
Components of the Tire Mobility Kit
........................................................................\
.. 8-
17
Using the Tire Mobility Kit
........................................................................\
................. 8-
18
Checking the tire inflation pressure
........................................................................\
.. 8-
21
Towing ........................................................................\
.....................................8-23Towing service ........................................................................\
....................................8-23
R emovable towing hook ........................................................................\
.................... 8
-24
Emergency towing
........................................................................\
............................. 8-
25
Emergency / Roadside assistance accessories ............................................8-27Fire extinguisher ........................................................................\
................................. 8-27
Fir st aid kit ........................................................................\
..................................... .....8-27
Triangle reflector
........................................................................\
................................ 8-
27
Tire pressure gauge
........................................................................\
........................... 8-
27
Emergency situations
8
Page 522 of 630
Emergency situations
8-2
ONX4080001
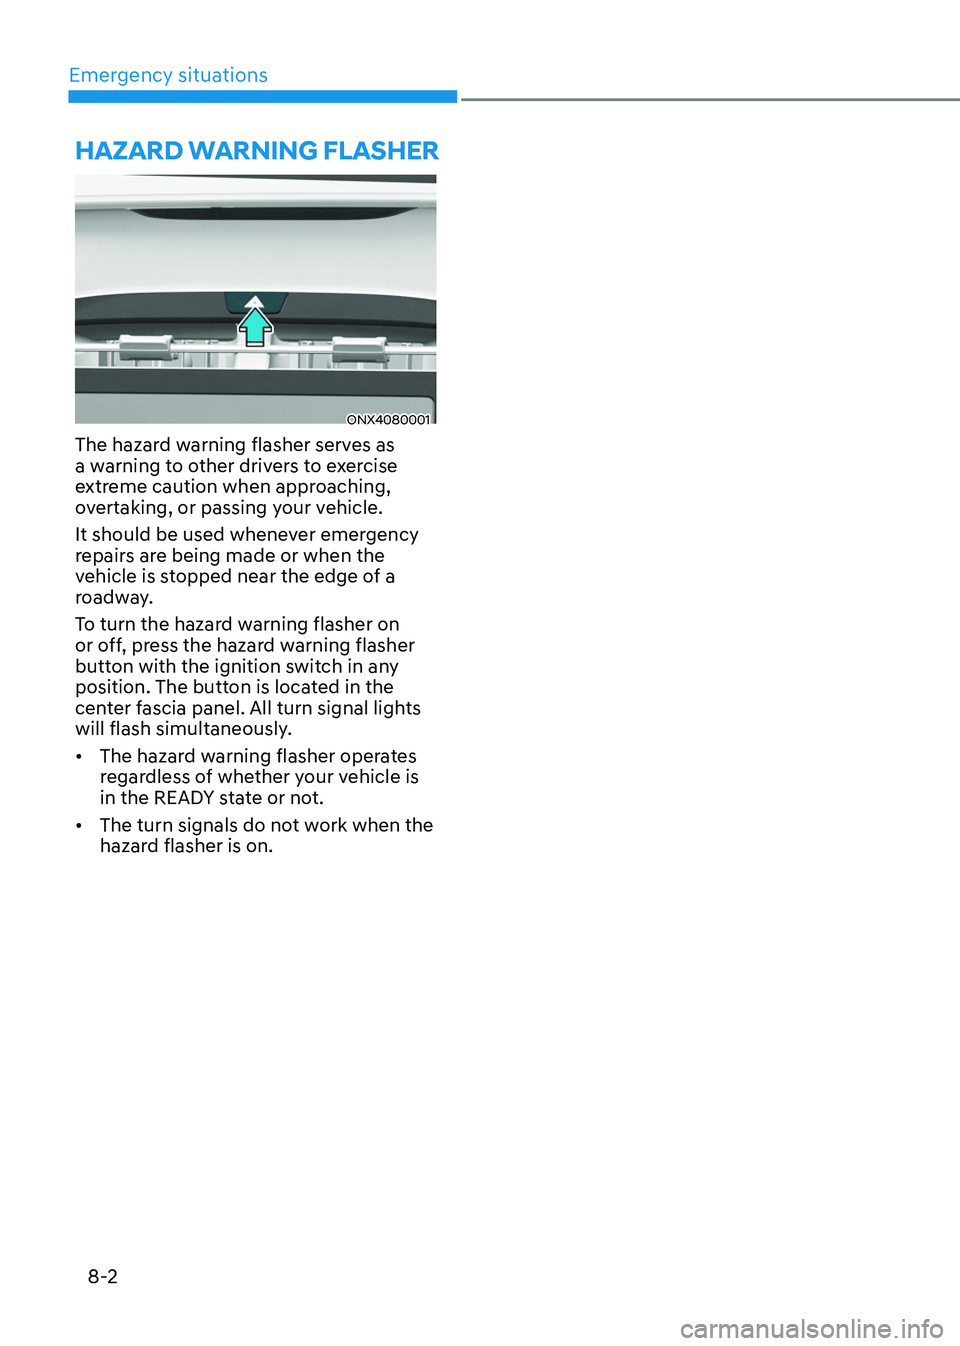
The hazard warning flasher serves as
a warning to other drivers to exercise
extreme caution when approaching,
overtaking, or passing your vehicle.
It should be used whenever emergency
repairs are being made or when the
vehicle is stopped near the edge of a
roadway.
To turn the hazard warning flasher on
or off, press the hazard warning flasher
button with the ignition switch in any
position. The button is located in the
center fascia panel. All turn signal lights
will flash simultaneously.
• The hazard warning flasher operates
regardless of whether your vehicle is
in the READY state or not.
• The turn signals do not work when the
hazard flasher is on.
Hazard warning flasHer
Page 526 of 630
Emergency situations
8-6
NOTICE
External power source using 12V battery
The use of external power accessories
may reduce performance and function
of the vehicle. Especially, the use of
dash cameras may shut off the power of
the vehicle prior to the dash camera’s
automatic shut-down.
If the power of the vehicle is shut off,
start the vehicle as explained. (refer to
“Using the 12V Battery Reset Switch”)
Jump Starting
In the event vehicle still does not have a
functional 12V battery (check if interior
lights will not turn on) then you can try
a jump start to the engine compartment
jumper terminals using a 12V booster
pack or jumper cables from another
vehicle’s 12V battery according to the
following instructions.
CAUTION
Jump starting can be dangerous if
done incorrectly. Follow the jump
starting procedure in this section to
avoid serious injury or damage to
your vehicle. If in doubt about how to
properly jump start your vehicle, we
strongly recommend that you have a
service technician or towing service do
it for you.
1.
Position the v
ehicles close enough
that the jumper cables will reach, but
do not allow the vehicles to touch.
Avoid fans or any moving parts in the
engine compartment at all times, even
when the vehicles are turned off.
2.
Turn o
ff all electrical devices such as
radios, lights, air conditioning, etc.
Put the vehicles in P (Park) and set the
parking brake. Turn both vehicles OFF.
ONX4080003
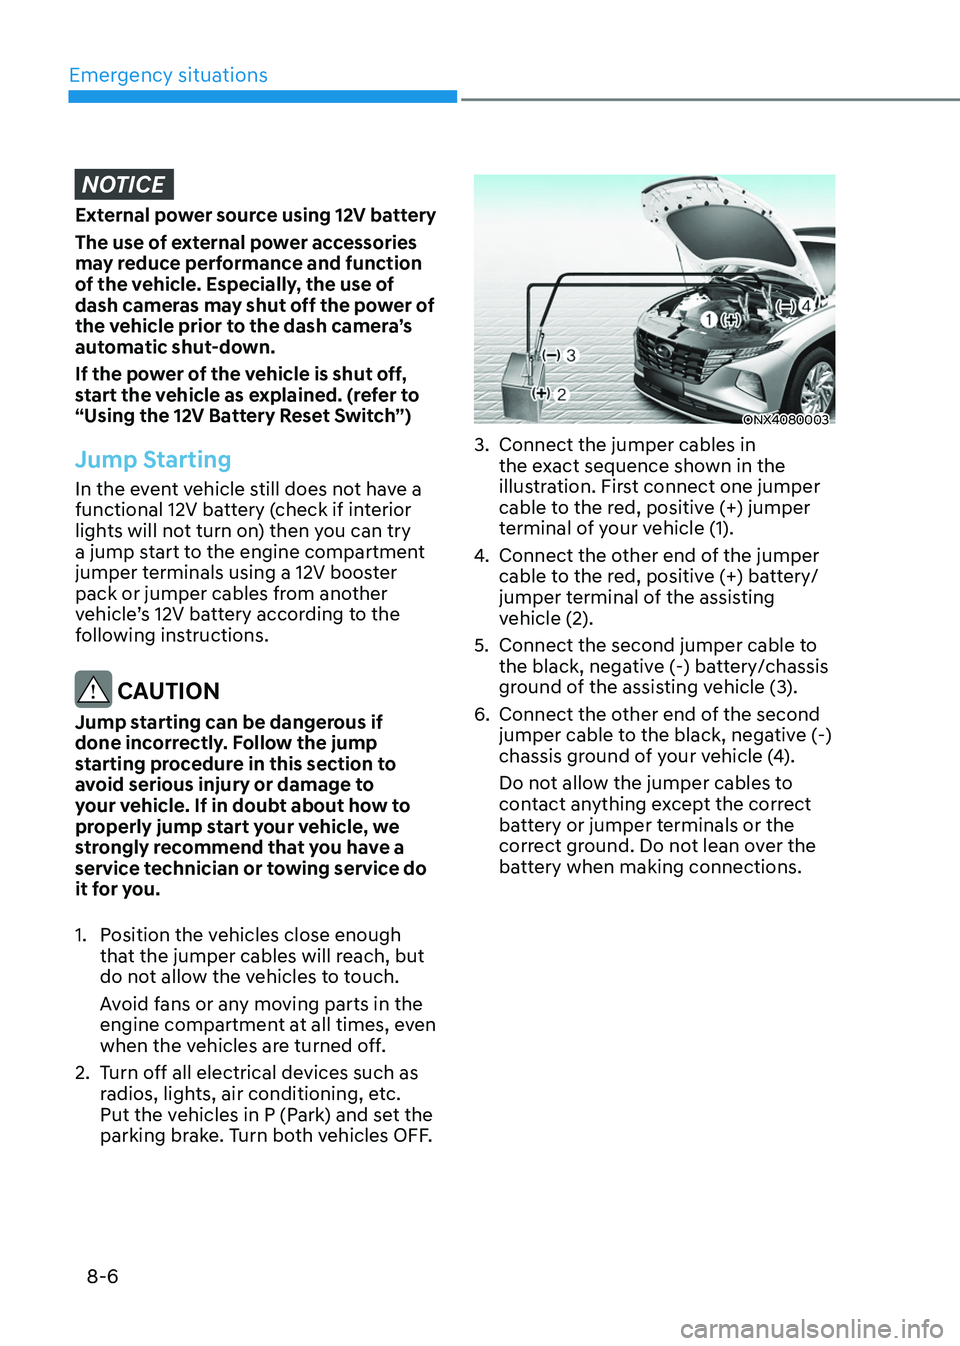
3. Connect the jumper cables in
the ex act sequence shown in the
illustration. First connect one jumper
cable to the red, positive (+) jumper
terminal of your vehicle (1).
4.
Connect the other end o
f the jumper
cable to the red, positive (+) battery/
jumper terminal of the assisting
vehicle (2).
5.
Connect the second jumper cable to
the black, nega
tive (-) battery/chassis
ground of the assisting vehicle (3).
6.
Connect the other end o
f the second
jumper cable to the black, negative (-)
chassis ground of your vehicle (4).
Do not allow the jumper cables to
contact anything except the correct
battery or jumper terminals or the
correct ground. Do not lean over the
battery when making connections.
Page 532 of 630
Emergency situations
8-12
Low tire pressure
warning light
Low tire pressure position and
tire pressure telltale
ONX4E040019
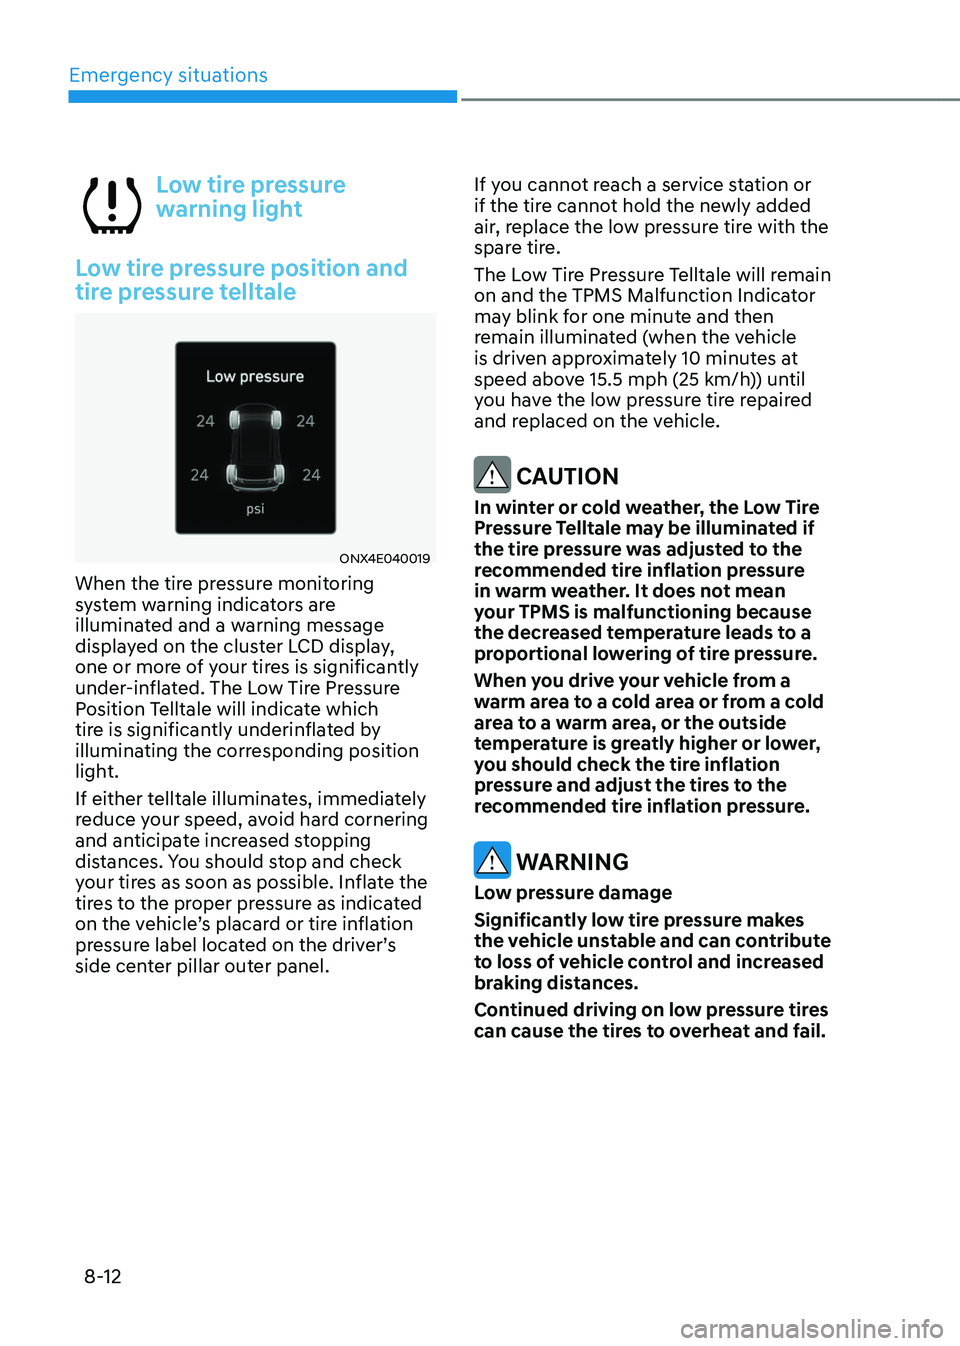
When the tire pressure monitoring
system warning indicators are
illuminated and a warning message
displayed on the cluster LCD display,
one or more of your tires is significantly
under-inflated. The Low Tire Pressure
Position Telltale will indicate which
tire is significantly underinflated by
illuminating the corresponding position
light.
If either telltale illuminates, immediately
reduce your speed, avoid hard cornering
and anticipate increased stopping
distances. You should stop and check
your tires as soon as possible. Inflate the
tires to the proper pressure as indicated
on the vehicle’s placard or tire inflation
pressure label located on the driver’s
side center pillar outer panel. If you cannot reach a service station or
if the tire cannot hold the newly added
air, replace the low pressure tire with the
spare tire.
The Low Tire Pressure Telltale will remain
on and the TPMS Malfunction Indicator
may blink for one minute and then
remain illuminated (when the vehicle
is driven approximately 10 minutes at
speed above 15.5 mph (25 km/h)) until
you have the low pressure tire repaired
and replaced on the vehicle.
CAUTION
In winter or cold weather, the Low Tire
Pressure Telltale may be illuminated if
the tire pressure was adjusted to the
recommended tire inflation pressure
in warm weather. It does not mean
your TPMS is malfunctioning because
the decreased temperature leads to a
proportional lowering of tire pressure.
When you drive your vehicle from a
warm area to a cold area or from a cold
area to a warm area, or the outside
temperature is greatly higher or lower,
you should check the tire inflation
pressure and adjust the tires to the
recommended tire inflation pressure.
WARNING
Low pressure damage
Significantly low tire pressure makes
the vehicle unstable and can contribute
to loss of vehicle control and increased
braking distances.
Continued driving on low pressure tires
can cause the tires to overheat and fail.