2021 HYUNDAI TUCSON HYBRID fuse
[x] Cancel search: fusePage 231 of 630
Convenient features
5 -74
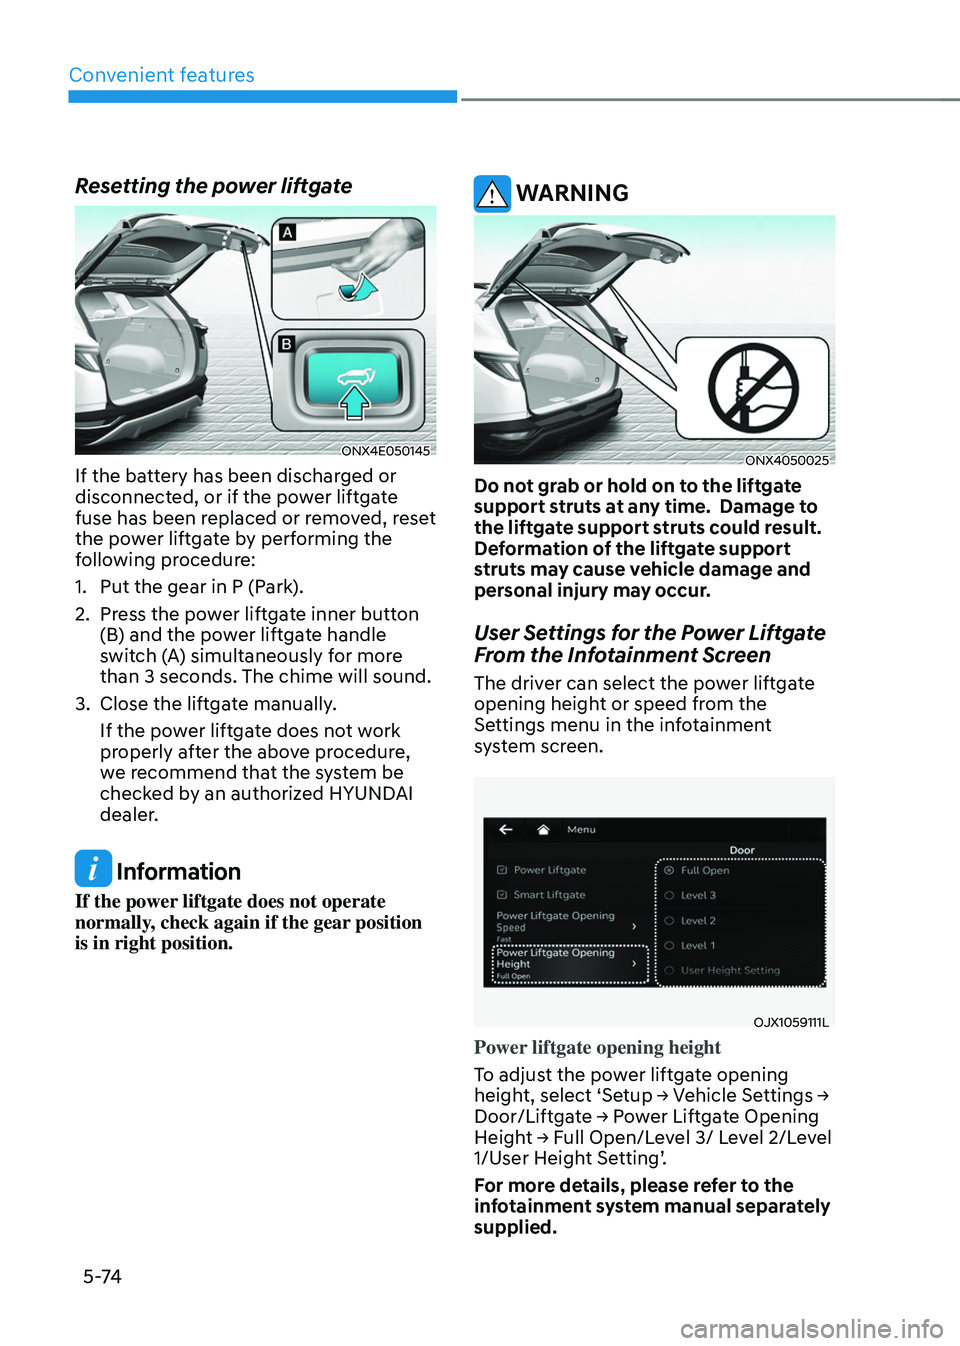
Resetting the power liftgate
ONX4E050145
If the battery has been discharged or
disconnected, or if the power liftgate
fuse has been replaced or removed, reset
the power liftgate by performing the
following procedure:
1.
Put the gear in P (Park
).
2.
Press the po
wer liftgate inner button
(B) and the power liftgate handle
switch (A) simultaneously for more
than 3 seconds. The chime will sound.
3.
Close the liftga
te manually.
If the power liftgate does not work
properly after the above procedure,
we recommend that the system be
checked by an authorized HYUNDAI
dealer.
Information
If the power liftgate does not operate
normally, check again if the gear position
is in right position.
WARNING
ONX4050025
Do not grab or hold on to the liftgate
support struts at any time. Damage to
the liftgate support struts could result.
Deformation of the liftgate support
struts may cause vehicle damage and
personal injury may occur.
User Settings for the Power Liftgate
From the Infotainment Screen
The driver can select the power liftgate
opening height or speed from the
Settings menu in the infotainment
system screen.
OJX1059111L
Power liftgate opening height
To adjust the power liftgate opening
height,
select ‘Se
tup
→ V
ehicle
Se
ttings
→ Door/Liftga
te
→ P
ower
Lift
gate
Opening Heigh
t
→ F
ull
Open/L
evel
3/ L
evel
2/L
evel
1/User H
eight Setting’.
For more details, please refer to the
infotainment system manual separately
supplied.
Page 276 of 630
05
5-119
CAUTION
To prevent damage to the power
outlets:
• Use the power outlet only when the
engine is running and remove the
accessory plug after use. Using the
accessory plug for prolonged periods
of time with the engine off could
cause the battery to discharge.
• Only use 12 volts electric accessories
which are less than 180 watts in
electric capacity.
• Adjust the air-conditioner or heater
to the lowest operating level when
using the power outlet.
• Close the cover when not in use.
• Some electronic devices can
cause electronic interference
when plugged into a vehicle’s
power outlet. These devices may
cause excessive audio static and
malfunctions in other electronic
systems or devices used in your
vehicle.
• Push the plug in as far as it will go. If
good contact is not made, the plug
may overheat and the fuse may open.
• Plug in battery equipped electrical/
electronic devices with reverse
current protection. The current
from the battery may flow into the
vehicle’s electrical/electronic system
and cause system malfunction.
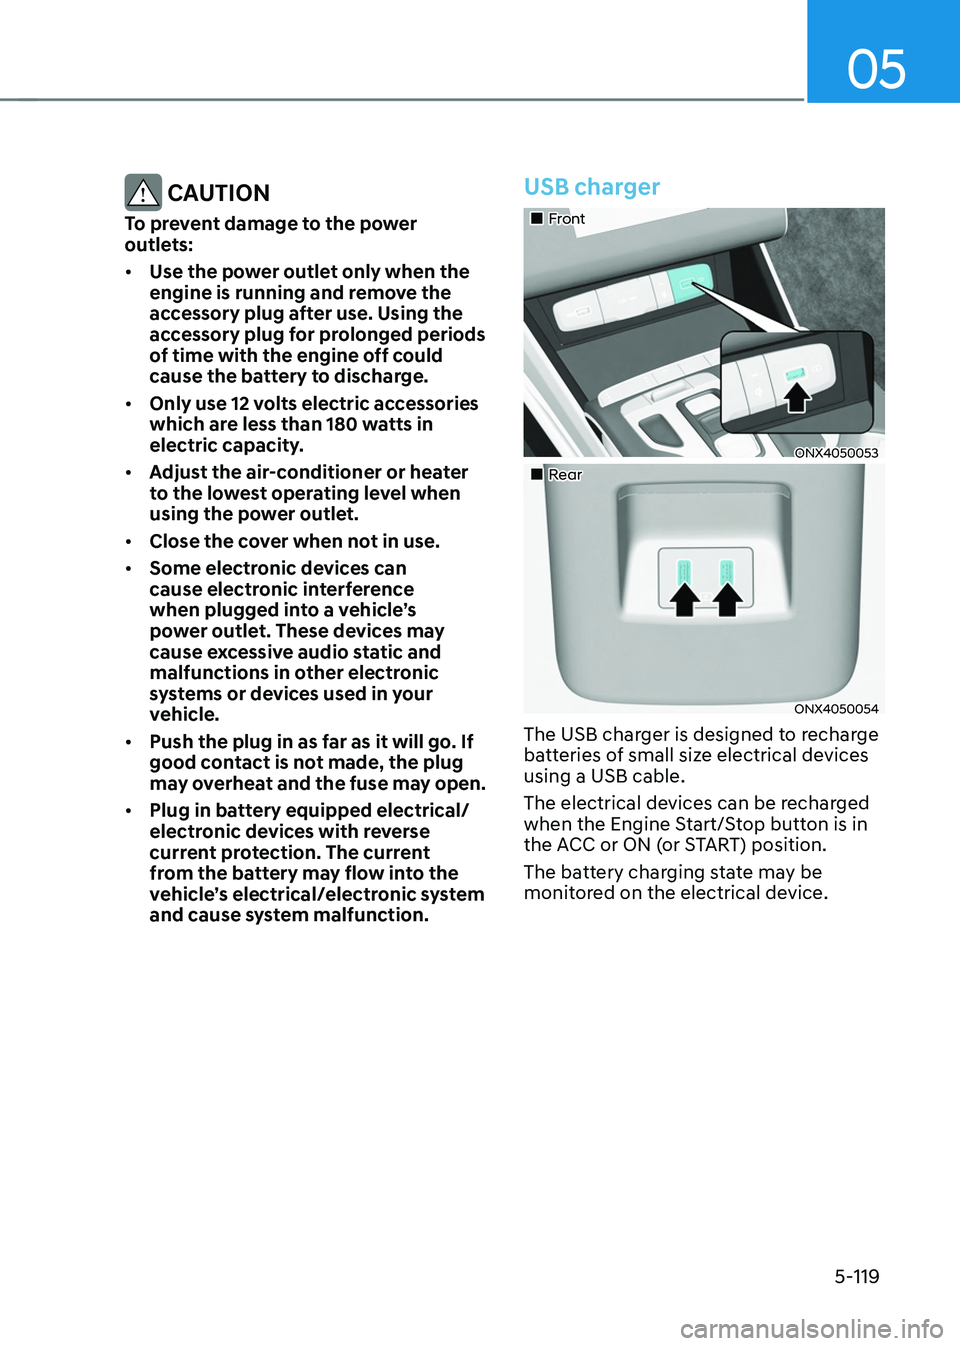
USB charger
„„Front
ONX4050053
„„Rear
ONX4050054
The USB charger is designed to recharge
batteries of small size electrical devices
using a USB cable.
The electrical devices can be recharged
when the Engine Start/Stop button is in
the ACC or ON (or START) position.
The battery charging state may be
monitored on the electrical device.
Page 298 of 630
06
6-11
NOTICE
To prevent damage to the vehicle:
Do not press the Engine Start/Stop
button for more than 10 seconds except
when the stop lamp fuse is blown.
When the stop lamp fuse is blown,
you cannot normally start the hybrid
system. Replace the fuse with a new
one. If you are not able to replace
the fuse, you can start the vehicle by
pressing and holding the Engine Start/
Stop button for 10 seconds with the
Engine Start/Stop button in the ACC
position.
For your safety always depress the
brake pedal before starting the vehicle.
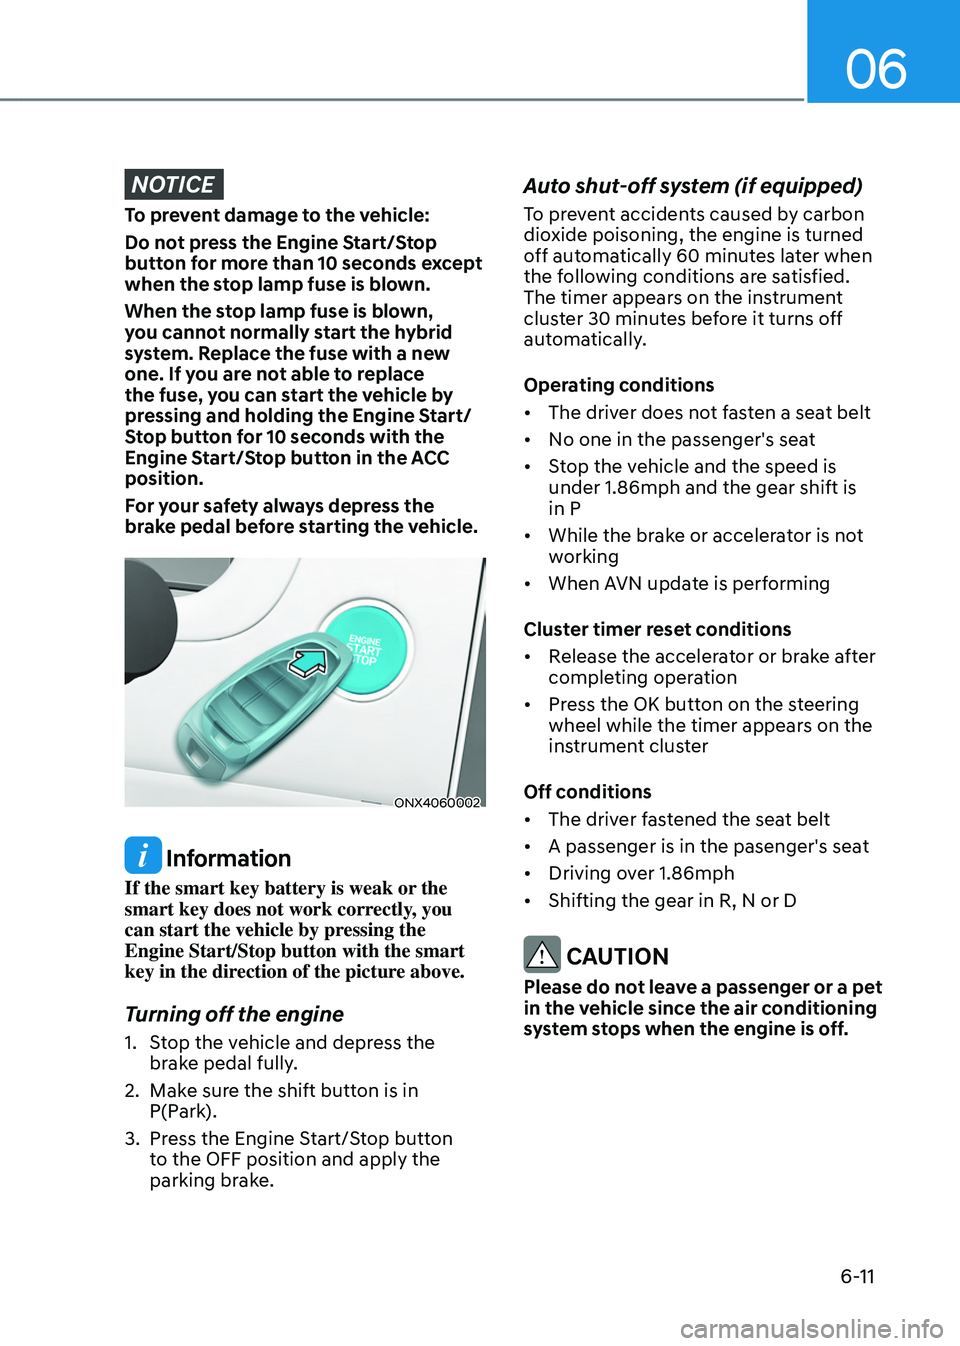
ONX4060002
Information
If the smart key battery is weak or the
smart key does not work correctly, you
can start the vehicle by pressing the
Engine Start/Stop button with the smart
key in the direction of the picture above.
Turning off the engine
1. Stop the vehicle and depress the
brake pedal fully.
2.
Make sur
e the shift button is in
P(Park).
3.
Press the E
ngine Start/Stop button
to the OFF position and apply the
parking brake.
Auto shut-off system (if equipped)
To prevent accidents caused by carbon
dioxide poisoning, the engine is turned
off automatically 60 minutes later when
the following conditions are satisfied.
The timer appears on the instrument
cluster 30 minutes before it turns off
automatically.
Operating conditions
• The driver does not fasten a seat belt
• No one in the passenger's seat
• Stop the vehicle and the speed is
under 1.86mph and the gear shift is
in P
• While the brake or accelerator is not
working
• When AVN update is performing
Cluster timer reset conditions
• Release the accelerator or brake after
completing operation
• Press the OK button on the steering
wheel while the timer appears on the
instrument cluster
Off conditions
• The driver fastened the seat belt
• A passenger is in the pasenger's seat
• Driving over 1.86mph
• Shifting the gear in R, N or D
CAUTION
Please do not leave a passenger or a pet
in the vehicle since the air conditioning
system stops when the engine is off.
Page 549 of 630

Tires and wheels ........................................................................\
......................9-31Tire care ........................................................................\
.............................................. 9-31
R ecommended cold tire inflation pressures ............................................................ 9-
31
Check tire inflation pressure
........................................................................\
............. 9-
32
Tire rotation
........................................................................\
........................................ 9-
33
Wheel alignment and tire balance
........................................................................\
.... 9-34
Tir
e replacement
........................................................................\
................................ 9-
34
Wheel replacement
........................................................................\
............................ 9-
35
Tire traction
........................................................................\
.....................................
...9-35
Tire maintenance
........................................................................\
............................... 9-
35
Tire sidewall labeling
........................................................................\
.......................... 9-
36
Low aspect ratio tires
........................................................................\
......................... 9-
39
Fuses ........................................................................\
........................................9-40Instrument panel fuse replacement ........................................................................\
.9-41
E ngine compartment panel fuse replacement ....................................................... 9-42
F
use/relay panel description
........................................................................\
............ 9-43
Light bulbs ........................................................................\
................................ 9-51Headlamp, position lamp, turn signal lamp, Daytime Running Light (DRL)
replacement ........................................................................\
.....................................
..9-52
Side repeater lamp replacement
........................................................................\
...... 9-52
Rear combina
tion lamp replacement
....................................................................... 9-53
High moun
ted stop lamp replacement
................................................................... 9-56
License pla
te lamp replacement
........................................................................\
....... 9-57
Int
erior light replacement
........................................................................\
.................. 9-57
Appearance care ........................................................................\
..................... 9-59Exterior care ........................................................................\
...................................... 9-59
Int erior care ........................................................................\
....................................... 9-63
Emission control system........................................................................\
.........9-66
California perchlorate notice
........................................................................\
. 9-70
9
Page 550 of 630
9-3
09
„„Smartstream G1.6 T-GDi HEV
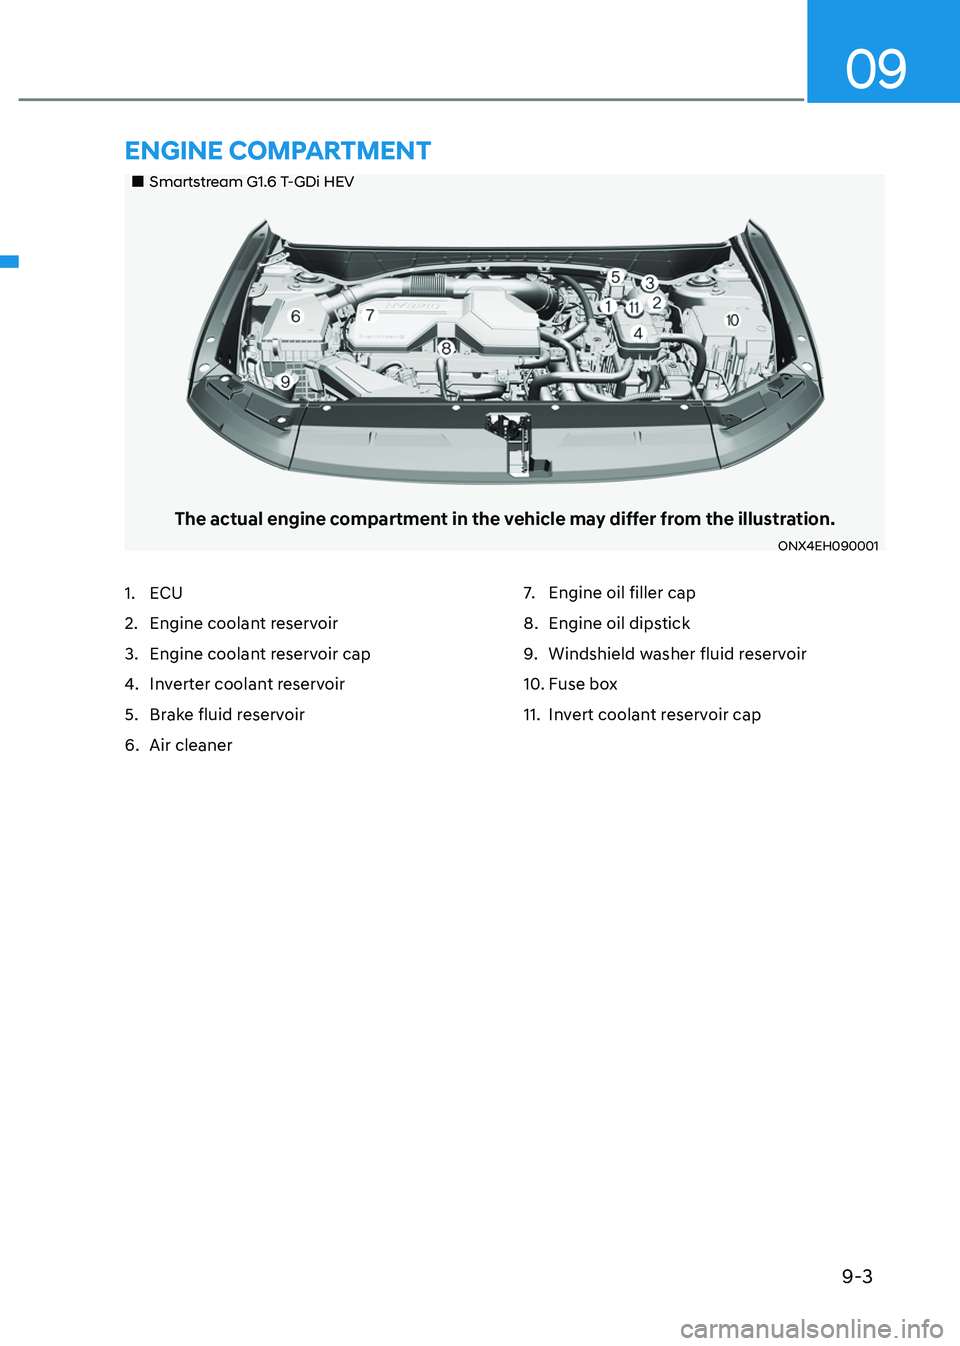
The actual engine compartment in the vehicle may differ from the illustration.
ONX4EH090001
1. ECU
2.
Engine coolan
t reservoir
3.
Engine coolan
t reservoir cap
4.
Inv
erter coolant reservoir
5.
Brak
e fluid reservoir
6.
Air cleaner 7.
Engine oil filler cap
8.
Engine oil dips
tick
9.
Windshield washer fluid r
eservoir
10.
Fuse bo
x
11.
Inv
ert coolant reservoir cap
EnginE compartmEnt
Page 587 of 630
Maintenance
9-40
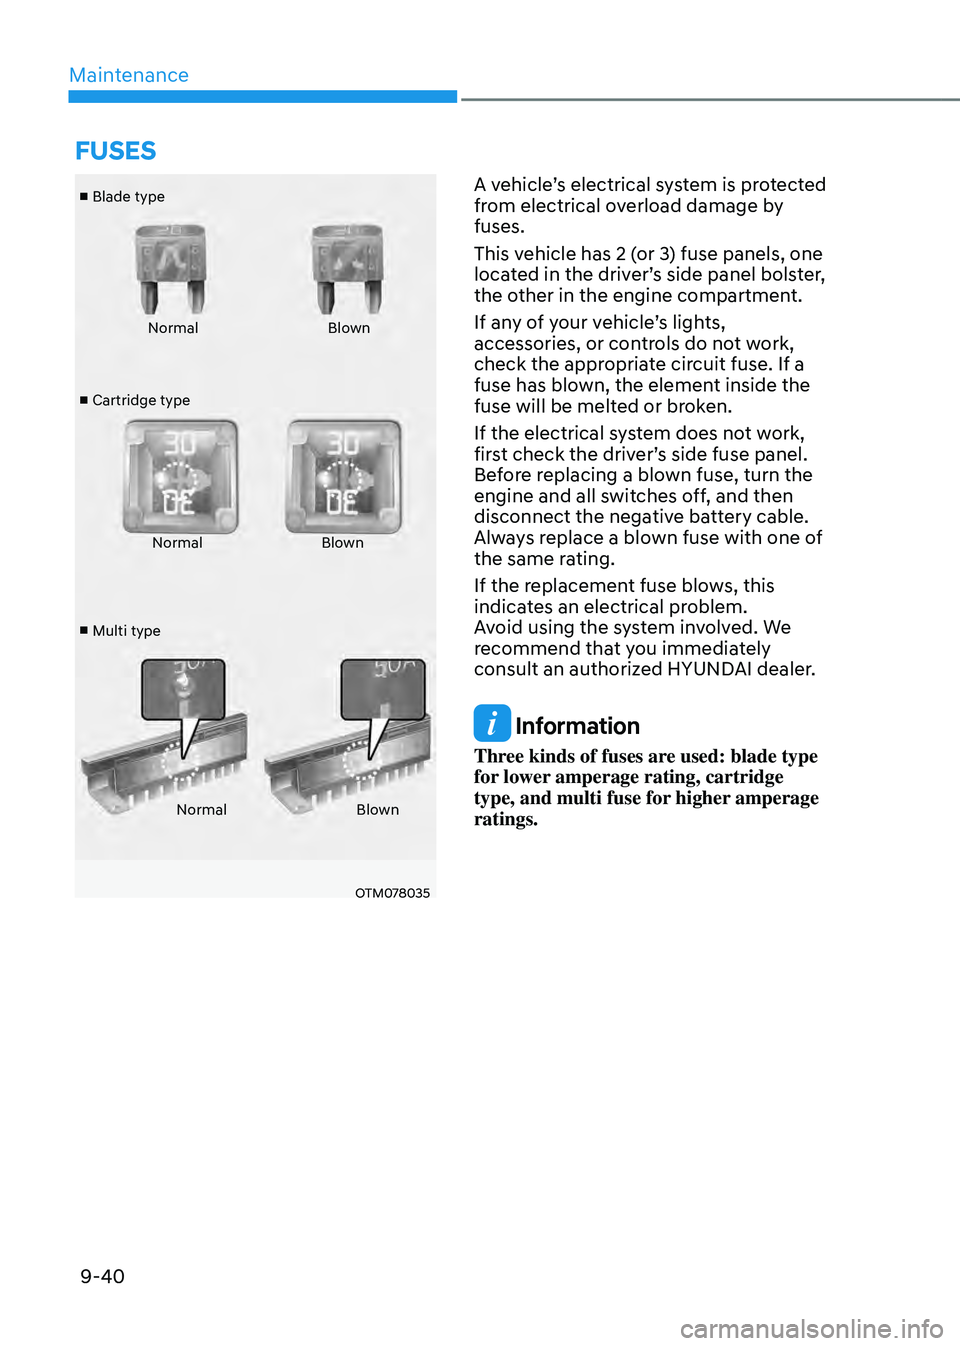
■ Blade type
■ Cartridge type
■ Multi type Normal
Blown
Normal Blown
Normal Blown
OTM078035
A vehicle’s electrical system is protected
from electrical overload damage by
fuses.
This vehicle has 2 (or 3) fuse panels, one
located in the driver’s side panel bolster,
the other in the engine compartment.
If any of your vehicle’s lights,
accessories, or controls do not work,
check the appropriate circuit fuse. If a
fuse has blown, the element inside the
fuse will be melted or broken.
If the electrical system does not work,
first check the driver’s side fuse panel.
Before replacing a blown fuse, turn the
engine and all switches off, and then
disconnect the negative battery cable.
Always replace a blown fuse with one of
the same rating.
If the replacement fuse blows, this
indicates an electrical problem.
Avoid using the system involved. We
recommend that you immediately
consult an authorized HYUNDAI dealer.
Information
Three kinds of fuses are used: blade type
for lower amperage rating, cartridge
type, and multi fuse for higher amperage
ratings.
fusEs
Page 588 of 630
09
9-41
WARNING
NEVER replace a fuse with anything but
another fuse of the same rating.
• A higher capacity fuse could cause
damage and possibly cause a fire.
• Do not install a wire or aluminum
foil instead of the proper fuse -
even as a temporary repair. It may
cause extensive wiring damage and
possibly a fire.
NOTICE
Do not use a screwdriver or any other
metal object to remove fuses because
it may cause a short circuit and damage
the system.
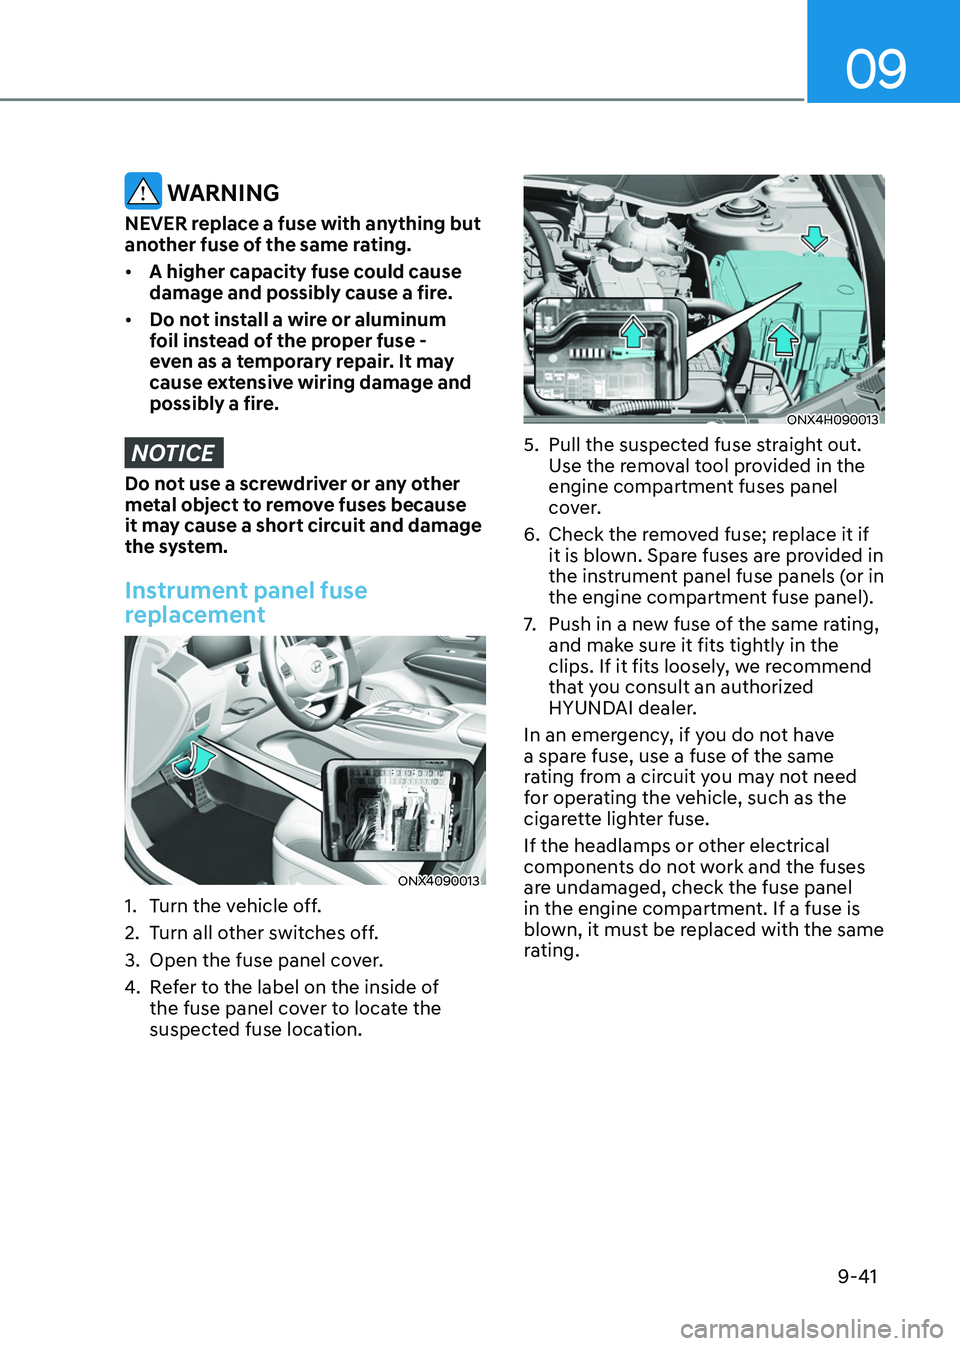
Instrument panel fuse
replacement
ONX4090013
1. Turn the vehicle off.
2.
Turn all o
ther switches off.
3.
Open the fuse panel cov
er.
4.
Re
fer to the label on the inside of
the fuse panel cover to locate the
suspected fuse location.
ONX4H090013
5. Pull the suspected fuse s traight out.
Use the removal tool provided in the
engine compartment fuses panel
cover.
6.
Check the remo
ved fuse; replace it if
it is blown. Spare fuses are provided in
the instrument panel fuse panels (or in
the engine compartment fuse panel).
7.
Push in a new fuse o
f the same rating,
and make sure it fits tightly in the
clips. If it fits loosely, we recommend
that you consult an authorized
HYUNDAI dealer.
In an emergency, if you do not have
a spare fuse, use a fuse of the same
rating from a circuit you may not need
for operating the vehicle, such as the
cigarette lighter fuse.
If the headlamps or other electrical
components do not work and the fuses
are undamaged, check the fuse panel
in the engine compartment. If a fuse is
blown, it must be replaced with the same
rating.
Page 589 of 630
Maintenance
9-42
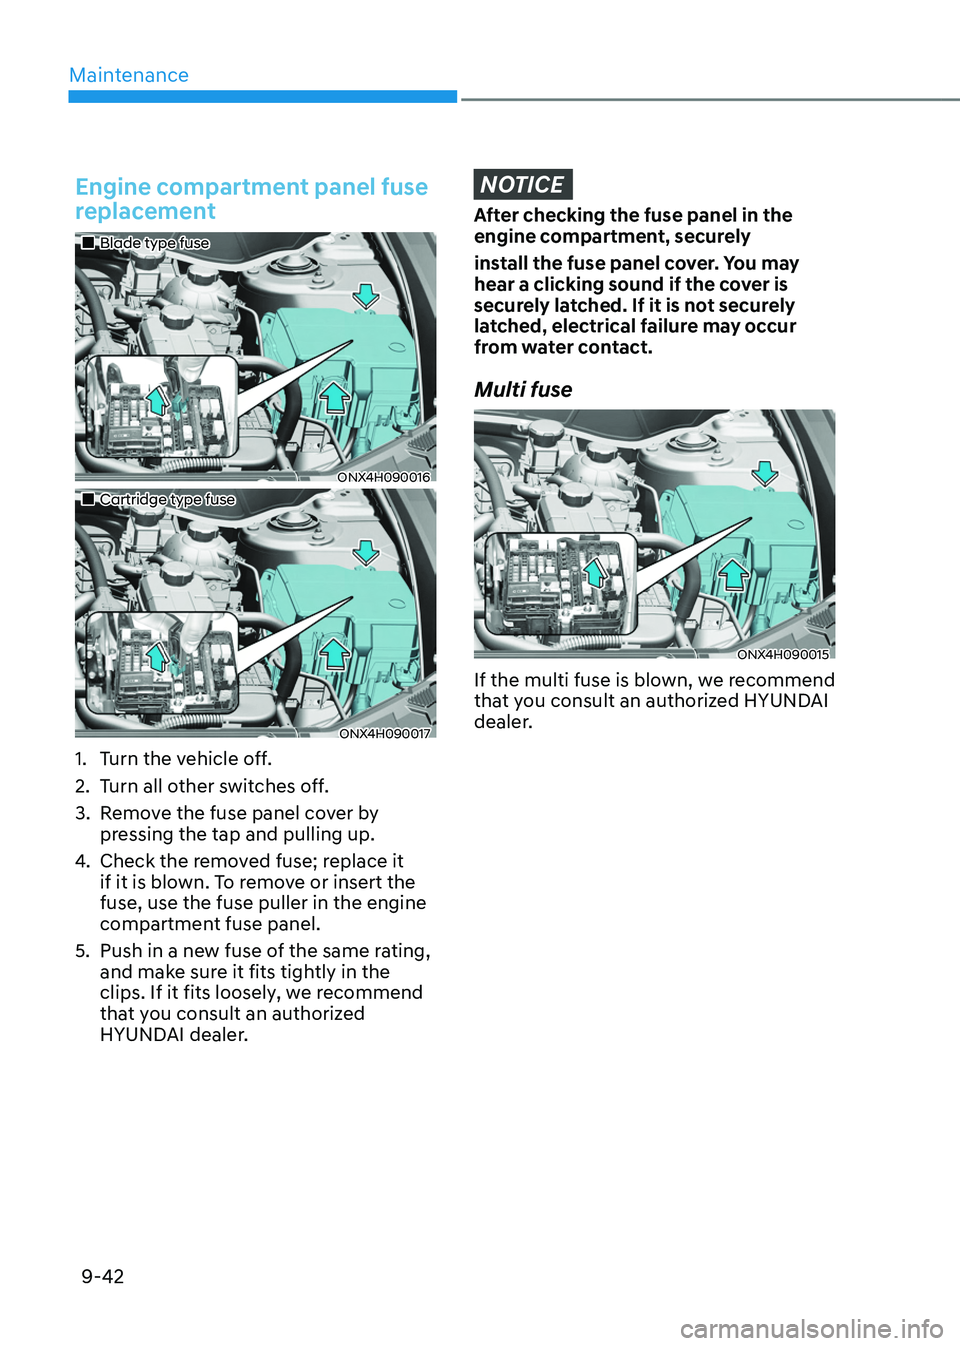
Engine compartment panel fuse
replacement
„„Blade type fuse
ONX4H090016
„„Cartridge type fuse
ONX4H090017
1. Turn the vehicle off.
2.
Turn all o
ther switches off.
3.
Remo
ve the fuse panel cover by
pressing the tap and pulling up.
4.
Check the remo
ved fuse; replace it
if it is blown. To remove or insert the
fuse, use the fuse puller in the engine
compartment fuse panel.
5.
Push in a new fuse o
f the same rating,
and make sure it fits tightly in the
clips. If it fits loosely, we recommend
that you consult an authorized
HYUNDAI dealer.
NOTICE
After checking the fuse panel in the
engine compartment, securely
install the fuse panel cover. You may
hear a clicking sound if the cover is
securely latched. If it is not securely
latched, electrical failure may occur
from water contact.
Multi fuse
ONX4H090015
If the multi fuse is blown, we recommend
that you consult an authorized HYUNDAI
dealer.