Page 525 of 630
08
8-5
if tHe 12 volt Battery is discHar ged
Before Jump Starting
This vehicle does not have a regular 12V
battery that needs periodic replacement.
It is lithium ion polymer type integrated
into the HEV high voltage battery. The
vehicle has a 12V battery protection
system that cuts 12V battery from vehicle
draw to prevent full discharge.
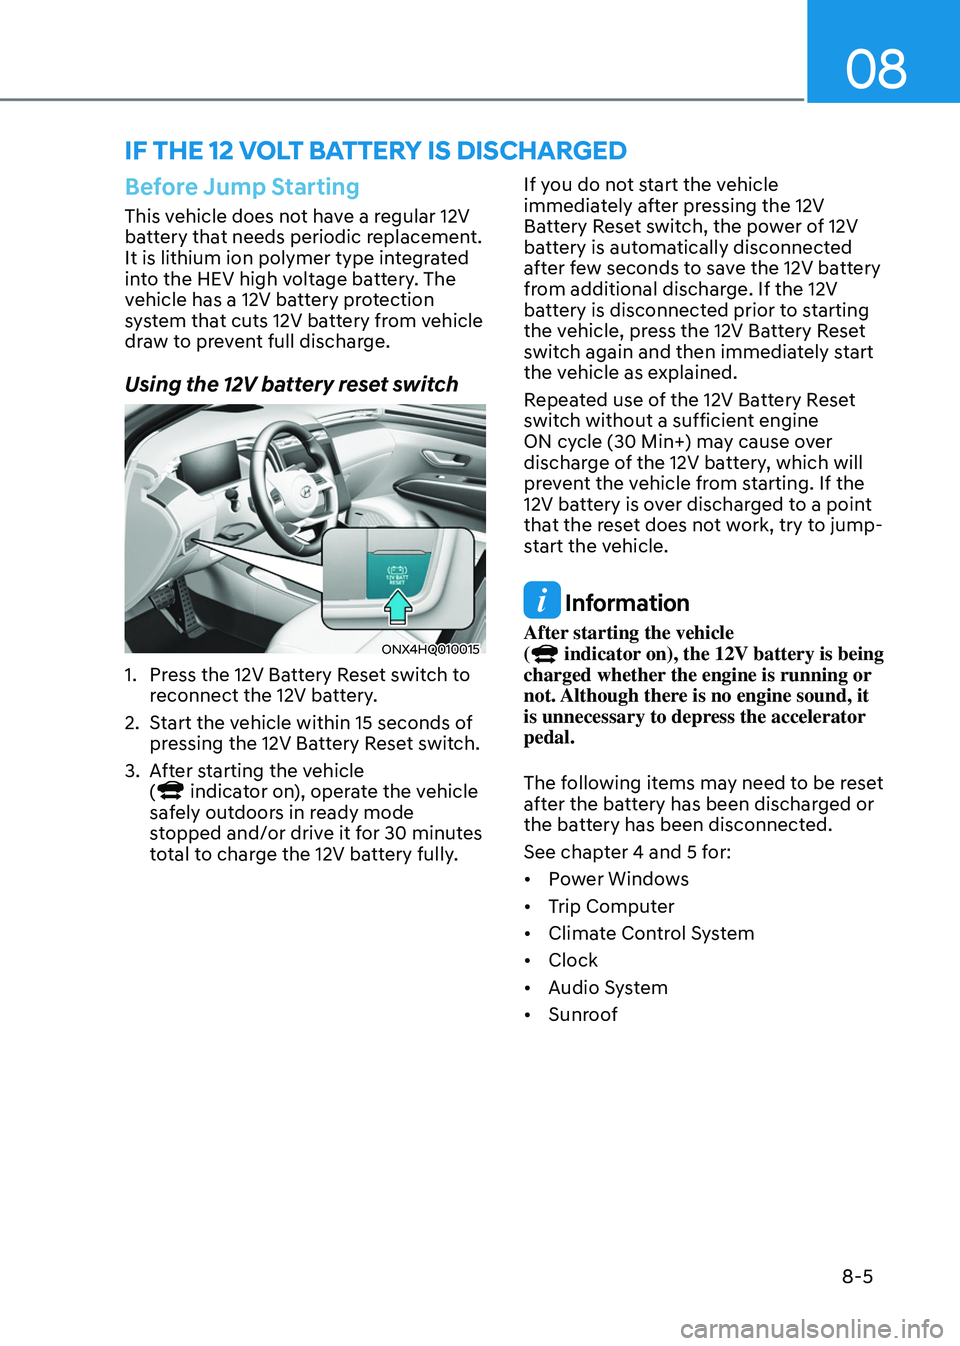
Using the 12V battery reset switch
ONX4HQ010015
1. Press the 12V Battery Reset switch to
r
econnect the 12V battery.
2.
Start the v
ehicle within 15 seconds of
pressing the 12V Battery Reset switch.
3.
Aft
er starting the vehicle
(
indicator on), operate the vehicle
safely outdoors in ready mode
stopped and/or drive it for 30 minutes
total to charge the 12V battery fully. If you do not start the vehicle
immediately after pressing the 12V
Battery Reset switch, the power of 12V
battery is automatically disconnected
after few seconds to save the 12V battery
from additional discharge. If the 12V
battery is disconnected prior to starting
the vehicle, press the 12V Battery Reset
switch again and then immediately start
the vehicle as explained.
Repeated use of the 12V Battery Reset
switch without a sufficient engine
ON cycle (30 Min+) may cause over
discharge of the 12V battery, which will
prevent the vehicle from starting. If the
12V battery is over discharged to a point
that the reset does not work, try to jump-
start the vehicle.
Information
After starting the vehicle
( indicator on), the 12V battery is being
charged whether the engine is running or
not. Although there is no engine sound, it
is unnecessary to depress the accelerator
pedal.
The following items may need to be reset
after the battery has been discharged or
the battery has been disconnected.
See chapter 4 and 5 for:
• Power Windows
• Trip Computer
• Climate Control System
• Clock
• Audio System
• Sunroof
Page 529 of 630
08
8-9
WARNING
Never remove the engine
coolant cap and/or inverter
coolant cap or the drain plug
while the engine and radiator
are hot.
Hot coolant and steam may blow out
under pressure, causing serious injury.
Turn the hybrid system off and wait until
the engine cools down. Use extreme
care when removing the engine coolant
cap and/or inverter coolant cap. Wrap
a thick towel around it, and turn it
counterclockwise slowly to the first
stop. Step back while the pressure is
released from the cooling system. When
you are sure all the pressure has been
released, press down on the cap, using
a thick towel, and continue turning
counterclockwise to remove it.
CAUTION
• Serious loss of coolant indicates a
leak in the cooling system and should
be checked as soon as possible by an
authorized HYUNDAI dealer.
• When the engine overheats from
low engine coolant, suddenly adding
engine coolant may cause cracks
in the engine. To prevent damage,
add engine coolant slowly in small
quantities.
Page 544 of 630
Emergency situations
8-24
Removable towing hook
ONX4080017
1. Open the liftgate, and remove the
towing hook from the tool case.
„„Front
ONX4080018
„„Rear
ONX4H080001
2. Remove the hole cover by pressing
the lo wer part of the cover on the
bumper.
3.
Install the t
owing hook by turning it
clockwise into the hole until it is fully
secured.
4.
Remo
ve the towing hook and install
the cover after use.
Page 565 of 630
Maintenance
9-18
Turn the vehicle off and wait until the
engine cools down. Use extreme care
when removing the engine coolant
cap and/or inverter coolant cap. Wrap
a thick towel around it, and turn it
counterclockwise slowly to the first
stop. Step back while the pressure is
released from the cooling system. When
you are sure all the pressure has been
released, press down on the cap, using
a thick towel, and continue turning
counterclockwise to remove it.
Information
The engine coolant and/or inverter coolant
level is influenced by the hybrid system
temperature. Before checking or refilling
the engine coolant and/or inverter coolant,
turn the hybrid vehicle off.
WARNING
The electric motor for the cooling fan
may continue to operate or start up
when the engine is not running and
can cause serious injury. Keep hands,
clothing and tools away from the
rotating fan blades of the cooling fan.
Always turn off the vehicle unless the
vehicle has to be inspected with the
engine on. Be cautious as the cooling
fan may operate if the negative (-)
battery terminal is not disconnected.
WARNING
Make sure the coolant cap is properly
closed after refilling coolant. Otherwise
the engine could be overheated while
driving.
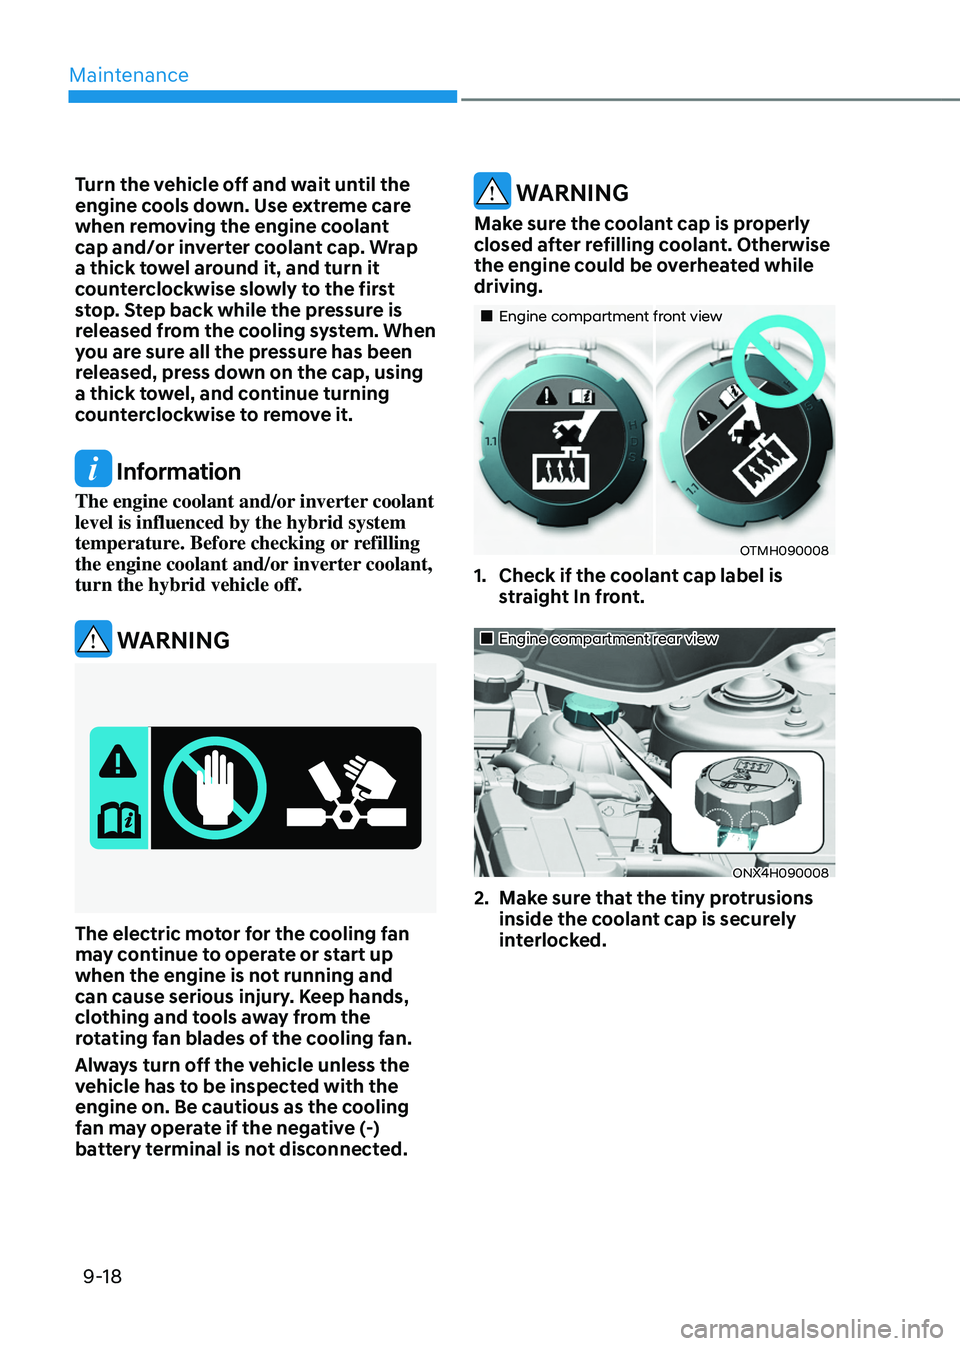
„„Engine compartment front view
OTMH090008
1. Check if the coolant cap label is
straight In front.
„„Engine compartment rear view
ONX4H090008
2. Make sure that the tiny protrusions
inside the c oolant cap is securely
interlocked.
Page 577 of 630
Maintenance
9-30
• The negative battery cable must
be removed first and installed last
when the battery is disconnected.
Disconnect the battery charger in the
following order:
1.
Turn o
ff the battery charger main
switch.
2.
Unhook the nega
tive clamp from
the negative battery terminal.
3.
Unhook the positiv
e clamp from
the positive battery terminal.
• We recommend that you use
batteries for replacement from an
authorized HYUNDAI dealer.
NOTICE
AGM battery (if equipped)
• Absorbent Glass Matt (AGM)
batteries are maintenance-free
and we recommend that the AGM
battery be serviced by an authorized
HYUNDAI dealer. For charging
your AGM battery, use only fully
automatic battery chargers that
are specially developed for AGM
batteries.
• When replacing the AGM battery,
we recommend that you use parts
for replacement from an authorized
HYUNDAI dealer.
• Do not open or remove the cap on
top of the battery. This may cause
leaks of internal electrolyte that
could result in severe injury.
By jump starting
After a jump start from a good battery,
drive the vehicle for 20-30 minutes
before it is shutoff. The vehicle may
not restart if you shut it off before the
battery had a chance to adequately
recharge. See “Jump Starting” in chapter
9 for more information on jump starting
procedures.
Information
An inappropriately disposed
battery can be harmful to the
environment and human health.
Dispose of the battery according
to your local law(s) or regulation.
Reset items
The following items may need to be reset
after the battery has been discharged or
the battery has been disconnected.
• Auto up/down window (see chapter 5)
• Sunroof (see chapter 5)
• Trip computer (see chapter 5)
• Climate control system (see chapter 5)
• Driver position memory system (see
chapter 5)
• Clock (see chapter 5)
• Infotainment system (see
infotainment system manual)
Page 600 of 630
09
9-53
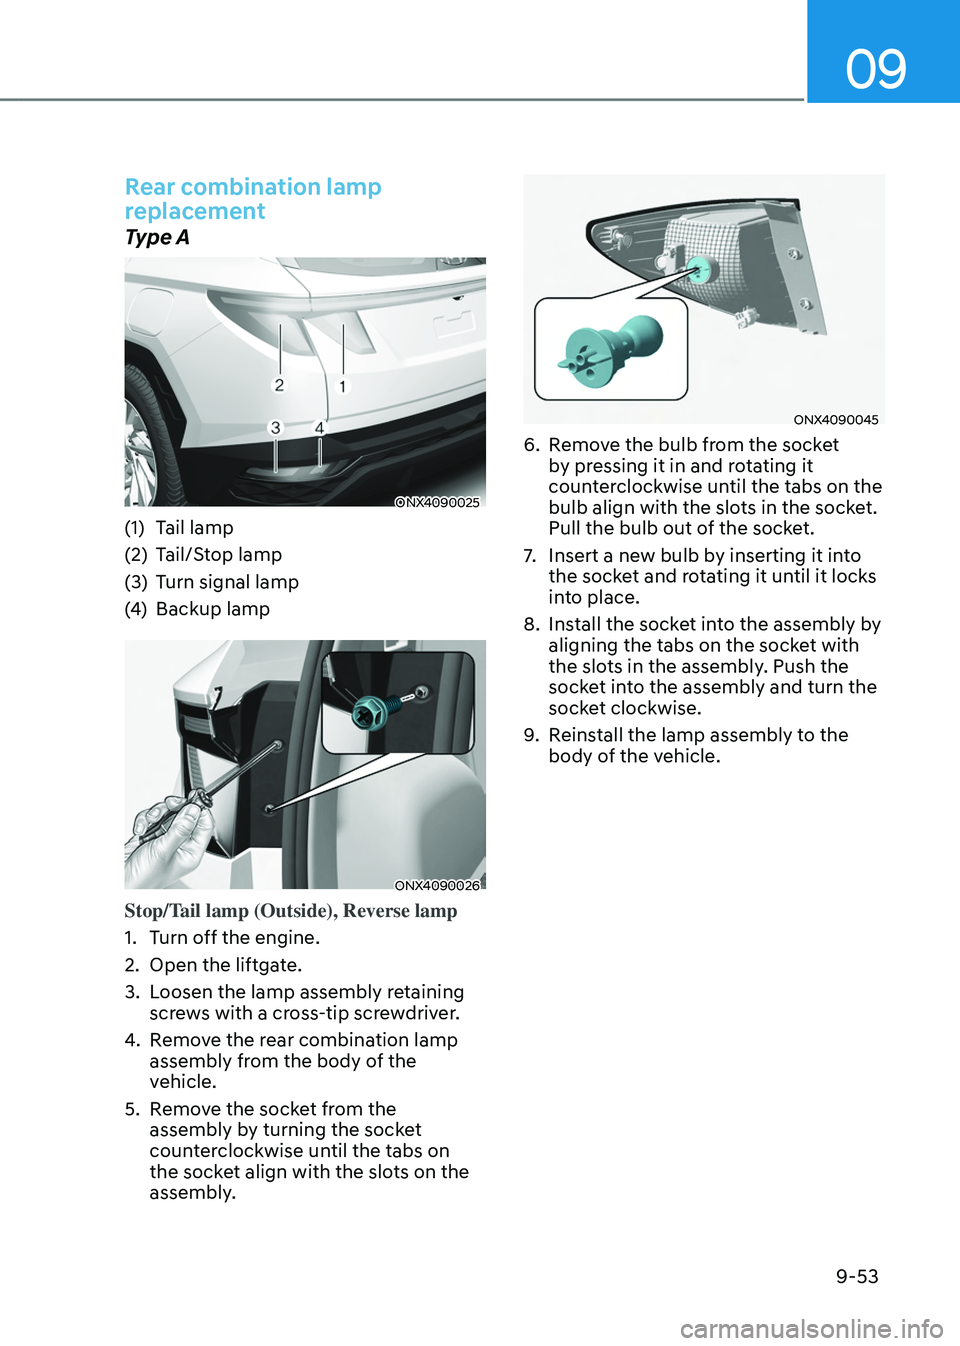
Rear combination lamp
replacement
Type A
ONX4090025
(1) Tail lamp
(2)
Tail/S
top lamp
(3)
Turn signal lamp
(4
)
Backup lamp
ONX4090026
Stop/Tail lamp (Outside), Reverse lamp
1.
Turn o
ff the engine.
2.
Open the liftga
te.
3.
Loosen the lamp assembly r
etaining
screws with a cross-tip screwdriver.
4.
Remo
ve the rear combination lamp
assembly from the body of the
vehicle.
5.
Remo
ve the socket from the
assembly by turning the socket
counterclockwise until the tabs on
the socket align with the slots on the
assembly.
ONX4090045
6. Remove the bulb from the socket
b y pressing it in and rotating it
counterclockwise until the tabs on the
bulb align with the slots in the socket.
Pull the bulb out of the socket.
7.
Insert a new bulb b
y inserting it into
the socket and rotating it until it locks
into place.
8.
Install the sock
et into the assembly by
aligning the tabs on the socket with
the slots in the assembly. Push the
socket into the assembly and turn the
socket clockwise.
9.
Reins
tall the lamp assembly to the
body of the vehicle.
Page 601 of 630
Maintenance
9-54
ONX4090027
Tail lamp (Inside)
1.
Turn o
ff the engine.
2.
Open the liftga
te.
3.
Remo
ve the service cover using a
flat-blade screwdriver.
4.
Remo
ve the socket from the
assembly by turning the socket
counterclockwise until the tabs on
the socket align with the slots on the
assembly.
ONX4090028
5. Remove the bulb from the socket
b y pressing it in and rotating it
counterclockwise until the tabs on the
bulb align with the slots in the socket.
Pull the bulb out of the socket.
6.
Insert a new bulb b
y inserting it into
the socket and rotating it until it locks
into place.
7.
Install the sock
et into the assembly by
aligning the tabs on the socket with
the slots in the assembly. Push the
socket into the assembly and turn the
socket clockwise.
8.
Reins
tall the lamp assembly to the
body of the vehicle.
Page 602 of 630
09
9-55
ONX4090029
Turn signal lamp
ONX4090030
Back-up lampTurn signal lamp, Back-up lamp
1.
Disconnect the negativ
e battery
cable.
2.
Loosen the r
etaining clips under the
bumper and screws on the wheel
house trim.
3.
Pre
y trim under the bumper toward
the vehicle.
4.
Remo
ve the socket from the
assembly by turning the socket
counterclockwise until the tabs on
the socket align with the slots on the
assembly.
5.
Remo
ve the bulb by pulling it straight
out.
6.
Insert a new bulb in the sock
et.
7.
Reins
tall the light assembly to the
body of the vehicle.