2021 HYUNDAI SONATA LIMITED recommended oil
[x] Cancel search: recommended oilPage 469 of 546
08
8-15
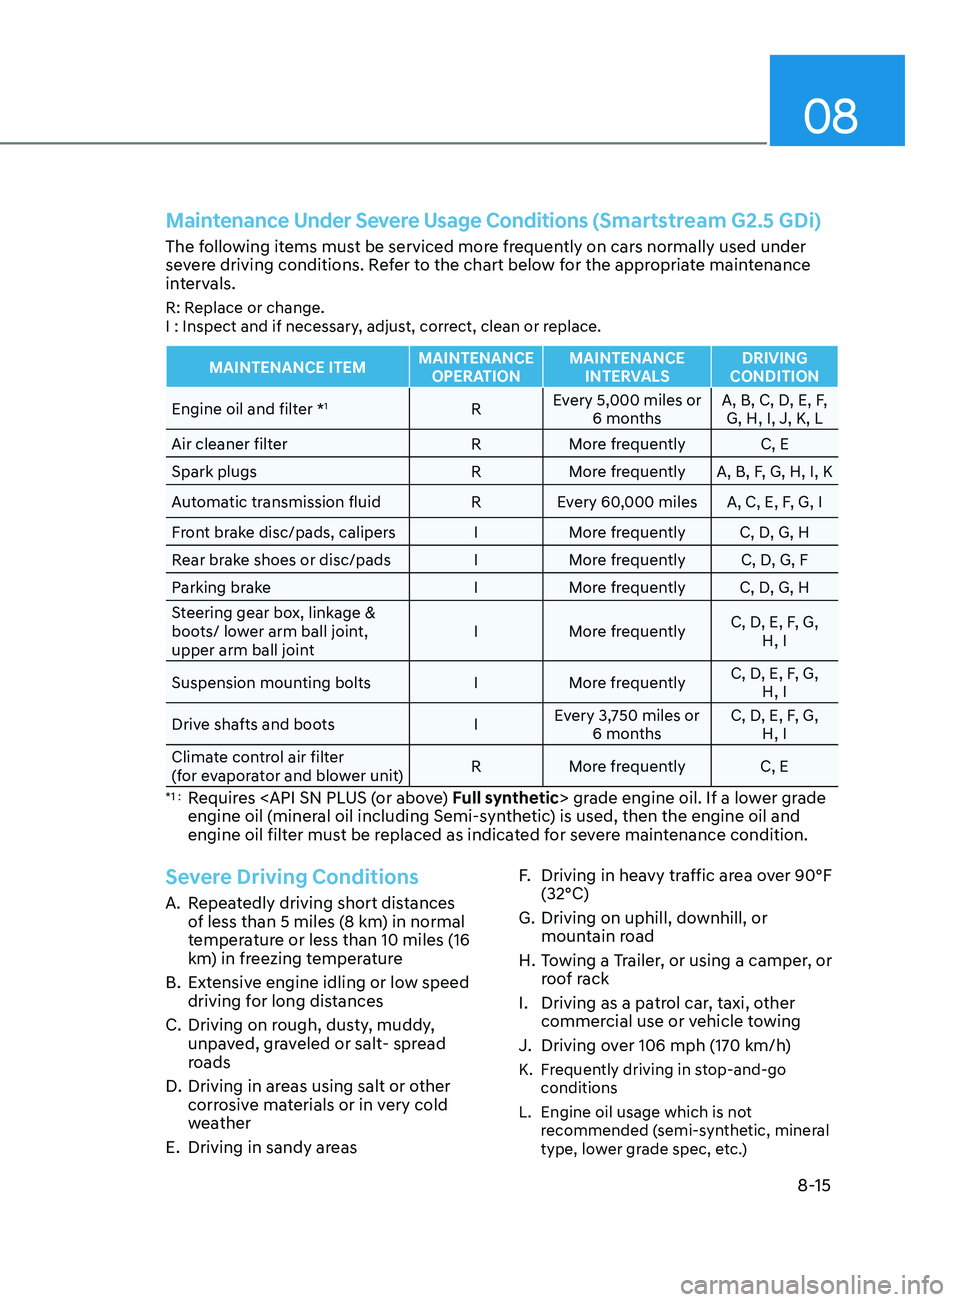
Maintenance Under Severe Usage Conditions (Smartstream G2.5 GDi)
The following items must be serviced more frequently on cars normally used under
severe driving conditions. Refer to the chart below for the appropriate maintenance
intervals.
R: Replace or change.
I : Inspect and if necessary, adjust, correct, clean or replace.
MAINTENANCE ITEMMAINTENANCE
OPERATION MAINTENANCE
INTERVALS DRIVING
CONDITION
Engine oil and filter *
1R Every 5,000 miles or
6 months A, B, C, D, E, F,
G, H, I, J, K, L
Air cleaner filter RMore frequently C, E
Spark plugs RMore frequently A, B, F, G, H, I, K
Automatic transmission fluid R Every 60,000 miles A, C, E, F, G, I
Front brake disc/pads, calipers I More frequently C, D, G, H
Rear brake shoes or disc/pads I More frequently C, D, G, F
Parking brake IMore frequently C, D, G, H
Steering gear box, linkage &
boots/ lower arm ball joint,
upper arm ball joint I
More frequently C, D, E, F, G,
H, I
Suspension mounting bolts IMore frequently C, D, E, F, G,
H, I
Drive shafts and boots IEvery 3,750 miles or
6 months C, D, E, F, G,
H, I
Climate control air filter
(for evaporator and blower unit) R
More frequently C, E
*1 : Requires
engine oil (mineral oil including Semi-synthetic) is used, then the engine oil and
engine oil filter must be replaced as indicated for severe maintenance condition.
Severe Driving Conditions
A. Repeatedly driving short distances
of less than 5 miles (8 km) in normal
temperature or less than 10 miles (16
km) in freezing temperature
B.
Ext
ensive engine idling or low speed
driving for long distances
C.
Driving on r
ough, dusty, muddy,
unpaved, graveled or salt- spread
roads
D.
Driving in ar
eas using salt or other
corrosive materials or in very cold
weather
E.
Driving in sandy ar
eas F.
Driving in hea
vy traffic area over 90°F
(32°C)
G. Driving on uphill, do wnhill, or
mountain road
H.
T
owing a Trailer, or using a camper, or
roof rack
I.
Driving as a pa
trol car, taxi, other
commercial use or vehicle towing
J.
Driving o
ver 106 mph (170 km/h)
K. Frequently driving in stop-and-go conditions
L.
E
ngine oil usage which is not
recommended (semi-synthetic, mineral
type, lower grade spec, etc.)
Page 470 of 546
Maintenance
8-16
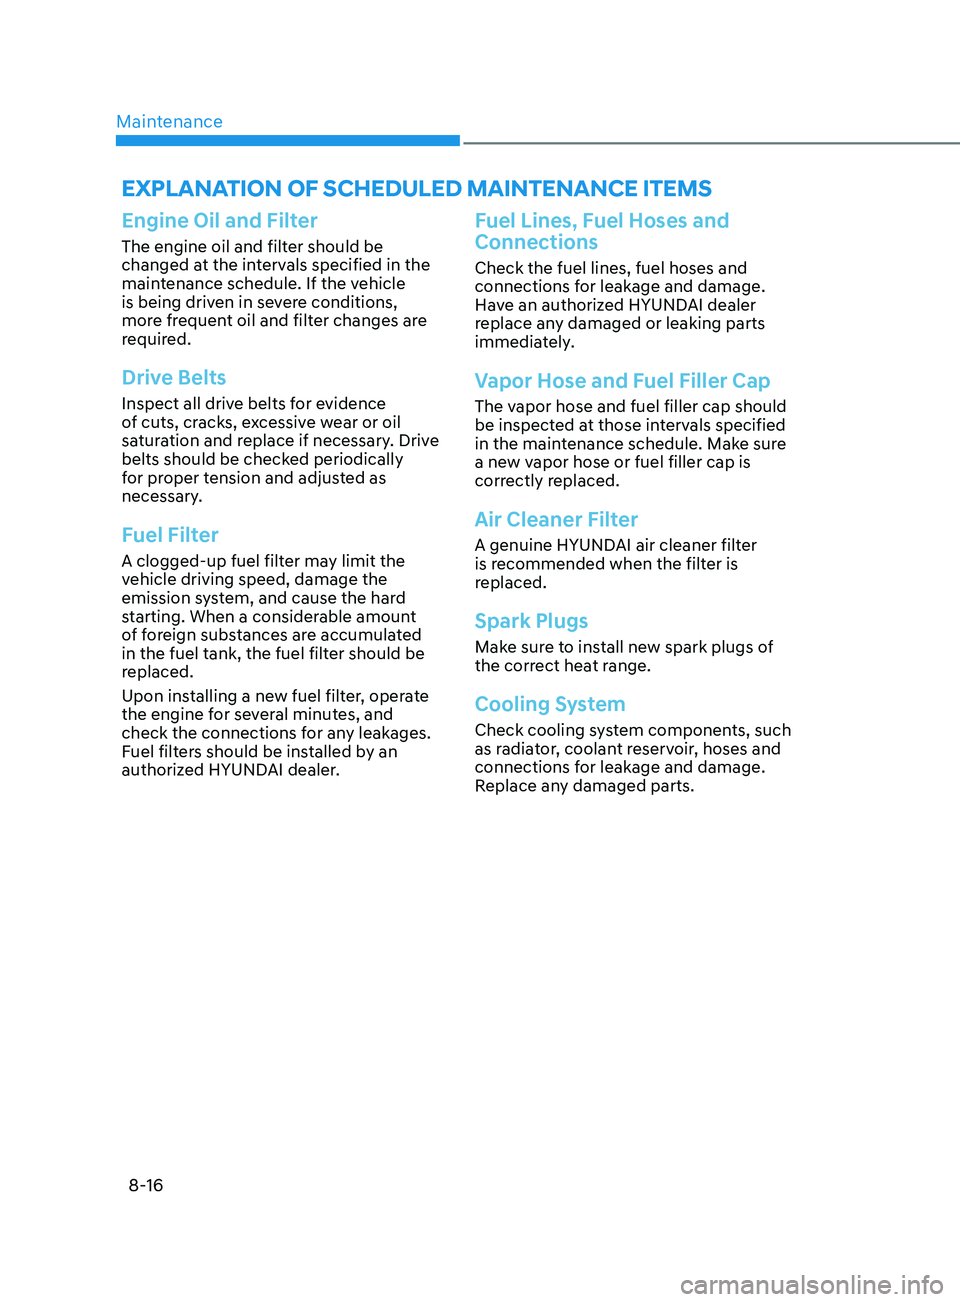
Engine Oil and Filter
The engine oil and filter should be
changed at the intervals specified in the
maintenance schedule. If the vehicle
is being driven in severe conditions,
more frequent oil and filter changes are
required.
Drive Belts
Inspect all drive belts for evidence
of cuts, cracks, excessive wear or oil
saturation and replace if necessary. Drive
belts should be checked periodically
for proper tension and adjusted as
necessary.
Fuel Filter
A clogged-up fuel filter may limit the
vehicle driving speed, damage the
emission system, and cause the hard
starting. When a considerable amount
of foreign substances are accumulated
in the fuel tank, the fuel filter should be
replaced.
Upon installing a new fuel filter, operate
the engine for several minutes, and
check the connections for any leakages.
Fuel filters should be installed by an
authorized HYUNDAI dealer.
Fuel Lines, Fuel Hoses and
Connections
Check the fuel lines, fuel hoses and
connections for leakage and damage.
Have an authorized HYUNDAI dealer
replace any damaged or leaking parts
immediately.
Vapor Hose and Fuel Filler Cap
The vapor hose and fuel filler cap should
be inspected at those intervals specified
in the maintenance schedule. Make sure
a new vapor hose or fuel filler cap is
correctly replaced.
Air Cleaner Filter
A genuine HYUNDAI air cleaner filter
is recommended when the filter is
replaced.
Spark Plugs
Make sure to install new spark plugs of
the correct heat range.
Cooling System
Check cooling system components, such
as radiator, coolant reservoir, hoses and
connections for leakage and damage.
Replace any damaged parts.
Explanation of SChEdulEd maintEnanCE itEmS
Page 473 of 546
08
8-19
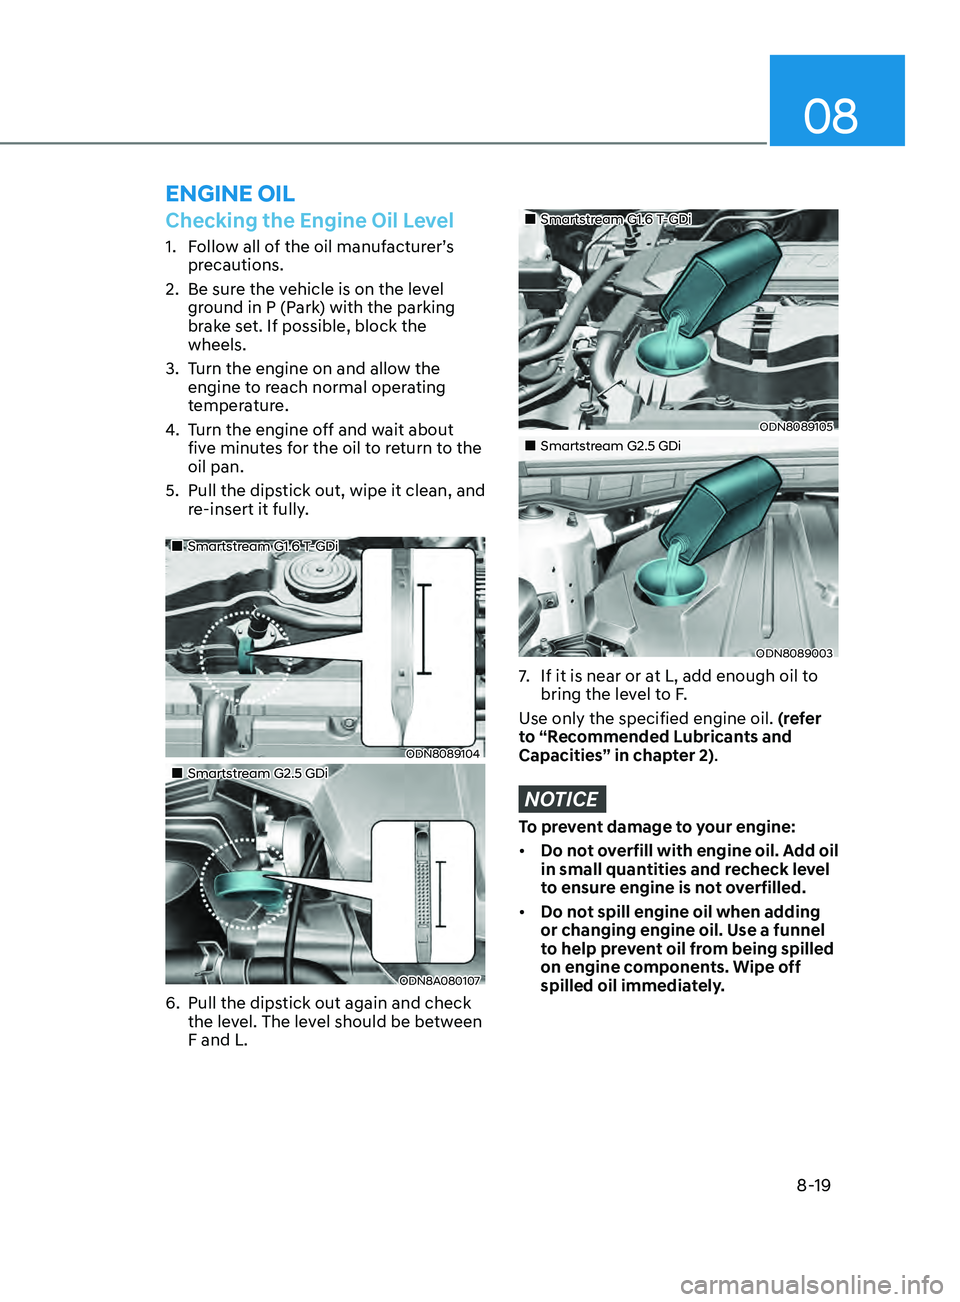
Checking the Engine Oil Level
1. Follow all of the oil manufacturer’s precautions.
2.
Be sur
e the vehicle is on the level
ground in P (Park) with the parking
brake set. If possible, block the
wheels.
3.
T
urn the engine on and allow the
engine to reach normal operating
temperature.
4.
T
urn the engine off and wait about
five minutes for the oil to return to the
oil pan.
5.
Pull the dips
tick out, wipe it clean, and
re-insert it fully.
„„Smartstream G1.6 T-GDi
ODN8089104
„„Smartstream G2.5 GDi
ODN8A080107
6. Pull the dips tick out again and check
the level. The level should be between
F and L.
„„Smartstream G1.6 T-GDi
ODN8089105
„„Smartstream G2.5 GDi
ODN8089003
7. If it is near or a t L, add enough oil to
bring the level to F.
Use only the specified engine oil. (refer
to “Recommended Lubricants and
Capacities” in chapter 2).
NOTICE
To prevent damage to your engine:
• Do not overfill with engine oil. Add oil
in small quantities and recheck level
to ensure engine is not overfilled.
• Do not spill engine oil when adding
or changing engine oil. Use a funnel
to help prevent oil from being spilled
on engine components. Wipe off
spilled oil immediately.
EnginE oil
Page 478 of 546
Maintenance
8-24
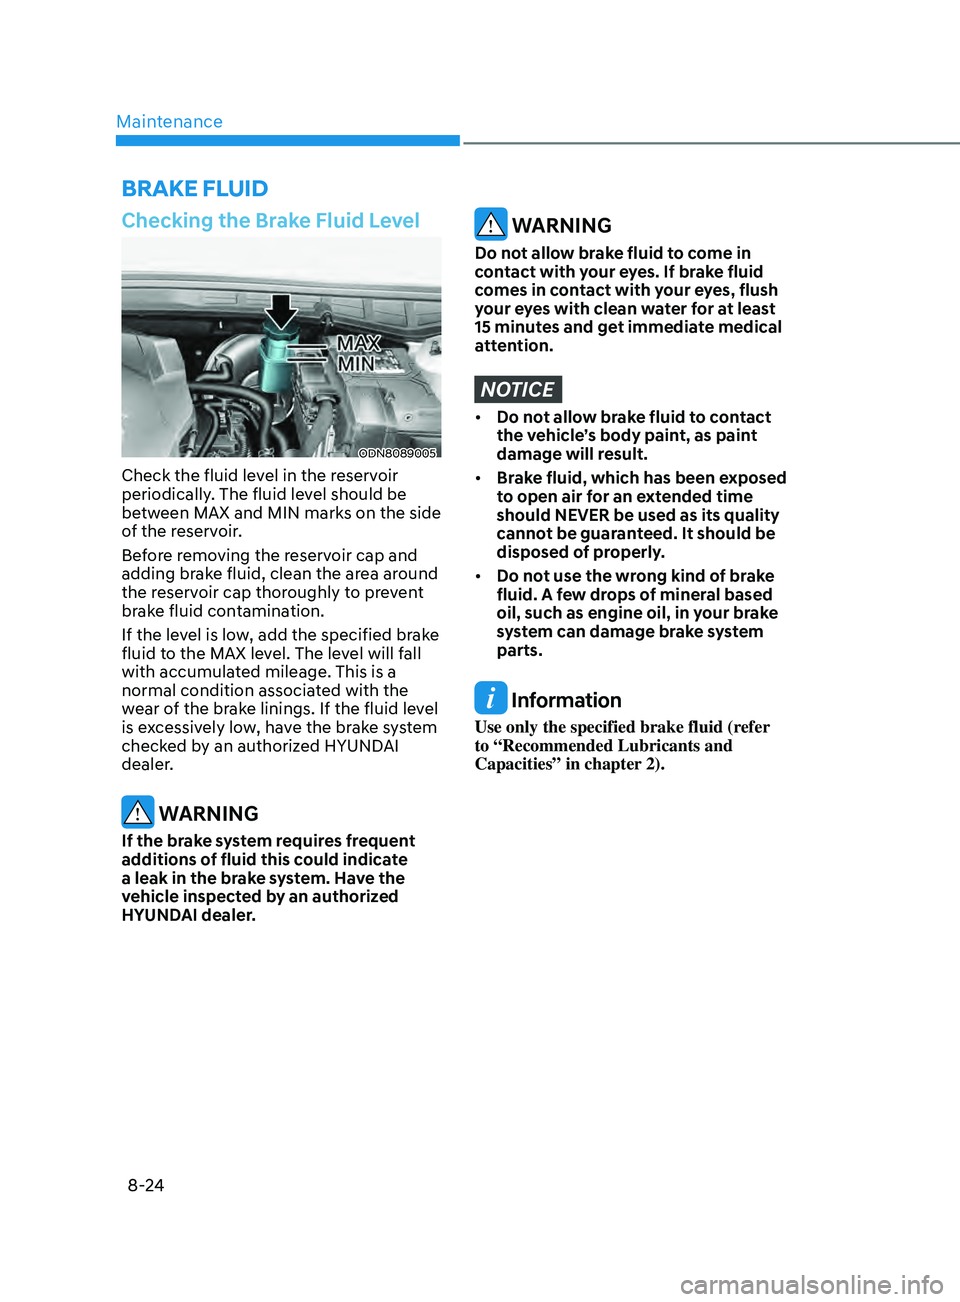
Checking the Brake Fluid Level
ODN8089005
Check the fluid level in the reservoir
periodically. The fluid level should be
between MAX and MIN marks on the side
of the reservoir.
Before removing the reservoir cap and
adding brake fluid, clean the area around
the reservoir cap thoroughly to prevent
brake fluid contamination.
If the level is low, add the specified brake
fluid to the MAX level. The level will fall
with accumulated mileage. This is a
normal condition associated with the
wear of the brake linings. If the fluid level
is excessively low, have the brake system
checked by an authorized HYUNDAI
dealer.
WARNING
If the brake system requires frequent
additions of fluid this could indicate
a leak in the brake system. Have the
vehicle inspected by an authorized
HYUNDAI dealer.
WARNING
Do not allow brake fluid to come in
contact with your eyes. If brake fluid
comes in contact with your eyes, flush
your eyes with clean water for at least
15 minutes and get immediate medical
attention.
NOTICE
• Do not allow brake fluid to contact
the vehicle’s body paint, as paint
damage will result.
• Brake fluid, which has been exposed
to open air for an extended time
should NEVER be used as its quality
cannot be guaranteed. It should be
disposed of properly.
• Do not use the wrong kind of brake
fluid. A few drops of mineral based
oil, such as engine oil, in your brake
system can damage brake system
parts.
Information
Use only the specified brake fluid (refer
to “Recommended Lubricants and
Capacities” in chapter 2).
BraKE fluid
Page 521 of 546
08
8-67
• When cleaning underneath the
vehicle, pay particular attention to the
components under the fenders and
other areas that are hidden from view.
Do a thorough job; just dampening
the accumulated mud rather than
washing it away will accelerate
corrosion rather than prevent it. Water
under high pressure and steam are
particularly effective in removing
accumulated mud and corrosive
materials.
• When cleaning lower door panels,
rocker panels and frame members, be
sure that drain holes are kept open so
that moisture can escape and not be
trapped inside to accelerate corrosion.
Keep your garage dry
Don’t park your vehicle in a damp,
poorly ventilated garage. This creates
a favorable environment for corrosion.
This is particularly true if you wash your
vehicle in the garage or drive it into the
garage when it is still wet or covered with
snow, ice or mud. Even a heated garage
can contribute to corrosion unless it is
well ventilated so moisture is dispersed.
Keep paint and trim in good condition
Scratches or chips in the finish should
be covered with “touch-up” paint as
soon as possible to reduce the possibility
of corrosion. If bare metal is showing
through, the attention of a qualified body
and paint shop is recommended.
Bird droppings are highly corrosive and
may damage painted surfaces in just a
few hours. Always remove bird droppings
as soon as possible.Interior Care
Interior general precautions
Prevent caustic solutions such as
perfume and cosmetic oil, from
contacting the interior parts because
they may cause damage or discoloration.
If they do contact the interior parts,
wipe them off immediately. See the
instructions for the proper way to clean
vinyl.
NOTICE
• Never allow water or other liquids
to come in contact with electrical/
electronic components inside the
vehicle as this may damage them.
• When cleaning leather products
(steering wheel, seats etc.), use
neutral detergents or low alcohol
content solutions. If you use high
alcohol content solutions or acid/
alkaline detergents, the color of the
leather may fade or the surface may
get stripped off.
Cleaning the upholstery and interior
trim
Vinyl (if equipped)
Remove dust and loose dirt from vinyl
with a whisk broom or vacuum cleaner.
Clean vinyl surfaces with a vinyl cleaner.
Fabric (if equipped)
Remove dust and loose dirt from
fabric with a whisk broom or vacuum
cleaner. Clean with a mild soap solution
recommended for upholstery or carpets.
Remove fresh spots immediately with
a fabric spot cleaner. If fresh spots do
not receive immediate attention, the
fabric can be stained and its color can be
affected. Also, its fire-resistant properties
can be reduced if the material is not
properly maintained.
Page 522 of 546
Maintenance
8-68
NOTICE
Using anything but recommended
cleaners and procedures may affect the
fabric’s appearance and fire-resistant
properties.
Leather (if equipped)
• Features of seat leather
- L
eather is made from the outer skin
of an animal, which goes through a
special process to be available for
use. Since it is a natural product,
each part differs in thickness or
density.
Wrinkles may appear as a natural
result of stretching and shrinking
depending on the temperature and
humidity.
- The sea
t is made of stretchable
fabric to improve comfort.
- The parts con
tacting the body are
curved and the side supporting
area is high which provides driving
comfort and stability.
- W
rinkles may appear naturally
from usage. It is not a fault of the
products.
CAUTION
• Wrinkles or abrasions which appear
naturally from usage are not covered
by warranty.
• Belts with metallic accessories,
zippers or keys inside the back
pocket may damage the seat fabric.
• Make sure not to wet the seat. It may
change the nature of natural leather.
• Jeans or clothes which could bleach
may contaminate the surface of the
seat covering fabric. •
Caring for the leather seats
- V
acuum the seat periodically to
remove dust and sand on the seat. It
will prevent abrasion or damage of
the leather and maintain its quality.
- Wipe the na
tural leather seat cover
often with dry or soft cloth.
- U
se of proper leather protector may
prevent abrasion of the cover and
helps maintain the color. Be sure to
read the instructions and consult
a specialist when using leather
coating or protective agent.
- Ligh
t colored (beige, cream beige)
leather is easily contaminated and
the stain is noticeable. Clean the
seats frequently.
- A
void wiping with wet cloth. It may
cause the surface to crack.
• Cleaning the leather seats
- R
emove all contaminations
instantly. Refer to instructions below
for removal of each contaminant.
- Cosme
tic products (sunscreen,
foundation, etc.)
Apply cleansing cream on a cloth
and wipe the contaminated spot.
Wipe off the cream with a wet cloth
and remove water with a dry cloth. - Be verages (coffee, soft drink, etc.)
Apply a small amount of neutral
detergent and wipe until
contaminations do not smear.
- Oil R
emove oil instantly with
absorbable cloth and wipe with
stain remover used only for natural
leather.
- Che
wing gum
Harden the gum with ice and
remove gradually.
Page 523 of 546
08
8-69
Cleaning the seat belt webbing
Clean the belt webbing with any
mild soap solution recommended for
cleaning upholstery or carpet. Follow
the instructions provided with the soap.
Do not bleach or re-dye the webbing
because this may weaken the seat belt.
Cleaning the interior window glass
If the interior glass surfaces of the
vehicle become hazy (that is, covered
with an oily, greasy or waxy film), they
should be cleaned with glass cleaner.
Follow the directions on the glass cleaner
container.
NOTICE
Do not scrape or scratch the inside of
the rear window. This may result in
damage to the rear window defroster
grid.
EmiSSion Control
S y
St
E m
The emission control system of your
vehicle is covered by a written limited
warranty. Please see the warranty
information contained in the Owner’s
Handbook & Warranty Information
booklet in your vehicle.
Your vehicle is equipped with an
emission control system to meet all
applicable emission regulations. There
are three emission control systems, as
follows.
(1)
Cr
ankcase emission control system
(2)
E
vaporative emission control system
(3)
Exhaus
t emission control system
In order to ensure the proper function
of the emission control systems, it
is recommended that you have your
vehicle inspected and maintained
by an authorized HYUNDAI dealer in
accordance with the maintenance
schedule in this manual.
NOTICE
For the Inspection and Maintenance
Test (with Electronic Stability Control
(ESC) system)
• To prevent the vehicle from misfiring
during dynamometer testing, turn
the Electronic Stability Control
(ESC) system off by pressing the ESC
switch (ESC OFF light illuminated).
• After dynamometer testing is
completed, turn the ESC system back
on by pressing the ESC switch again.