2021 HYUNDAI SONATA HYBRID interior lights
[x] Cancel search: interior lightsPage 150 of 527
5
Closing the Sunroof ........................................................................\
...........................5-57
Resetting the Sunroof ........................................................................\
........................5-58
Sunroof Open Warning ........................................................................\
......................5-58
Solar Roof ........................................................................\
................................5-59How to Use ........................................................................\
.........................................5-59
Battery Charging Amount ........................................................................\
..................5-59
Solar Roof Operation Lamp ........................................................................\
...............5-59
Check Solar Roof Operation ........................................................................\
..............5-59
Consume and Generating amount up to environmental condition ......................5-60
System Malfunction ........................................................................\
...........................5-61
Exterior Features ........................................................................\
.....................5-62Hood ........................................................................\
....................................................5-62
Trunk ........................................................................\
....................................................5-63
Emergency Trunk Safety Release ........................................................................\
.....5-64
Fuel Filler Door ........................................................................\
..................................5-68
Head Up Display (HUD) ........................................................................\
..........5-70
Lighting
........................................................................\
.....................................5-72Exterior Lights ........................................................................\
....................................5-72
Interior Lights ........................................................................\
.....................................5-78
Welcome System ........................................................................\
................................5-81
Wipers and Washers ........................................................................\
...............5-82Windshield Wipers ........................................................................\
.............................5-82
Windshield Washers ........................................................................\
...........................5-83
Rear View Monitor (RVM) ........................................................................\
.......5-84Rear View Monitor with Parking Guidance ..............................................................5-84
Rear View Monitor - Top View ........................................................................\
..........5-84
Surround View Monitor (SVM) .......................................................................5-86
Reverse Parking Distance Warning (PDW)
....................................................5-87Operation of Reverse Parking Distance Warning System ........................................5-87
To Turn off Reverse Parking Distance Warning System ..........................................5-89
Non-Operational Conditions of Reverse Parking Distance Warning System ........5-89
Reverse Parking Distance Warning System Precautions ........................................5-90
Page 166 of 527

Convenient Features
5-18
CAUTION
• If metallic window tint was applied
to your vehicle, it may cause
bad Bluetooth connection or
performance degradation of the
digital key.
• If multiple users operate the remote
control function simultaneously, the
connection between the digital key
and the vehicle might result in failed
commands. Please connect and
operate the remote control function
only the necessary user.
• When using the remote control
operation, the driver (the remote
control user) should leave the vehicle
after confirming the door lock (the
chime sounds once and the hazard
warning lights blink).
• The remote functions of the Digital
Key app enables the vehicle to be
controlled from a set distance. If
the digital key or the vehicle goes
beyond the operable distance, the
remote control function might be
disconnected or cancelled.
• If the digital key (smartphone) is
connected with the vehicle for the
remote control, the driver with the
key goes far away from the vehicle,
the function might not work.
• If the remote control operation
is executed where the mobile
connection is weak, Bluetooth
connection is poor due to several
Bluetooth devices or there is an
object such as metal or concrete, it
might be delayed or the operable
distance might decrease. You should
not cover the smartphone with your
hand or place other devices which
can cause frequency interference. It
may result in poor performance.
• If the remote control function is not
available, please use NFC function to
lock or unlock the doors. Remote Start with Digital Key
•
When the shift button of your vehicle
is in P (Park) and all of the doors
including trunk and hood is locked
and the vehicle is off, press the Door
Lock button in the Hyundai Digital
Key app then press the Remote Start
button within 4 seconds.
You can confirm the engine is on if the
hazard warning lights blinks two times
and the chime sounds.
• If you want to turn off the engine,
press Remote Engine Stop. Air
Conditioner / Heating system
maintains the same status as when
you last used the vehicle.
• Unless you put the registered digital
key(smartphone) on the interior
authentication pad (wireless charger)
when the remote start function is on,
the engine will turn off.
• If you do not get on the vehicle within
10 minutes after the engine turns on,
the vehicle will turn off.
For more information, refer to the Engine
Start/Stop button in chapter 6.
Vehicle information Display
The digital key application displays
the vehicle information such as
driving or door conditions through the
communication with the vehicle.
• How to check : Select the vehicle
what you want to check and touch
the vehicle image, then vehicle
information display page will be
shown.
• Contents : accumulated odometer,
latest fuel economy, driving range,
fuel remaining, tire pressure, doors
lock/unlock status and last data
updated time.
ÃThe information displayed may differ
from the actual vehicle status.
ÃFor more information, please refer to
the ‘Tutorial’ on your Digital key app.
Page 226 of 527
Convenient Features
5-78
NOTICE
If the driver exits the vehicle through
another door besides the driver
door, the battery saver function
does not operate and the headlamp
delay function does not turn OFF
automatically.
This may cause the battery to
discharge. To avoid battery discharge,
turn OFF the headlamps manually from
the headlamp switch before exiting the
vehicle.
Headlamp leveling device
It automatically adjusts the headlamp
beam level according to the number of
passengers and loading weight in the
luggage area.
And it offers proper headlamp beam
under various conditions.
WARNING
If the function does not work properly,
have the vehicle inspected by an
authorized HYUNDAI dealer. Do not
attempt to inspect or replace the wiring
yourself.
Interior Lights
WARNING
Do not use the interior lights when
driving in the dark. The interior lights
may obscure your view and cause an
accident.
NOTICE
Do not use the interior lights for
extended periods when the vehicle is
turned off or the battery will discharge.
Interior lamp AUTO cut
The interior lamps will automatically go
off approximately 20 minutes after the
engine is turned off and the doors are
closed. If a door is opened, the lamp
will go off 40 minutes after the engine is
turned off. If the doors are locked by the
remote key or smart key and the vehicle
enters the armed stage of the theft
alarm system, the lamps will go off five
seconds later.
Page 425 of 527
07
7-5
NOTICE
External power source using 12V battery
The use of external power accessories
may reduce performance and function
of the vehicle. Especially, the use of
dash cameras may shut off the power of
the vehicle prior to the dash camera’s
automatic shut-down.
If the power of the vehicle is shut off,
start the vehicle as explained. (refer to
“Using the 12V Battery Reset Switch”)
Jump Starting
In the event vehicle still does not have a
functional 12V battery (check if interior
lights will not turn on) then you can try
a jump start to the engine compartment
jumper terminals using a 12V booster
pack or jumper cables from another
vehicle’s 12V battery according to the
following instructions.
CAUTION
Jump starting can be dangerous if
done incorrectly. Follow the jump
starting procedure in this section to
avoid serious injury or damage to
your vehicle. If in doubt about how to
properly jump start your vehicle, we
strongly recommend that you have a
service technician or towing service do
it for you.
1. Position the vehicles close enough
that the jumper cables will reach, but
do not allow the vehicles to touch.
Avoid fans or any moving parts in the
engine compartment at all times, even
when the vehicles are turned off.
2. Turn off all electrical devices such as
radios, lights, air conditioning, etc.
Put the vehicles in P (Park) and set the
parking brake. Turn both vehicles OFF.
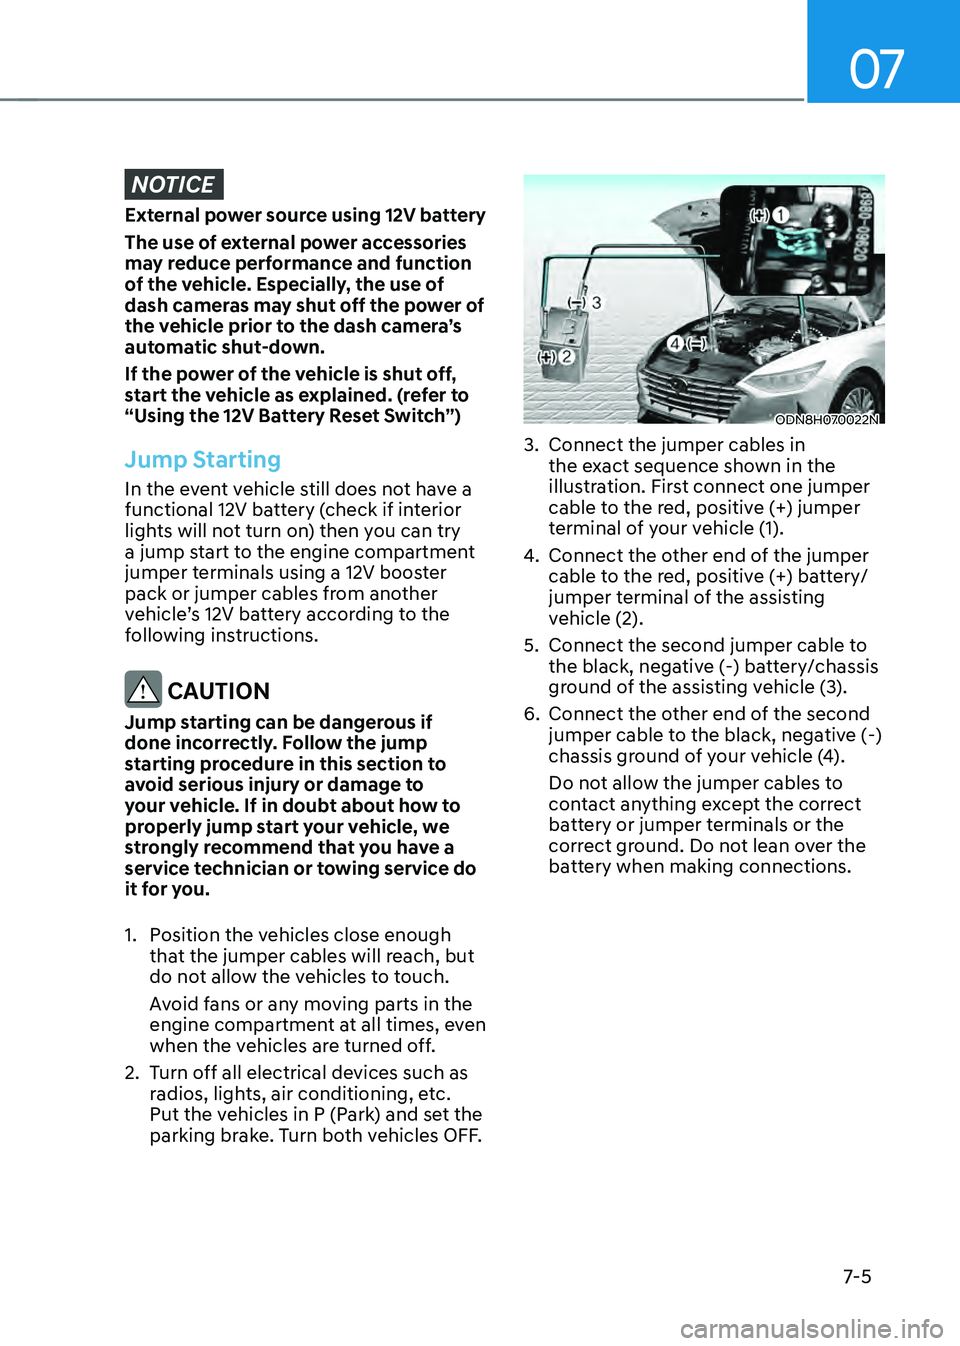
ODN8H070022N
3. Connect the jumper cables in
the exact sequence shown in the
illustration. First connect one jumper
cable to the red, positive (+) jumper
terminal of your vehicle (1).
4. Connect the other end of the jumper
cable to the red, positive (+) battery/
jumper terminal of the assisting
vehicle (2).
5. Connect the second jumper cable to
the black, negative (-) battery/chassis
ground of the assisting vehicle (3).
6. Connect the other end of the second
jumper cable to the black, negative (-)
chassis ground of your vehicle (4).
Do not allow the jumper cables to
contact anything except the correct
battery or jumper terminals or the
correct ground. Do not lean over the
battery when making connections.
Page 498 of 527
08
8-49
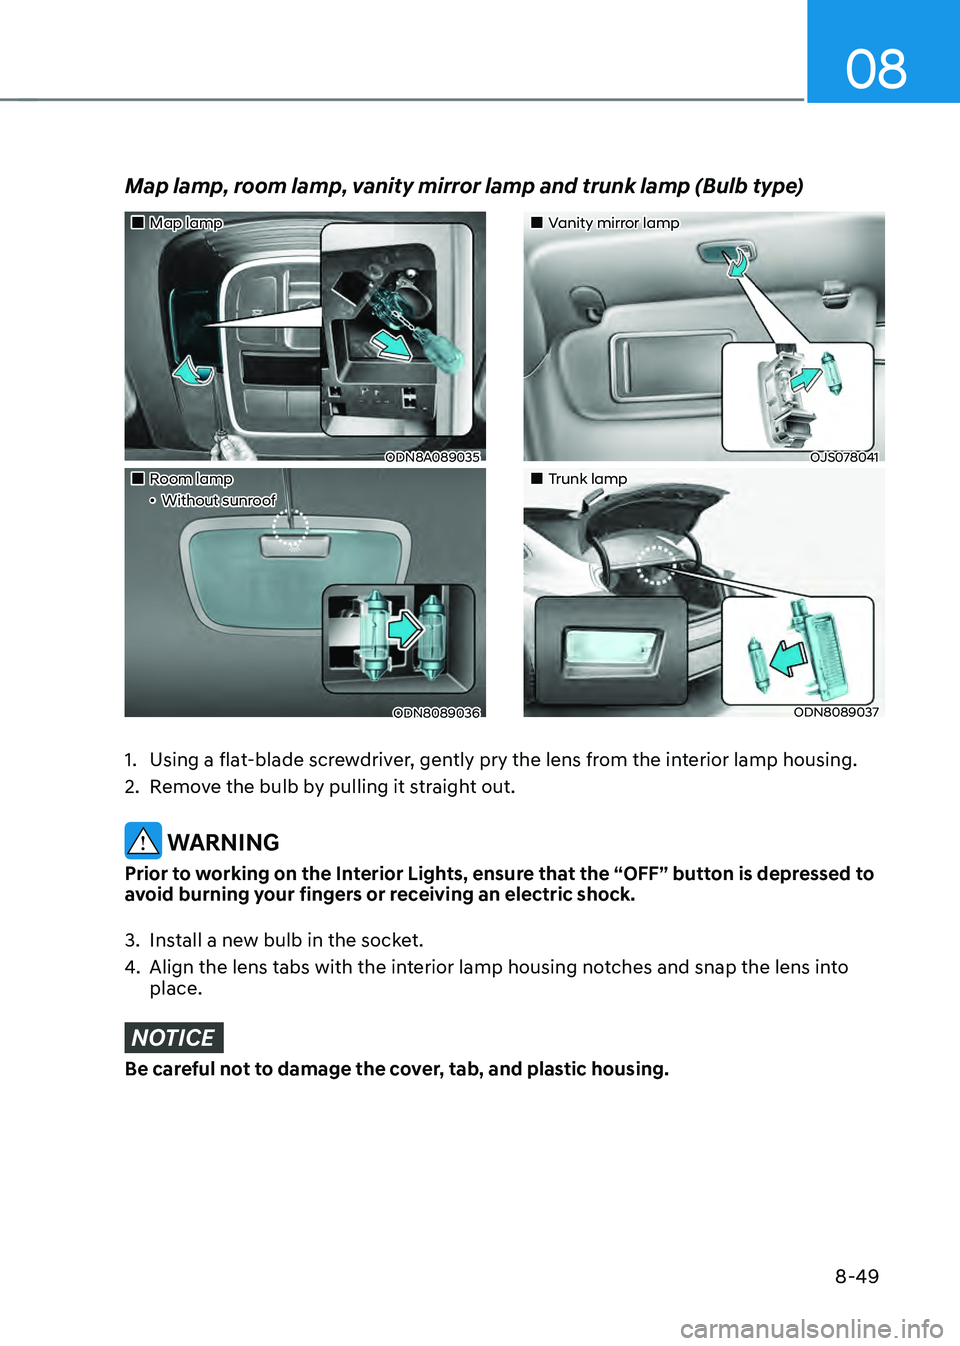
„„Map lamp
ODN8A089035
„„Room lamp„ǴWithout sunroof
ODN8089036
„„Vanity mirror lamp
OJS078041
„„Trunk lamp
ODN8089037
Map lamp, room lamp, vanity mirror lamp and trunk lamp (Bulb type)
1. Using a flat-blade screwdriver, gently pry the lens from the interior lamp housing.
2. Remove the bulb by pulling it straight out.
WARNING
Prior to working on the Interior Lights, ensure that the “OFF” button is depressed to
avoid burning your fingers or receiving an electric shock.
3. Install a new bulb in the socket.
4. Align the lens tabs with the interior lamp housing notches and snap the lens into
place.
NOTICE
Be careful not to damage the cover, tab, and plastic housing.
Page 518 of 527
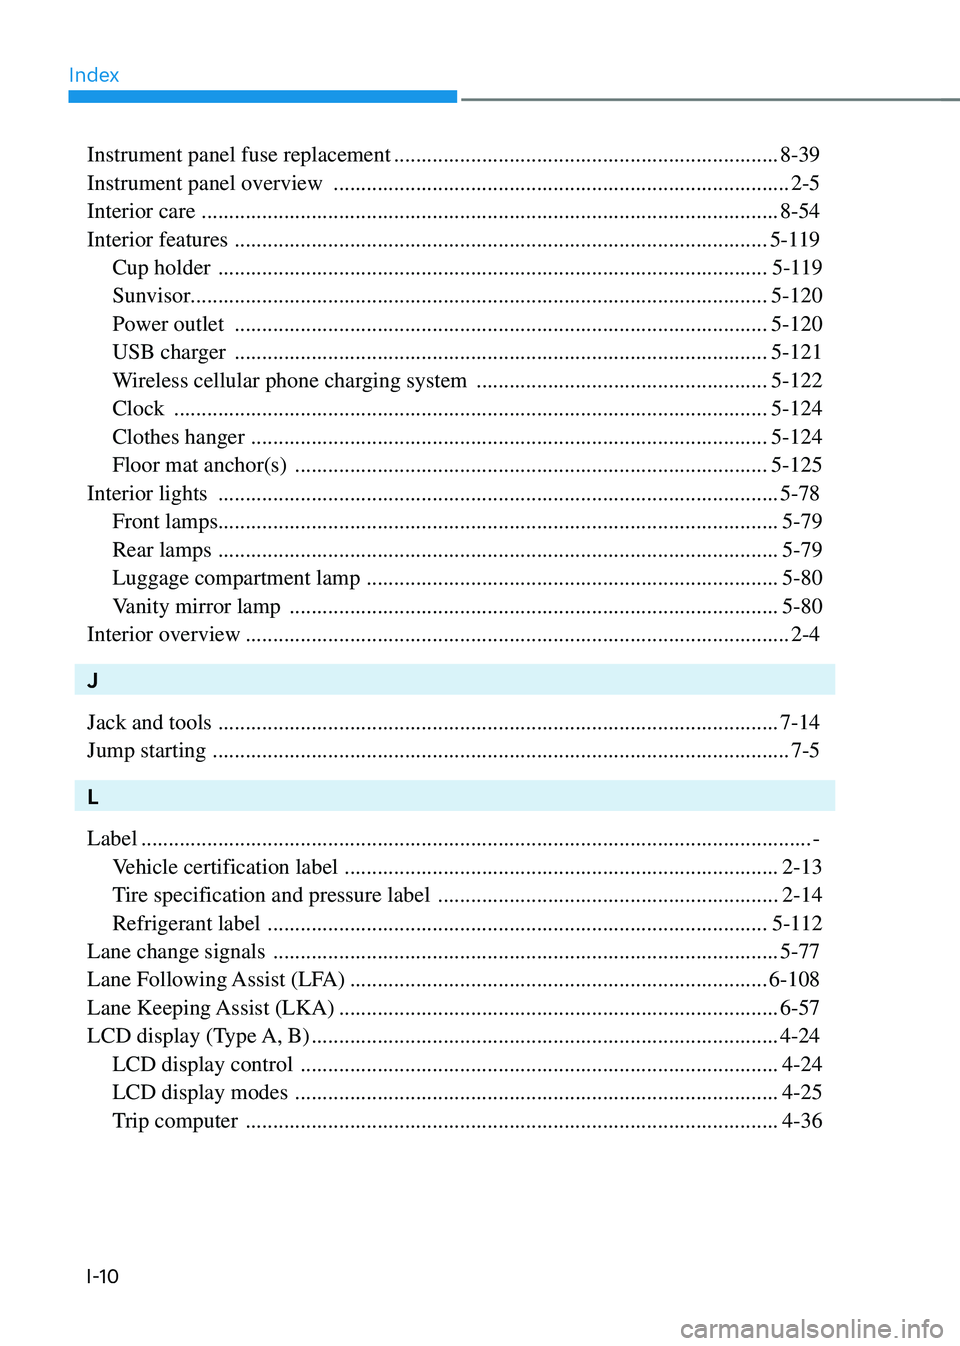
Index
I-10
Instrument panel fuse replacement ......................................................................8-39
Instrument panel overview
........................................................................\
...........2-5
Interior care
........................................................................\
.................................8-54
Interior features
........................................................................\
.........................5-119
Cup holder
........................................................................\
............................5-119
Sunvisor ........................................................................\
................................. 5-120
Power outlet
........................................................................\
.........................5-120
USB charger
........................................................................\
.........................5-121
Wireless cellular phone charging system
.....................................................5-122
Clock
........................................................................\
....................................5-124
Clothes hanger
........................................................................\
......................5-124
Floor mat anchor(s)
........................................................................\
..............5-125
Interior lights
........................................................................\
..............................5-78
Front lamps ........................................................................\
.............................. 5-79
Rear lamps
........................................................................\
..............................5-79
Luggage compartment lamp
........................................................................\
...5-80
Vanity mirror lamp
........................................................................\
.................5-80
Interior overview
........................................................................\
...........................2-4
J
Jack and tools
........................................................................\
..............................7-14
Jump starting
........................................................................\
.................................7-5
L
Label
........................................................................\
..................................................-
Vehicle certification label
........................................................................\
.......2-13
Tire specification and pressure label
..............................................................2-14
Refrigerant label
........................................................................\
...................5-112
Lane change signals
........................................................................\
....................5-77
Lane Following Assist (LFA)
........................................................................\
....6-108
Lane Keeping Assist (LKA)
........................................................................\
........6-57
LCD display (Type A, B)
........................................................................\
.............4-24
LCD display control
........................................................................\
...............4-24
LCD display modes
........................................................................\
................4-25
Trip computer
........................................................................\
.........................4-36