2021 HYUNDAI SONATA HYBRID light
[x] Cancel search: lightPage 186 of 527
Convenient Features
5-38
STEERING WHEEL
Electric Power Steering (EPS)
The system assists you with steering the
vehicle. If the vehicle is turned off or
if the power steering system becomes
inoperative, you may still steer the
vehicle, but it will require increased
steering effort.
Also, the steering effort becomes heavier
as the vehicle’s speed increases and
becomes lighter as the vehicle’s speed
decreases for better control of the
steering wheel.
Should you notice any change in the
effort required to steer during normal
vehicle operation, have the system
checked by an authorized HYUNDAI
dealer.
CAUTION
• If the Electric Power Steering System
does not operate normally, the
warning light (
) will illuminate
on the instrument cluster. You may
steer the vehicle, but it will require
increased steering efforts. Take your
vehicle to an authorized HYUNDAI
dealer and have the system checked
as soon as possible.
• When an abnormality is detected
in the electric power steering
system, to prevent a an accident, the
steering assist function may become
inoperative. At this time, the warning
light turns on or blinks on the cluster.
The steering wheel may become
difficult to control or operate. Have
your vehicle checked immediately,
after moving the vehicle to a safe
area.
Information
The following symptoms may occur during
normal vehicle operation:
• The steering effort may be high
immediately after placing the ignition
switch in the ON position.
This happens as the system performs
the EPS system diagnostics. When the
diagnostics are completed, the steering
wheel effort will return to its normal
condition.
• When the battery voltage is low, you
might have to put more steering effort.
However, it is a temporary condition so
that it will return to normal condition
after charging the battery.
• A click noise may be heard from the
EPS relay after the ignition switch is in
the ON or LOCK/OFF position.
• Motor noise may be heard when the
vehicle is at a stop or at a low driving
speed.
• When you operate the steering wheel
in low temperatures, abnormal noise
may occur. If the temperature rises, the
noise will disappear. This is a normal
condition.
• When an error is detected from the
EPS, the steering effort assist function
may become inoperative in order to
prevent fatal accidents. Instrument
cluster warning lights may be on or the
steering effort may be high. If these
symptoms occur, drive the vehicle to
a safe area as soon as it is safe to do
so. Have the system checked by an
authorized HYUNDAI dealer as soon
as possible.
Page 187 of 527
05
5-39
Tilt Steering / Telescope Steering
When adjusting the steering wheel to a
comfortable position, adjust the steering
wheel so that it points toward your chest,
not toward your face. Make sure you can
see the instrument cluster warning lights
and gauges. After locking the lever, push
the steering wheel both up and down to
be certain it is locked in position. Always
adjust the position of the steering wheel
before driving.
WARNING
NEVER adjust the steering wheel while
driving. This may cause loss of vehicle
control resulting in an accident.
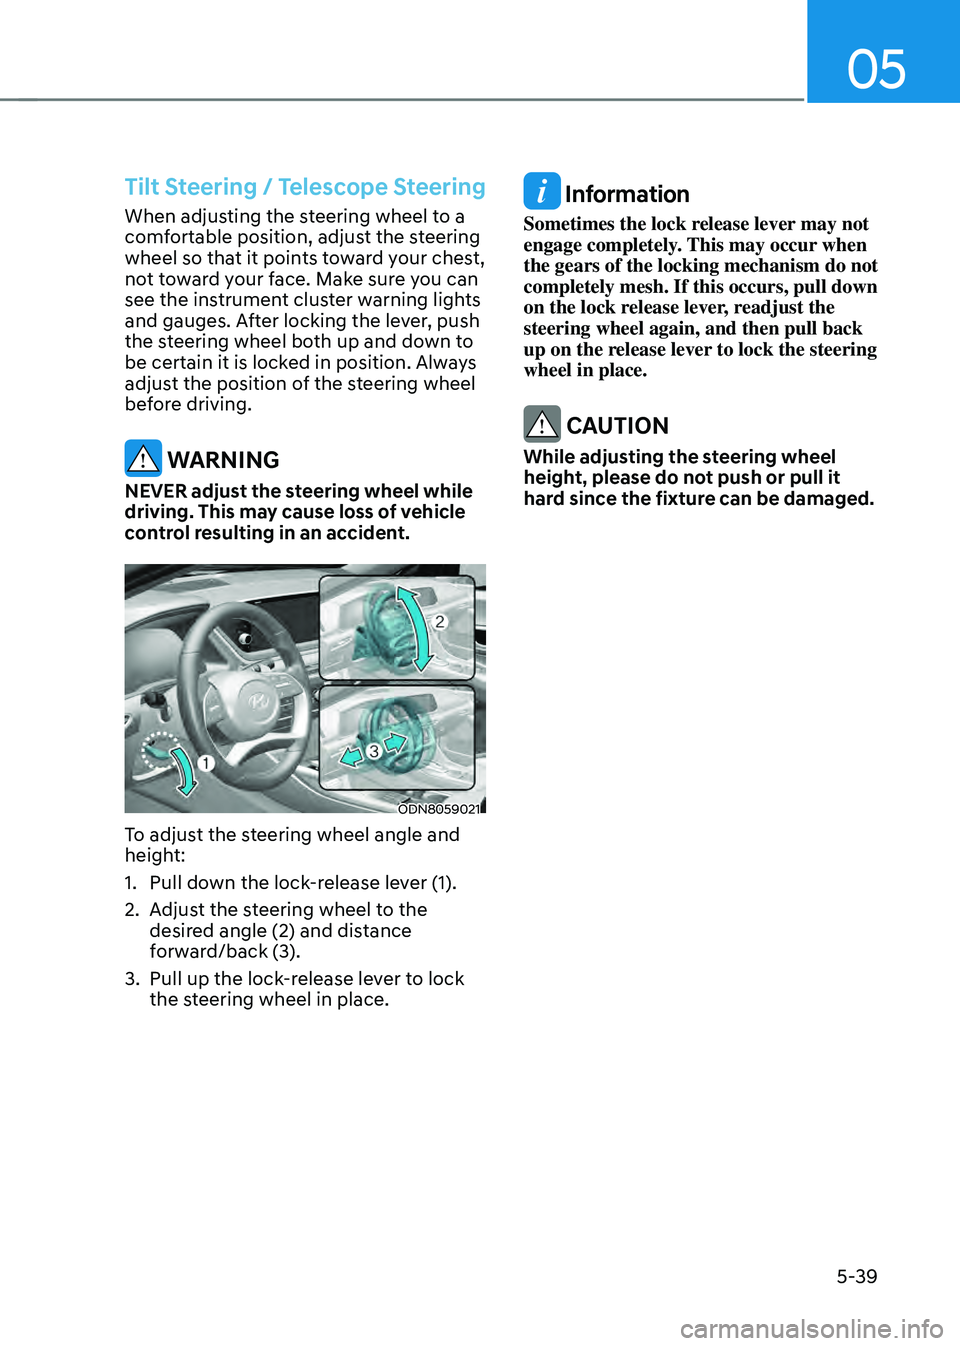
ODN8059021
To adjust the steering wheel angle and
height:
1. Pull down the lock-release lever (1).
2. Adjust the steering wheel to the
desired angle (2) and distance
forward/back (3).
3. Pull up the lock-release lever to lock
the steering wheel in place.
Information
Sometimes the lock release lever may not
engage completely. This may occur when
the gears of the locking mechanism do not
completely mesh. If this occurs, pull down
on the lock release lever, readjust the
steering wheel again, and then pull back
up on the release lever to lock the steering
wheel in place.
CAUTION
While adjusting the steering wheel
height, please do not push or pull it
hard since the fixture can be damaged.
Page 191 of 527
05
5-43
Electrochromic mirror (ECM) with
HomeLink® system (if equipped)
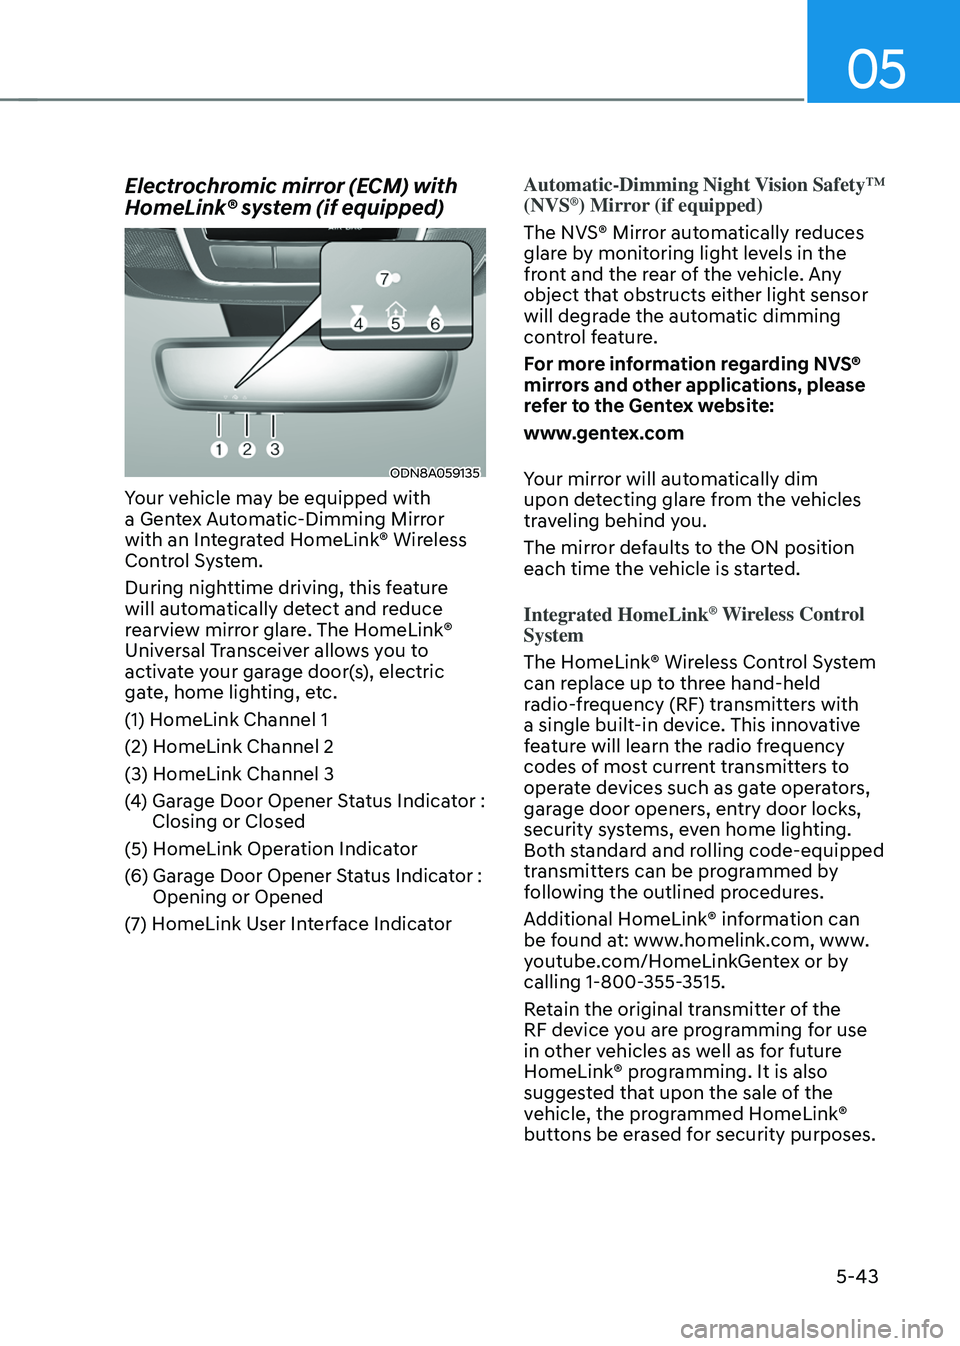
ODN8A059135
Your vehicle may be equipped with
a Gentex Automatic-Dimming Mirror
with an Integrated HomeLink® Wireless
Control System.
During nighttime driving, this feature
will automatically detect and reduce
rearview mirror glare. The HomeLink®
Universal Transceiver allows you to
activate your garage door(s), electric
gate, home lighting, etc.
(1) HomeLink Channel 1
(2) HomeLink Channel 2
(3) HomeLink Channel 3
(4) Garage Door Opener Status Indicator : Closing or Closed
(5) HomeLink Operation Indicator
(6) Garage Door Opener Status Indicator : Opening or Opened
(7) HomeLink User Interface Indicator
Automatic-Dimming Night Vision Safety™
(NVS®) Mirror (if equipped)
The NVS® Mirror automatically reduces
glare by monitoring light levels in the
front and the rear of the vehicle. Any
object that obstructs either light sensor
will degrade the automatic dimming
control feature.
For more information regarding NVS®
mirrors and other applications, please
refer to the Gentex website:
www.gentex.com
Your mirror will automatically dim
upon detecting glare from the vehicles
traveling behind you.
The mirror defaults to the ON position
each time the vehicle is started.
Integrated HomeLink
® Wireless Control
System
The HomeLink® Wireless Control System
can replace up to three hand-held
radio-frequency (RF) transmitters with
a single built-in device. This innovative
feature will learn the radio frequency
codes of most current transmitters to
operate devices such as gate operators,
garage door openers, entry door locks,
security systems, even home lighting.
Both standard and rolling code-equipped
transmitters can be programmed by
following the outlined procedures.
Additional HomeLink® information can
be found at: www.homelink.com, www.
youtube.com/HomeLinkGentex or by
calling 1-800-355-3515.
Retain the original transmitter of the
RF device you are programming for use
in other vehicles as well as for future
HomeLink® programming. It is also
suggested that upon the sale of the
vehicle, the programmed HomeLink®
buttons be erased for security purposes.
Page 194 of 527
Convenient Features
5-46
Gate operator & Canadian programming
During programming, your handheld
transmitter may automatically stop
transmitting. Continue to press the
Integrated HomeLink® Wireless Control
System button while you press and re-
press (“cycle”) your handheld transmitter
every two seconds until the frequency
signal has been learned. The indicator
light will flash slowly and then rapidly
after several seconds upon successful
training.
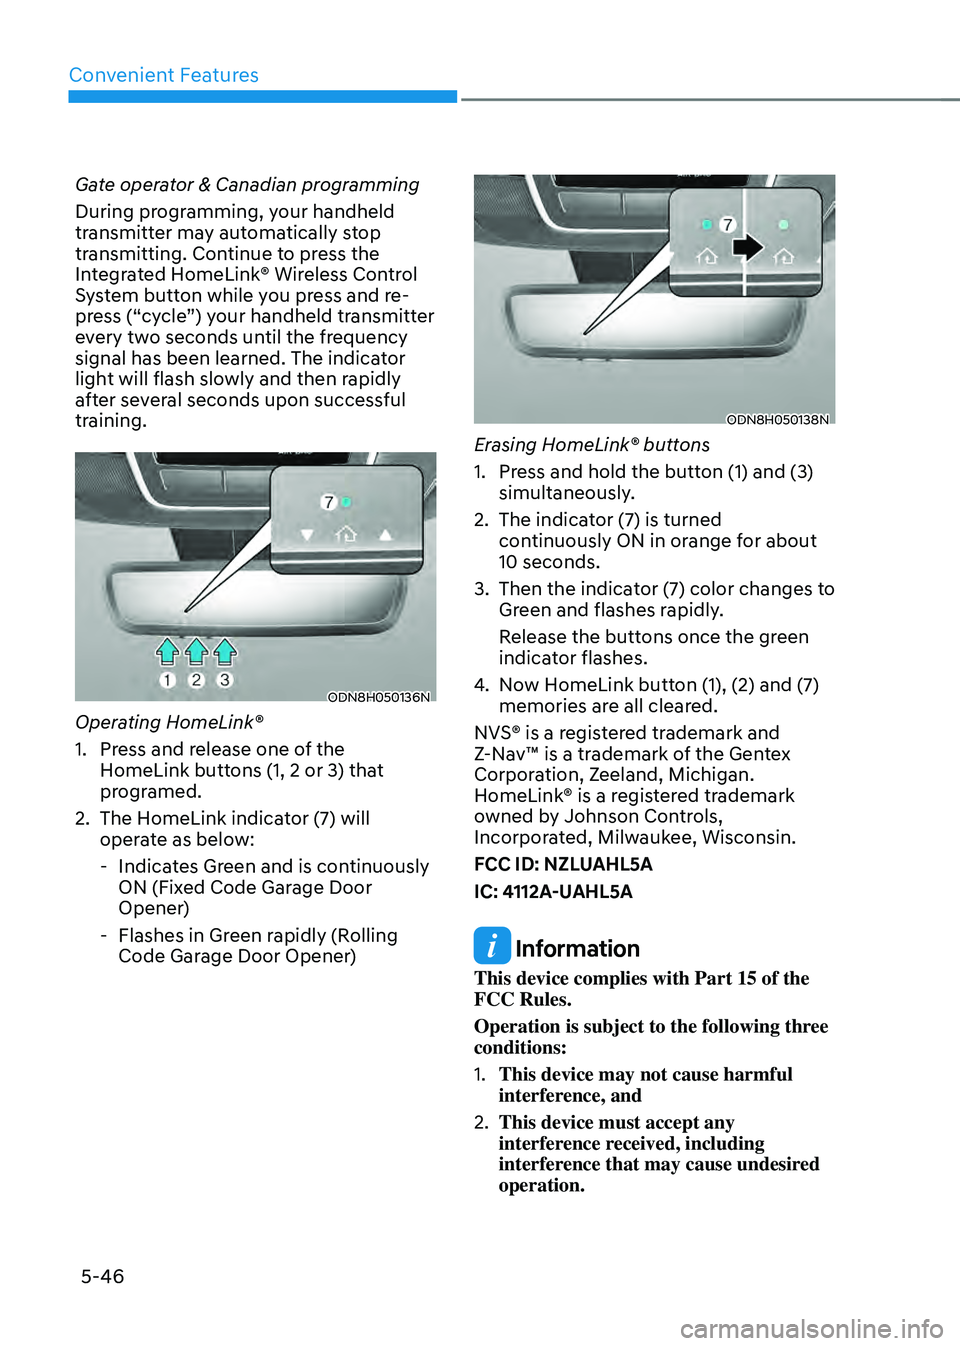
ODN8H050136N
Operating HomeLink®
1. Press and release one of the
HomeLink buttons (1, 2 or 3) that
programed.
2. The HomeLink indicator (7) will
operate as below:
-Indicates Green and is continuously
ON (Fixed Code Garage Door
Opener)
-Flashes in Green rapidly (Rolling
Code Garage Door Opener)
ODN8H050138N
Erasing HomeLink® buttons
1. Press and hold the button (1) and (3)
simultaneously.
2. The indicator (7) is turned
continuously ON in orange for about
10 seconds.
3. Then the indicator (7) color changes to
Green and flashes rapidly.
Release the buttons once the green
indicator flashes.
4. Now HomeLink button (1), (2) and (7)
memories are all cleared.
NVS® is a registered trademark and
Z-Nav™ is a trademark of the Gentex
Corporation, Zeeland, Michigan.
HomeLink® is a registered trademark
owned by Johnson Controls,
Incorporated, Milwaukee, Wisconsin.
FCC ID: NZLUAHL5A
IC: 4112A-UAHL5A
Information
This device complies with Part 15 of the
FCC Rules.
Operation is subject to the following three
conditions:
1. This device may not cause harmful
interference, and
2. This device must accept any
interference received, including
interference that may cause undesired
operation.
Page 200 of 527
Convenient Features
5-52
Power Windows
The ignition switch must be in the
ON position to be able to raise or
lower the windows. Each door has a
Power Window switch to control that
door’s window. The driver has a Power
Window Lock switch which can block
the operation of passenger windows.
The power windows will operate for
approximately 30 seconds after the
ignition switch is placed in the ACC or
LOCK/OFF position. However, if the front
doors are opened, the Power Windows
will not operate even within the 30
second period.
WARNING
To avoid serious injury or death, do not
extend your head, arms or body outside
the windows while driving.
Information
• In cold and wet climates, power
windows may not work properly due to
freezing conditions.
• While driving with the rear windows
down or with the sunroof (if equipped)
opened (or partially opened), your
vehicle may demonstrate a wind
buffeting or pulsation noise. This
noise is normal and can be reduced
or eliminated by taking the following
actions. If the noise occurs with one
or both of the rear windows down,
partially lower both front windows
approximately one inch. If you
experience the noise with the sunroof
open, slightly close the sunroof.
Window opening and closing
ODN8059031
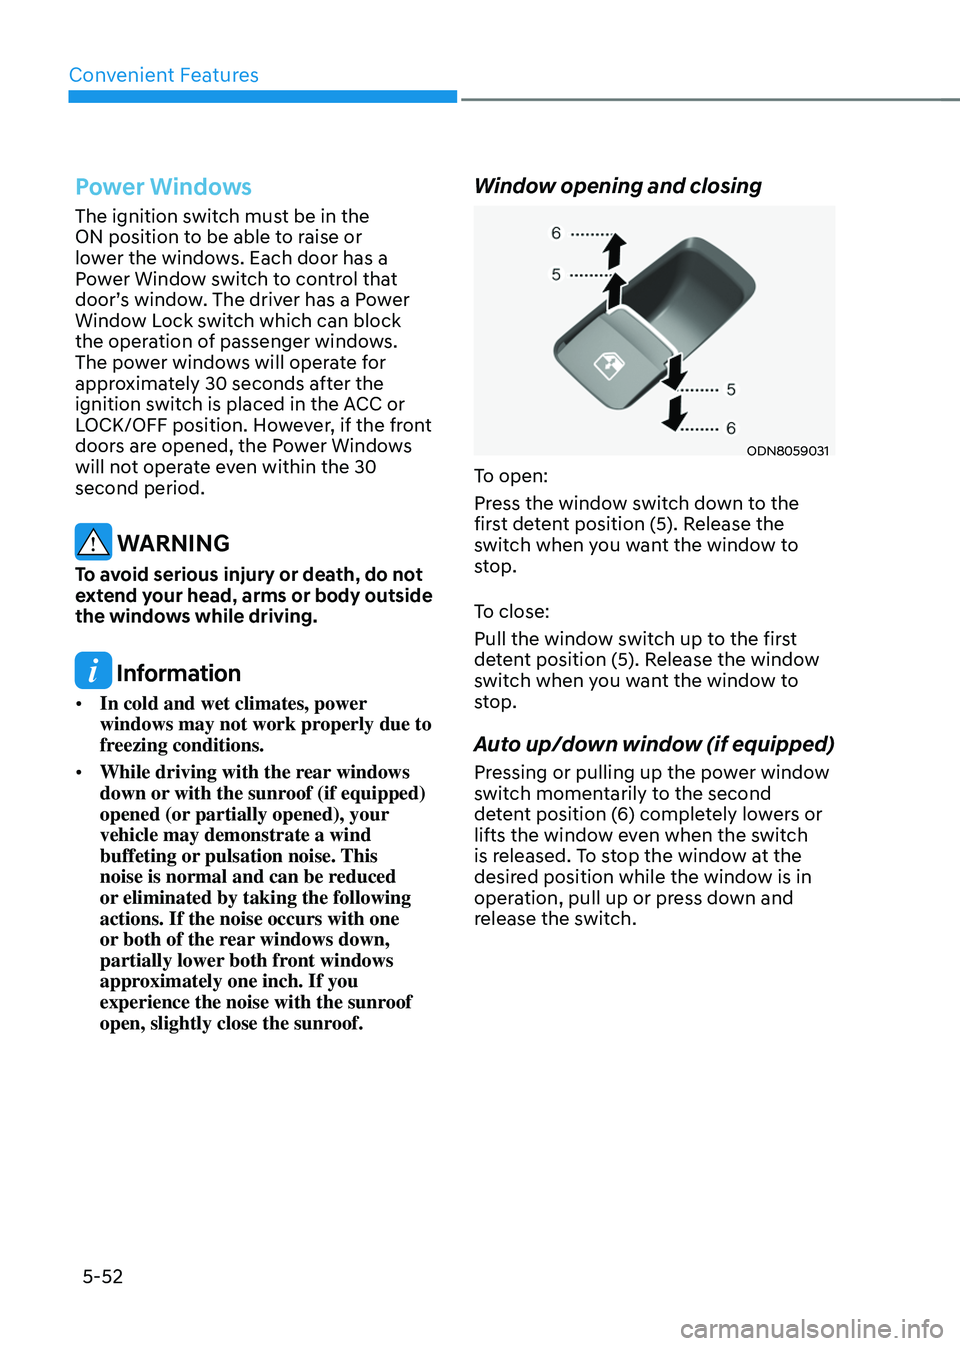
To open:
Press the window switch down to the
first detent position (5). Release the
switch when you want the window to
stop.
To close:
Pull the window switch up to the first
detent position (5). Release the window
switch when you want the window to
stop.
Auto up/down window (if equipped)
Pressing or pulling up the power window
switch momentarily to the second
detent position (6) completely lowers or
lifts the window even when the switch
is released. To stop the window at the
desired position while the window is in
operation, pull up or press down and
release the switch.
Page 204 of 527
Convenient Features
5-56
Sunshade
ODN8A059036
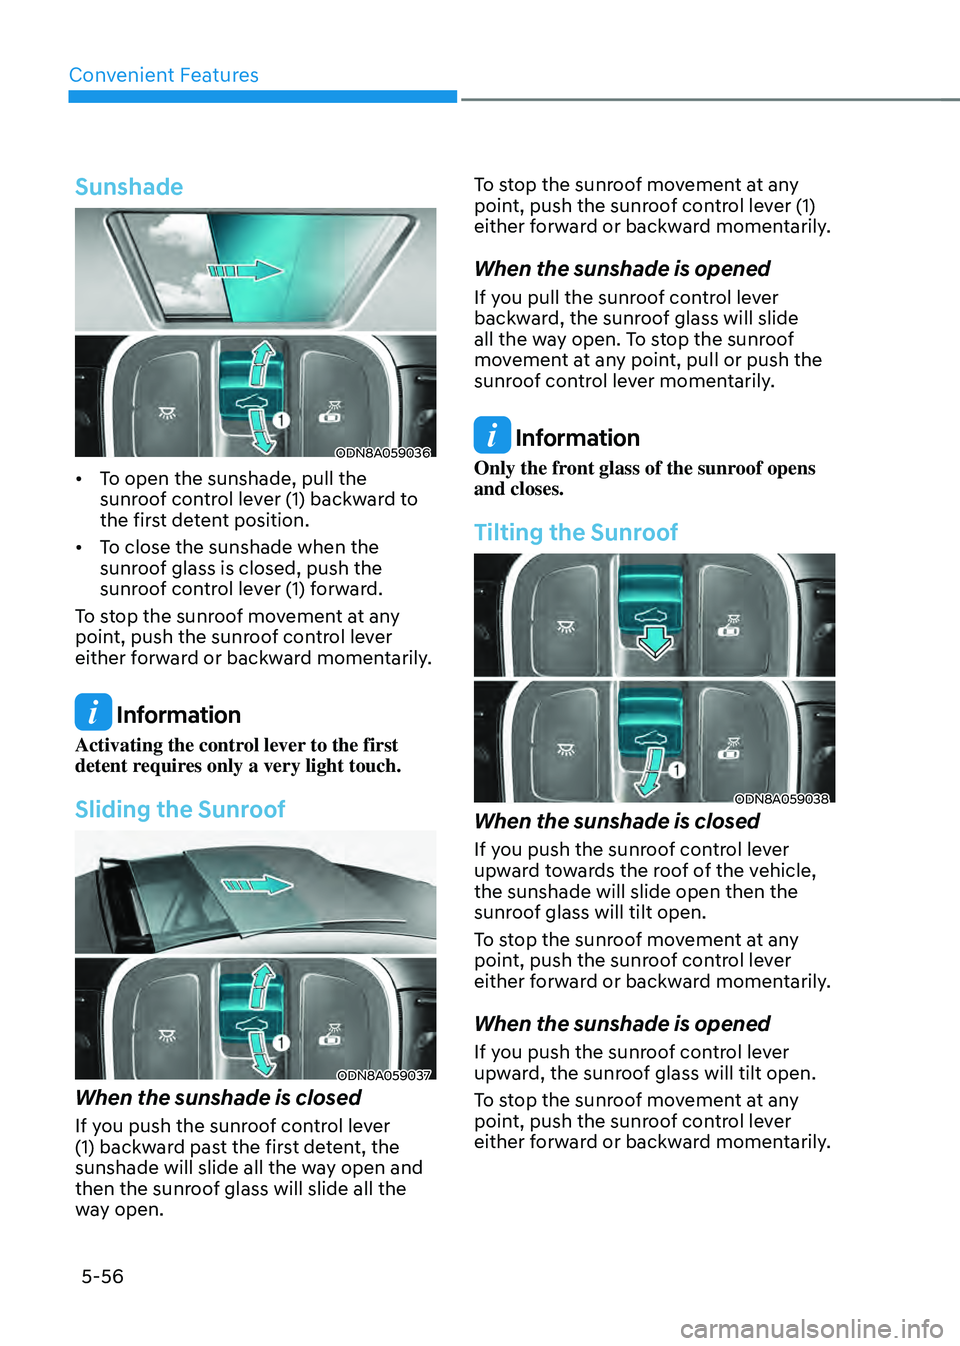
• To open the sunshade, pull the
sunroof control lever (1) backward to
the first detent position.
• To close the sunshade when the
sunroof glass is closed, push the
sunroof control lever (1) forward.
To stop the sunroof movement at any
point, push the sunroof control lever
either forward or backward momentarily.
Information
Activating the control lever to the first
detent requires only a very light touch.
Sliding the Sunroof
ODN8A059037
When the sunshade is closed
If you push the sunroof control lever
(1) backward past the first detent, the
sunshade will slide all the way open and
then the sunroof glass will slide all the
way open. To stop the sunroof movement at any
point, push the sunroof control lever (1)
either forward or backward momentarily.
When the sunshade is opened
If you pull the sunroof control lever
backward, the sunroof glass will slide
all the way open. To stop the sunroof
movement at any point, pull or push the
sunroof control lever momentarily.
Information
Only the front glass of the sunroof opens
and closes.
Tilting the Sunroof
ODN8A059038
When the sunshade is closed
If you push the sunroof control lever
upward towards the roof of the vehicle,
the sunshade will slide open then the
sunroof glass will tilt open.
To stop the sunroof movement at any
point, push the sunroof control lever
either forward or backward momentarily.
When the sunshade is opened
If you push the sunroof control lever
upward, the sunroof glass will tilt open.
To stop the sunroof movement at any
point, push the sunroof control lever
either forward or backward momentarily.
Page 206 of 527
Convenient Features
5-58
Resetting the Sunroof
ODN8A059039
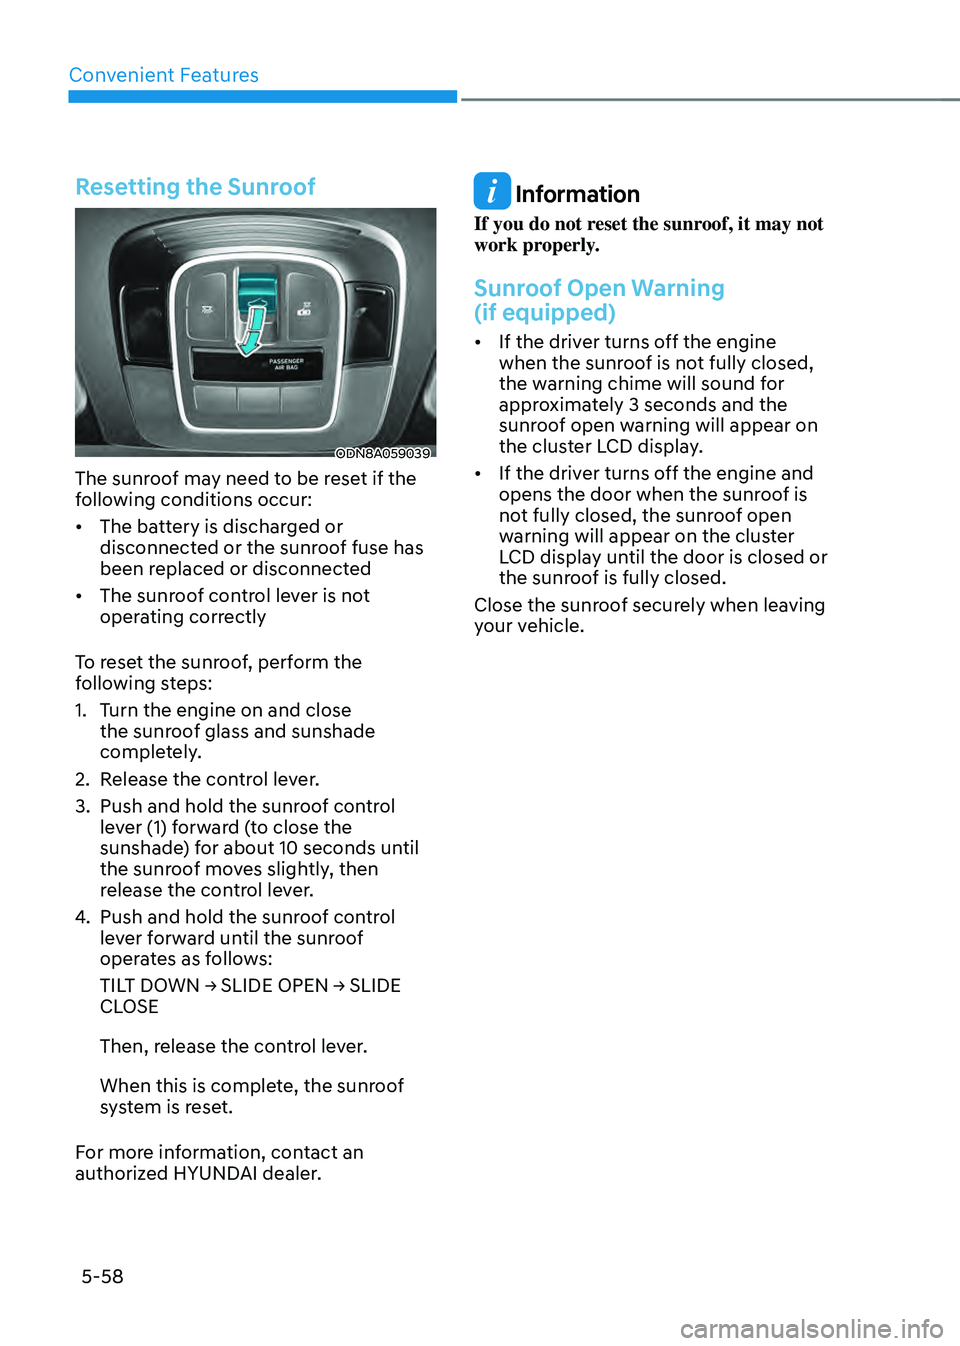
The sunroof may need to be reset if the
following conditions occur:
• The battery is discharged or
disconnected or the sunroof fuse has
been replaced or disconnected
• The sunroof control lever is not
operating correctly
To reset the sunroof, perform the
following steps:
1. Turn the engine on and close
the sunroof glass and sunshade
completely.
2. Release the control lever.
3. Push and hold the sunroof control
lever (1) forward (to close the
sunshade) for about 10 seconds until
the sunroof moves slightly, then
release the control lever.
4. Push and hold the sunroof control
lever forward until the sunroof
operates as follows:
TILT DOWN → SLIDE OPEN → SLIDE CLOSE
Then, release the control lever.
When this is complete, the sunroof
system is reset.
For more information, contact an
authorized HYUNDAI dealer.
Information
If you do not reset the sunroof, it may not
work properly.
Sunroof Open Warning
(if equipped)
• If the driver turns off the engine
when the sunroof is not fully closed,
the warning chime will sound for
approximately 3 seconds and the
sunroof open warning will appear on
the cluster LCD display.
• If the driver turns off the engine and
opens the door when the sunroof is
not fully closed, the sunroof open
warning will appear on the cluster
LCD display until the door is closed or
the sunroof is fully closed.
Close the sunroof securely when leaving
your vehicle.
Page 207 of 527
05
5-59
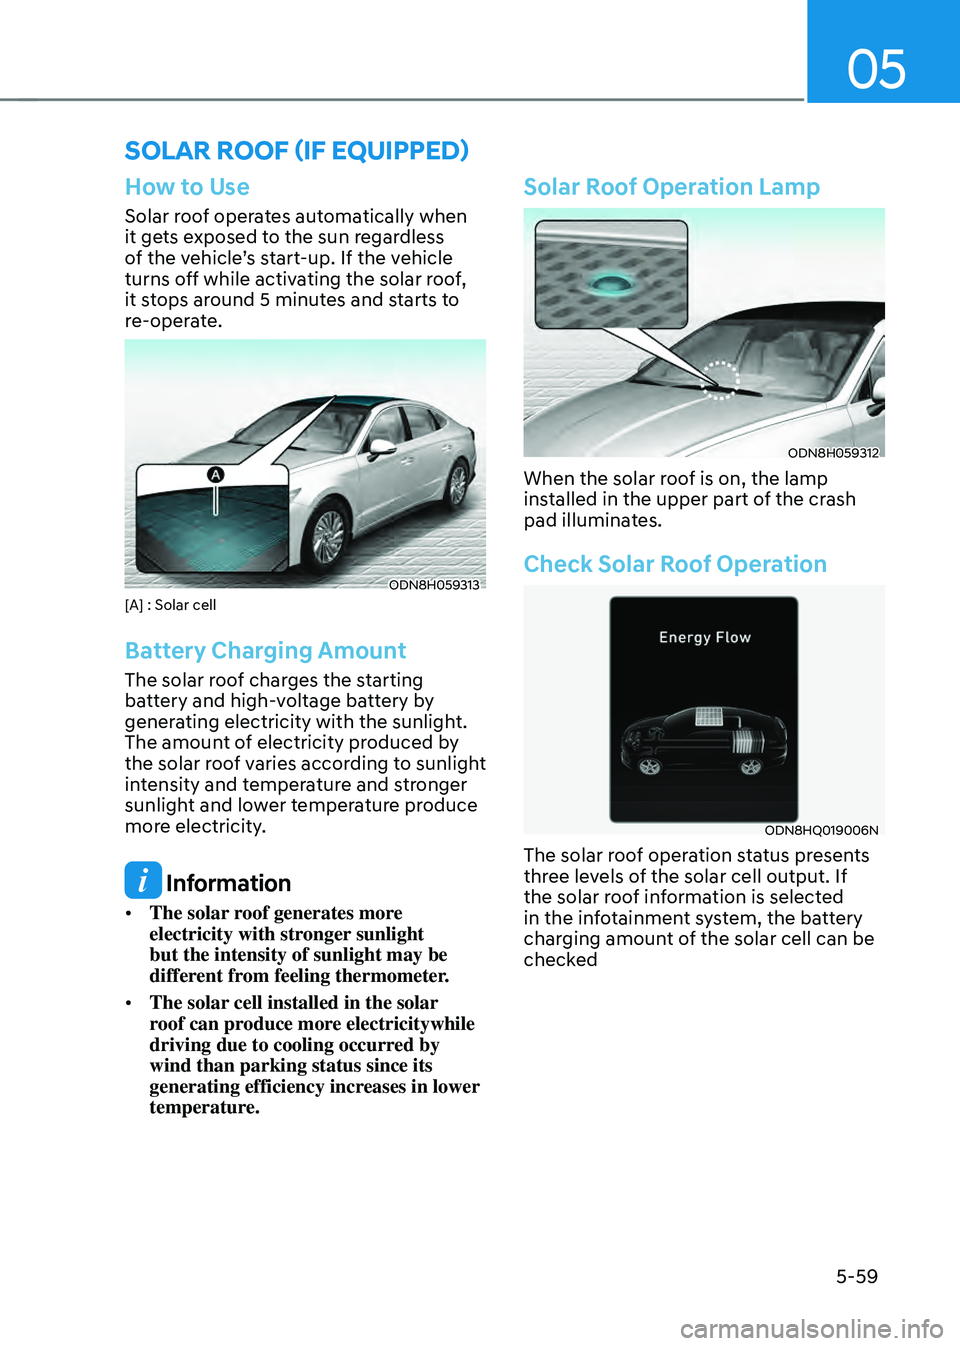
How to Use
Solar roof operates automatically when
it gets exposed to the sun regardless
of the vehicle’s start-up. If the vehicle
turns off while activating the solar roof,
it stops around 5 minutes and starts to
re-operate.
ODN8H059313[A] : Solar cell
Battery Charging Amount
The solar roof charges the starting
battery and high-voltage battery by
generating electricity with the sunlight.
The amount of electricity produced by
the solar roof varies according to sunlight
intensity and temperature and stronger
sunlight and lower temperature produce
more electricity.
Information
• The solar roof generates more
electricity with stronger sunlight
but the intensity of sunlight may be
different from feeling thermometer.
• The solar cell installed in the solar
roof can produce more electricitywhile
driving due to cooling occurred by
wind than parking status since its
generating efficiency increases in lower
temperature.
Solar Roof Operation Lamp
ODN8H059312
When the solar roof is on, the lamp
installed in the upper part of the crash
pad illuminates.
Check Solar Roof Operation
ODN8HQ019006N
The solar roof operation status presents
three levels of the solar cell output. If
the solar roof information is selected
in the infotainment system, the battery
charging amount of the solar cell can be
checked
SOLAR ROOF (IF EQUIPPED)