2021 HYUNDAI SANTA FE oil
[x] Cancel search: oilPage 600 of 636
Maintenance
9-50
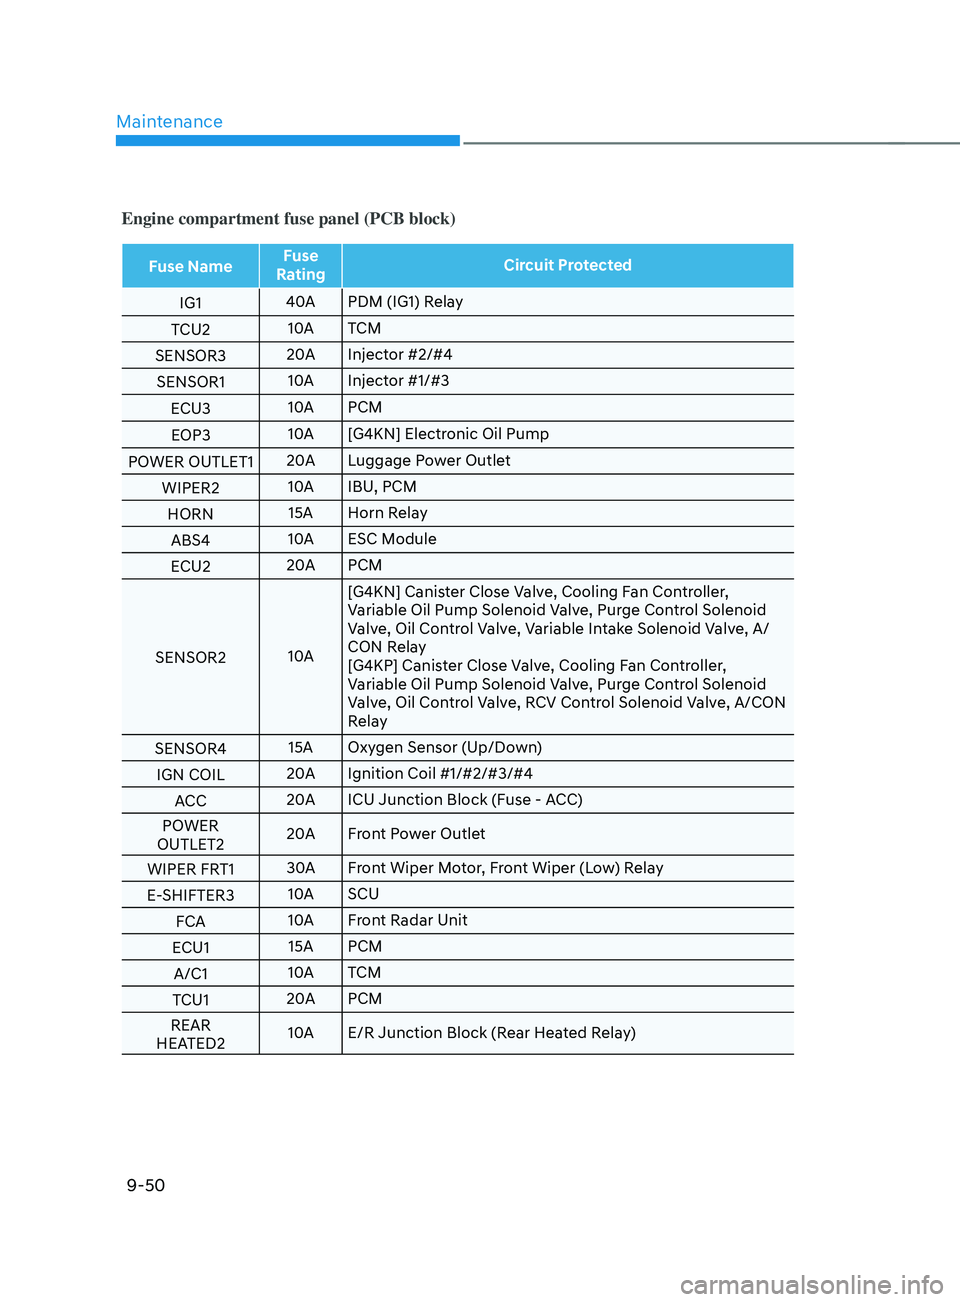
Engine compartment fuse panel (PCB block)
Fuse NameFuse
Rating Circuit Protected
IG1 40A
PDM (IG1) Relay
TCU2 10A
TCM
SENSOR3 20A
Injector #2/#4
SENSOR1 10A
Injector #1/#3
ECU3 10A
PCM
EOP3 10A
[G4KN] Electronic Oil Pump
POWER OUTLET1 20A
Luggage Power Outlet
WIPER2 10A
IBU, PCM
HORN 15A Horn Relay
ABS4 10A
ESC Module
ECU2 20A
PCM
SENSOR2 10A[G4KN] Canister Close Valve, Cooling Fan Controller,
Variable Oil Pump Solenoid Valve, Purge Control Solenoid
Valve, Oil Control Valve, Variable Intake Solenoid Valve, A/
CON Relay
[G4KP] Canister Close Valve, Cooling Fan Controller,
Variable Oil Pump Solenoid Valve, Purge Control Solenoid
Valve, Oil Control Valve, RCV Control Solenoid Valve, A/CON
Relay
SENSOR4 15A Oxygen Sensor (Up/Down)
IGN COIL 20A
Ignition Coil #1/#2/#3/#4
ACC 20A
ICU Junction Block (Fuse - ACC)
POWER
OUTLET2 20A
Front Power Outlet
WIPER FRT1 30A
Front Wiper Motor, Front Wiper (Low) Relay
E-SHIFTER3 10A
SCU
FCA 10A
Front Radar Unit
ECU1 15A PCM
A/C1 10A
TCM
TCU1 20A
PCM
REAR
HEATED2 10A
E/R Junction Block (Rear Heated Relay)
Page 604 of 636
Maintenance
9-54
• Always handle them carefully, and
avoid scratches and abrasions. If
the bulbs are lit, avoid contact with
liquids.
• Never touch the glass with bare
hands. Residual oil may cause the
bulb to overheat and burst when lit.
• A bulb should be operated only when
installed in a headlamp.
• If a bulb becomes damaged or
cracked, replace it immediately and
carefully dispose of it.
Lamps
If the LED lamp does not operate, we
recommend that you have the vehicle
checked by an authorized HYUNDAI
dealer.
Side repeater lamp replacement
OTM090023
If the LED lamp (1) does not operate,
we recommend that the system be
inspected by an authorized HYUNDAI
dealer.
The LED lamps cannot be replaced as
a single unit because it is an integrated
unit. The LED lamps has to be replaced
with the unit.
A skilled technician should check or
repair the LED lamp, for it may damage
related parts of the vehicle.
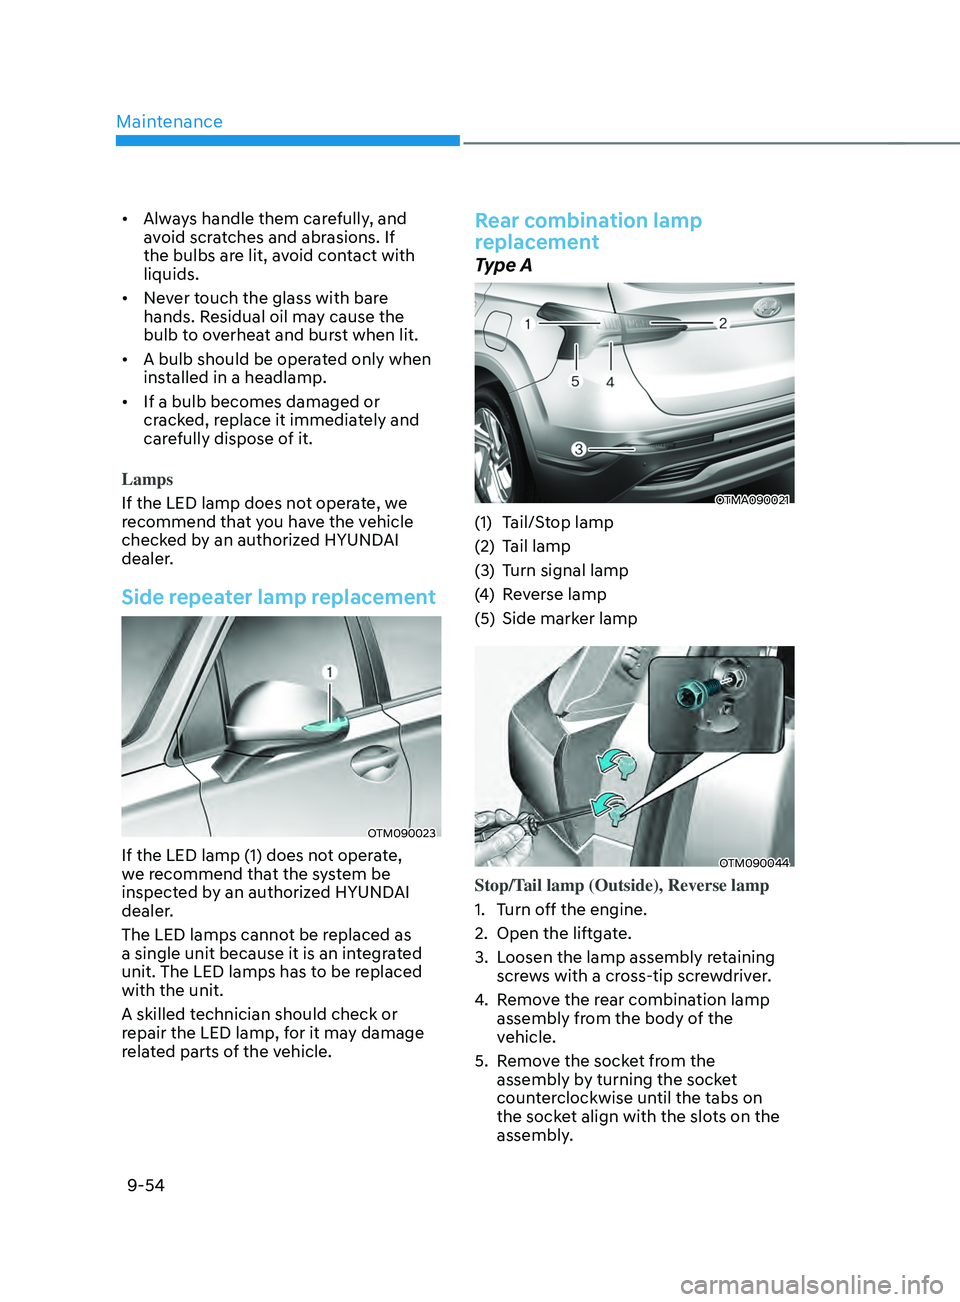
Rear combination lamp
replacement
Type A
OTMA090021
(1) Tail/Stop lamp
(2)
Tail lamp
(3
)
Turn signal lamp
(4
)
Re
verse lamp
(5)
Side marker lamp
OTM090044
Stop/Tail lamp (Outside), Reverse lamp
1.
Turn o
ff the engine.
2.
Open the liftga
te.
3.
Loosen the lamp assembly r
etaining
screws with a cross-tip screwdriver.
4.
Remo
ve the rear combination lamp
assembly from the body of the
vehicle.
5.
Remo
ve the socket from the
assembly by turning the socket
counterclockwise until the tabs on
the socket align with the slots on the
assembly.
Page 611 of 636
09
9-61
NOTICE
• Do not use strong soap, chemical
detergents or hot water, and do not
wash the vehicle in direct sunlight
or when the body of the vehicle is
warm.
• Be careful when washing the side
windows of your vehicle.
• Especially, with high-pressure water,
water may leak through the windows
and wet the interior.
• To prevent damage to the plastic
parts, do not clean with chemical
solvents or strong detergents.
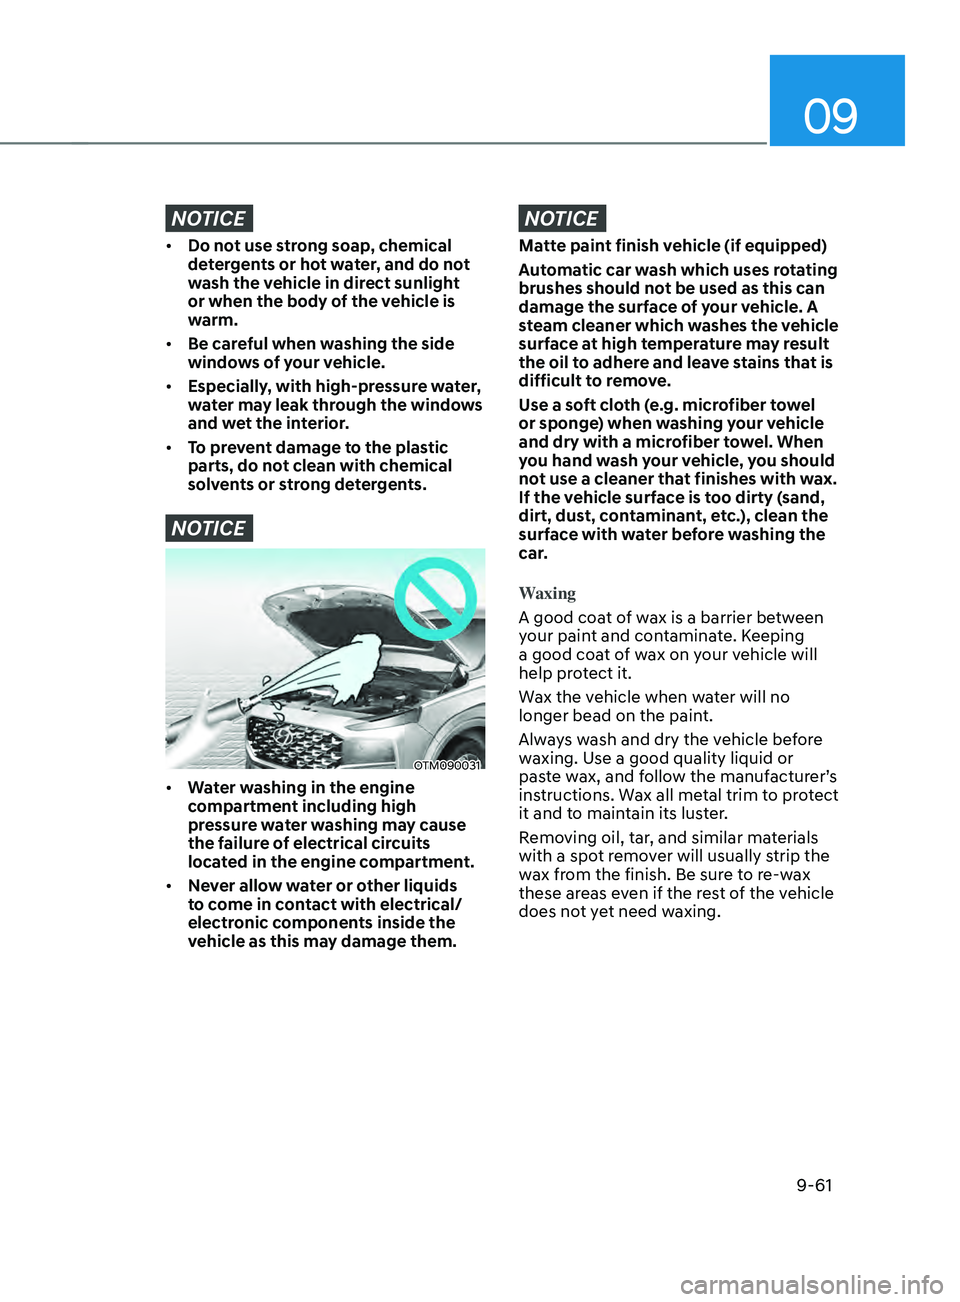
NOTICE
OTM090031
• Water washing in the engine
compartment including high
pressure water washing may cause
the failure of electrical circuits
located in the engine compartment.
• Never allow water or other liquids
to come in contact with electrical/
electronic components inside the
vehicle as this may damage them.
NOTICE
Matte paint finish vehicle (if equipped)
Automatic car wash which uses rotating
brushes should not be used as this can
damage the surface of your vehicle. A
steam cleaner which washes the vehicle
surface at high temperature may result
the oil to adhere and leave stains that is
difficult to remove.
Use a soft cloth (e.g. microfiber towel
or sponge) when washing your vehicle
and dry with a microfiber towel. When
you hand wash your vehicle, you should
not use a cleaner that finishes with wax.
If the vehicle surface is too dirty (sand,
dirt, dust, contaminant, etc.), clean the
surface with water before washing the
car.
Waxing
A good coat of wax is a barrier between
your paint and contaminate. Keeping
a good coat of wax on your vehicle will
help protect it.
Wax the vehicle when water will no
longer bead on the paint.
Always wash and dry the vehicle before
waxing. Use a good quality liquid or
paste wax, and follow the manufacturer’s
instructions. Wax all metal trim to protect
it and to maintain its luster.
Removing oil, tar, and similar materials
with a spot remover will usually strip the
wax from the finish. Be sure to re-wax
these areas even if the rest of the vehicle
does not yet need waxing.
Page 616 of 636

Maintenance
9-66
Interior care
Interior general precautions
Prevent caustic solutions such as
perfume and cosmetic oil, from
contacting the interior parts because
they may cause damage or discoloration.
If they do contact the interior parts,
wipe them off immediately. See the
instructions for the proper way to clean
vinyl.
NOTICE
• Never allow water or other liquids
to come in contact with electrical/
electronic components inside the
vehicle as this may damage them.
• When cleaning leather products
(steering wheel, seats etc.), use
neutral detergents or low alcohol
content solutions. If you use high
alcohol content solutions or acid/
alkaline detergents, the color of the
leather may fade or the surface may
get stripped off.
Cleaning the upholstery and interior
trim
Vinyl (if equipped)
Remove dust and loose dirt from vinyl
with a whisk broom or vacuum cleaner.
Clean vinyl surfaces with a vinyl cleaner.
Fabric (if equipped)
Remove dust and loose dirt from
fabric with a whisk broom or vacuum
cleaner. Clean with a mild soap solution
recommended for upholstery or carpets.
Remove fresh spots immediately with
a fabric spot cleaner. If fresh spots do
not receive immediate attention, the
fabric can be stained and its color can be
affected. Also, its fire-resistant properties
can be reduced if the material is not
properly maintained.
NOTICE
Using anything but recommended
cleaners and procedures may affect the
fabric’s appearance and fire-resistant
properties.
Page 618 of 636
Maintenance
9-68
- OilRemo ve oil instantly with
absorbable cloth and wipe with
stain remover used only for natural
leather.
- Chewing gum
Har
den the gum with ice and
remove gradually.
• Handling prime napa leather (if
equipped)
Try to avoid excessive sunlight and
heat exposure. Excessive sunlight
and heat exposure naturally fades
and dries out napa leather, causing
wrinkles and discoloration. If the napa
leather is wet with liquid, immediately
clean it with lint-free cloth to minimize
damage. Do not scratch the napa
leather surface with a sharp object.
If your napa leather seat is bright
colored, it may be contaminated or
stained from dyed materials such as
jeans.
Interior wooden trim
• Use a wooden furniture protector (e.g.
wax, coating compound) to clean the
interior wooden trim.
• Often wipe the interior wooden
trim with a lint-free, clean cloth to
maintain the unique wooden textures
for a longer period of time.
• If you spill beverage (e.g. water,
coffee) over the interior wooden trim,
immediately wipe it with clean, dry
cloth.
• Sharp objects (e.g. driver, knife),
adhesive materials, or tapes may
damage the interior wooden trim.
• Any strong impacts may damage the
interior wooden trim.
• If the coating finish over the interior
wooden trim is removed, moisture
may damage or change wood traits.
• If the interior wooden trim is
damaged, you may get a splinter
from the wood surface. Therefore,
you should immediately have the
damaged interior wooden trim
replaced by an authorized HYUNDAI
dealer.
Cleaning the seat belt webbing
Clean the belt webbing with any
mild soap solution recommended for
cleaning upholstery or carpet. Follow
the instructions provided with the soap.
Do not bleach or re-dye the webbing
because this may weaken the seat belt.
Cleaning the interior window glass
If the interior glass surfaces of the
vehicle become fogged (that is, covered
with an oily, greasy or waxy film), they
should be cleaned with glass cleaner.
Follow the directions on the glass cleaner
container.
NOTICE
Do not scrape or scratch the inside of
the rear window. This may result in
damage to the rear window defroster
grid.
Page 627 of 636
I
I-5
Dual clutch transmission........................................................................\
.............. 6-23
Dual clutch transmission operation ..................................................................6-23
Good driving practices ........................................................................\
............ 6-33
LCD display message (button type) .................................................................6-30
Paddle shifter (Manual shifter mode) ...............................................................6-32
Parking ........................................................................\
..................................... 6-30
E
Emer
gency commodity
........................................................................\
................ 8-32
Fire extinguisher ........................................................................\
....................... 8-32
First aid kit ........................................................................\
............................... 8-32
Tire pressure gauge ........................................................................\
..................8-32
Triangle reflector ........................................................................\
...................... 8-32
Emission control system
........................................................................\
.............. 9-69
Gasoline Particulate Filter (GPF) .....................................................................9-72
Engine
........................................................................\
............................................ 2-8
Engine compartment
........................................................................\
...................... 2-7
Engine compartment
........................................................................\
...................... 9-3
Engine coolant /liquid-cooled intercooler coolant
............................................... 9-18
Changing coolant ........................................................................\
...................... 9-20
Checking the coolant level ........................................................................\
.......9-18
Engine number
........................................................................\
............................. 2-16
Engine oil
........................................................................\
..................................... 9-16
Checking the engine oil and filter ....................................................................9-17
Checking the engine oil level ........................................................................\
... 9-16
Engine Start/Stop button
........................................................................\
................ 6-9
Engine Stop/Start button positions ...................................................................6-10
Remote start ........................................................................\
.............................. 6-13
Starting the engine ........................................................................\
....................6-1
1
Turning of
f the engine
........................................................................\
.............. 6-12
Explanation of scheduled maintenance items
...................................................... 9-14
Fuel filter (for gasoline engine) ........................................................................\
9-14
Parking brake ........................................................................\
............................ 9-15
Exterior features
........................................................................\
........................... 5-67
Fuel filler door ........................................................................\
.......................... 5-77
Hood ........................................................................\
......................................... 5-67
Liftgate ........................................................................\
.....................................5-68
Power liftgate ........................................................................\
...........................5-70
Smart liftgate ........................................................................\
............................ 5-75