2021 HYUNDAI SANTA FE climate control
[x] Cancel search: climate controlPage 349 of 636
06
6-61
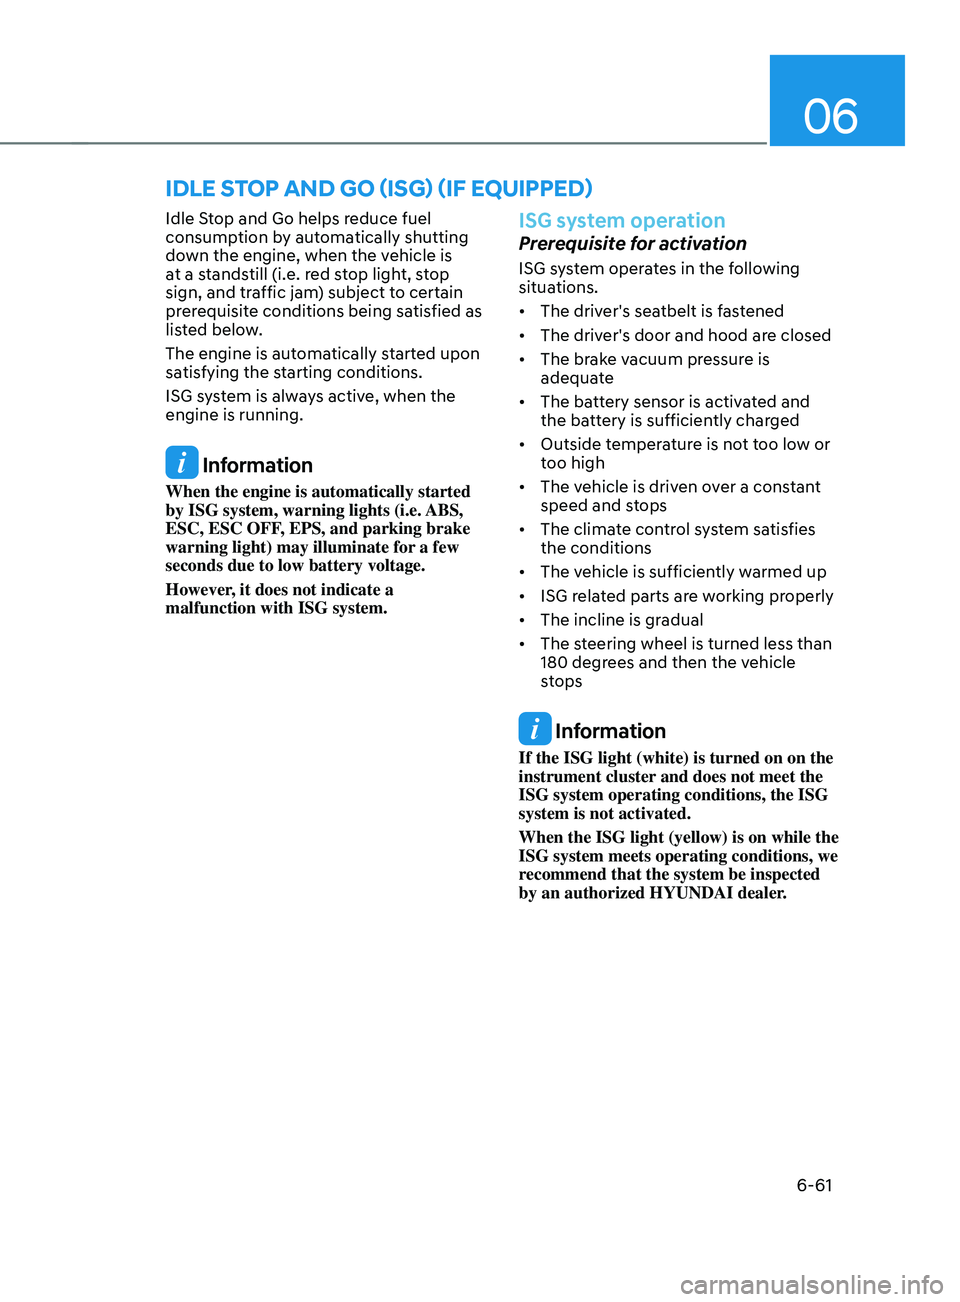
IDLE sTOp AnD gO (Isg) (IF EQUIppED)
Idle Stop and Go helps reduce fuel
consumption by automatically shutting
down the engine, when the vehicle is
at a standstill (i.e. red stop light, stop
sign, and traffic jam) subject to certain
prerequisite conditions being satisfied as
listed below.
The engine is automatically started upon
satisfying the starting conditions.
ISG system is always active, when the
engine is running.
Information
When the engine is automatically started
by ISG system, warning lights (i.e. ABS,
ESC, ESC OFF, EPS, and parking brake
warning light) may illuminate for a few
seconds due to low battery voltage.
However, it does not indicate a
malfunction with ISG system.
ISG system operation
Prerequisite for activation
ISG system operates in the following
situations.
• The driver's seatbelt is fastened
• The driver's door and hood are closed
• The brake vacuum pressure is
adequate
• The battery sensor is activated and
the battery is sufficiently charged
• Outside temperature is not too low or
too high
• The vehicle is driven over a constant
speed and stops
• The climate control system satisfies
the conditions
• The vehicle is sufficiently warmed up
• ISG related parts are working properly
• The incline is gradual
• The steering wheel is turned less than
180 degrees and then the vehicle
stops
Information
If the ISG light (white) is turned on on the
instrument cluster and does not meet the
ISG system operating conditions, the ISG
system is not activated.
When the ISG light (yellow) is on while the
ISG system meets operating conditions, we
recommend that the system be inspected
by an authorized HYUNDAI dealer.
Page 352 of 636
Driving your vehicle
6-64
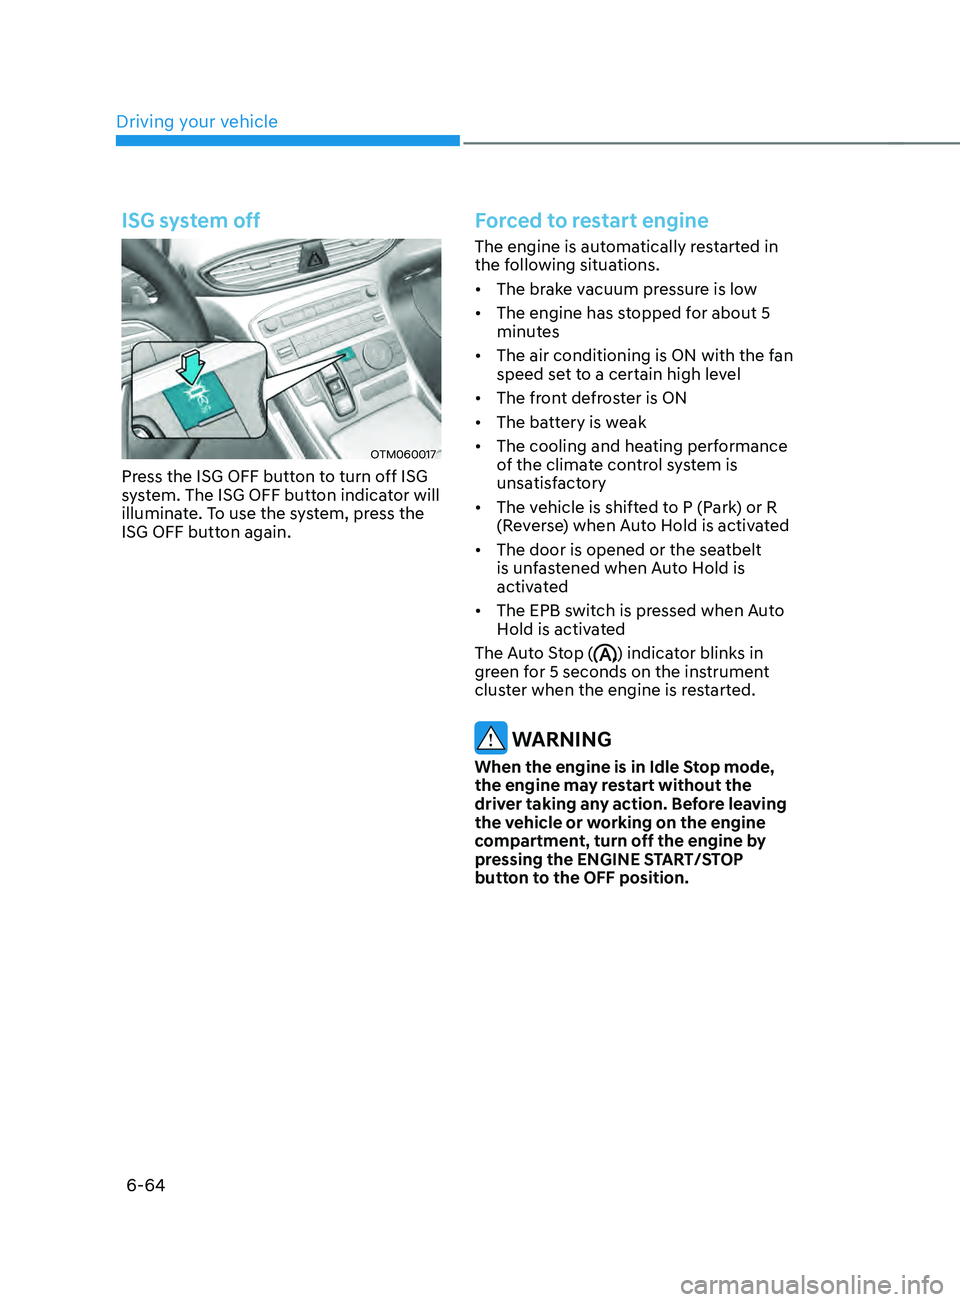
ISG system off
OTM060017
Press the ISG OFF button to turn off ISG
system. The ISG OFF button indicator will
illuminate. To use the system, press the
ISG OFF button again.
Forced to restart engine
The engine is automatically restarted in
the following situations.
• The brake vacuum pressure is low
• The engine has stopped for about 5
minutes
• The air conditioning is ON with the fan
speed set to a certain high level
• The front defroster is ON
• The battery is weak
• The cooling and heating performance
of the climate control system is
unsatisfactory
• The vehicle is shifted to P (Park) or R
(Reverse) when Auto Hold is activated
• The door is opened or the seatbelt
is unfastened when Auto Hold is
activated
• The EPB switch is pressed when Auto
Hold is activated
The Auto Stop (
) indicator blinks in
green for 5 seconds on the instrument
cluster when the engine is restarted.
WARNING
When the engine is in Idle Stop mode,
the engine may restart without the
driver taking any action. Before leaving
the vehicle or working on the engine
compartment, turn off the engine by
pressing the ENGINE START/STOP
button to the OFF position.
Page 561 of 636
09
9-11
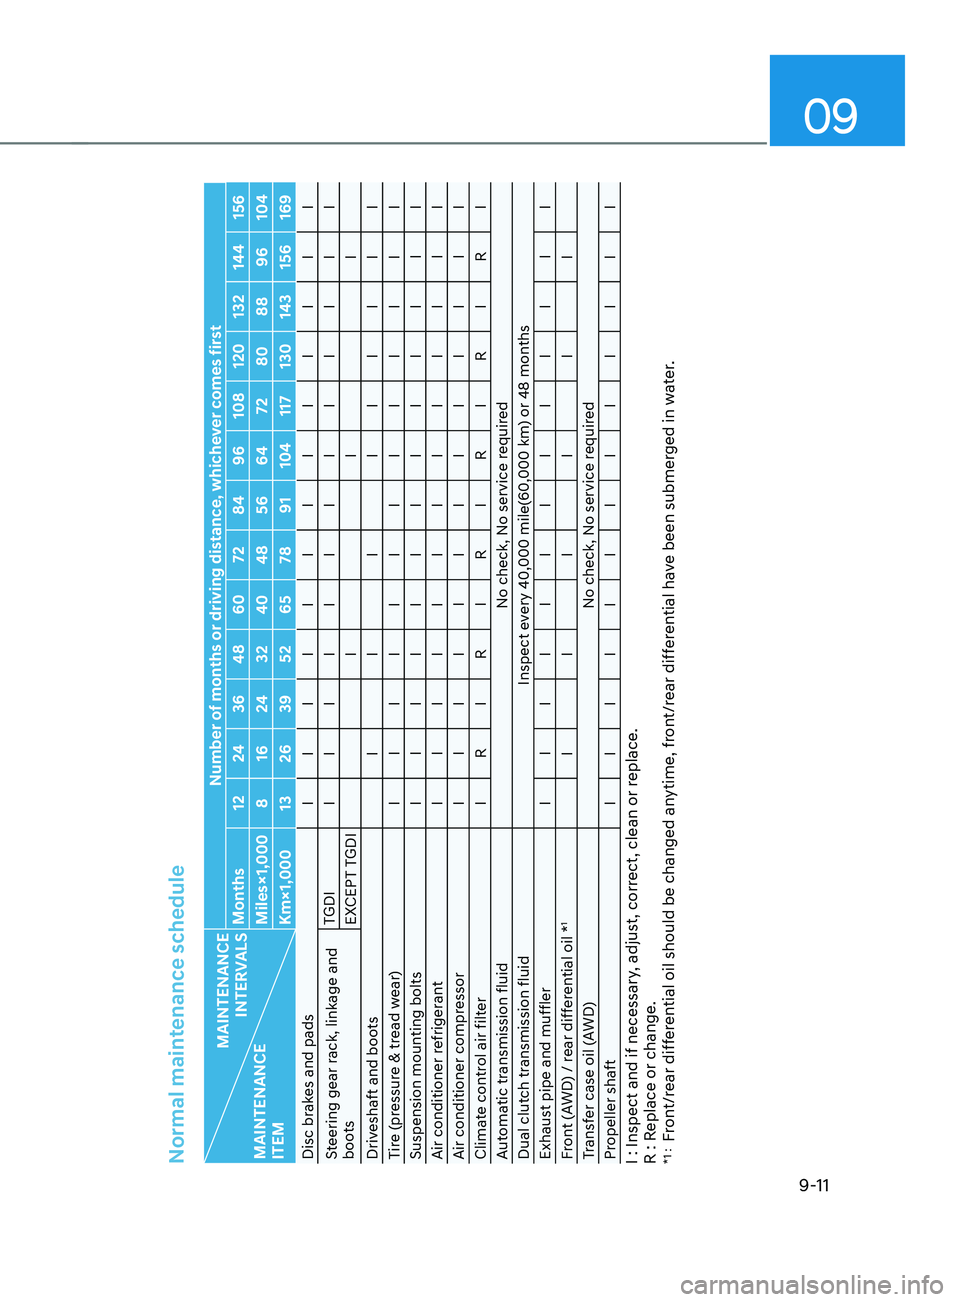
Normal maintenance schedule
MAINTENANCE INTERVALS
MAINTENANCE
ITEM Number of months or driving distance, whichever comes first
Months 12 24 36 48 60 72 84 96 108 120 132 144 156
Miles×1,000 8 16 24 32 40 48 56 64 72 80 88 96 104
Km×1,000 13 26 39 52 65 78 91 104 117 130 143 156 169
Cooling system Inspect coolant level for leak every day
At first, inspect 40,000 miles (60,000 km) or 48 months.
After that, inspect every 20,000 miles (30,000 km) or 24 months
Engine coolant TGDI
At first, replace at 80,000 miles (130,000 km) or 10 years.
After that, replace every 24,000 miles (39,000 km) or 24 months
EXCEPT TGDI At first, replace at 120,000 miles (200,000 km) or 120 months.
After that, replace every 30,000 miles (50,000 km) or 24 months
Battery condition I I I I I I I I I I I I I
Brake lines, hoses and connections I I I I I I I I I I I I I
Brake pedal IIIIII
Parking brake (if equipped) IIIIII
Brake fluid TGDI
Inspect every 6,000 miles (10,000 km) or 12 months,
Replace every 48,000 miles (80,000 km) or 48 months
EXCEPT TGDI Inspect every 7,500 miles (12,000 km) or 12 months,
Replace every 60,000 miles (96,000 km) or 48 monthsI : Inspect and if necessary, adjust, correct, clean or replace.
R : Replace or change.Normal maintenance schedule
MAINTENANCE
INTERVALS
MAINTENANCE
ITEM Number of months or driving distance, whichever comes first
Months 12 24 36 48 60 72 84 96 108 120 132 144 156
Miles×1,000 8 16 24 32 40 48 56 64 72 80 88 96 104
Km×1,000 13 26 39 52 65 78 91 104 117 130 143 156 169
Disc brakes and pads I I I I I I I I I I I I I
Steering gear rack, linkage and
boots TGDI
I I I I I I I I I I I I I
EXCEPT TGDI III
Driveshaft and boots IIII I I I I I
Tire (pressure & tread wear) I I I I I I I I I I I I I
Suspension mounting bolts I I I I I I I I I I I I I
Air conditioner refrigerant I I I I I I I I I I I I I
Air conditioner compressor I I I I I I I I I I I I I
Climate control air filter I R I R I R I R I R I R I
Automatic transmission fluid No check, No service required
Dual clutch transmission fluid Inspect every 40,000 mile(60,000 km) or 48 months
Exhaust pipe and muffler I I I I I I I I I I I I I
Front (AWD) / rear differential oil *
1
I IIIII
Transfer case oil (AWD) No check, No service required
Propeller shaft I I I I I I I I I I I I I
I : Inspect and if necessary, adjust, correct, clean or replace.
R : Replace or change.*1 : Front/rear differential oil should be changed anytime, front/rear differential have been submerged in water.
Page 563 of 636
09
9-13
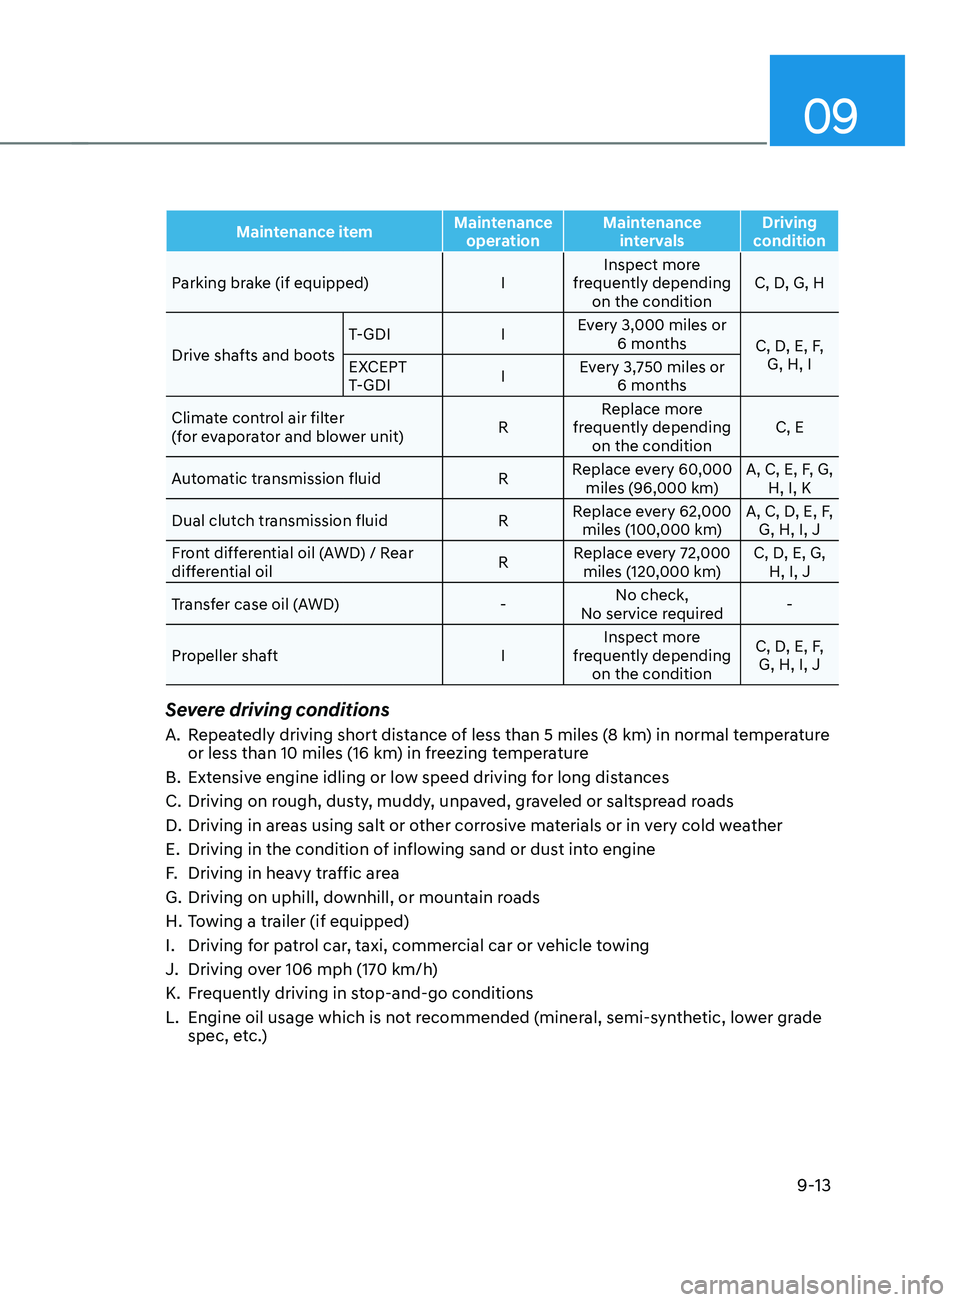
Maintenance itemMaintenance
operation Maintenance
intervals Driving
condition
Parking brake (if equipped) IInspect more
frequently depending on the condition C, D, G, H
Drive shafts and boots T-GDI
IEvery 3,000 miles or
6 months C, D, E, F,
G, H, I
EXCEPT
T-GDI IEvery 3,750 miles or
6 months
Climate control air filter
(for evaporator and blower unit) RReplace more
frequently depending on the condition C, E
Automatic transmission fluid RReplace every 60,000
miles (96,000 km) A, C, E, F, G,
H, I, K
Dual clutch transmission fluid RReplace every 62,000
miles (100,000 km) A, C, D, E, F,
G, H, I, J
Front differential oil (AWD) / Rear
differential oil RReplace every 72,000
miles (120,000 km) C, D, E, G,
H, I, J
Transfer case oil (AWD) -No check,
No service required -
Propeller shaft IInspect more
frequently depending on the condition C, D, E, F,
G, H, I, J
Severe driving conditions
A. Repeatedly driving short distance of less than 5 miles (8 km) in normal temperature
or less than 10 miles (16 km ) in freezing temperature
B.
Extensiv
e engine idling or low speed driving for long distances
C.
Driving on rough, dus
ty, muddy, unpaved, graveled or saltspread roads
D.
Driving in areas using salt or o
ther corrosive materials or in very cold weather
E.
Driving in the condition of in
flowing sand or dust into engine
F.
Driving in heavy tr
affic area
G.
Driving on uphill, downhill, or moun
tain roads
H.
To
wing a trailer (if equipped)
I.
Driving for pa
trol car, taxi, commercial car or vehicle towing
J.
Driving ov
er 106 mph (170 km/h)
K.
Fr
equently driving in stop-and-go conditions
L.
Engine oil usage which is no
t recommended (mineral, semi-synthetic, lower grade
spec, etc.)
Page 572 of 636
Maintenance9-22
WASHER FL UID
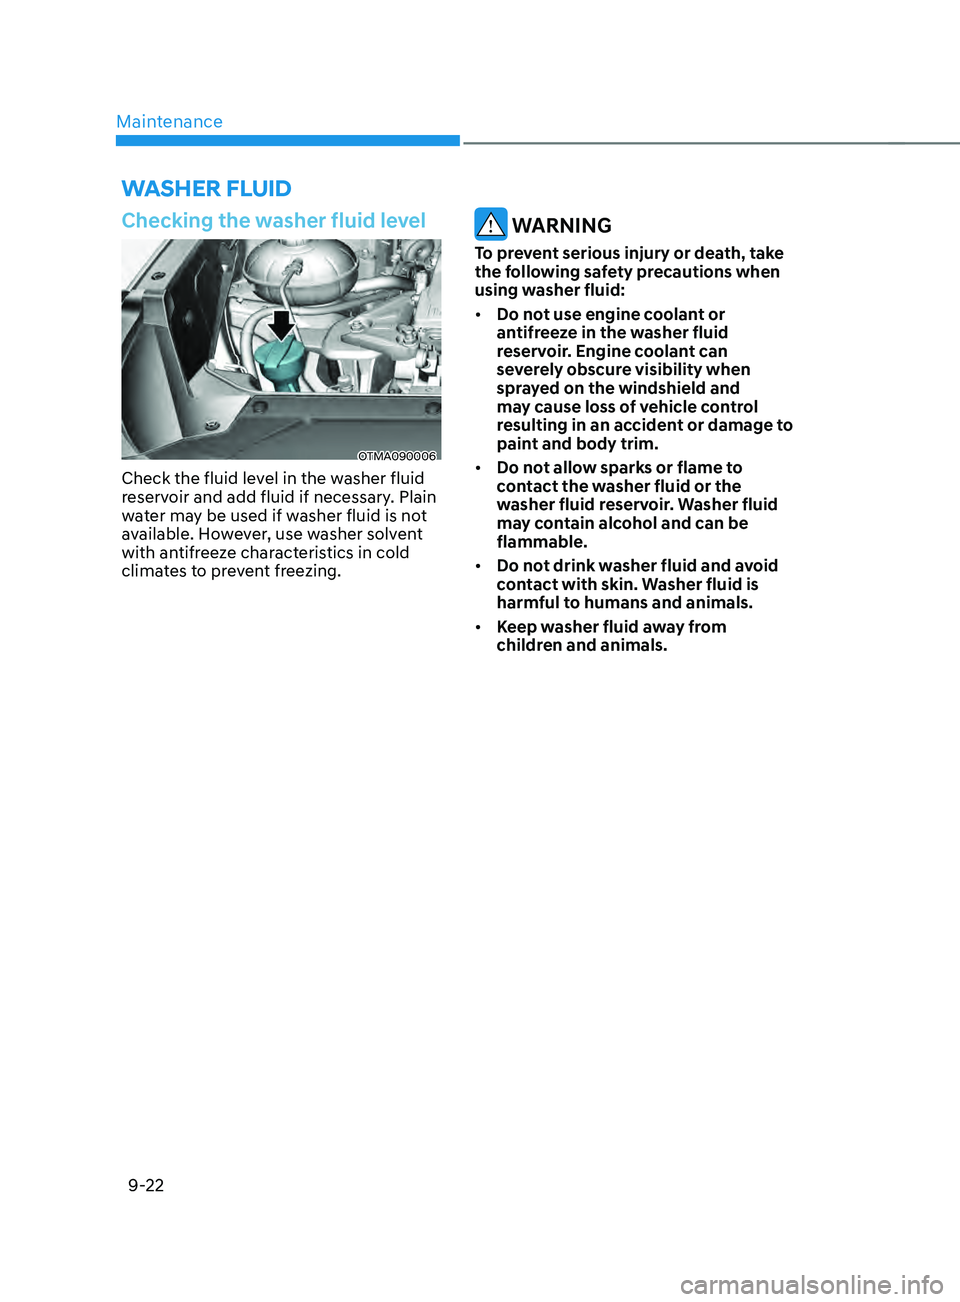
Checking the washer fluid level
OTMA090006
Check the fluid level in the washer fluid
reservoir and add fluid if necessary. Plain
water may be used if washer fluid is not
available. However, use washer solvent
with antifreeze characteristics in cold
climates to prevent freezing.
WARNING
To prevent serious injury or death, take
the following safety precautions when
using washer fluid:
• Do not use engine coolant or
antifreeze in the washer fluid
reservoir. Engine coolant can
severely obscure visibility when
sprayed on the windshield and
may cause loss of vehicle control
resulting in an accident or damage to
paint and body trim.
• Do not allow sparks or flame to
contact the washer fluid or the
washer fluid reservoir. Washer fluid
may contain alcohol and can be
flammable.
• Do not drink washer fluid and avoid
contact with skin. Washer fluid is
harmful to humans and animals.
• Keep washer fluid away from
children and animals.
Page 581 of 636
09
9-31
• The negative battery cable must
be removed first and installed last
when the battery is disconnected.
Disconnect the battery charger in the
following order:
1.
Turn o
ff the battery charger main
switch.
2.
Unhook the nega
tive clamp from
the negative battery terminal.
3.
Unhook the positiv
e clamp from
the positive battery terminal.
• We recommend that you use
batteries for replacement from an
authorized HYUNDAI dealer.
NOTICE
AGM battery (if equipped)
• Absorbent Glass Matt (AGM)
batteries are maintenance-free
and we recommend that the AGM
battery be serviced by an authorized
HYUNDAI dealer. For charging
your AGM battery, use only fully
automatic battery chargers that
are specially developed for AGM
batteries.
• When replacing the AGM battery,
we recommend that you use parts
for replacement from an authorized
HYUNDAI dealer.
• Do not open or remove the cap on
top of the battery. This may cause
leaks of internal electrolyte that
could result in severe injury.
By jump starting
After a jump start from a good battery,
drive the vehicle for 20-30 minutes
before it is shutoff. The vehicle may
not restart if you shut it off before the
battery had a chance to adequately
recharge. See “Jump Starting” in chapter
6 for more information on jump starting
procedures.
Information
An inappropriately disposed
battery can be harmful to the
environment and human health.
Dispose of the battery according
to your local law(s) or regulation.
Reset items
The following items may need to be reset
after the battery has been discharged or
the battery has been disconnected.
• Auto up/down window (see chapter 5)
• Sunroof (see chapter 5)
• Trip computer (see chapter 5)
• Climate control system (see chapter 5)
• Driver position memory system (see
chapter 5)
• Clock (see chapter 5)
• Infotainment system (see
infotainment system manual)
Page 585 of 636
09
9-35
Wheel alignment and tire
balance
The wheels on your vehicle were aligned
and balanced carefully at the factory to
give you the longest tire life and best
overall performance.
In most cases, you will not need to have
your wheels aligned again. However,
if you notice unusual tire wear or your
vehicle pulling one way or the other, the
alignment may need to be reset.
If you notice your vehicle vibrating when
driving on a smooth road, your wheels
may need to be rebalanced.
NOTICE
Incorrect wheel weights can damage
your vehicle’s aluminum wheels. Use
only approved wheel weights.
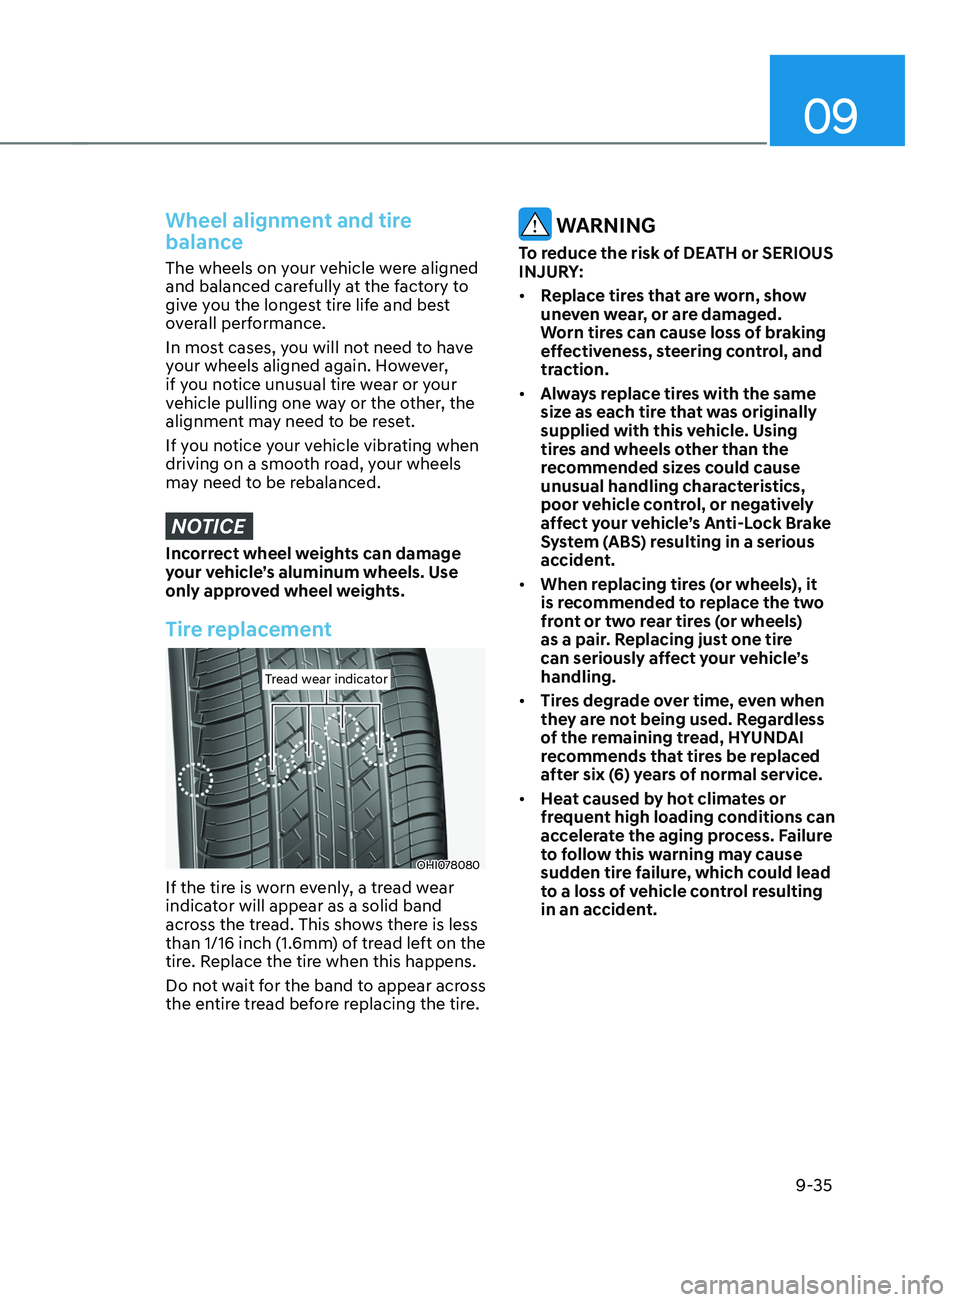
Tire replacement
Tread wear indicatorTread wear indicator
OHI078080
If the tire is worn evenly, a tread wear
indicator will appear as a solid band
across the tread. This shows there is less
than 1/16 inch (1.6mm) of tread left on the
tire. Replace the tire when this happens.
Do not wait for the band to appear across
the entire tread before replacing the tire.
WARNING
To reduce the risk of DEATH or SERIOUS
INJURY:
• Replace tires that are worn, show
uneven wear, or are damaged.
Worn tires can cause loss of braking
effectiveness, steering control, and
traction.
• Always replace tires with the same
size as each tire that was originally
supplied with this vehicle. Using
tires and wheels other than the
recommended sizes could cause
unusual handling characteristics,
poor vehicle control, or negatively
affect your vehicle’s Anti-Lock Brake
System (ABS) resulting in a serious
accident.
• When replacing tires (or wheels), it
is recommended to replace the two
front or two rear tires (or wheels)
as a pair. Replacing just one tire
can seriously affect your vehicle’s
handling.
• Tires degrade over time, even when
they are not being used. Regardless
of the remaining tread, HYUNDAI
recommends that tires be replaced
after six (6) years of normal service.
• Heat caused by hot climates or
frequent high loading conditions can
accelerate the aging process. Failure
to follow this warning may cause
sudden tire failure, which could lead
to a loss of vehicle control resulting
in an accident.
Page 589 of 636
09
9-39
7. Uniform tire quality grading
Quality grades can be found where
applicable on the tire sidewall between
tread shoulder and maximum section
width.
For example:
TREADWEAR 200
TRACTION AA
TEMPERATURE A
Tread wear
The tread wear grade is a comparative
rating based on the wear rate of the tire
when tested under controlled conditions
on a specified government test course.
For example, a tire graded 150 would
wear one-and-a-half times (1½) as well
on the government course as a tire
graded 100.
The relative performance of tires
depends upon the actual conditions
of their use, however, and may depart
significantly from the norm due to
variations in driving habits, service
practices and differences in road
characteristics and climate.
These grades are molded on the
sidewalls of passenger vehicle tires. The
tires available as standard or optional
equipment on your vehicle may vary with
respect to grade.Traction - AA, A, B & C
The traction grades, from highest to
lowest, are AA, A, B and C. Those grades
represent the tire’s ability to stop on wet
pavement as measured under controlled
conditions on specified government
test surfaces of asphalt and concrete.
A tire marked C may have poor traction
performance.
WARNING
The traction grade assigned to this
tire is based on straight ahead braking
traction tests, and does not include
acceleration, cornering, hydroplaning,
or peak traction characteristics.
Temperature - A, B & C
The temperature grades are A (the
highest), B and C representing the tire’s
resistance to the generation of heat
and its ability to dissipate heat when
tested under controlled conditions on a
specified indoor laboratory test wheel.
Sustained high temperature can cause
the material of the tire to degenerate
and reduce tire life, and excessive
temperature can lead to sudden tire
failure. Grades B and A represent higher
levels of performance on the laboratory
test wheel than the minimum required
by law.