2021 HYUNDAI SANTA FE turn signal
[x] Cancel search: turn signalPage 263 of 636
05
5-119
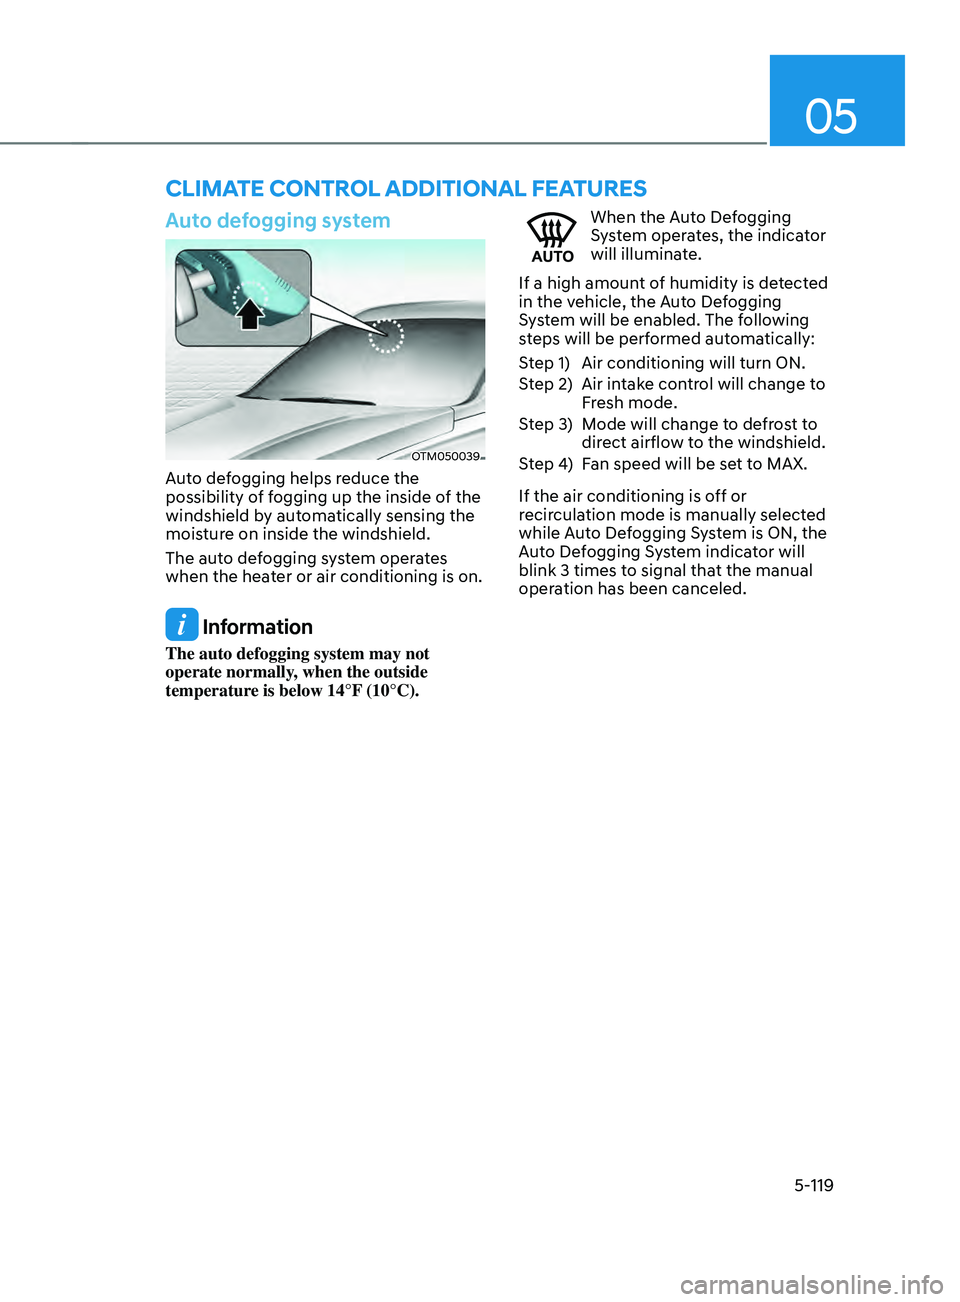
Auto defogging system
OTM050039
Auto defogging helps reduce the
possibility of fogging up the inside of the
windshield by automatically sensing the
moisture on inside the windshield.
The auto defogging system operates
when the heater or air conditioning is on.
Information
The auto defogging system may not
operate normally, when the outside
temperature is below 14°F (10°C).
When the Auto Defogging
System operates, the indicator
will illuminate.
If a high amount of humidity is detected
in the vehicle, the Auto Defogging
System will be enabled. The following
steps will be performed automatically:
Step 1) Air conditioning will turn ON.
Step 2) Air intake control will change to Fresh mode.
Step 3) Mode will change to defrost to direct airflow to the windshield.
Step 4) Fan speed will be set to MAX.
If the air conditioning is off or
recirculation mode is manually selected
while Auto Defogging System is ON, the
Auto Defogging System indicator will
blink 3 times to signal that the manual
operation has been canceled.
CLIMATE CONTROL ADDITIONAL FEATURES
Page 264 of 636
Convenient features
5-120
Turning the Auto Defogging System
ON or OFF
Climate control system
Press the front windshield defroster
button for 3 seconds when the Engine
Start/Stop button is in the ON position.
When the Auto Defogging System is
turned off, the ADS OFF symbol will blink
3 times and ADS OFF will be displayed on
the climate control information screen.
When the Auto Defogging System is
turned on, the ADS OFF symbol will blink
6 times without a signal.
Infotainment system
Auto Defogging System can be turned
on
and o
ff
b
y
selecting ‘Se
tup
→ Vehicle Se
ttings
→ Clima
te
→ De
fog/
Defrost
Op
tions
→ A
uto
De
fog’
fr
om
the inf
otainment system screen.
For detailed information, refer to the
separately supplied infotainment
system manual.
Information
• When the air conditioning is turned
on by Auto Defogging System, if you
try to turn off the air conditioning, the
indicator will blink 3 times and the air
conditioning will not be turned off.
• To maintain the effectiveness and
efficiency of the Auto Defogging
System, do not select Recirculation
mode while the system is operating.
• When Auto Defogging System is
operating, fan speed adjustment,
temperature adjustment, and air intake
control selection are all disabled.
NOTICE
Do not remove the sensor cover located
on the upper end of the windshield
glass.
Damage to system parts could occur
and may not be covered by your vehicle
warranty.
Auto dehumidify (if equipped)
To increase cabin air quality and reduce
windshield misting, recirculation mode
switches off automatically after about 5
to 30 minutes, depending on the outside
temperature, and the air intake will
change to fresh mode.
Turning Auto Dehumidify ON or OFF
Climate control system
To turn the Auto Dehumidify feature
on or off, select Face level (
) mode
and press the air intake control ()
button at least five times within three
seconds. When Auto Dehumidify is
turned on, the air intake control button
indicator will blink 6 times. When turned
off, the indicator will blink 3 times.
Infotainment system
Auto Dehumidify can be turned on and
off
b
y
selecting ‘Se
tup
→ V
ehicle
Se
ttings
→ Clima
te
→ A
utomatic
V
entilation
→ Aut
o Dehumidify’ from the infotainment
system screen.
For detailed information, refer to the
separately supplied infotainment
system manual.
Page 373 of 636
06
6-85
Backing up
Hold the bottom of the steering wheel
with one hand. Then, to move the trailer
to the left, move your hand to the left. To
move the trailer to the right, move your
hand to the right. Always back up slowly
and, if possible, have someone guide
you.
Making turns
When you’re turning with a trailer, make
wider turns than normal. Do this so your
trailer won’t strike soft shoulders, curbs,
road signs, trees, or other objects. Avoid
jerky or sudden maneuvers. Signal well in
advance.
Turn signals
When you tow a trailer, your vehicle has
to have a different turn signal flasher and
extra wiring. The green arrows on your
instrument panel will flash whenever you
signal a turn or lane change. Properly
connected, the trailer lights will also flash
to alert other drivers you’re about to turn,
change lanes, or stop.
When towing a trailer, the green arrows
on your instrument panel will flash for
turns even if the bulbs on the trailer
are burned out. Thus, you may think
drivers behind you are seeing your
signals when, in fact, they are not. It’s
important to check occasionally to be
sure the trailer bulbs are still working.
You must also check the lights every time
you disconnect and then reconnect the
wires.
WARNING
Do not connect a trailer lighting system
directly to your vehicle’s lighting
system. Use an approved trailer wiring
harness. Failure to do so could result in
damage to the vehicle electrical system
and/or personal injury. We recommend
that you consult an authorized
HYUNDAI dealer for assistance.
Driving on hills
Reduce speed and shift to a lower gear
before you start down a long or steep
downgrade. If you don’t shift down, you
might have to use your brakes so much
that they would get overheated and may
not operate efficiently.
On a long uphill grade, shift down and
reduce your speed to around 45 mph (70
km/h) to reduce the possibility of engine
and transmission overheating.
If your trailer weighs more than the
maximum trailer weight without trailer
brakes and you have a automatic
transmission, you should drive in D
(Drive) when towing a trailer.
Operating your vehicle in D (Drive)
when towing a trailer will minimize heat
build-up and extend the life of your
transmission.
Page 384 of 636
Driver assistance system
7-2
FORWARD COLLIsIOn–AVOIDAnCE A ssIsT (F CA) (sEnsOR
FUsIOn)
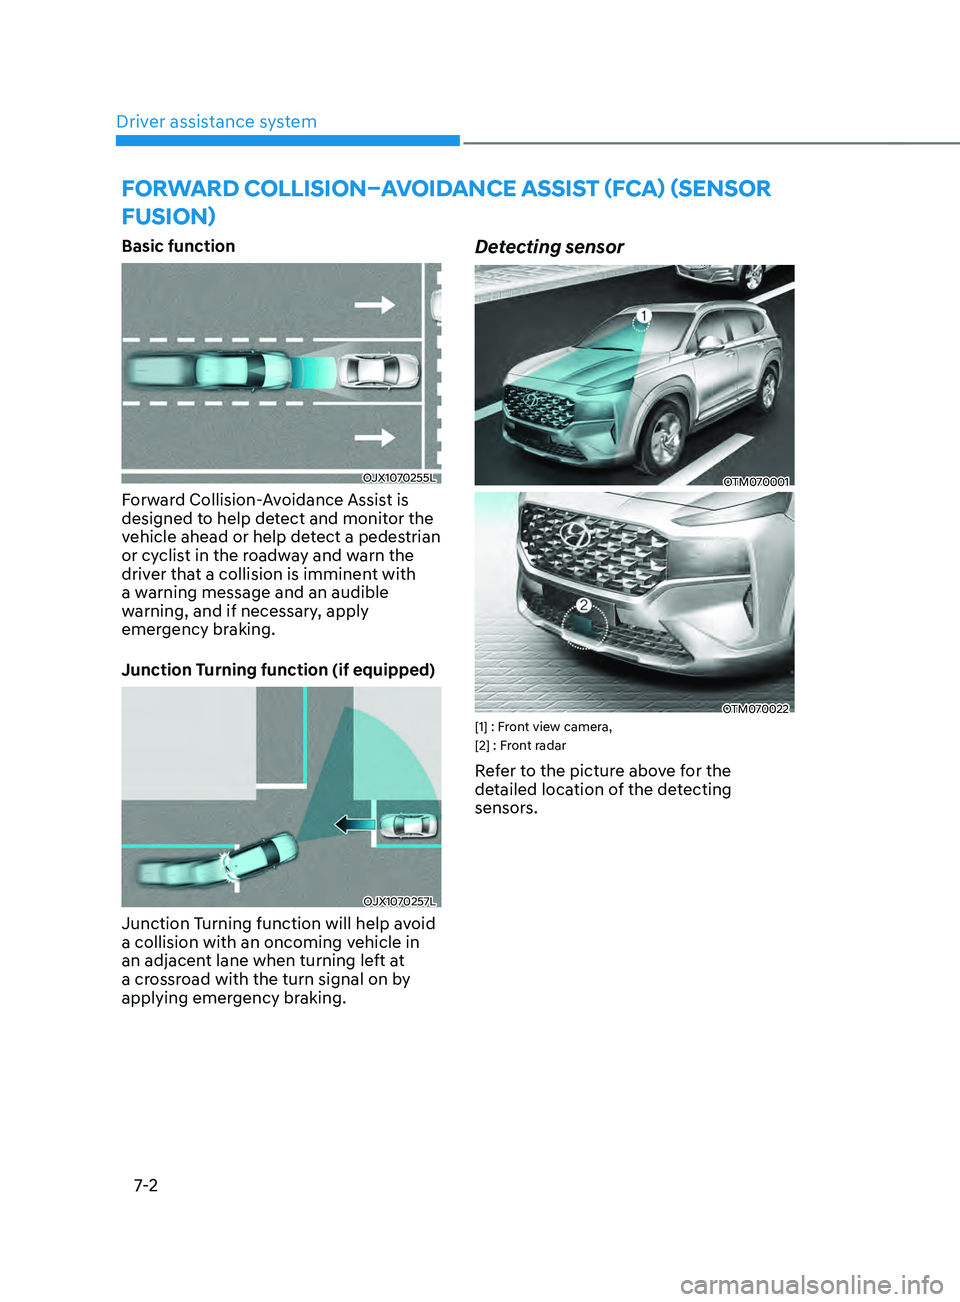
Basic function
OJX1070255L
Forward Collision-Avoidance Assist is
designed to help detect and monitor the
vehicle ahead or help detect a pedestrian
or cyclist in the roadway and warn the
driver that a collision is imminent with
a warning message and an audible
warning, and if necessary, apply
emergency braking.
Junction Turning function (if equipped)
OJX1070257L
Junction Turning function will help avoid
a collision with an oncoming vehicle in
an adjacent lane when turning left at
a crossroad with the turn signal on by
applying emergency braking.
Detecting sensor
OTM070001
OTM070022[1] : Front view camera,
[2] : Front radar
Refer to the picture above for the
detailed location of the detecting
sensors.
Page 400 of 636
Driver assistance system7-18
LAnE kEEpIng AssIsT (LkA)
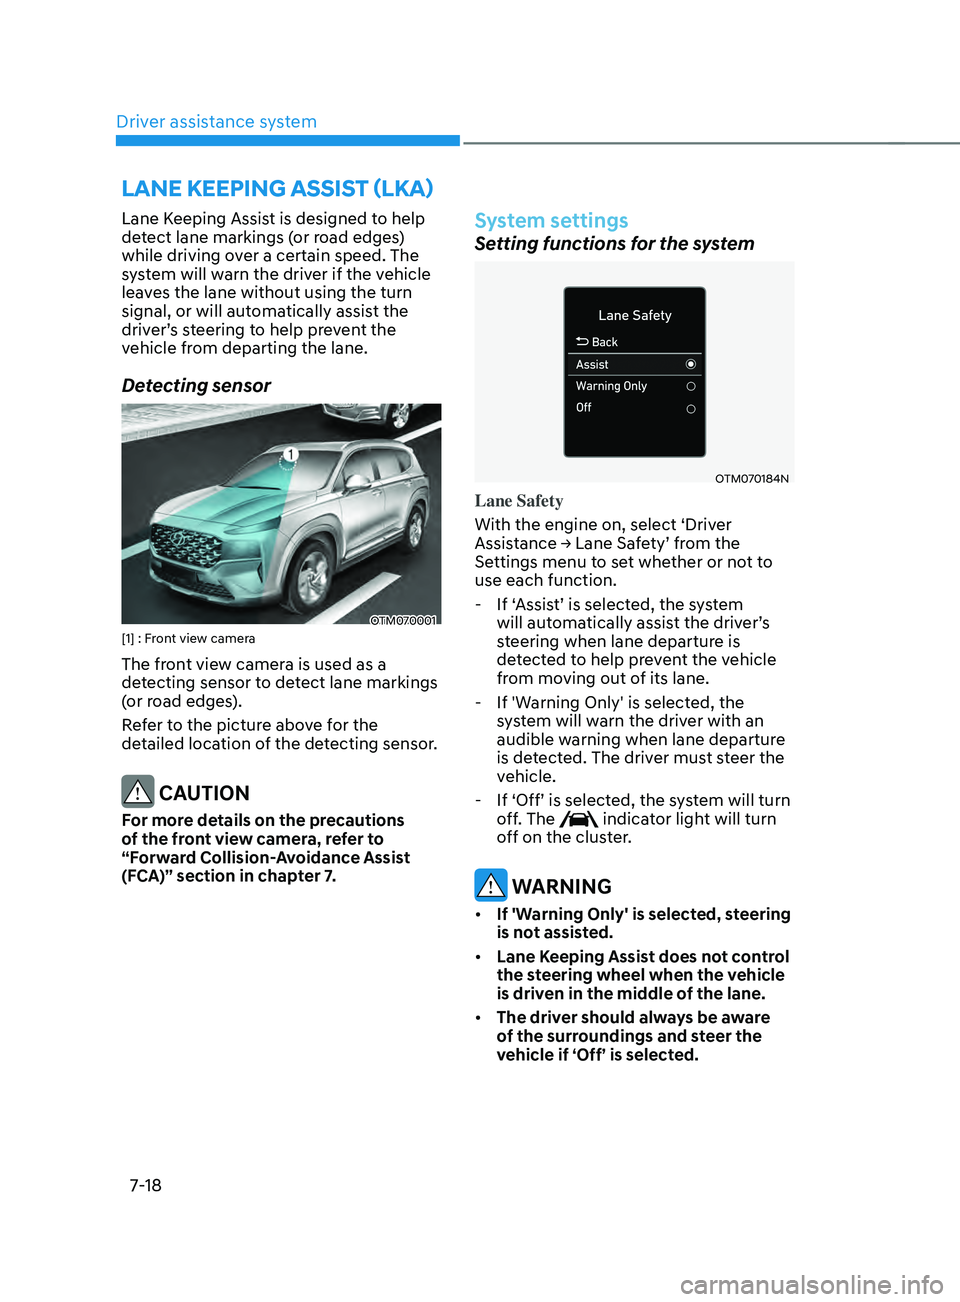
Lane Keeping Assist is designed to help
detect lane markings (or road edges)
while driving over a certain speed. The
system will warn the driver if the vehicle
leaves the lane without using the turn
signal, or will automatically assist the
driver’s steering to help prevent the
vehicle from departing the lane.
Detecting sensor
OTM070001[1] : Front view camera
The front view camera is used as a
detecting sensor to detect lane markings
(or road edges).
Refer to the picture above for the
detailed location of the detecting sensor.
CAUTION
For more details on the precautions
of the front view camera, refer to
“Forward Collision-Avoidance Assist
(FCA)” section in chapter 7.
System settings
Setting functions for the system
OTM070184N
Lane Safety
With the engine on, select ‘Driver
Assistance
→ Lane Sa
fety’
fr
om
the Settings menu t
o set whether or not to
use each function.
- If ‘Assis
t’ is selected, the system
will automatically assist the driver’s
steering when lane departure is
detected to help prevent the vehicle
from moving out of its lane.
- If 'Warning Only' is select
ed, the
system will warn the driver with an
audible warning when lane departure
is detected. The driver must steer the
vehicle.
- If ‘Off’ is selected, the s
ystem will turn
off. The
indicator light will turn
off on the cluster.
WARNING
• If 'Warning Only' is selected, steering
is not assisted.
• Lane Keeping Assist does not control
the steering wheel when the vehicle
is driven in the middle of the lane.
• The driver should always be aware
of the surroundings and steer the
vehicle if ‘Off’ is selected.
Page 406 of 636
Driver assistance system
7-24
• If any other system’s warning
message is displayed or audible
warning is generated, Lane Keeping
Assist warning message may not be
displayed and audible warning may
not be generated.
• You may not hear the warning
sound of Lane Keeping Assist if the
surrounding is noisy.
• If you attach objects to the steering
wheel, steering may not be assisted
properly.
• Lane Keeping Assist may not operate
for 15 seconds after the vehicle is
started, or the front view camera is
initialized.
• Lane Keeping Assist will not operate
when:
-The turn signal or hazard w
arning
flasher is turned on
- The vehicle is no
t driven in the
center of the lane when the system
is turned on or right after changing
a lane
- ESC (Electronic S
tability Control)
or VSM (Vehicle Stability
Management) is activated
- The vehicle is driv
en on a sharp
curve
- 35 mph (55 km/h) or abo
ve 130
mph (210 km/h)
- The vehicle mak
es sharp lane
changes
- The vehicle br
akes suddenly
Page 412 of 636
Driver assistance system
7-30
Collision Warning
• Collision warning will operate when
the turn signal is turned on in the
direction of the detected vehicle.
• If ‘Warning Only’ is selected from the
Settings menu, the collision warning
will operate when your vehicle
approaches the lane the blind spot
vehicle is detected.
• To warn the driver of a collision, the
warning light on the side view mirror
and head-up display (if equipped) will
blink. At the same time, an audible
warning will sound.
• When the turn signal is turned off or
you move away from the lane, the
collision warning will be canceled
and the system will return to vehicle
detection state. WARNING
• The detecting range of the rear
corner radar is determined by a
standard road width, therefore, on a
narrow road, the system may detect
other vehicles in the next next lane
and warn you. In contrast, on a wide
road, the system may not be able to
detect a vehicle driving in the next
lane and may not warn you.
• When the hazard warning flasher is
on, the collision warning by the turn
signal will not operate.
Information
If the driver's seat is on the left side, the
collision warning may occur when you
turn left. Maintain a proper distance with
the vehicles in the left lane. If the driver's
seat is on the right side, the collision
warning may occur when you turn right.
Maintain a proper distance with the
vehicles in the right lane.
Page 433 of 636
07
7-51
bLInD-spOT VIEW mOnITOR (bVm) (IF EQUIppED)
„„Left side„„Right side
OTM070014OTM070015
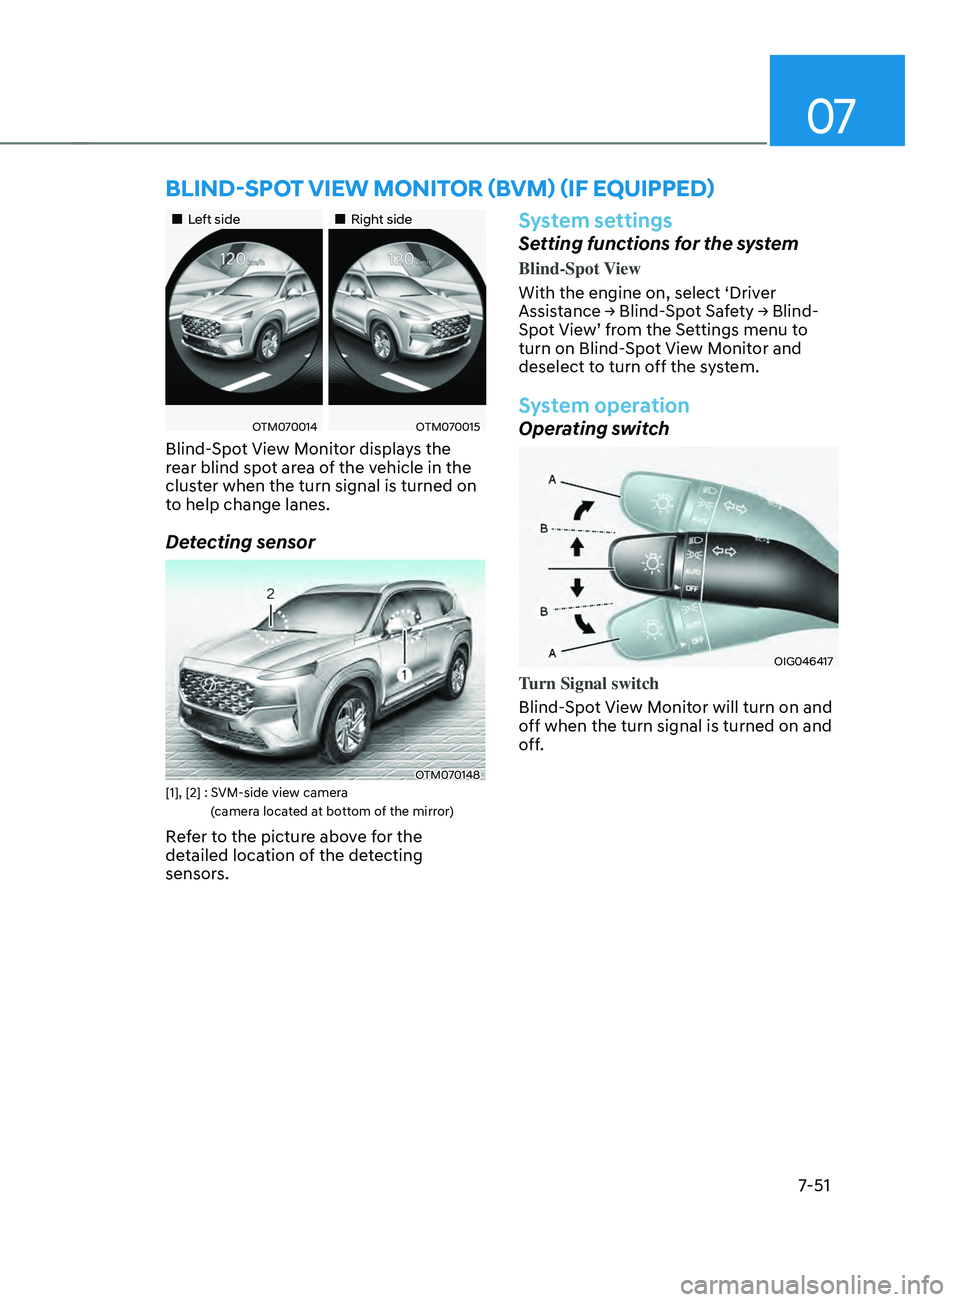
Blind-Spot View Monitor displays the
rear blind spot area of the vehicle in the
cluster when the turn signal is turned on
to help change lanes.
Detecting sensor
OTM070148[1], [2] : SVM-side view camera
(
camera located at bottom of the mirror)
Refer to the picture above for the
detailed location of the detecting
sensors.
System settings
Setting functions for the system
Blind-Spot View
With the engine on, select ‘Driver
Assistance
→ Blind-
Spot
Sa
fety
→ Blind-
Spo
t View’ from the Settings menu to
turn on Blind-Spot View Monitor and
deselect to turn off the system.
System operation
Operating switch
OIG046417
Turn Signal switch
Blind-Spot View Monitor will turn on and
off when the turn signal is turned on and
off.