2021 HYUNDAI SANTA FE LIMITED engine overheat
[x] Cancel search: engine overheatPage 526 of 636
Emergency situations
8-8
6. If you cannot find the cause of the
overheating, wait until the engine
temperature has returned to normal.
Then, if coolant has been lost,
carefully add coolant to the reservoir
to bring the fluid level in the reservoir
up to the halfway mark.
7.
Proceed with caution, k
eeping alert
for further signs of overheating.
If overheating happens again,
we recommend that you call an
authorized HYUNDAI dealer for
assistance. CAUTION
• Serious loss of coolant indicates a
leak in the cooling system and we
recommend the system be checked
by an authorized HYUNDAI dealer.
• When the engine overheats from
low engine coolant, suddenly adding
engine coolant may cause cracks
in the engine. To prevent damage,
add engine coolant slowly in small
quantities. It may require several
refilling cycles to properly fill the
engine cooling system. If necessary,
an authorized HYUNDAI dealer
should be consulted to perform this
task.
Page 528 of 636
Emergency situations
8-10
Tire pressure monitoring system
WARNING
Over-inflation or under-inflation can
reduce tire life, adversely affect vehicle
handling, and lead to sudden tire failure
that may cause loss of vehicle control
resulting in an accident.
Each tire, including the spare (if
provided), should be checked monthly
when cold and inflated to the inflation
pressure recommended by the vehicle
manufacturer on the vehicle placard
or tire inflation pressure label. (If your
vehicle has tires of a different size than
the size indicated on the vehicle placard
or tire inflation pressure label, you should
determine the proper tire inflation
pressure for those tires.)
As an added safety feature, your
vehicle has been equipped with a tire
pressure monitoring system (TPMS)
that illuminates a low tire pressure
telltale when one or more of your tires is
significantly under-inflated. Accordingly,
when the low tire pressure telltale
illuminates, you should stop and check
your tires as soon as possible, and inflate
them to the proper pressure. Driving on
a significantly under-inflated tire causes
the tire to overheat and can lead to tire
failure.
Under-inflation also reduces fuel
efficiency and tire tread life, and may
affect the vehicle’s handling and
stopping ability.
Please note that the TPMS is not a
substitute for proper tire maintenance,
and it is the driver’s responsibility to
maintain correct tire pressure, even if
under-inflation has not reached the level
to trigger illumination of the TPMS low
tire pressure telltale.
Your vehicle has also been equipped with
a TPMS malfunction indicator to indicate
when the system is not operating
properly. The TPMS malfunction
indicator is combined with the low
tire pressure telltale. When the system
detects a malfunction, the telltale will
flash for approximately one minute and
then remain continuously illuminated.
This sequence will continue upon
subsequent vehicle start-ups as long as
the malfunction exists.
When the malfunction indicator is
illuminated, the system may not be able
to detect or signal low tire pressure as
intended. TPMS malfunctions may occur
for a variety of reasons, including the
installation of replacement or alternate
tires or wheels on the vehicle that
prevent the TPMS from functioning
properly.
Always check the TPMS malfunction
telltale after replacing one or more tires
or wheels on your vehicle to ensure that
the replacement or alternate tires and
wheels allow the TPMS to continue to
function properly.
NOTICE
If any of the below happens, we
recommend that you have the system
checked by an authorized HYUNDAI
dealer.
1.
The Lo
w Tire Pressure Telltale/ TPMS
Malfunction Indicator does not
illuminate for 3 seconds when the
Engine Start/Stop button is pressed
to the ON position or when the
engine is running.
2.
The TPMS Malfunction Indica
tor
remains illuminated after blinking for
approximately 1 minute.
3.
The Lo
w Tire Pressure Position
Telltale remains illuminated.
Page 541 of 636
08
8-23
WARNING
Do not use the TMK if a tire is severely
damaged by driving run flat or with
insufficient air pressure.
Only punctured areas located within the
tread region of the tire can be sealed
using the TMK.
Notes on the safe use of the Tire
Mobility Kit
• Park your car at the side of the road
so that you can work with the Tire
Mobility Kit away from moving traffic.
• To be sure your vehicle will not move,
even when you’re on fairly level
ground, always set your parking brake.
• Only use the Tire Mobility Kit for
sealing/inflation passenger car tires.
Only punctured areas located within
the tread region of the tire can be
sealed using the tire mobility kit.
• Do not use on motorcycles, bicycles
or any other type of tires.
• When the tire and wheel are
damaged, do not use Tire Mobility Kit
for your safety.
• Use of the Tire Mobility Kit may not be
effective for tire damage larger than
approximately 4 mm (16 inch).
Please contact the nearest HYUNDAI
dealer if the tire cannot be made
roadworthy with the Tire Mobility Kit. •
Do not use the Tire Mobility Kit if a tire
is severely damaged by driving run flat
or with insufficient air pressure.
• Do not remove any foreign objects
such as nails or screws that have
penetrated the tire.
• Provided the car is outdoors, leave the
engine running. Otherwise operating
the compressor may eventually drain
the car battery.
• Never leave the Tire Mobility Kit
unattended while it is being used.
• Do not leave the compressor running
for more than 10 minutes at a time or
it may overheat.
• Do not use the Tire Mobility Kit if the
ambient temperature is below -22°F
(30°C).
• In case of skin contact with the
sealant, wash the area thoroughly
with plenty of water. If the irritation
persists, seek medical attention.
• In case of eye contact with the
sealant, flush your eyes for at least 15
minutes. If the irritation persists, seek
medical attention.
• In case of swallowing the sealant,
rinse the mouth and drink plenty of
water. However, never give anything
to an unconscious person and seek
medical attention immediately.
• Long time exposure to the sealant
may cause damage to bodily tissue
such as kidney, etc.
Page 546 of 636
Emergency situations
8-28
13. After driving approximately 4~6 miles
(7~10 km or about 10 minutes), stop at
a safe location.
OTM080009
14. Connect the connection hose (3) of
the compressor and tire into the tire
valve.
15. Connect cables (4) to the battery.
16. Adjust the tire inflation pressure to the
recommended tire inflation.
With the engine running, proceed as
follows.
-To incr
ease the inflation pressure:
Switch on the compressor.
To check the current inflation
pressure setting, briefly switch off
the compressor.
- To r
educe the inflation pressure:
Adjust the valve (9) for reducing
tire inflation pressure.
NOTICE
Do not let the compressor run for more
than 10 minutes, otherwise the device
will overheat and may be damaged.
Checking the tire inflation
pressure
1. After driving approximately 4~6 miles
(7~10 km or about 10 minut es), stop at
a safe location.
OTM080009
2. Connect the connection hose (3) o f
the compressor and tire into the tire
valve.
3.
Connect cables (4
) to the battery.
4.
Adjus
t the tire inflation pressure to the
recommended tire inflation.
With the engine running, proceed as
follows.
- To incr
ease the inflation pressure:
Switch on the compressor.
To check the current inflation
pressure setting, briefly switch off
the compressor.
- To r
educe the inflation pressure:
Adjust the valve (9) for reducing
tire inflation pressure.
NOTICE
Do not let the compressor run for more
than 10 minutes, otherwise the device
will overheat and may be damaged.
Page 569 of 636
09
9-19
Turn the vehicle off and wait until the
engine cools down. Use extreme care
when removing the engine coolant
cap and/or water-cooled intercooler
coolant cap. Wrap a thick towel around
it, and turn it counterclockwise slowly
to the first stop. Step back while the
pressure is released from the cooling
system. When you are sure all the
pressure has been released, press down
on the cap, using a thick towel, and
continue turning counterclockwise to
remove it.
Information
The coolant level is influenced by the
engine temperature. Before checking or
refilling the coolant, turn the engine off.
WARNING
The electric motor for the cooling fan
may continue to operate or start up
when the engine is not running and
can cause serious injury. Keep hands,
clothing and tools away from the
rotating fan blades of the cooling fan.
Always turn off the vehicle unless the
vehicle has to be inspected with the
engine on. Be cautious as the cooling
fan may operate if the negative (-)
battery terminal is not disconnected.
WARNING
Make sure the coolant cap is properly
closed after refilling coolant. Otherwise
the engine could be overheated while
driving.
„„Engine compartment front view
OOSH089010L
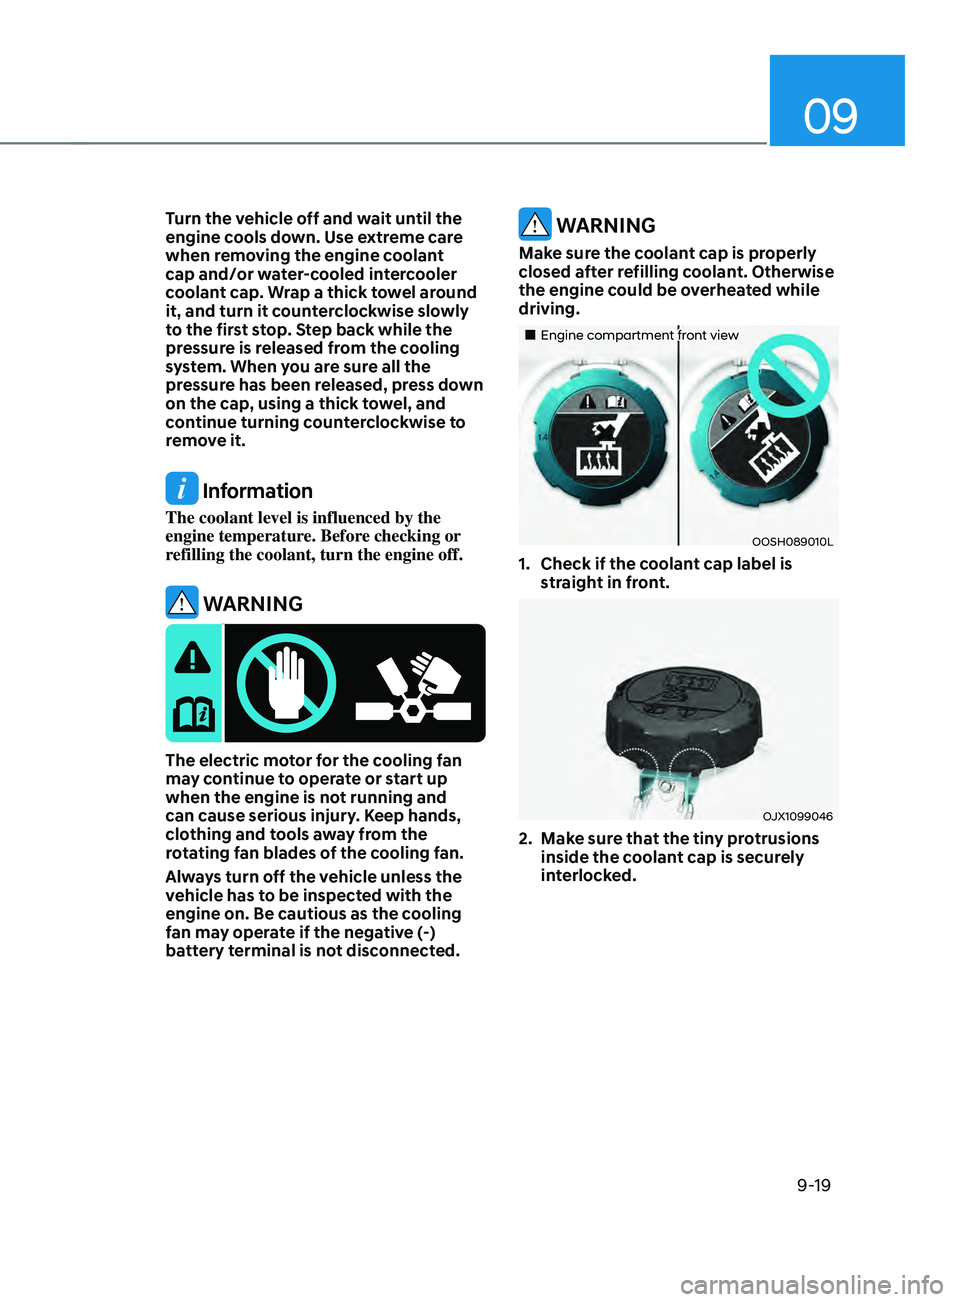
1. Check if the coolant cap label is
straight in front.
OJX1099046
2. Make sure that the tiny protrusions
inside the c oolant cap is securely
interlocked.
Page 604 of 636

Maintenance
9-54
• Always handle them carefully, and
avoid scratches and abrasions. If
the bulbs are lit, avoid contact with
liquids.
• Never touch the glass with bare
hands. Residual oil may cause the
bulb to overheat and burst when lit.
• A bulb should be operated only when
installed in a headlamp.
• If a bulb becomes damaged or
cracked, replace it immediately and
carefully dispose of it.
Lamps
If the LED lamp does not operate, we
recommend that you have the vehicle
checked by an authorized HYUNDAI
dealer.
Side repeater lamp replacement
OTM090023
If the LED lamp (1) does not operate,
we recommend that the system be
inspected by an authorized HYUNDAI
dealer.
The LED lamps cannot be replaced as
a single unit because it is an integrated
unit. The LED lamps has to be replaced
with the unit.
A skilled technician should check or
repair the LED lamp, for it may damage
related parts of the vehicle.
Rear combination lamp
replacement
Type A
OTMA090021
(1) Tail/Stop lamp
(2)
Tail lamp
(3
)
Turn signal lamp
(4
)
Re
verse lamp
(5)
Side marker lamp
OTM090044
Stop/Tail lamp (Outside), Reverse lamp
1.
Turn o
ff the engine.
2.
Open the liftga
te.
3.
Loosen the lamp assembly r
etaining
screws with a cross-tip screwdriver.
4.
Remo
ve the rear combination lamp
assembly from the body of the
vehicle.
5.
Remo
ve the socket from the
assembly by turning the socket
counterclockwise until the tabs on
the socket align with the slots on the
assembly.
Page 629 of 636

........................................................................\
...............6-61
Forced to restart engine ..............................................")
I
I -7
I
Idle Stop and Go (ISG)
........................................................................\
...............6-61
Forced to restart engine ........................................................................\
............6-64
ISG malfunction ........................................................................\
....................... 6-65
ISG system off ........................................................................\
.......................... 6-64
ISG system operation ........................................................................\
...............6-61
If the engine overheats
........................................................................\
................... 8-7
If the engine will not start
........................................................................\
.............. 8-3
If you have a flat tire (with spare tire)
................................................................. 8-14
Changing tires ........................................................................\
.......................... 8-16
Jack and tools ........................................................................\
........................... 8-14
Jack label ........................................................................\
.................................. 8-21
Removing and storing the spare tire .................................................................8-14
If you have a flat tire (with
Tire Mobility Kit)
.................................................... 8-22
Checking the tire inflation pressure ................................................................. 8-28
Components of the T
ire Mobility Kit
............................................................... 8-24
Introduction ........................................................................\
.............................. 8-22
Notes on the safe use of the T
ire Mobility Kit
.................................................8-23
Using the T
ire Mobility Kit
........................................................................\
...... 8-25
Ignition switch
........................................................................\
............................... 6-5
Key ignition switch ........................................................................\
....................6-5
Key ignition switch positions ........................................................................\
.....6-6
Starting the engine ........................................................................\
...................... 6-7
Important safety precautions
........................................................................\
.......... 3-2
Air bag hazards ........................................................................\
........................... 3-2
Always wear your seat belt ........................................................................\
........3-2
Control your speed ........................................................................\
..................... 3-2
Driver distraction ........................................................................\
........................ 3-2
Keep your vehicle in safe condition ...................................................................3-2
Restrain all children ........................................................................\
................... 3-2
In case of an emer
gency while driving
.................................................................. 8-2
If the engine stalls at a crossroad or crossing .....................................................8-2
If the engine stalls while driving ........................................................................\
8-2
If you have a flat tire while driving ....................................................................8-3