2021 HYUNDAI SANTA FE LIMITED check engine
[x] Cancel search: check enginePage 211 of 636

05
5-67
Hood
Opening the hood
OTM050032
1. Park the vehicle and set the parking
brake.
2.
Pull the release le
ver to unlatch the
hood. The hood should pop open
slightly.
OTM050069
3. Go to the front of the vehicle, raise the
hood sligh tly, push up the secondary
latch (1) inside of the hood center and
lift the hood.
After the hood has been lifted halfway,
it will raise completely by itself.
Closing the hood
1. Before closing the hood, check in and
ar ound the engine compartment to
ensure the following:
- Any t
ools or other loose objects
are removed from the engine room
area or hood opening area
- All glov
e, rags, or other
combustible material is removed
from the engine compartment
- All filler caps are tigh
tly and
correctly installed
2.
Lo
wer the hood halfway (lifted
approximately 12 in. (30 cm) from the
closed position) and push down to
securely lock in place. Then double
check to be sure the hood is secure.
If the hood can be raised slightly, it is
not securely locked. Open it again and
close it with more force.
WARNING
• Before closing the hood, ensure
all obstructions are removed from
around the hood opening.
• Always double check to be sure that
the hood is firmly latched before
driving away. Check there is no
hood open warning light or message
displayed on the instrument cluster.
Driving with the hood opened may
cause a total loss of visibility, which
might result in an accident.
• Do not move the vehicle with the
hood in the raised position, as vision
is obstructed, which might result in
an accident, and the hood could fall
or be damaged.
ExTERIOR FEATURES
Page 223 of 636
05
5-79
• Do not get back into a vehicle
once you have begun refueling.
You can generate a buildup of
static electricity by touching,
rubbing or sliding against any item
or fabric capable of producing
static electricity. Static electricity
discharge can ignite fuel vapors
causing a fire. If you must re-enter
the vehicle, you should once again
eliminate potentially dangerous
static electricity discharge by
touching a metal part of the vehicle,
away from the fuel filler neck, nozzle
or other fuel source, with your bare
hand.
• When using an approved portable
fuel container, be sure to place the
container on the ground prior to
refueling. Static electricity discharge
from the container can ignite fuel
vapors causing a fire.
Once refueling has begun, contact
between your bare hand and the
vehicle should be maintained until
the filling is complete.
• Use only approved portable plastic
fuel containers designed to carry and
store fuel.
• When refueling, always shift the
gear to the P (Park) position, set
the parking brake, and press the
Engine Start/Stop button to the
OFF position. Sparks produced by
electrical components related to the
engine can ignite fuel vapors causing
a fire.
• Do not use matches or a lighter and
do not smoke or leave a lit cigarette
in your vehicle while at a gas station,
especially during refueling.• Do not over-fill or top-off your
vehicle tank, which can cause fuel
spillage.
• If a fire breaks out during refueling,
leave the vicinity of the vehicle, and
immediately contact the manager
of the gas station and then contact
the local fire department. Follow any
safety instructions they provide.
• If pressurized fuel sprays out, it can
cover your clothes or skin and thus
subject you to the risk of fire and
burns. Always remove the fuel cap
carefully and slowly. If the cap is
venting fuel or if you hear a hissing
sound, wait until the condition stops
before completely removing the cap.
• Always check that the fuel cap is
installed securely to prevent fuel
spillage in the event of an accident.
Information
Make sure to refuel your vehicle according
to the “Fuel Requirements” section in
suggested in chapter 1.
NOTICE
• Do not spill fuel on the exterior
surfaces of the vehicle. Any type of
fuel spilled on painted surfaces may
damage the paint.
• If the fuel filler cap requires
replacement, we recommend that
you use only a genuine HYUNDAI cap
or the equivalent specified for your
vehicle. An incorrect fuel filler cap
can result in a serious malfunction of
the fuel system or emission control
system.
Page 238 of 636
Convenient features
5-94
AUTO (Automatic) control
(if equipped)
The rain sensor located on the upper
end of the windshield glass senses
the amount of rainfall and controls the
wiping cycle for the proper interval.
The wiper operation time will be
automatically controlled depends on
rainfall.
When the rain stops, the wiper stops.
To vary the sensitivity setting, turn the
sensitivity control knob.
If the wiper switch is set in AUTO mode
when the Engine Start/Stop button is in
the ON position, the wiper will operate
once to perform a self-check of the
system. Set the wiper to the OFF (O)
position when the wiper is not in use.
WARNING
To avoid personal injury from the
windshield wipers, when the engine
is running and the windshield wiper
switch is placed in the AUTO mode:
• Do not touch the upper end of the
windshield glass facing the rain
sensor.
• Do not wipe the upper end of the
windshield glass with a damp or wet
cloth.
• Do not put pressure on the
windshield glass.
NOTICE
• When washing the vehicle, set the
wiper switch in the OFF (O) position
to stop the auto wiper operation. The
wiper may operate and be damaged
if the switch is set in the AUTO mode
while washing the vehicle.
• Do not remove the sensor cover
located on the upper end of the
passenger side windshield glass.
Damage to system components
could occur and may not be covered
by your vehicle warranty.
• Because of using a photo sensor,
temporary malfunction could occur
according to sudden ambient light
change made by stone and dust
while driving.
Page 273 of 636
![HYUNDAI SANTA FE LIMITED 2021 Owners Manual 05
5-129
Wireless smart phone charging
system (if equipped)
OTM050022
[A] : Indicator light, [B] : Charging pad
On certain models, the vehicle comes
equipped with a wireless smart phone
charger.
Th HYUNDAI SANTA FE LIMITED 2021 Owners Manual 05
5-129
Wireless smart phone charging
system (if equipped)
OTM050022
[A] : Indicator light, [B] : Charging pad
On certain models, the vehicle comes
equipped with a wireless smart phone
charger.
Th](/manual-img/35/56182/w960_56182-272.png)
05
5-129
Wireless smart phone charging
system (if equipped)
OTM050022
[A] : Indicator light, [B] : Charging pad
On certain models, the vehicle comes
equipped with a wireless smart phone
charger.
The system is available when all doors
are closed, and when the Engine Start/
Stop button is in the ACC or ON (or
START) position.
To charge a cellular phone
The wireless smart phone charging
system charges only the Qi-enabled
smart phones (
). Read the label on
the smart phone accessory cover or
visit your smart phone manufacturer’s
website to check whether your smart
phone supports the Qi technology.
The wireless charging process starts
when you put a Qi-enabled smart phone
on the wireless charging unit.
1.
Remo
ve other items, including the
smart key, from the wireless charging
unit. If not, the wireless charging
process may be interrupted. Place
the smart phone on the center of the
charging pad.
2.
The indicat
or light is orange when the
smart phone is charging. The indicator
light will turn blue when phone
charging is complete.
3.
You can turn ON or OFF the wir
eless
charging function from the Settings
menu on the instrument cluster.
Select:
- Setup → U
ser
se
ttings
→ Conv
enience
→ Wir
eless
Char
ging
If your smart phone is no
t charging:
- Slightly change the position o
f the
smart phone on the charging pad.
- Make sur
e the indicator light is
orange.
Page 291 of 636
06
6-3
WARNING
Carbon monoxide (CO) gas is toxic. Breathing CO can cause unconsciousness and
death.
Engine exhaust contains carbon monoxide which cannot be seen or smelled.
Do not inhale engine exhaust.
If at any time you smell engine exhaust inside the vehicle, open the windows
immediately. Exposure to CO can cause unconsciousness and death by asphyxiation.
Be sure the exhaust system does not leak.
The exhaust system should be checked whenever the vehicle is raised to change the
oil or for any other purpose. If you hear a change in the sound of the exhaust or if you
drive over something that strikes the underneath side of the vehicle, we recommend
that the exhaust system be checked as soon as possible by an authorized HYUNDAI
dealer.
Do not run the engine in an enclosed area.
Letting the engine idle in your garage, even with the garage door open, is a hazardous
practice. Run the engine only long enough to start the engine and to move the vehicle
out of the garage.
Avoid idling the engine for prolonged periods with people inside the vehicle.
If it is necessary to idle the engine for a prolonged period with people inside the
vehicle, be sure to do so only in an open area with the air intake set at “Fresh” and fan
control set to high so fresh air is drawn into the interior.
Keep the air intakes clear.
To assure proper operation of the ventilation system, keep the ventilation air intakes
located in front of the windshield clear of snow, ice, leaves, or other obstructions.
If you must drive with the liftgate open:
Close all windows.
Open instrument panel air vents.
Set the air intake control at “Fresh”, the air flow control at “Floor” or “Face”, and the fan
control set to high.
WARNING
CALIFORNIA PROPOSITION 65 WARNING
Engine exhaust and a wide variety of automobile components including
components found in the interior furnishings in a vehicle, contain or emit harmful
chemicals known to the State of California to cause cancer and birth defects and
reproductive harm. In addition, certain fluids contained in vehicles and certain
products of components contain or emit chemicals known to the State of California
to cause cancer and birth defects or other reproductive harm.
Page 294 of 636
Driving your vehicle
6-6
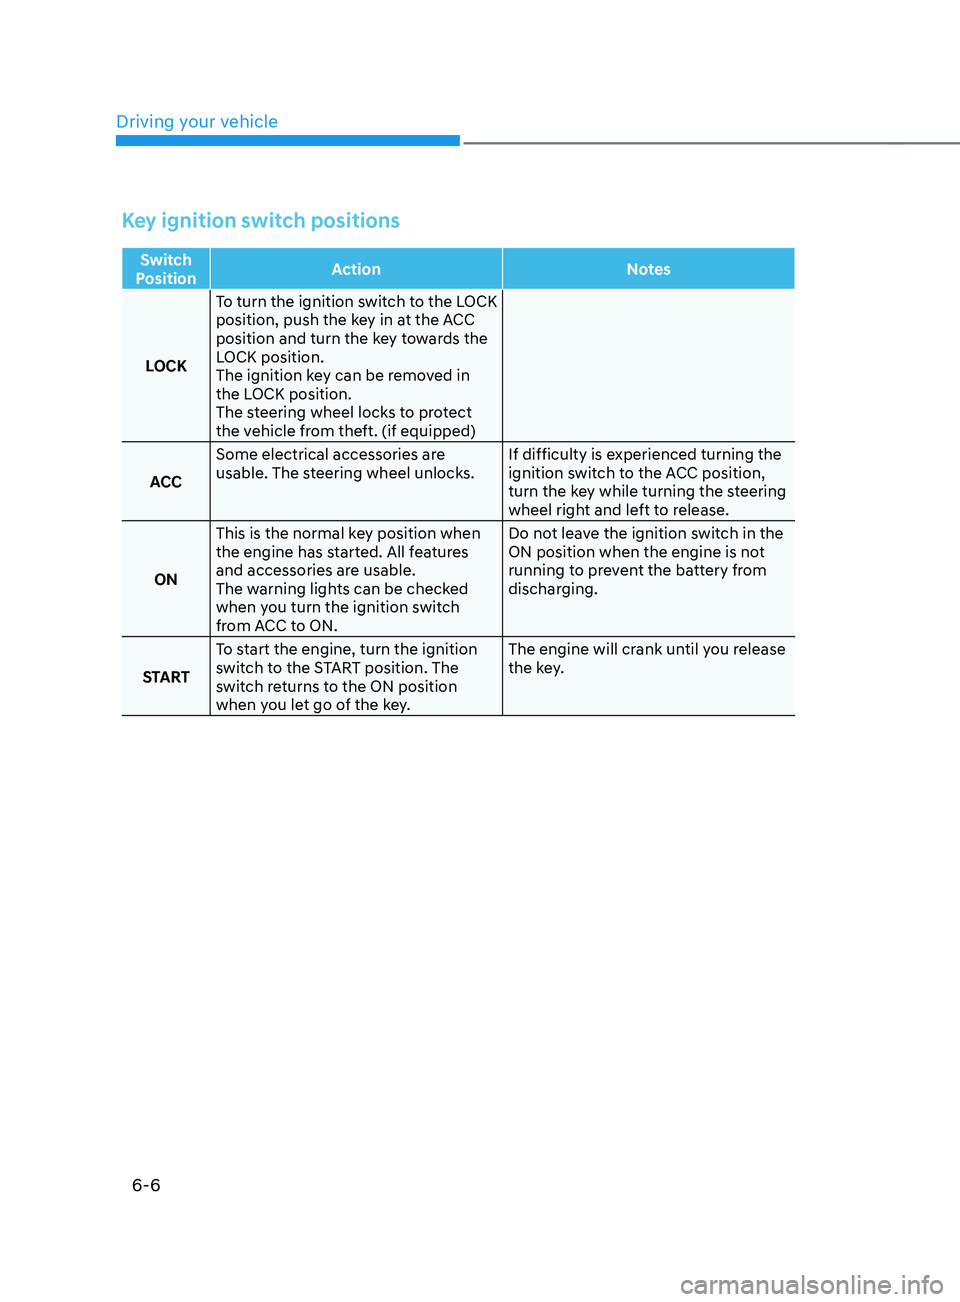
Key ignition switch positions
Switch
Position Action
Notes
LOCK To turn the ignition switch to the LOCK
position, push the key in at the ACC
position and turn the key towards the
LOCK position.
The ignition key can be removed in
the LOCK position.
The steering wheel locks to protect
the vehicle from theft. (if equipped)
ACC Some electrical accessories are
usable. The steering wheel unlocks.
If difficulty is experienced turning the
ignition switch to the ACC position,
turn the key while turning the steering
wheel right and left to release.
ON This is the normal key position when
the engine has started. All features
and accessories are usable.
The warning lights can be checked
when you turn the ignition switch
from ACC to ON. Do not leave the ignition switch in the
ON position when the engine is not
running to prevent the battery from
discharging.
START To start the engine, turn the ignition
switch to the START position. The
switch returns to the ON position
when you let go of the key. The engine will crank until you release
the key.
Page 298 of 636
Driving your vehicle
6-10
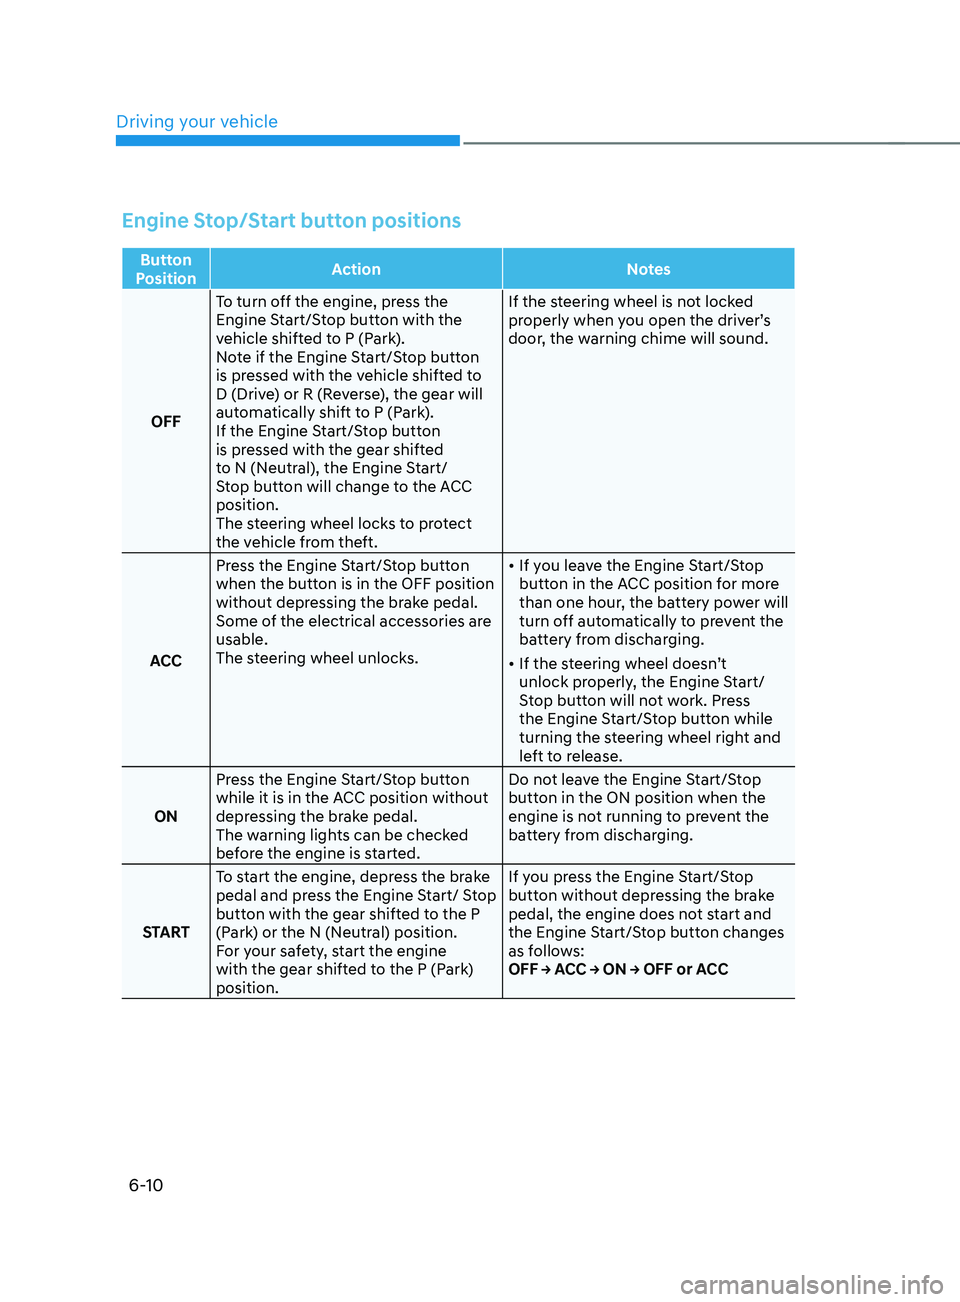
Engine Stop/Start button positions
Button
Position Action
Notes
OFF To turn off the engine, press the
Engine Start/Stop button with the
vehicle shifted to P (Park).
Note if the Engine Start/Stop button
is pressed with the vehicle shifted to
D (Drive) or R (Reverse), the gear will
automatically shift to P (Park).
If the Engine Start/Stop button
is pressed with the gear shifted
to N (Neutral), the Engine Start/
Stop button will change to the ACC
position.
The steering wheel locks to protect
the vehicle from theft. If the steering wheel is not locked
properly when you open the driver’s
door, the warning chime will sound.
ACC Press the Engine Start/Stop button
when the button is in the OFF position
without depressing the brake pedal.
Some of the electrical accessories are
usable.
The steering wheel unlocks.
•
If you leave the Engine Start/Stop
button in the ACC position for more
than one hour, the battery power will
turn off automatically to prevent the
battery from discharging.
• If the steering wheel doesn’t
unlock properly, the Engine Start/
Stop button will not work. Press
the Engine Start/Stop button while
turning the steering wheel right and
left to release.
ON Press the Engine Start/Stop button
while it is in the ACC position without
depressing the brake pedal.
The warning lights can be checked
before the engine is started. Do not leave the Engine Start/Stop
button in the ON position when the
engine is not running to prevent the
battery from discharging.
START To start the engine, depress the brake
pedal and press the Engine Start/ Stop
button with the gear shifted to the P
(Park) or the N (Neutral) position.
For your safety, start the engine
with the gear shifted to the P (Park)
position. If you press the Engine Start/Stop
button without depressing the brake
pedal, the engine does not start and
the Engine Start/Stop button changes
as follows:
OFF → ACC → ON → OFF or ACC
Page 299 of 636
06
6-11
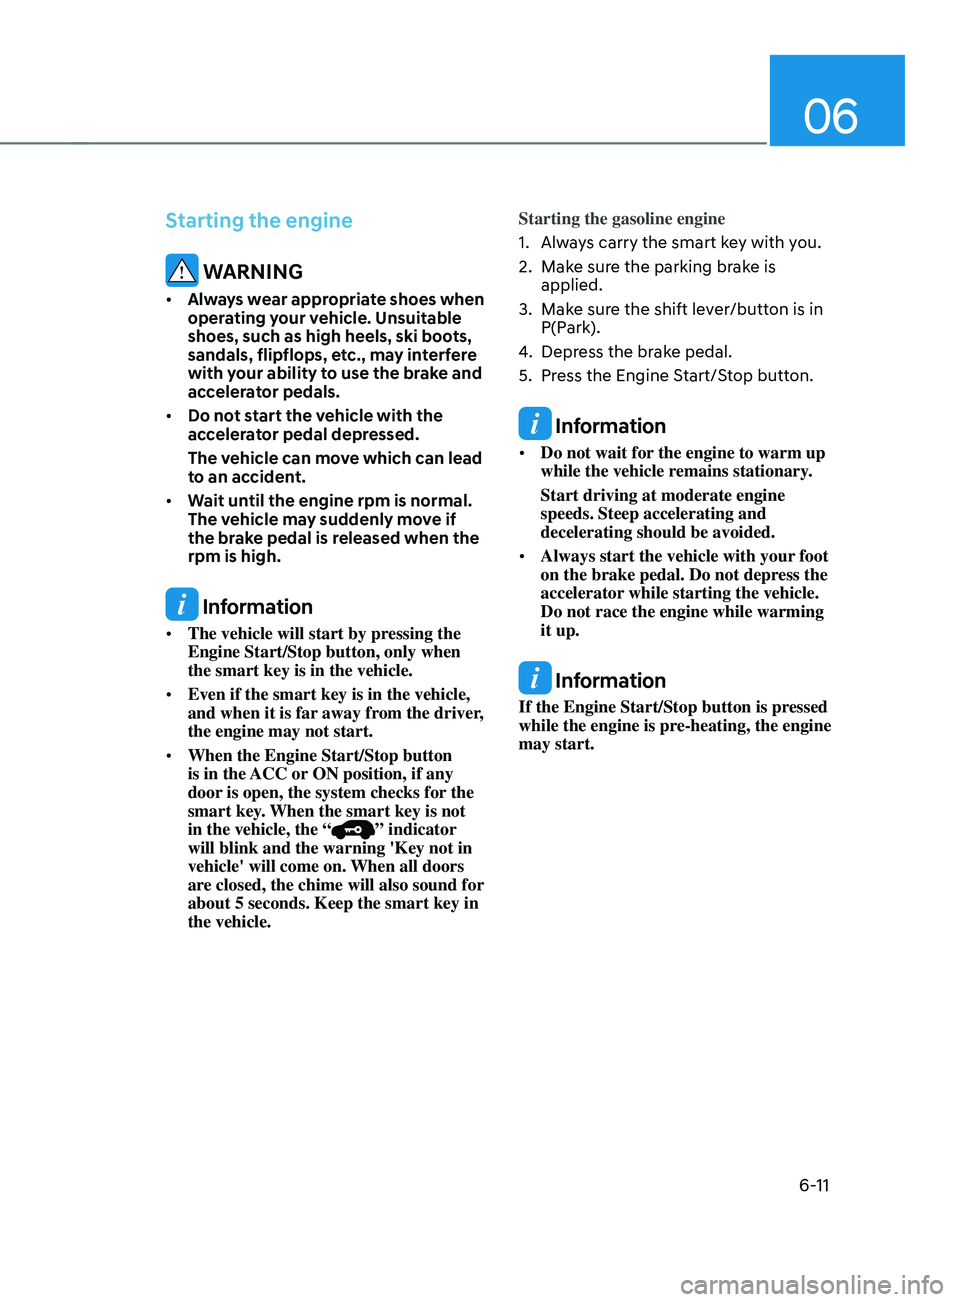
Starting the engine
WARNING
• Always wear appropriate shoes when
operating your vehicle. Unsuitable
shoes, such as high heels, ski boots,
sandals, flipflops, etc., may interfere
with your ability to use the brake and
accelerator pedals.
• Do not start the vehicle with the
accelerator pedal depressed.
The vehicle can move which can lead
to an accident.
• Wait until the engine rpm is normal.
The vehicle may suddenly move if
the brake pedal is released when the
rpm is high.
Information
• The vehicle will start by pressing the
Engine Start/Stop button, only when
the smart key is in the vehicle.
• Even if the smart key is in the vehicle,
and when it is far away from the driver,
the engine may not start.
• When the Engine Start/Stop button
is in the ACC or ON position, if any
door is open, the system checks for the
smart key. When the smart key is not
in the vehicle, the “
” indicator
will blink and the warning 'Key not in
vehicle' will come on. When all doors
are closed, the chime will also sound for
about 5 seconds. Keep the smart key in
the vehicle. Starting the gasoline engine
1.
Alwa
ys carry the smart key with you.
2.
Make sur
e the parking brake is
applied.
3.
Make sur
e the shift lever/button is in
P(Park).
4.
Depress the br
ake pedal.
5.
Press the E
ngine Start/Stop button.
Information
•
Do not wait for the engine to warm up
while the vehicle remains stationary.
Start driving at moderate engine
speeds. Steep accelerating and
decelerating should be avoided.
• Always start the vehicle with your foot
on the brake pedal. Do not depress the
accelerator while starting the vehicle.
Do not race the engine while warming
it up.
Information
If the Engine Start/Stop button is pressed
while the engine is pre-heating, the engine
may start.