2021 HYUNDAI SANTA FE CALLIGRAPHY ECU
[x] Cancel search: ECUPage 544 of 636
Emergency situations
8-26
OTM080023
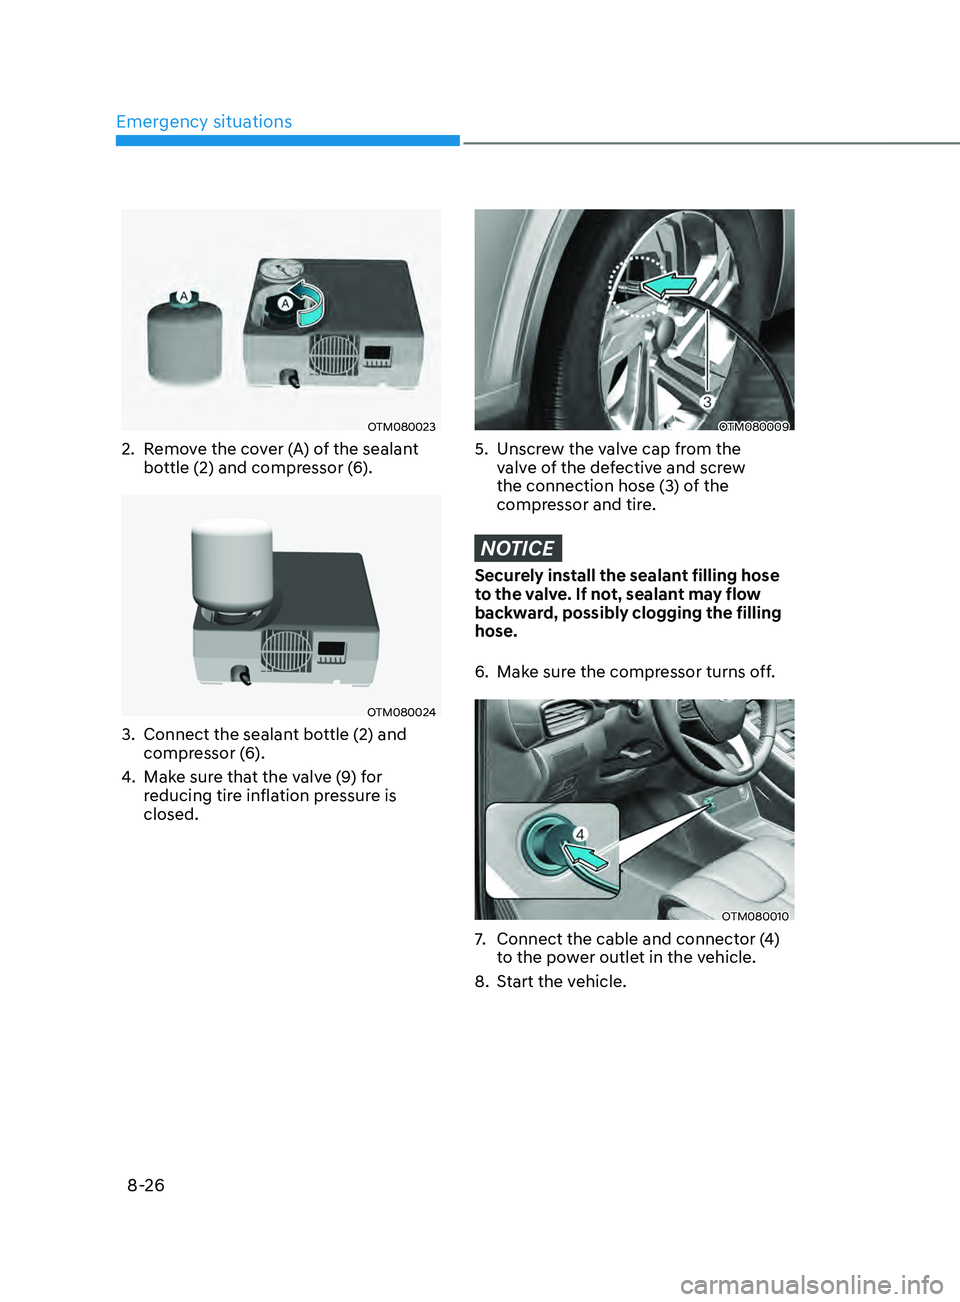
2. Remove the cover (A) of the sealant
bottle (2) and compressor (6).
OTM080024
3. Connect the sealant bo ttle (2) and
compressor (6).
4.
Make sur
e that the valve (9) for
reducing tire inflation pressure is
closed.
OTM080009
5. Unscrew the valve cap from the
v alve of the defective and screw
the connection hose (3) of the
compressor and tire.
NOTICE
Securely install the sealant filling hose
to the valve. If not, sealant may flow
backward, possibly clogging the filling
hose.
6.
Make sur
e the compressor turns off.
OTM080010
7. Connect the cable and connector ( 4)
to the power outlet in the vehicle.
8.
Start the v
ehicle.
Page 564 of 636
Maintenance
9-14
Engine oil and filter
The engine oil and filter should be
changed at the intervals specified in the
maintenance schedule. If the vehicle
is being driven in severe conditions,
more frequent oil and filter changes are
required.
Drive belts
Inspect all drive belts for evidence
of cuts, cracks, excessive wear or oil
saturation and replace if necessary.
Drive belts should be checked
periodically for proper tension and
adjusted as necessary.
Information
When you are inspecting the belt, turn the
engine off.
Fuel lines, fuel hoses and
connections
Check the fuel lines, fuel hoses and
connections for leakage and damage.
We recommend an authorized HYUNDAI
dealer replace any damaged or leaking
parts immediately.
Fuel filter (for gasoline engine)
The fuel filter is considered to be
maintenance free but periodic inspection
is recommended for this maintenance
depends on fuel quality. If there are
some important matters like fuel flow
restriction, surging, loss of power, hard
starting problem etc., replace the fuel
filter immediately. We recommend that
you consult an authorized HYUNDAI
dealer for details.
Vapor hose and fuel filler cap
The vapor hose and fuel filler cap should
be inspected at those intervals specified
in the maintenance schedule. Make sure
a new vapor hose or fuel filler cap is
correctly replaced.
Vacuum crankcase ventilation
hoses (if equipped)
Inspect the surface of hoses for evidence
of heat and/or mechanical damage.
Hard and brittle rubber, cracking,
tears, cuts, abrasions, and excessive
swelling indicate deterioration. Particular
attention should be paid to examine
those hose surfaces nearest to high heat
sources, such as the exhaust manifold.
Inspect the hose routing to ensure that
the hoses do not come in contact with
any heat source, sharp edges or moving
component which might cause heat
damage or mechanical wear. Inspect
all hose connections, such as clamps
and couplings, to make sure they are
secure, and that no leaks are present.
Hoses should be replaced immediately if
there is any evidence of deterioration or
damage.
ExPLANATION OF SCHEDULED MAINTENANCE ITEMS
Page 569 of 636

09
9-19
Turn the vehicle off and wait until the
engine cools down. Use extreme care
when removing the engine coolant
cap and/or water-cooled intercooler
coolant cap. Wrap a thick towel around
it, and turn it counterclockwise slowly
to the first stop. Step back while the
pressure is released from the cooling
system. When you are sure all the
pressure has been released, press down
on the cap, using a thick towel, and
continue turning counterclockwise to
remove it.
Information
The coolant level is influenced by the
engine temperature. Before checking or
refilling the coolant, turn the engine off.
WARNING
The electric motor for the cooling fan
may continue to operate or start up
when the engine is not running and
can cause serious injury. Keep hands,
clothing and tools away from the
rotating fan blades of the cooling fan.
Always turn off the vehicle unless the
vehicle has to be inspected with the
engine on. Be cautious as the cooling
fan may operate if the negative (-)
battery terminal is not disconnected.
WARNING
Make sure the coolant cap is properly
closed after refilling coolant. Otherwise
the engine could be overheated while
driving.
„„Engine compartment front view
OOSH089010L
1. Check if the coolant cap label is
straight in front.
OJX1099046
2. Make sure that the tiny protrusions
inside the c oolant cap is securely
interlocked.
Page 579 of 636
09
9-29
For best battery service
OTMA090009
• Keep the battery securely mounted.
• Keep the battery top clean and dry.
• Keep the terminals and connections
clean, tight, and coated with
petroleum jelly or terminal grease.
• Rinse any spilled electrolyte from the
battery immediately with a solution of
water and baking soda.
• If the vehicle is not going to be used
for an extended time, disconnect the
battery cables.
Information
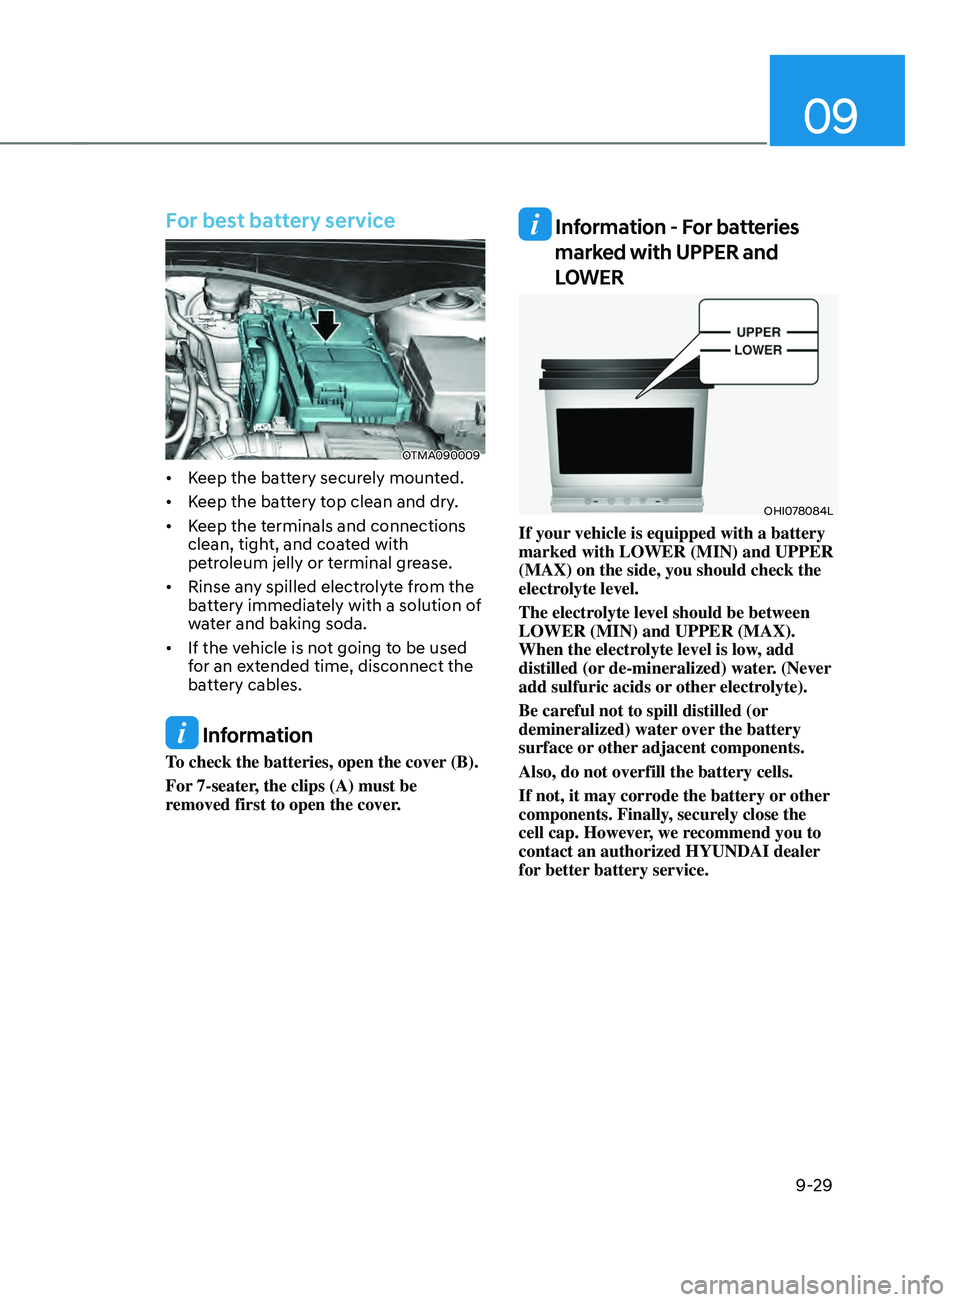
To check the batteries, open the cover (B).
For 7-seater, the clips (A) must be
removed first to open the cover.
Information - For batteries
marked with UPPER and
LOWER
OHI078084L
If your vehicle is equipped with a battery
marked with LOWER (MIN) and UPPER
(MAX) on the side, you should check the
electrolyte level.
The electrolyte level should be between
LOWER (MIN) and UPPER (MAX).
When the electrolyte level is low, add
distilled (or de-mineralized) water. (Never
add sulfuric acids or other electrolyte).
Be careful not to spill distilled (or
demineralized) water over the battery
surface or other adjacent components.
Also, do not overfill the battery cells.
If not, it may corrode the battery or other
components. Finally, securely close the
cell cap. However, we recommend you to
contact an authorized HYUNDAI dealer
for better battery service.
Page 593 of 636
09
9-43
Engine compartment panel fuse
replacement
Blade fuse / Cartridge fuse
„„Blade type fuse
OTMA090011
„„Cartridge type fuse
OTMA090012
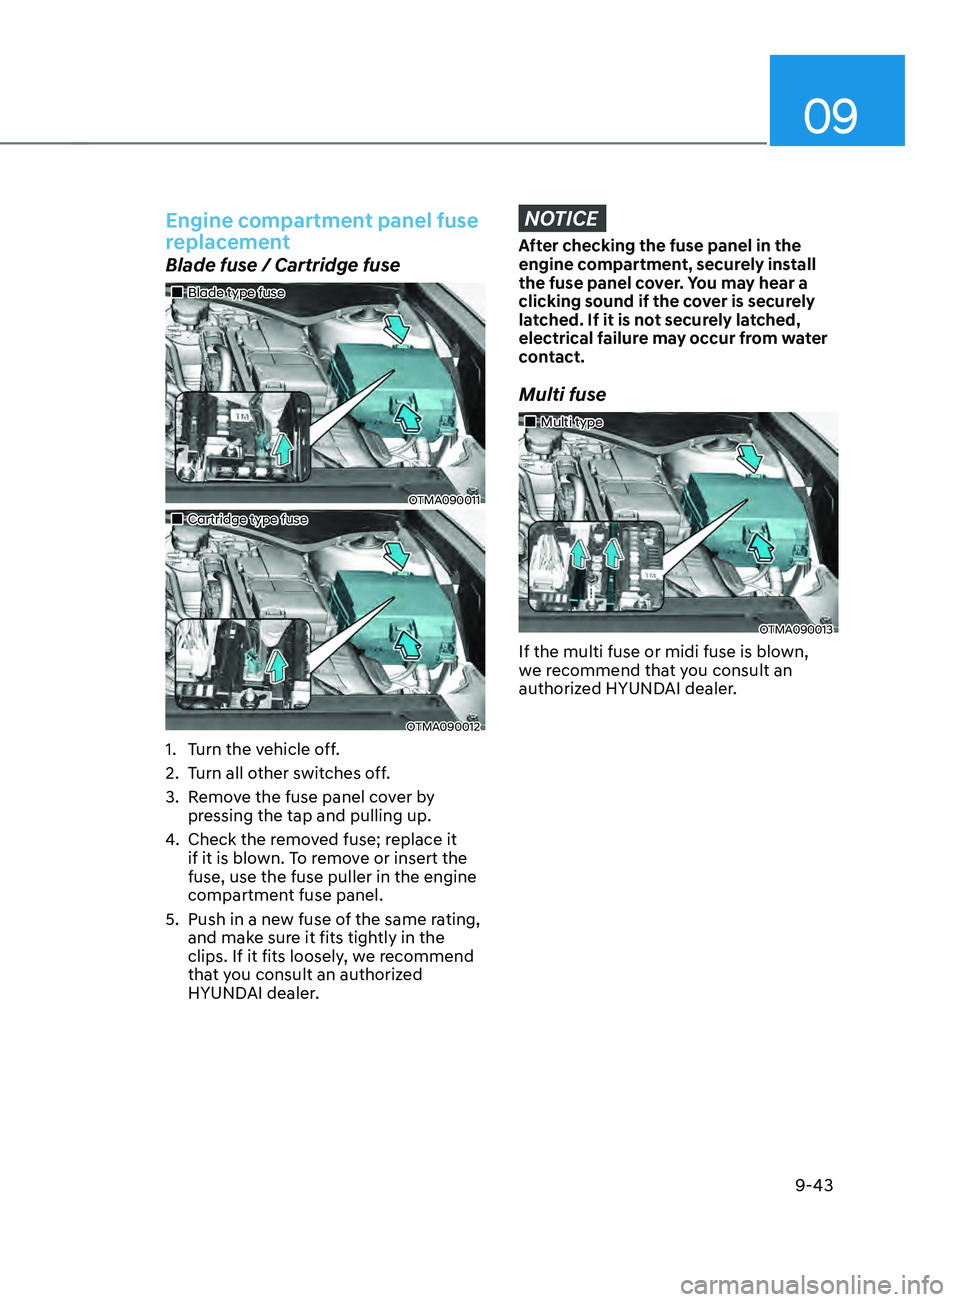
1. Turn the vehicle off.
2.
Turn all o
ther switches off.
3.
Remo
ve the fuse panel cover by
pressing the tap and pulling up.
4.
Check the remo
ved fuse; replace it
if it is blown. To remove or insert the
fuse, use the fuse puller in the engine
compartment fuse panel.
5.
Push in a new fuse o
f the same rating,
and make sure it fits tightly in the
clips. If it fits loosely, we recommend
that you consult an authorized
HYUNDAI dealer.
NOTICE
After checking the fuse panel in the
engine compartment, securely install
the fuse panel cover. You may hear a
clicking sound if the cover is securely
latched. If it is not securely latched,
electrical failure may occur from water
contact.
Multi fuse
„„Multi type
OTMA090013
If the multi fuse or midi fuse is blown,
we recommend that you consult an
authorized HYUNDAI dealer.
Page 600 of 636
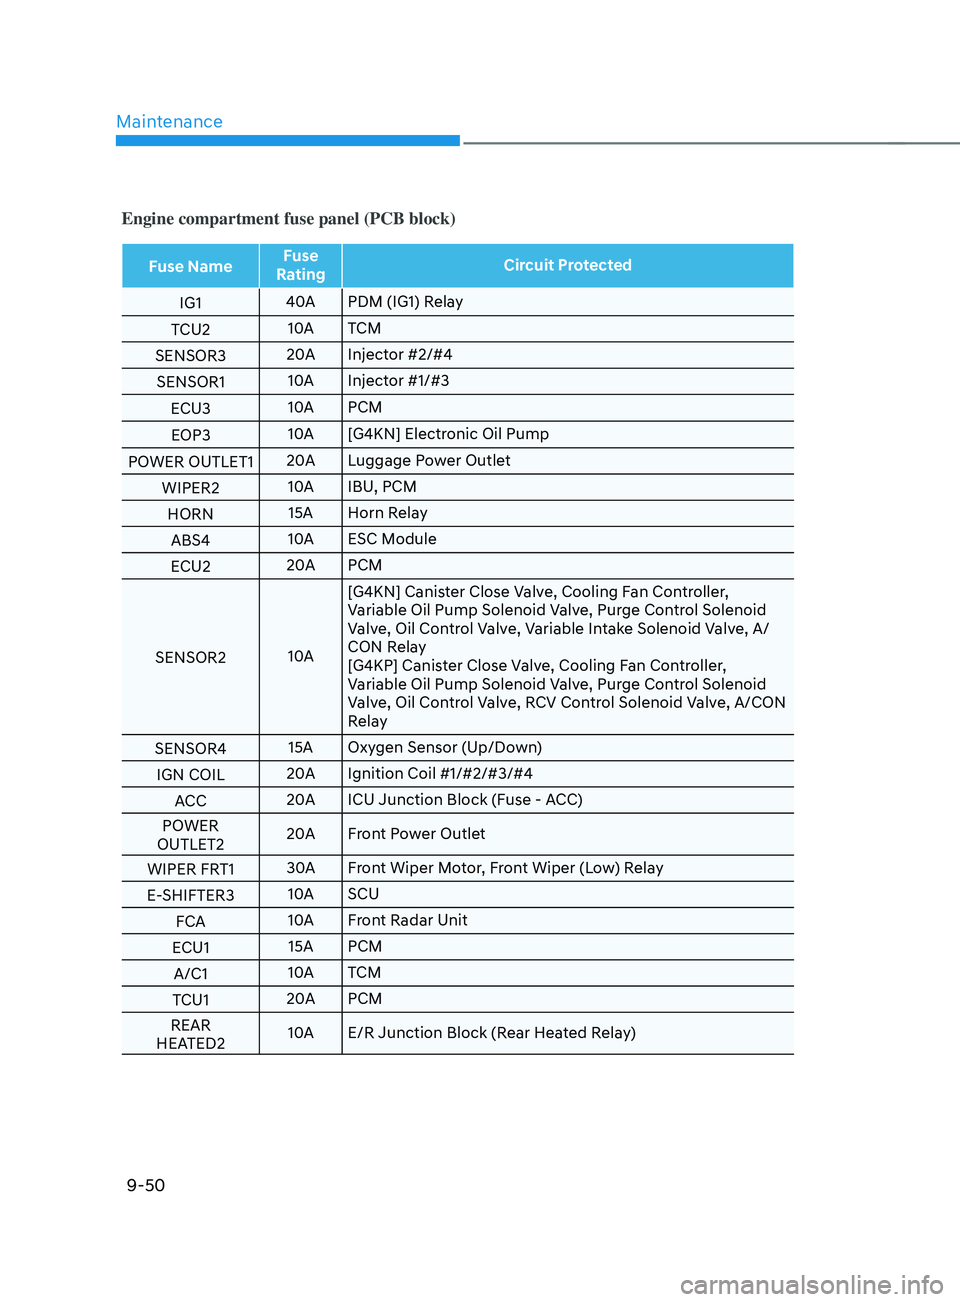
Maintenance
9-50
Engine compartment fuse panel (PCB block)
Fuse NameFuse
Rating Circuit Protected
IG1 40A
PDM (IG1) Relay
TCU2 10A
TCM
SENSOR3 20A
Injector #2/#4
SENSOR1 10A
Injector #1/#3
ECU3 10A
PCM
EOP3 10A
[G4KN] Electronic Oil Pump
POWER OUTLET1 20A
Luggage Power Outlet
WIPER2 10A
IBU, PCM
HORN 15A Horn Relay
ABS4 10A
ESC Module
ECU2 20A
PCM
SENSOR2 10A[G4KN] Canister Close Valve, Cooling Fan Controller,
Variable Oil Pump Solenoid Valve, Purge Control Solenoid
Valve, Oil Control Valve, Variable Intake Solenoid Valve, A/
CON Relay
[G4KP] Canister Close Valve, Cooling Fan Controller,
Variable Oil Pump Solenoid Valve, Purge Control Solenoid
Valve, Oil Control Valve, RCV Control Solenoid Valve, A/CON
Relay
SENSOR4 15A Oxygen Sensor (Up/Down)
IGN COIL 20A
Ignition Coil #1/#2/#3/#4
ACC 20A
ICU Junction Block (Fuse - ACC)
POWER
OUTLET2 20A
Front Power Outlet
WIPER FRT1 30A
Front Wiper Motor, Front Wiper (Low) Relay
E-SHIFTER3 10A
SCU
FCA 10A
Front Radar Unit
ECU1 15A PCM
A/C1 10A
TCM
TCU1 20A
PCM
REAR
HEATED2 10A
E/R Junction Block (Rear Heated Relay)
Page 630 of 636

Index
I-8
Infotainment system........................................................................\
................... 5-137
Antenna ........................................................................\
..................................5-137
Bluetooth® Wireless Technology ....................................................................5-139
How vehicle radio works ........................................................................\
........ 5-139
Infotainment system ........................................................................\
............... 5-138
Steering wheel remote controls ......................................................................5-137
USB Port ........................................................................\
................................ 5-137
Voice recognition ........................................................................\
....................5-138
Infotainment System specifications
.................................................................. 5-143
Bluetooth ........................................................................\
................................ 5-144
USB ........................................................................\
........................................ 5-143
Instrument cluster
........................................................................\
.......................... 4-4
Gauges and meters ........................................................................\
.....................4-5
Instrument cluster control ........................................................................\
...........4-5
LCD display messages ........................................................................\
............. 4-23
Transmission shift indicator ........................................................................\
.......4-9
Warning and indicator lights ........................................................................\
....4-10
Instrument panel overview (I)
........................................................................\
....... 2-5
Instrument panel overview (II)
........................................................................\
...... 2-6
Integrated memory system
........................................................................\
........... 5-39
Easy access function ........................................................................\
................. 5-41
Recalling memory positions ........................................................................\
.....5-40
Resetting the system ........................................................................\
................. 5-40
Storing memory positions ........................................................................\
........5-39
Interior features
........................................................................\
.......................... 5-124
AC Inverter ........................................................................\
............................. 5-127
Ashtray ........................................................................\
................................... 5-125
Cargo security screen ........................................................................\
.............5-134
Clock ........................................................................\
...................................... 5-131
Coat hook ........................................................................\
...............................5-131
Cup holder ........................................................................\
..............................5-124
Floor mat anchor(s) ........................................................................\
................5-132
Luggage net holder ........................................................................\
................. 5-133
Power outlet ........................................................................\
............................ 5-126
Side curtain ........................................................................\
............................. 5-133
Sunvisor ........................................................................\
.................................. 5-125
USB charger ........................................................................\
...........................5-127
Wireless smart phone char
ging system
.......................................................... 5-129