2021 HYUNDAI PALISADE shift lock
[x] Cancel search: shift lockPage 34 of 612

2-17
Safety system of your vehicle
2
5. To use the rear seat, lift and unfold
the seatback to the upright posi-
tion by pulling up the recline lever.
Push the seatback firmly until it
clicks into place. Make sure the
seatback is locked in place.
6. Return the rear seat belt to the
proper position.Do not place objects in the rear
seats, since they cannot be
properly secured and may hit
vehicle occupants in a collision
causing serious injury or death.
WARNING
When returning the rear seat-
back from a folded to an upright
position, hold the seatback and
return it slowly. Ensure that the
seatback is completely locked
into its upright position by
pushing on the top of the seat-
back. In an accident or sudden
stop, the unlocked seatback
could allow cargo to move for-
ward with great force and enter
the passenger compartment,
which could result in serious
injury or death.
WARNING
OLX2039024N
■2nd row seat
OLX2039096N
■3rd row seat
Make sure the vehicle is off, the
shift button is in P (Park), and the
parking brake is securely applied
whenever loading or unloading
cargo. Failure to take these steps
may allow the vehicle to move if
the shift button is inadvertently
shifted to another position.
WARNING
Be careful when loading
cargo through the rear pas-
senger seats to prevent dam-
age to the vehicle interior.
When cargo is loaded through
the rear passenger seats,
ensure the cargo is properly
secured to prevent it from
moving while driving.
Unsecured cargo in the pas-
senger compartment can
cause damage to the vehicle
or injury to it's occupants.
CAUTION
Page 70 of 612

2-53
Safety system of your vehicle
2
To install the tether anchor:
1. Route the child restraint tether
strap over the child restraint seat-
back. Route the tether strap under
the head restraint and between
the head restraint posts, or route
the tether strap over the top of the
vehicle seatback. Make sure the
strap is not twisted.
2. Connect the tether strap hook to
the tether anchor, then tighten the
tether strap according to the child
seat manufacturer's instructions to
firmly secure the child restraint to
the seat.
3. Check that the child restraint is
securely attached to the seat by
pushing and pulling the seat for-
ward-and-back and side-to-side.
Securing a child restraint with
lap/shoulder belt
When not using the LATCH system,
all child restraints must be secured to
a vehicle rear seat with the lap part
of a lap/shoulder belt.
Automatic locking mode
Since all passenger seat belts move
freely under normal conditions and
only lock under extreme or emer-
gency conditions (emergency locking
mode), you must manually pull the
seat belt all the way out to shift the
retractor to the "Automatic Locking"
mode to secure a child restraint.
The "Automatic Locking" mode will
help prevent the normal movement
of the child in the vehicle from caus-
ing the seat belt to loosen and com-
promise the child restraint system. To
secure a child restraint system, use
the following procedure. ALWAYS place a rear-facing
child restraint in the rear seat of
the vehicle.
Placing a rear-facing child
restraint in the front seat can
result in serious injury or death
if the child restraint is struck by
an inflating air bag.
WARNING
OLX2039038NOLMB033044
Page 71 of 612

2-54
Safety system of your vehicle
To install a child restraint system on
the rear seats, do the following:
1. Place the child restraint system on
a rear seat and route the lap/ shoul-
der belt around or through the child
restraint, following the restraint
manufacturer's instructions.
Be sure the seat belt webbing is not
twisted.
When using the rear center seat
belt, you should also refer to the
"Rear Seat Belt – Passenger's 3-
point system" section in this
chapter.2. Fasten the lap/shoulder belt latch
into the buckle. Listen for the dis-
tinct "click" sound.
Information
Position the release button so that it is
easy to access in case of an emergency.3. Pull the shoulder portion of the seat
belt all the way out. When the
shoulder portion of the seat belt is
fully extended, it will shift the retrac-
tor to the "Automatic Locking" (child
restraint) mode.
i
NOTICEOLMB033045OLMB033097
Page 72 of 612
2-55
Safety system of your vehicle
2
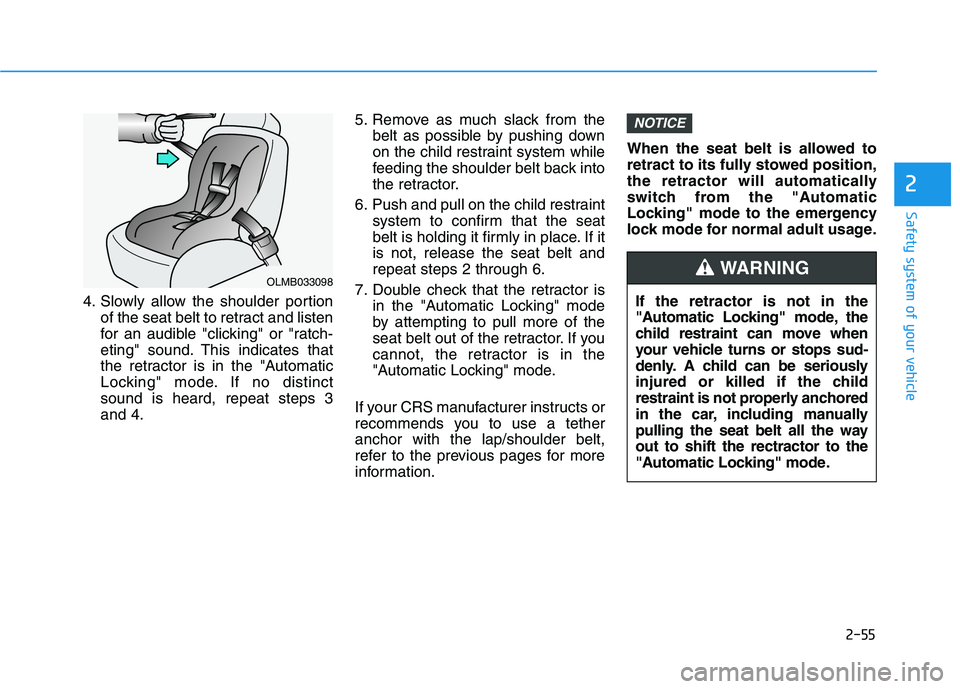
4. Slowly allow the shoulder portion
of the seat belt to retract and listen
for an audible "clicking" or "ratch-
eting" sound. This indicates that
the retractor is in the "Automatic
Locking" mode. If no distinct
sound is heard, repeat steps 3
and 4.5. Remove as much slack from the
belt as possible by pushing down
on the child restraint system while
feeding the shoulder belt back into
the retractor.
6. Push and pull on the child restraint
system to confirm that the seat
belt is holding it firmly in place. If it
is not, release the seat belt and
repeat steps 2 through 6.
7. Double check that the retractor is
in the "Automatic Locking" mode
by attempting to pull more of the
seat belt out of the retractor. If you
cannot, the retractor is in the
"Automatic Locking" mode.
If your CRS manufacturer instructs or
recommends you to use a tether
anchor with the lap/shoulder belt,
refer to the previous pages for more
information.When the seat belt is allowed to
retract to its fully stowed position,
the retractor will automatically
switch from the "Automatic
Locking" mode to the emergency
lock mode for normal adult usage.
NOTICE
OLMB033098
If the retractor is not in the
"Automatic Locking" mode, the
child restraint can move when
your vehicle turns or stops sud-
denly. A child can be seriously
injured or killed if the child
restraint is not properly anchored
in the car, including manually
pulling the seat belt all the way
out to shift the rectractor to the
"Automatic Locking" mode.
WARNING
Page 106 of 612

3-10
Convenient features of your vehicle
Information
• The door handle buttons will only
operate when the smart key is with-
in 28-40 inches (0.7~1m) from the
outside door handle.
• Either the driver or front passenger
door can be opened with the door
handle button when the smart key is
within this range.
• If you press the front passenger out-
side door handle with the smart key
in your possession, all the doors will
unlock.
Remote start (if equipped)
You can start the vehicle using the
remote start button (4) of the smart
key.
To start the vehicle remotely :
- Lock the doors by pressing the
door lock button (1) within 32 ft (10
m) distance from the vehicle.
- Press the remote start button for
over 2 seconds within 4 seconds
after locking the doors.Press the remote start button once to
turn off the vehicle.
Air conditioner/heater system main-
tains the status before turning off the
vehicle.
If no further action for operating/driv-
ing the vehicle is taken, the vehicle
will be turned off 10 minutes after
starting the vehicle remotely.
Opening the liftgate
Non-power liftgate
To unlock and open the liftgate:
1.Make sure you have the smart key
in your possession.
2.Press either the liftgate handle
release switch on the vehicle for
more than one second. The hazard
warning lights will blink two times
and the liftgate latch will unlock.
3.Once the liftgate is opened and
then closed, the liftgate will auto-
matically re-lock after 30 seconds.
Information
The liftgate handle switch will only
operate when the smart key is within
28 inches (0.7 m) from the liftgate
handle.
i
i
•Laws in your country may
restrict the use of remote start.
You should check country reg-
ulations before using this
remote starting system.
It is only possible to start the
vehicle remotely when shifted
to P (Park).
If the hood or the liftgate is
opened, you cannot start the
vehicle remotely.
The Remote start function
works the same as Blue Link
remote start. For further cau-
tion information, refer to the
separately supplied "Blue
Link (Infotainment system)
manual".
CAUTION
Page 115 of 612
3-19
Convenient features of your vehicle
3
Automatic Door Lock and
Unlock Features
Your vehicle is equipped with fea-
tures that will automatically lock or
unlock your vehicle based on set-
tings you select in the cluster LCD
display.
Auto LOCK - Enable on Speed
When this feature is set in the cluster
LCD display, all the doors will be
locked automatically when the vehi-
cle exceeds 9 mph (15 kph).
Auto LOCK - Enable on Shift
When this feature is set in the cluster
LCD display, all the doors will be
locked automatically when the vehi-
cle is shifted out of P (Park) while the
engine is running.
Auto UNLOCK - On shift to P
When this feature is set in the LCD
cluster display, all the doors will be
unlocked automatically when the
vehicle is shifted back into P (Park).
Auto UNLOCK - On key out
(if equipped with remote key)
When this feature is set in the LCD
cluster display, all the doors will be
unlocked automatically when the
ignition key is removed from the key
ignition switch.
Auto UNLOCK - Vehicle Off
(if equipped with smart key)
When this feature is set in the LCD
cluster display, all the doors will be
unlocked automatically when the
vehicle is off.
For more information on these
features, refer to the LCD Display
section later in this chapter.
Additional Unlock Safety
Feature - Air Bag Deployment
As an additional safety feature, all
doors will be automatically unlocked
when an impact causes the air bags
to deploy. Opening a door when something
is approaching may cause dam-
age or injury. Be careful when
opening doors and watch for
vehicles, motorcycles, bicycles
or pedestrians approaching the
vehicle in the path of the door.
CAUTION
If you stay in the vehicle for a
long time while the weather is
very hot or cold, there are risks
of injuries or danger to life. Do
not lock the vehicle from the
outside when someone is in the
vehicle.
WARNING
Page 137 of 612

3-41
Convenient features of your vehicle
3
Reverse Parking Aid Function
(if equipped)
When you move the shift button to
the R (Reverse) position, the side
view mirror(s) will rotate downwards
to aid with driving in reverse. The
position of the side view mirror
switch (1) determines whether or not
the mirrors will move:
Left/Right :When either the L (Left) or
R (Right) switch is select-
ed, both side view mirrors
will move.
Neutral : When neither switch is select-
ed, the side view mirrors will
not move.The side view mirrors will automati-
cally revert to their original positions
if any of the following occur:
The ignition switch is placed to
either the LOCK/OFF position or
the ACC position.
The shift button is selected to any
position except R (Reverse).
The remote control side view mir-
ror switch is not selected.
OLX2049019N
Page 163 of 612

3-67
Convenient features of your vehicle
3
Do not get back into a vehicle
once you have begun refuel-
ing. You can generate a build-
up of static electricity by
touching, rubbing or sliding
against any item or fabric
capable of producing static
electricity. Static electricity
discharge can ignite fuel
vapors causing a fire. If you
must re-enter the vehicle, you
should once again eliminate
potentially dangerous static
electricity discharge by touch-
ing a metal part of the vehicle,
away from the fuel filler neck,
nozzle or other gasoline
source, with your bare hand.
When using an approved
portable fuel container, be
sure to place the container on
the ground prior to refueling.
Static electricity discharge
from the container can ignite
fuel vapors causing a fire.
Once refueling has begun,
contact between your bare
hand and the vehicle should
be maintained until the filling
is complete.
Use only approved portable
plastic fuel containers designed
to carry and store gasoline.
When refueling, always move
the shift button to the P (Park)
position, set the parking
brake, and place the ignition
switch to the LOCK/OFF posi-
tion. Sparks produced by
electrical components related
to the engine can ignite fuel
vapors causing a fire.
Do not use matches or a
lighter and do not smoke or
leave a lit cigarette in your
vehicle while at a gas station,
especially during refueling.
Gasoline is highly flammable
and explosive. Failure to follow
these guidelines may result in
SERIOUS INJURY or DEATH:
Read and follow all warnings
posted at the gas station.
Before refueling, note the
location of the Emergency
Gasoline Shut-Off, if available,
at the gas station.
Before touching the fuel noz-
zle, you should eliminate the
potential build-up of static
electricity by touching a metal
part of the vehicle, a safe dis-
tance away from the fuel filler
neck, nozzle, or other gas
source, with your bare hand.
Do not use cellular phones
while refueling. Electric cur-
rent and/or electronic interfer-
ence from cellular phones can
potentially ignite fuel vapors
and cause a fire.
WARNING