Page 15 of 612

1-4
Your vehicle at a glance
I IN
NT
TE
ER
RI
IO
OR
R
O
OV
VE
ER
RV
VI
IE
EW
W
1. Inside door handle ................................3-16
2. Central door lock/unlock switch ............3-17
3. Power window switches ........................3-43
4. Power window lock button/ ....................3-45
Electronic child safety lock button..........3-20
5. Side view mirror control switch ..............3-40
6. Instrument panel illumination
control switch ........................................3-71
7. Blind-spot Collision Warning system ....5-78
8. Lane Keeping Assist system................5-110
9. ESC OFF button ....................................5-35
10. Power liftgate button ............................3-56
11. EPB(Electronic Parking Brake) ............5-24
12. Hood release lever ..............................3-53
13. Steering wheel tilt/telescopic lever ......3-31
14. Steering wheel ....................................3-31
15. Seat........................................................2-4
16. Fuse box ..............................................7-51
OLX2019003N
The actual shape may differ from the illustration.
Page 146 of 612

3-50
Convenient features of your vehicle
Periodically remove any dirt that
may accumulate on the sunroof
guide rail or between the sun-
roof and roof panel which can
make a noise.
Do not try to open the sunroof
when the temperature is below
freezing or when the sunroof is
covered with snow or ice, other-
wise the motor could be dam-
aged. In cold and wet climates, the
sunroof may not work properly.
Resetting the Sunroof
The sunroof may need to be reset if
the following conditions occur:
The battery is discharged or dis-
connected or the sunroof fuse has
been replaced or disconnected The sunroof control lever is not
operating correctly
To reset the sunroof, perform the fol-
lowing steps:
1. Turn the engine on.
2. Push the control lever forward.
The sunroof will close completely
depending on the condition of the
sunroof.
3. Release the control lever until the
sunroof does not move.
4. Push the control lever forward
about 10 seconds.
- When the sunroof is in the close
position :
The glass will slightly move up
and down.
Do not release the lever until the
operation is completed.
If you release the lever during opera-
tion, try again from step 2.
NOTICE
OLX2048032
■Front
■Rear (if equipped)
OLX2048098
Page 506 of 612

7
Fuses ......................................................................7-48
Instrument Panel Fuse Replacement..........................7-49
Engine Compartment Panel Fuse Replacement.......7-50
Fuse/Relay Panel Description ......................................7-51
Light bulbs.............................................................7-61
Headlamp, Parking lamp, Daytime Running Light,
Turn signal lamp and Side marker ..............................7-61
Side Repeater Lamp Replacement ..............................7-64
Rear combination lamp light replacement ................7-64
High Mounted Stop Lamp Bulb Replacement ..........7-66
License Plate Light Bulb Replacement .....................7-66
Interior Light Bulb Replacement .................................7-67
Appearance care ..................................................7-69
Exterior Care ....................................................................7-69
Interior Care .....................................................................7-74
Emission control system .....................................7-77
Crankcase Emission Control System ..........................7-77
Evaporative Emission Control System Including
Onboard Refueling Vapor Recovery (ORVR)............7-77
Exhaust Emission Control System ..............................7-78
California perchlorate notice .............................7-81
Page 552 of 612

7-48
Maintenance
F FU
US
SE
ES
S
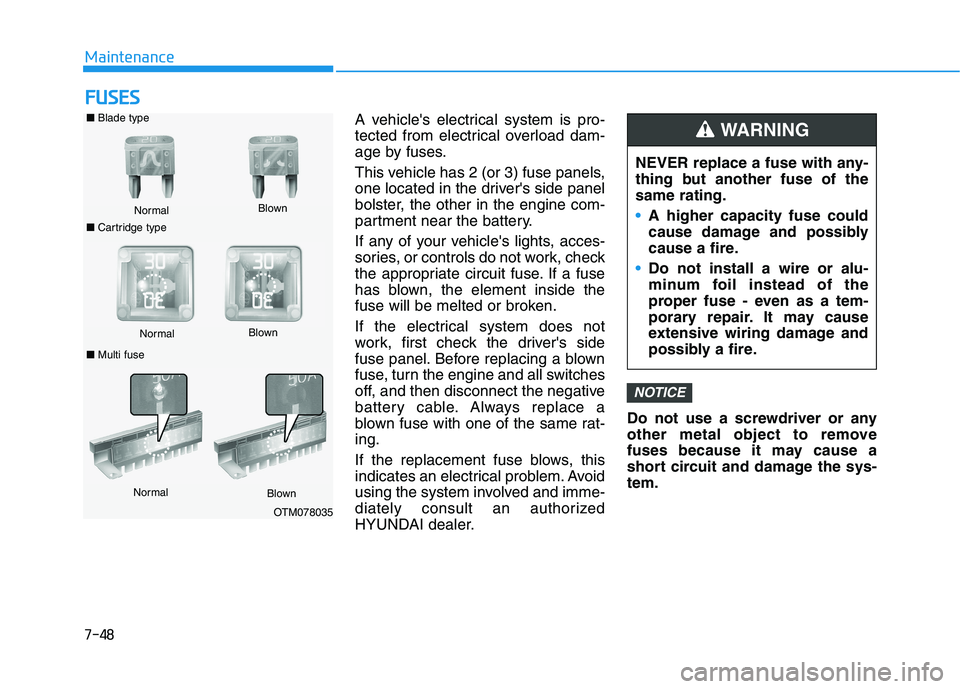
A vehicle's electrical system is pro-
tected from electrical overload dam-
age by fuses.
This vehicle has 2 (or 3) fuse panels,
one located in the driver's side panel
bolster, the other in the engine com-
partment near the battery.
If any of your vehicle's lights, acces-
sories, or controls do not work, check
the appropriate circuit fuse. If a fuse
has blown, the element inside the
fuse will be melted or broken.
If the electrical system does not
work, first check the driver's side
fuse panel. Before replacing a blown
fuse, turn the engine and all switches
off, and then disconnect the negative
battery cable. Always replace a
blown fuse with one of the same rat-
ing.
If the replacement fuse blows, this
indicates an electrical problem. Avoid
using the system involved and imme-
diately consult an authorized
HYUNDAI dealer.Do not use a screwdriver or any
other metal object to remove
fuses because it may cause a
short circuit and damage the sys-
tem.
NOTICE
NEVER replace a fuse with any-
thing but another fuse of the
same rating.
A higher capacity fuse could
cause damage and possibly
cause a fire.
Do not install a wire or alu-
minum foil instead of the
proper fuse - even as a tem-
porary repair. It may cause
extensive wiring damage and
possibly a fire.
WARNING ■Blade type
Normal
■Cartridge typeBlown
NormalBlown
■Multi fuse
Normal
Blown
OTM078035
Page 553 of 612

7-49
7
Maintenance
Instrument Panel Fuse
Replacement
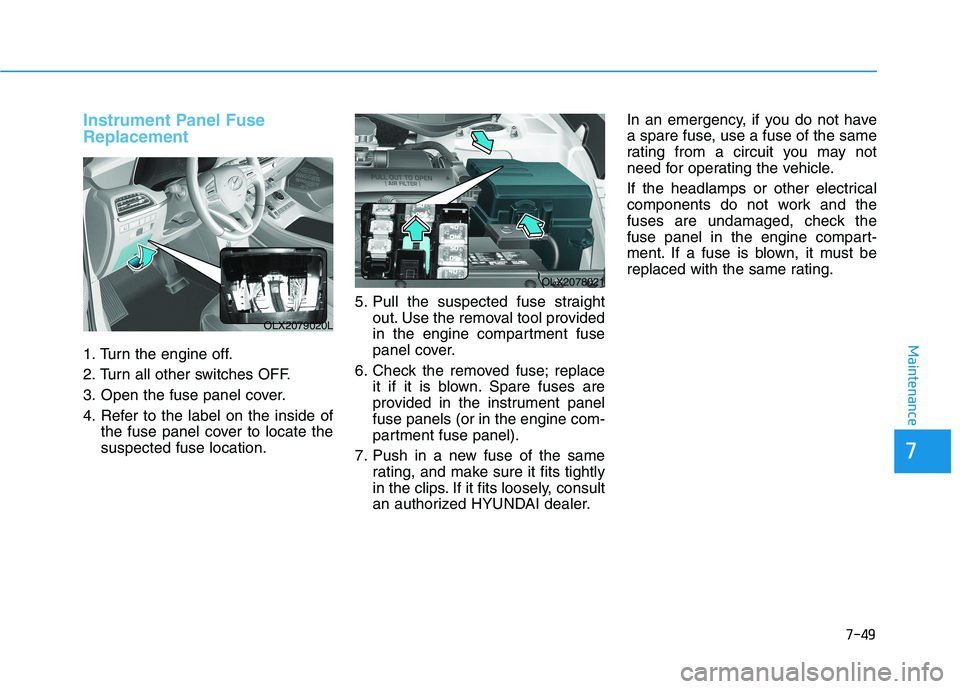
1. Turn the engine off.
2. Turn all other switches OFF.
3. Open the fuse panel cover.
4. Refer to the label on the inside of
the fuse panel cover to locate the
suspected fuse location.5. Pull the suspected fuse straight
out. Use the removal tool provided
in the engine compartment fuse
panel cover.
6. Check the removed fuse; replace
it if it is blown. Spare fuses are
provided in the instrument panel
fuse panels (or in the engine com-
partment fuse panel).
7. Push in a new fuse of the same
rating, and make sure it fits tightly
in the clips. If it fits loosely, consult
an authorized HYUNDAI dealer.In an emergency, if you do not have
a spare fuse, use a fuse of the same
rating from a circuit you may not
need for operating the vehicle.
If the headlamps or other electrical
components do not work and the
fuses are undamaged, check the
fuse panel in the engine compart-
ment. If a fuse is blown, it must be
replaced with the same rating.
OLX2079020L
OLX2078021
Page 554 of 612

7-50
Maintenance
Engine Compartment Panel
Fuse Replacement
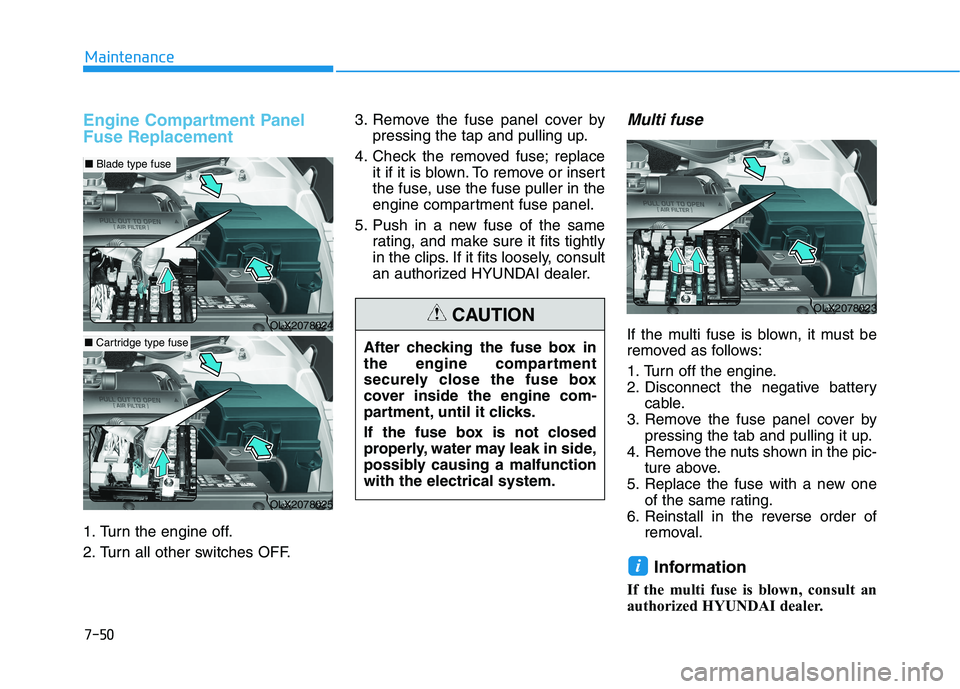
1. Turn the engine off.
2. Turn all other switches OFF.3. Remove the fuse panel cover by
pressing the tap and pulling up.
4. Check the removed fuse; replace
it if it is blown. To remove or insert
the fuse, use the fuse puller in the
engine compartment fuse panel.
5. Push in a new fuse of the same
rating, and make sure it fits tightly
in the clips. If it fits loosely, consult
an authorized HYUNDAI dealer.
Multi fuse
If the multi fuse is blown, it must be
removed as follows:
1. Turn off the engine.
2. Disconnect the negative battery
cable.
3. Remove the fuse panel cover by
pressing the tab and pulling it up.
4. Remove the nuts shown in the pic-
ture above.
5. Replace the fuse with a new one
of the same rating.
6. Reinstall in the reverse order of
removal.
Information
If the multi fuse is blown, consult an
authorized HYUNDAI dealer.
i
After checking the fuse box in
the engine compartment
securely close the fuse box
cover inside the engine com-
partment, until it clicks.
If the fuse box is not closed
properly, water may leak in side,
possibly causing a malfunction
with the electrical system.
CAUTIONOLX2078024
■Blade type fuse
OLX2078025
■Cartridge type fuse
OLX2078023
Page 555 of 612
7-51
7
Maintenance
Fuse/Relay Panel Description
Instrument panel fuse panel
Inside the fuse/relay box cover, you
can find the fuse/relay label describ-
ing fuse/relay names and ratings.
Information
Not all fuse panel descriptions in this
manual may be applicable to your
vehicle; the information is accurate at
the time of printing. When you inspect
the fuse box on your vehicle, refer to
the fuse box label.
i
OLX2079054N
OLX2079027L
Page 556 of 612

7-52
Maintenance
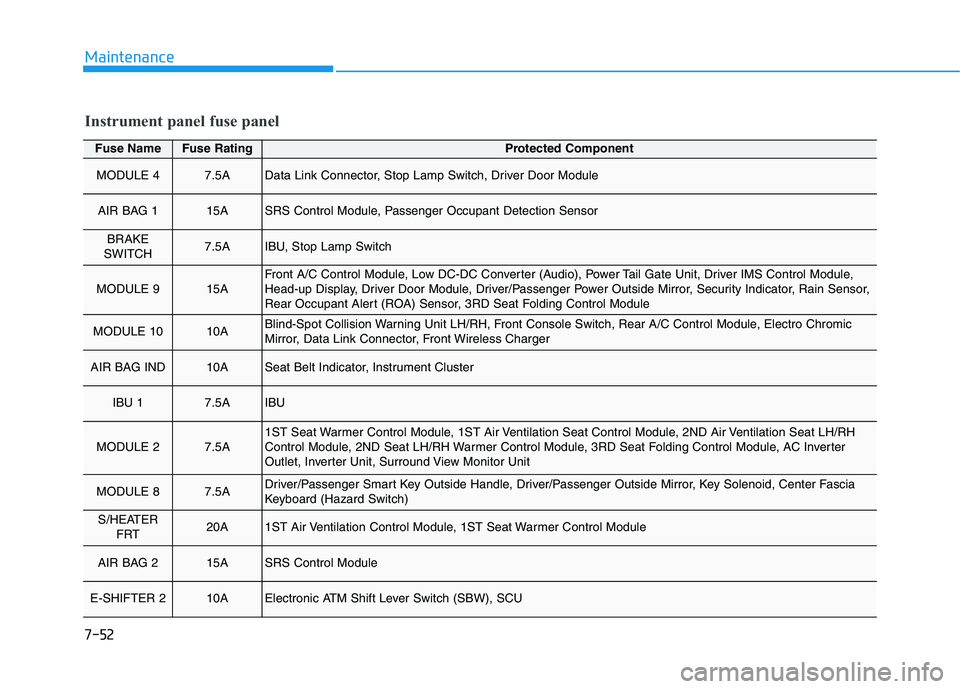
Fuse NameFuse RatingProtected Component
MODULE 47.5AData Link Connector, Stop Lamp Switch, Driver Door Module
AIR BAG 115ASRS Control Module, Passenger Occupant Detection Sensor
BRAKE
SWITCH7.5AIBU, Stop Lamp Switch
MODULE 915AFront A/C Control Module, Low DC-DC Converter (Audio), Power Tail Gate Unit, Driver IMS Control Module,
Head-up Display, Driver Door Module, Driver/Passenger Power Outside Mirror, Security Indicator, Rain Sensor,
Rear Occupant Alert (ROA) Sensor, 3RD Seat Folding Control Module
MODULE 1010ABlind-Spot Collision Warning Unit LH/RH, Front Console Switch, Rear A/C Control Module, Electro Chromic
Mirror, Data Link Connector, Front Wireless Charger
AIR BAG IND10ASeat Belt Indicator, Instrument Cluster
IBU 17.5AIBU
MODULE 27.5A1ST Seat Warmer Control Module, 1ST Air Ventilation Seat Control Module, 2ND Air Ventilation Seat LH/RH
Control Module, 2ND Seat LH/RH Warmer Control Module, 3RD Seat Folding Control Module, AC Inverter
Outlet, Inverter Unit, Surround View Monitor Unit
MODULE 87.5ADriver/Passenger Smart Key Outside Handle, Driver/Passenger Outside Mirror, Key Solenoid, Center Fascia
Keyboard (Hazard Switch)
S/HEATER
FRT20A1ST Air Ventilation Control Module, 1ST Seat Warmer Control Module
AIR BAG 215ASRS Control Module
E-SHIFTER 210AElectronic ATM Shift Lever Switch (SBW), SCU
Instrument panel fuse panel