Page 500 of 612
6-21
What to do in an emergency
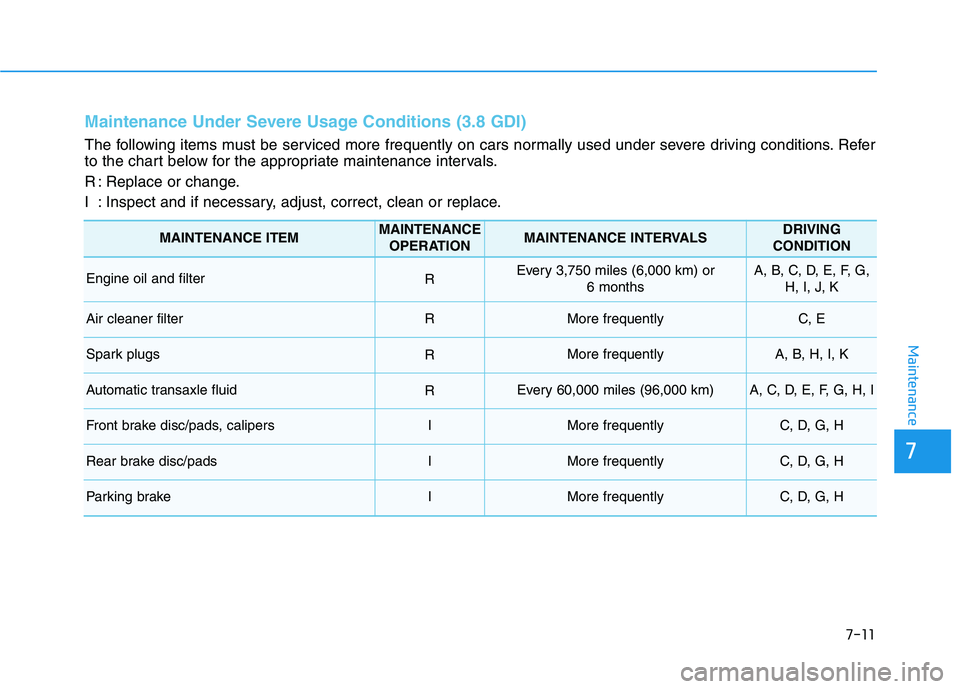
Jack label
6
The actual Jack label in the vehicle may differ from the illustration.
For more detailed specifications, refer to the label attached to the jack.
1. Model Name
2. Maximum allowable load
3. When using the jack, set your
parking brake.
4. When using the jack, stop the
engine.
5. Do not get under a vehicle that is
supported by a jack.
6. The designated locations under
the frame
7. When supporting the vehicle, the
base plate of jack must be vertical
under the lifting point.8. Shift into Reverse gear on vehicles
with manual transmission or move
the shift button to the P (Park)
position on vehicles with automat-
ic transmission.
9. The jack should be used on firm
level ground.
10.Jack manufacture
11.Production date
12.Representative company and
address
■Example
OOS067043
Page 502 of 612

6-23
What to do in an emergency
6
When towing your vehicle in an
emergency without wheel dollies:
1. Place the ignition switch in the
ACC position.
2. Place the shift button in N
(Neutral).
3. Release the parking brake.
Removable Towing Hook
1. Open the liftgate, and remove the
towing hook from the tool case.
2. Remove the hole cover by press-
ing the lower part of the cover on
the front or rear bumper.
3. Install the towing hook by turning it
clockwise into the hole until it is
fully secured.
4. Remove the towing hook and
install the cover after use.
OLX2069016N
■Front
OLX2068017
If your vehicle is equipped with
a rollover sensor, place the igni-
tion switch in the OFF or ACC
position when the vehicle is
being towed. The side impact
and curtain air bag may deploy
if the sensor detects the situa-
tion as a rollover.
WARNING
Failure to place the shift button
in N (Neutral) when being towed
with the front wheels on the
ground can cause internal dam-
age to the transmission.
CAUTION
OLX2068015■Rear
Page 503 of 612

6-24
What to do in an emergency
Emergency Towing
If towing is necessary, we recom-
mend you have it done by an author-
ized HYUNDAI dealer or a commer-
cial tow truck service.If towing service is not available in an
emergency, your vehicle may be
temporarily towed using a cable or
chain secured to the emergency tow-
ing hook at the front (or rear) of the
vehicle.
Use extreme caution when towing
the vehicle with a cable or chain. A
driver must be in the vehicle to steer
it and operate the brakes.
Towing in this manner may be done
only on hard-surfaced roads for a
short distance and at low speeds.
Also, the wheels, axles, power train,
steering and brakes must all be in
good condition.Always follow these emergency tow-
ing precautions:
While depressing the brake pedal
shift to the N (Neutral) position and
turn the vehicle off. The POWER
button will be in the ACC position.
Release the parking brake.
Depress the brake pedal with more
force than normal since you will
have reduced braking perform-
ance.
More steering effort will be
required because the power steer-
ing system will be disabled.
Use a vehicle heavier than your
own to tow your vehicle.
The drivers of both vehicles should
communicate with each other fre-
quently.
Before emergency towing, check
that the hook is not broken or dam-
aged.
Fasten the towing cable or chain
securely to the hook.
Do not jerk the hook. Apply steady
and even force.
OLX2069018N
OLX2068019
The driver must be in the vehi-
cle for steering and braking
operations when the vehicle is
being towed. Passengers other
than the driver must not be in
the vehicle.
CAUTION
Page 510 of 612
Owner Maintenance Schedule
When you stop for fuel:
• Check the engine oil level.
Check the coolant level in the
engine coolant reservoir.
Check the windshield washer fluid
level.
Check the tire for low or under-
inflated tires.
While operating your vehicle:
Note any changes in the sound of
the exhaust or any smell of
exhaust fumes in the vehicle.
Check for vibrations in the steering
wheel. Notice if there is any
increased steering effort or loose-
ness in the steering wheel, or
change in its straight-ahead posi-
tion.
Notice if your vehicle constantly
turns slightly or "pulls" to one side
when traveling on smooth, level
road.
When stopping, listen and check
for unusual sounds, pulling to one
side, increased brake pedal travel
or "hard-to-push" brake pedal.
If any slipping or changes in the
operation of your transmission
occurs, check the transmission
fluid level.
Check the automatic transmission
P (Park) function. Check the parking brake.
Check for fluid leaks under your
vehicle (water dripping from the air
conditioning system during or after
use is normal).
At least monthly:
Check coolant level in the engine
coolant reservoir.
Check the operation of all exterior
lights, including the brake lights,
turn signals and hazard warning
flashers.
Check the inflation pressures of all
tires including the spare for tires
that are worn, show uneven wear,
or are damaged.
Check for loose wheel lug nuts.
At least twice a year:
(i.e., every Spring and Autumn)
Check radiator, heater and air con-
ditioning hoses for leaks or dam-
age.
Check windshield washer spray
and wiper operation. Clean wiper
blades with a clean cloth damp-
ened with washer a fluid. Be careful when checking your
engine coolant level when the
engine is hot. This may result in
coolant being blown out of the
opening and cause serious
burns and other injuries.
WARNING
Maintenance
7-6
Page 514 of 612
Maintenance
7-10
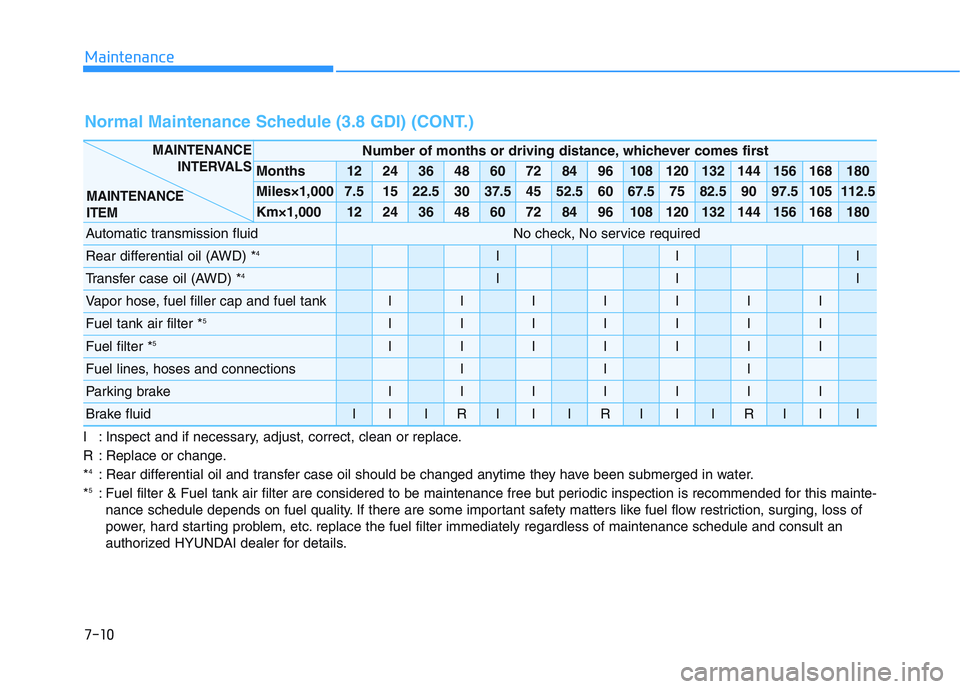
I : Inspect and if necessary, adjust, correct, clean or replace.
R : Replace or change.
*
4: Rear differential oil and transfer case oil should be changed anytime they have been submerged in water.
*5: Fuel filter & Fuel tank air filter are considered to be maintenance free but periodic inspection is recommended for this mainte-
nance schedule depends on fuel quality. If there are some important safety matters like fuel flow restriction, surging, loss of
power, hard starting problem, etc. replace the fuel filter immediately regardless of maintenance schedule and consult an
authorized HYUNDAI dealer for details.
Number of months or driving distance, whichever comes first
Months1224364860728496108120132144156168180
Miles×1,0007.51522.53037.54552.56067.57582.59097.5105112.5
Km×1,0001224364860728496108120132144156168180
Automatic transmission fluidNo check, No service required
Rear differential oil (AWD) *4III
Transfer case oil (AWD) *4III
Vapor hose, fuel filler cap and fuel tankIIIIIII
Fuel tank air filter *5IIIIIII
Fuel filter *5IIIIIII
Fuel lines, hoses and connectionsIII
Parking brakeIIIIIII
Brake fluidIIIRIIIRIIIRIII
MAINTENANCE
INTERVALS
MAINTENANCE
ITEM
Normal Maintenance Schedule (3.8 GDI) (CONT.)
Page 515 of 612
Maintenance
7
7-11
Maintenance Under Severe Usage Conditions (3.8 GDI)
The following items must be serviced more frequently on cars normally used under severe driving conditions. Refer
to the chart below for the appropriate maintenance intervals.
R : Replace or change.
I : Inspect and if necessary, adjust, correct, clean or replace.
MAINTENANCE ITEMMAINTENANCE
OPERATIONMAINTENANCE INTERVALSDRIVING
CONDITION
Engine oil and filterREvery 3,750 miles (6,000 km) or
6 monthsA, B, C, D, E, F, G,
H, I, J, K
Air cleaner filterRMore frequentlyC, E
Spark plugs RMore frequentlyA, B, H, I, K
Automatic transaxle fluidREvery 60,000 miles (96,000 km) A, C, D, E, F, G, H, I
Front brake disc/pads, calipersIMore frequentlyC, D, G, H
Rear brake disc/padsIMore frequentlyC, D, G, H
Parking brakeIMore frequentlyC, D, G, H
Page 519 of 612
7-15
7
Maintenance
Brake Hoses and Lines
Visually check for proper installation,
chafing, cracks, deterioration and
any leakage. Replace any deteriorat-
ed or damaged parts immediately.
Brake Fluid
Check the brake fluid level in the
brake fluid reservoir. The level should
be between the MIN and the MAX
marks on the side of the reservoir.
Use only hydraulic brake fluid con-
forming to DOT 3 or DOT 4 specifi-
cation.
Parking Brake
Inspect the parking brake system.
Brake Discs, Pads, Calipers
and Rotors
Check the pads for excessive wear,
discs for run out and wear, and
calipers for fluid leakage.
Exhaust Pipe and Muffler
Visually inspect the exhaust pipes,
muffler and hangers for cracks, dete-
rioration, or damage. Start the
engine and listen carefully for any
exhaust gas leakage. Tighten con-
nections or replace parts as neces-
sary.
Suspension Mounting Bolts
Check the suspension connections
for looseness or damage. Retighten
to the specified torque.
Steering Gear Box, Linkage &
Boots/Lower Arm Ball Joint
With the vehicle stopped and the
engine off, check for excessive free-
play in the steering wheel. Check the
linkage for bends or damage. Check
the dust boots and ball joints for
deterioration, cracks, or damage.
Replace any damaged parts.
Drive Shafts and Boots
Check the drive shafts, boots and
clamps for cracks, deterioration, or
damage. Replace any damaged
parts and, if necessary, repack the
grease.
Air Conditioning Refrigerant
Check the air conditioning lines and
connections for leakage and dam-
age.
Page 565 of 612

7-61
7
Maintenance
L LI
IG
GH
HT
T
B
BU
UL
LB
BS
S
Consult an authorized HYUNDAI
dealer to replace most vehicle light
bulbs. It is difficult to replace vehicle
light bulbs because other parts of the
vehicle must be removed before you
can get to the bulb. This is especially
true for removing the headlamp
assembly to get to the bulb(s).
Removing/installing the headlamp
assembly can result in damage to
the vehicle.
Information
The headlamp and tail lamp lenses
could appear frosty if the vehicle is
washed after driving or the vehicle is
driven at night in wet weather. This
condition is caused by temperature
difference between the lamp inside
and outside and, it does not indicate a
problem with your vehicle. When
moisture condenses in the lamp, it will
be removed after driving with the
headlamp on. The removable level
may differ depending on lamp size,
lamp position and environmental con-
dition. However, if moisture is not
removed, we recommend that your
vehicle is inspected by an authorized
HYUNDAI dealer.
Headlamp, Parking lamp,
Daytime Running Light, Turn
signal lamp and Side marker
Type A
(1) Turn signal lamp
(2) Daytime running light /
Parking lamp
(3) Side marker lamp
(4) Headlamp (Low)
(5) Headlamp (High)
(6) Side reflex reflector
i
Prior to replacing a lamp,
depress the brake pedal,
move the shift button into P
(Park) apply the parking
brake, place the ignition
switch to the OFF position,
and take the key with you
when leaving the vehicle to
avoid sudden movement of
the vehicle and to prevent
possible electric shock.
Be aware the bulbs may be
hot and may burn your fin-
gers.
WARNING
OLX2079029N