2021 HYUNDAI PALISADE climate control
[x] Cancel search: climate controlPage 280 of 612
![HYUNDAI PALISADE 2021 Owners Manual 3-184
Convenient features of your vehicle
System Maintenance
Cabin air filter
[A] : Outside air, [B] : Recirculated air
[C] : Climate control air filter, [D] : Blower
[E] : Evaporator core, [F] : Heat HYUNDAI PALISADE 2021 Owners Manual 3-184
Convenient features of your vehicle
System Maintenance
Cabin air filter
[A] : Outside air, [B] : Recirculated air
[C] : Climate control air filter, [D] : Blower
[E] : Evaporator core, [F] : Heat](/manual-img/35/41162/w960_41162-279.png)
3-184
Convenient features of your vehicle
System Maintenance
Cabin air filter
[A] : Outside air, [B] : Recirculated air
[C] : Climate control air filter, [D] : Blower
[E] : Evaporator core, [F] : Heater core
The cabin air filter is installed behind
the glove box. It filters the dust or
other pollutants that enter the vehicle
through the heating and air condi-
tioning system.Have the cabin air filter replaced by
an authorized HYUNDAI dealer
according to the maintenance sched-
ule. If the vehicle is being driven in
severe conditions such as dusty or
rough roads and/or if transporting
pets or occupants smoke inside the
vehicle, then more frequent cabin air
filter inspections and changes are
required.
If the air flow rate suddenly decreas-
es, the system should be checked at
an authorized HYUNDAI dealer.
Checking the amount of air con-
ditioner refrigerant and com-
pressor lubricant
When the amount of refrigerant is
low, the performance of the air con-
ditioning is reduced. Overfilling also
reduces the performance of the air
conditioning system.
Therefore, if abnormal operation is
found, have the system inspected by
an authorized HYUNDAI dealer.
It is important that the correct
type and amount of oil and refrig-
erant is used. Otherwise, damage
to the compressor and abnormal
system operation may occur. To
prevent damage, the air condition-
ing system in your vehicle should
only be serviced by trained and
certified technicians.
NOTICE
OIK047401L
Page 282 of 612

3-186
Convenient features of your vehicle
For maximum defrost perform-
ance, set the temperature control
knob to the highest temperature
setting (rotated all the way to the
right) and the fan speed control to
the highest setting.
If warm air to the floor is desired
while defrosting or defogging, set the
mode to the floor-defrost position.
Before driving, clear all snow and
ice from the windshield, rear win-
dow, side view mirrors, and all side
windows.
Clear all snow and ice from the
hood and air inlet in the cowl grill to
improve heater and defroster effi-
ciency and to reduce the probability
of fogging up the inside of the wind-
shield.
If the engine temperature is still
cold after starting, then a brief
engine warm up period may be
required for the vented air flow to
become warm or hot.Manual Climate Control System
To defog inside windshield
1. Select any fan speed except "0"
position.
2. Select the desired temperature.
3. Select the or position.
4. Fresh mode will be selected auto-
matically. Additionally, the air condi-
tioning will automatically operate if
the mode is selected to the
position.
Check to make sure the A/C is ON. If
the A/C ON LED is not illuminated,
press the A/C button once to turn the
air conditioner ON.
NOTICE
W WI
IN
ND
DS
SH
HI
IE
EL
LD
D
D
DE
EF
FR
RO
OS
ST
TI
IN
NG
G
A
AN
ND
D
D
DE
EF
FO
OG
GG
GI
IN
NG
G
Windshield heating
Do not use the or posi-
tion during cooling operation in
extremely humid weather. The
difference between the temper-
ature of the outside air and that
of the windshield could cause
the outer surface of the wind-
shield to fog up, causing loss of
visibility could cause an acci-
dent resulting in serious injury
or death. In this case, set the
mode selection knob or button
to the position and fan
speed control knob or button to
a lower speed.
WARNING
OLX2048335L
Page 284 of 612

3-188
Convenient features of your vehicle
Defogging logic
To reduce the probability of fogging
up the inside of the windshield, the
air intake or air conditioning are con-
trolled automatically according to
certain conditions such as or
positions. To cancel or reset the
defogging logic, do the following.
Manual climate control system
1. Turn the ignition switch to the ON
position.
2. Press the defroster button ( ).
3. Press the air intake control button
at least 5 times within 3 seconds.
The LED indicator on the air intake
button will blink 3 times to indicate
that the defogging logic has been
disabled.
Repeat the steps again to re-enable
the defogging logic.
If the battery has been discharged or
disconnected, it resets to the defog
logic status.
Automatic climate control system
1. Turn the ignition switch to the ON
position.
2. Press the defroster button ( ).
3. While pressing the air conditioning
button (A/C), press the air intake
control button at least 5 times
within 3 seconds.
The Automatic Climate Control infor-
mation screen will blink 3 times to
indicate that the defogging logic has
been disabled.
Repeat the steps again to re-enable
the defogging logic.
If the battery has been discharged or
disconnected, it resets to the defog
logic status.
Auto Defogging System
(Additional Feature with
Automatic Temperature
Control System) (if equipped)
Auto defogging helps reduce the pos-
sibility of fogging up the inside of the
windshield by automatically sensing
the moisture on inside the windshield.
The auto defogging system operates
when the heater or air conditioning is
on.
Information
The auto defogging system may not
operate normally, when the outside
temperature is below 14 °F (-10 °C).
i
OLX2049322N
Page 285 of 612

3-189
Convenient features of your vehicle
3
When the Auto Defogging
System operates, the indi-
cator will illuminate.
If a high amount of humidity is
detected in the vehicle, the Auto
Defogging System will be enabled.
The following steps will be performed
automatically:
Step 1) The A/C button will turn ON.
Step 2) The air intake control will
change to Fresh mode.
Step 3) The mode will be changed to
defrost to direct airflow to the
windshield.
Step 4) The fan speed will be set to
MAX.
If the air conditioning is off or recircu-
lated air position is manually select-
ed while Auto Defogging System is
ON, the Auto Defogging System
Indicator will blink 3 times to signal
that the manual operation has been
canceled.To cancel or reset the
Auto Defogging System
Press the front windshield defroster
button for 3 seconds when the igni-
tion switch is in the ON position.
When the Auto Defogging System is
canceled, the ADS OFF symbol will
blink 3 times and ADS OFF will be
displayed on the climate control
information screen.
When the Auto Defogging System is
reset, the ADS OFF symbol will blink
6 times without a signal.
Information
• When the air conditioning is turned
on by Auto defogging system, if you
try to turn off the air conditioning, the
indicator will blink 3 times and the air
conditioning will not be turned off.
• To maintain the effectiveness and
efficiency of the Auto Defogging
System, do not select Recirculation
mode while the system is operating.
• When the Auto Defogging System is
operating, the fan speed adjustment
button, the temperature adjustment
knob, and the air intake control but-
ton are all disabled.
Do not remove the sensor cover
located on the upper end of the
windshield glass.
Damage to system parts could
occur and may not be covered by
your vehicle warranty.
NOTICE
i
Page 359 of 612

5-50
Driving your vehicle
The Idle Stop and Go (ISG) system
automatically and temporarily shuts
down the engine when the vehicle is
stopped and idling to improve fuel
efficiency and reduce exhaust gas
emissions. (i.e. red stop light, stop
sign, and traffic jam).
The engine is automatically started
upon satisfying the starting condi-
tions.
The ISG system is always active,
when the engine is running.
Information
When the engine is automatically
started by the ISG system, some warn-
ing lights (i.e. ABS, ESC, ESC OFF,
EPS, and parking brake warning
light) may illuminate for a few sec-
onds due to the low battery voltage.
However, it does not indicate a mal-
function with the ISG system.
To Activate the ISG System
Prerequisite for activation
The ISG system operates in the fol-
lowing situations.
The driver's seatbelt is fastened
The driver's door and hood are
closed
The brake vacuum pressure is
adequate
The battery sensor is activated and
the battery is sufficiently charged
Outside temperature is not too low
or too high
The vehicle is driven over a con-
stant speed and stops
The climate control system satis-
fies the conditions
The vehicle is sufficiently warmed
up
The incline is gradual
The steering wheel is turned less
than 180 degrees and then the
vehicle stops
Information
The ISG system is
not activated, when
the prerequisites to
activate the ISG sys-
tem are unsatisfied.
In this case, the ISG
OFF button indicator illuminates,
and the auto stop indicator ( )
illuminates in yellow on the instru-
ment cluster.
• When the above indicator remains
illuminated on the instrument clus-
ter, we recommend that you have
the IGS system checked by an
authorized HYUNDAI dealer.
i
i
I IS
SG
G
(
(I
ID
DL
LE
E
S
ST
TO
OP
P
A
AN
ND
D
G
GO
O)
)
S
SY
YS
ST
TE
EM
M
(
(I
IF
F
E
EQ
QU
UI
IP
PP
PE
ED
D)
)
•
Page 361 of 612

5-52
Driving your vehicle
Auto start
To restart the engine in the auto
stop mode
Release the brake pedal.
- When Auto Hold is activated, if you
release the brake pedal, the
engine will be in the auto stop
state. However, if you depress the
accelerator pedal, the engine will
start again.
The auto stop indicator ( ) goes
OFF on the instrument cluster, when
the engine is restarted.
The engine is automatically restart-
ed in the following situations.
The brake vacuum pressure is low
The engine has stopped for about
5 minutes
The air conditioning is ON with the
fan speed set to the highest posi-
tion
The front defroster is ON
The battery is weak
The cooling and heating perform-
ance of the climate control system
is unsatisfactory
The vehicle is shifted to P (Park)
when Auto Hold is activated
The door is opened or the seatbelt
is unfastened when Auto Hold is
activated
The EPB switch is pressed when
Auto Hold is activated
The auto stop indicator ( ) blinks
in green for 5 seconds on the instru-
ment cluster.
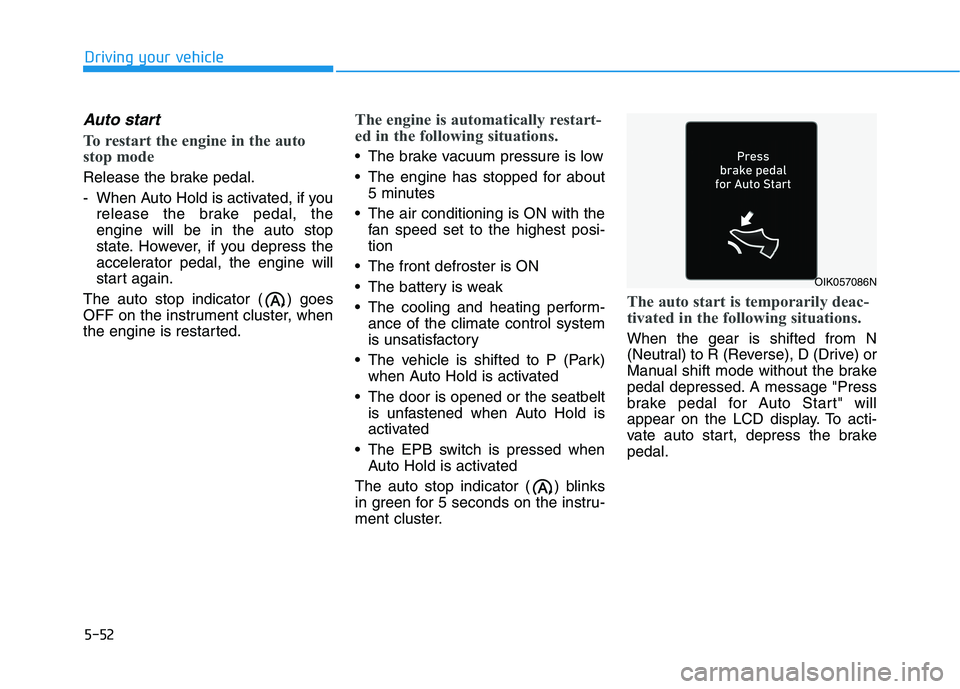
The auto start is temporarily deac-
tivated in the following situations.
When the gear is shifted from N
(Neutral) to R (Reverse), D (Drive) or
Manual shift mode without the brake
pedal depressed. A message "Press
brake pedal for Auto Start" will
appear on the LCD display. To acti-
vate auto start, depress the brake
pedal.
OIK057086N
Page 505 of 612

7
Maintenance
7
Maintenance
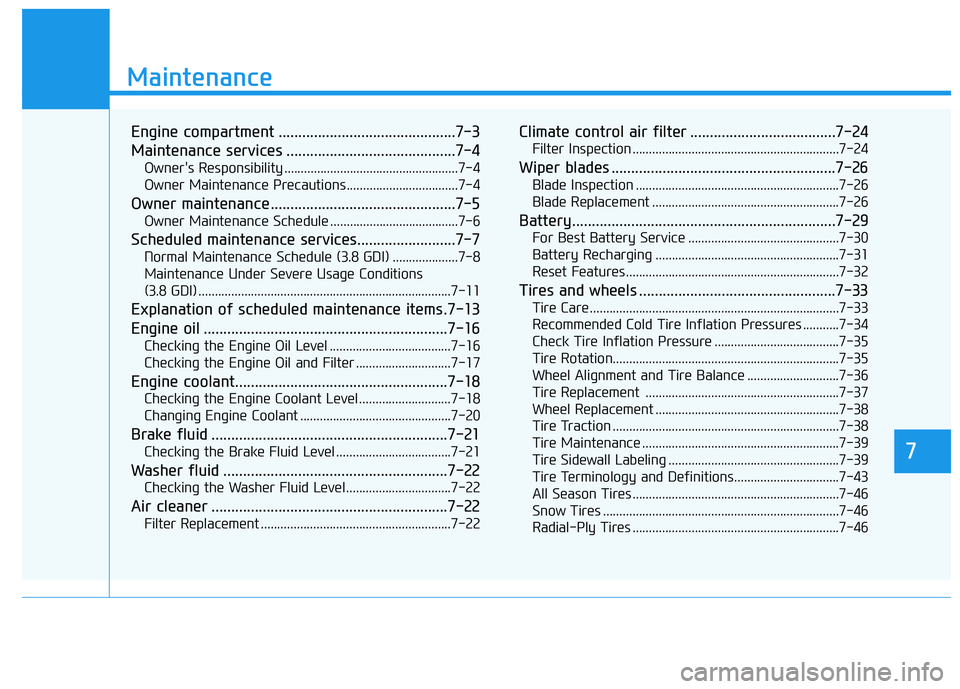
Engine compartment .............................................7-3
Maintenance services ...........................................7-4
Owner's Responsibility .....................................................7-4
Owner Maintenance Precautions..................................7-4
Owner maintenance ...............................................7-5
Owner Maintenance Schedule .......................................7-6
Scheduled maintenance services.........................7-7
Normal Maintenance Schedule (3.8 GDI) ....................7-8
Maintenance Under Severe Usage Conditions
(3.8 GDI) .............................................................................7-11
Explanation of scheduled maintenance items .7-13
Engine oil ..............................................................7-16
Checking the Engine Oil Level .....................................7-16
Checking the Engine Oil and Filter .............................7-17
Engine coolant......................................................7-18
Checking the Engine Coolant Level ............................7-18
Changing Engine Coolant ..............................................7-20
Brake fluid ............................................................7-21
Checking the Brake Fluid Level ...................................7-21
Washer fluid .........................................................7-22
Checking the Washer Fluid Level................................7-22
Air cleaner ............................................................7-22
Filter Replacement ..........................................................7-22
Climate control air filter .....................................7-24
Filter Inspection ...............................................................7-24
Wiper blades .........................................................7-26
Blade Inspection ..............................................................7-26
Blade Replacement .........................................................7-26
Battery...................................................................7-29
For Best Battery Service ..............................................7-30
Battery Recharging ........................................................7-31
Reset Features.................................................................7-32
Tires and wheels ..................................................7-33
Tire Care ............................................................................7-33
Recommended Cold Tire Inflation Pressures ...........7-34
Check Tire Inflation Pressure ......................................7-35
Tire Rotation.....................................................................7-35
Wheel Alignment and Tire Balance ............................7-36
Tire Replacement ...........................................................7-37
Wheel Replacement ........................................................7-38
Tire Traction .....................................................................7-38
Tire Maintenance ............................................................7-39
Tire Sidewall Labeling ....................................................7-39
Tire Terminology and Definitions................................7-43
All Season Tires ...............................................................7-46
Snow Tires ........................................................................7-46
Radial-Ply Tires ...............................................................7-46
7
Page 513 of 612

Maintenance
7
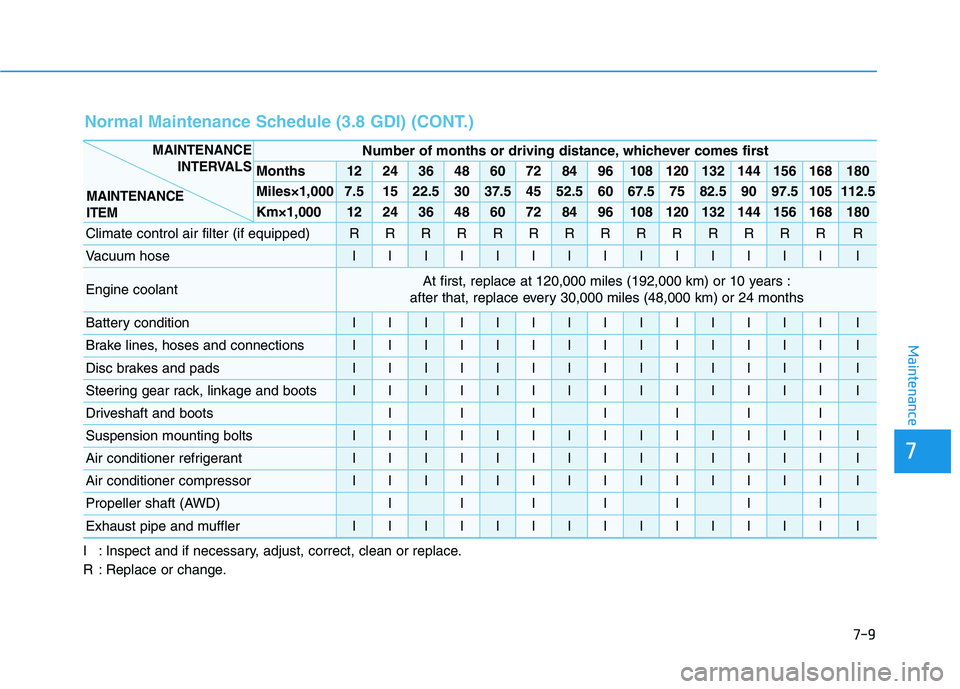
7-9 I : Inspect and if necessary, adjust, correct, clean or replace.
R : Replace or change.
Number of months or driving distance, whichever comes first
Months1224364860728496108120132144156168180
Miles×1,0007.51522.53037.54552.56067.57582.59097.5105112.5
Km×1,0001224364860728496108120132144156168180
Climate control air filter (if equipped)RRRRRRRRRRRRRRR
Vacuum hoseIIIIIIIIIIIIIII
Engine coolantAt first, replace at 120,000 miles (192,000 km) or 10 years :
after that, replace every 30,000 miles (48,000 km) or 24 months
Battery conditionIIIIIIIIIIIIIII
Brake lines, hoses and connectionsIIIIIIIIIIIIIII
Disc brakes and padsIIIIIIIIIIIIIII
Steering gear rack, linkage and bootsIIIIIIIIIIIIIII
Driveshaft and bootsIIIIIII
Suspension mounting boltsIIIIIIIIIIIIIII
Air conditioner refrigerantIIIIIIIIIIIIIII
Air conditioner compressorIIIIIIIIIIIIIII
Propeller shaft (AWD)IIIIIII
Exhaust pipe and mufflerIIIIIIIIIIIIIII
MAINTENANCE
INTERVALS
MAINTENANCE
ITEM
Normal Maintenance Schedule (3.8 GDI) (CONT.)