2021 HYUNDAI PALISADE heater
[x] Cancel search: heaterPage 282 of 612

3-186
Convenient features of your vehicle
For maximum defrost perform-
ance, set the temperature control
knob to the highest temperature
setting (rotated all the way to the
right) and the fan speed control to
the highest setting.
If warm air to the floor is desired
while defrosting or defogging, set the
mode to the floor-defrost position.
Before driving, clear all snow and
ice from the windshield, rear win-
dow, side view mirrors, and all side
windows.
Clear all snow and ice from the
hood and air inlet in the cowl grill to
improve heater and defroster effi-
ciency and to reduce the probability
of fogging up the inside of the wind-
shield.
If the engine temperature is still
cold after starting, then a brief
engine warm up period may be
required for the vented air flow to
become warm or hot.Manual Climate Control System
To defog inside windshield
1. Select any fan speed except "0"
position.
2. Select the desired temperature.
3. Select the or position.
4. Fresh mode will be selected auto-
matically. Additionally, the air condi-
tioning will automatically operate if
the mode is selected to the
position.
Check to make sure the A/C is ON. If
the A/C ON LED is not illuminated,
press the A/C button once to turn the
air conditioner ON.
NOTICE
W WI
IN
ND
DS
SH
HI
IE
EL
LD
D
D
DE
EF
FR
RO
OS
ST
TI
IN
NG
G
A
AN
ND
D
D
DE
EF
FO
OG
GG
GI
IN
NG
G
Windshield heating
Do not use the or posi-
tion during cooling operation in
extremely humid weather. The
difference between the temper-
ature of the outside air and that
of the windshield could cause
the outer surface of the wind-
shield to fog up, causing loss of
visibility could cause an acci-
dent resulting in serious injury
or death. In this case, set the
mode selection knob or button
to the position and fan
speed control knob or button to
a lower speed.
WARNING
OLX2048335L
Page 284 of 612

3-188
Convenient features of your vehicle
Defogging logic
To reduce the probability of fogging
up the inside of the windshield, the
air intake or air conditioning are con-
trolled automatically according to
certain conditions such as or
positions. To cancel or reset the
defogging logic, do the following.
Manual climate control system
1. Turn the ignition switch to the ON
position.
2. Press the defroster button ( ).
3. Press the air intake control button
at least 5 times within 3 seconds.
The LED indicator on the air intake
button will blink 3 times to indicate
that the defogging logic has been
disabled.
Repeat the steps again to re-enable
the defogging logic.
If the battery has been discharged or
disconnected, it resets to the defog
logic status.
Automatic climate control system
1. Turn the ignition switch to the ON
position.
2. Press the defroster button ( ).
3. While pressing the air conditioning
button (A/C), press the air intake
control button at least 5 times
within 3 seconds.
The Automatic Climate Control infor-
mation screen will blink 3 times to
indicate that the defogging logic has
been disabled.
Repeat the steps again to re-enable
the defogging logic.
If the battery has been discharged or
disconnected, it resets to the defog
logic status.
Auto Defogging System
(Additional Feature with
Automatic Temperature
Control System) (if equipped)
Auto defogging helps reduce the pos-
sibility of fogging up the inside of the
windshield by automatically sensing
the moisture on inside the windshield.
The auto defogging system operates
when the heater or air conditioning is
on.
Information
The auto defogging system may not
operate normally, when the outside
temperature is below 14 °F (-10 °C).
i
OLX2049322N
Page 293 of 612
3-197
Convenient features of your vehicle
3
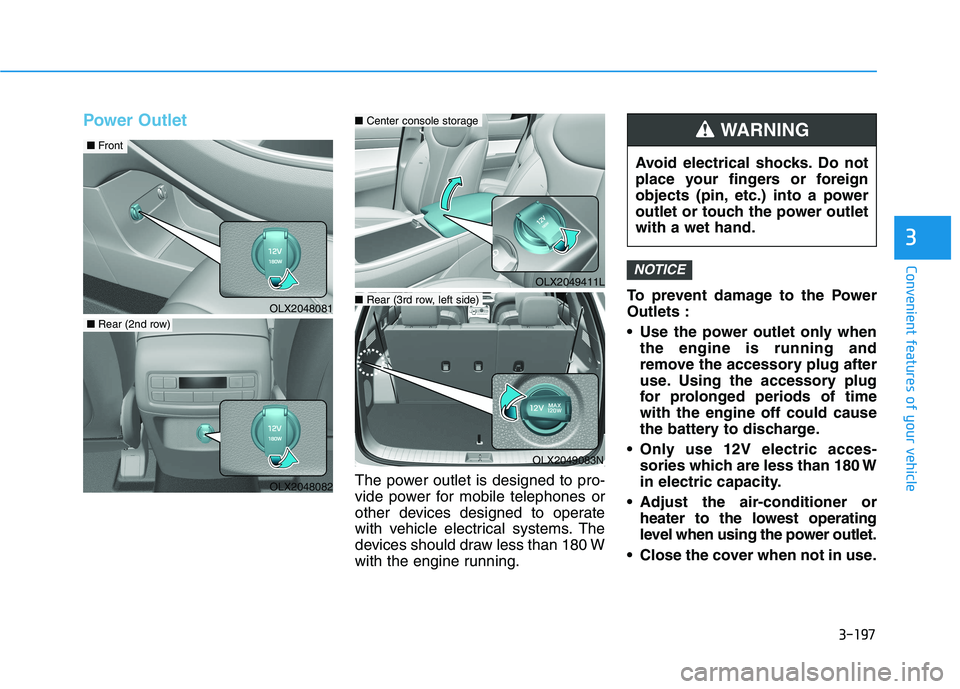
Power Outlet
The power outlet is designed to pro-
vide power for mobile telephones or
other devices designed to operate
with vehicle electrical systems. The
devices should draw less than 180 W
with the engine running.To prevent damage to the Power
Outlets :
Use the power outlet only when
the engine is running and
remove the accessory plug after
use. Using the accessory plug
for prolonged periods of time
with the engine off could cause
the battery to discharge.
Only use 12V electric acces-
sories which are less than 180 W
in electric capacity.
Adjust the air-conditioner or
heater to the lowest operating
level when using the power outlet.
Close the cover when not in use.
NOTICEOLX2049411L
Avoid electrical shocks. Do not
place your fingers or foreign
objects (pin, etc.) into a power
outlet or touch the power outlet
with a wet hand.
WARNING
OLX2048081
■Front
OLX2048082
■Rear (2nd row)
OLX2049083N
■Center console storage
■Rear (3rd row, left side)
Page 295 of 612
3-199
Convenient features of your vehicle
3
To prevent the battery from being
discharged, do not use the AC
inverter while the engine is not
running.
When not using the AC inverter,
make sure to close the AC invert-
er cover.
After using an electric accessory
or equipment, pull the plug out.
Leaving the accessory or equip-
ment plugged in for a long time
may cause battery discharge.
Do not use an electric accessory
or equipment the power con-
sumption of which is greater
than 150W (115V).
Some electric accessories or
equipments can cause electron-
ic interference. It may cause
excessive audio noise and mal-
functions in other electric sys-
tems or devices in the vehicle.
Do not use broken electric
accessories or equipments,
which may damage the AC
inverter and electrical systems
of the vehicle. Do not use two or more electric
accessories or equipments at
the same time. It may cause
damage to the electrical sys-
tems of the vehicle.
When the input voltage is lower,
outlet LED will blink and the AC
inverter will turn off automatical-
ly. If the input voltage goes up to
normal, the AC inverter will turn
on again.
NOTICE
To reduce a risk of serious or
fatal injuries:
Do not use a heated electric
device such as a coffeepot,
toaster, heater, iron, etc.
Do not insert foreign objects
into the outlet and do not
touch the outlet as you may
get shocked.
Do not let children touch the
AC inverter.
WARNING
Page 510 of 612
Owner Maintenance Schedule
When you stop for fuel:
• Check the engine oil level.
Check the coolant level in the
engine coolant reservoir.
Check the windshield washer fluid
level.
Check the tire for low or under-
inflated tires.
While operating your vehicle:
Note any changes in the sound of
the exhaust or any smell of
exhaust fumes in the vehicle.
Check for vibrations in the steering
wheel. Notice if there is any
increased steering effort or loose-
ness in the steering wheel, or
change in its straight-ahead posi-
tion.
Notice if your vehicle constantly
turns slightly or "pulls" to one side
when traveling on smooth, level
road.
When stopping, listen and check
for unusual sounds, pulling to one
side, increased brake pedal travel
or "hard-to-push" brake pedal.
If any slipping or changes in the
operation of your transmission
occurs, check the transmission
fluid level.
Check the automatic transmission
P (Park) function. Check the parking brake.
Check for fluid leaks under your
vehicle (water dripping from the air
conditioning system during or after
use is normal).
At least monthly:
Check coolant level in the engine
coolant reservoir.
Check the operation of all exterior
lights, including the brake lights,
turn signals and hazard warning
flashers.
Check the inflation pressures of all
tires including the spare for tires
that are worn, show uneven wear,
or are damaged.
Check for loose wheel lug nuts.
At least twice a year:
(i.e., every Spring and Autumn)
Check radiator, heater and air con-
ditioning hoses for leaks or dam-
age.
Check windshield washer spray
and wiper operation. Clean wiper
blades with a clean cloth damp-
ened with washer a fluid. Be careful when checking your
engine coolant level when the
engine is hot. This may result in
coolant being blown out of the
opening and cause serious
burns and other injuries.
WARNING
Maintenance
7-6
Page 522 of 612
7-18
Maintenance
E EN
NG
GI
IN
NE
E
C
CO
OO
OL
LA
AN
NT
T
The high-pressure cooling system
has a reservoir filled with year-round
antifreeze coolant. The reservoir is
filled at the factory.
Check the antifreeze protection and
coolant level at least once a year, at
the beginning of the winter season
and before traveling to a colder cli-
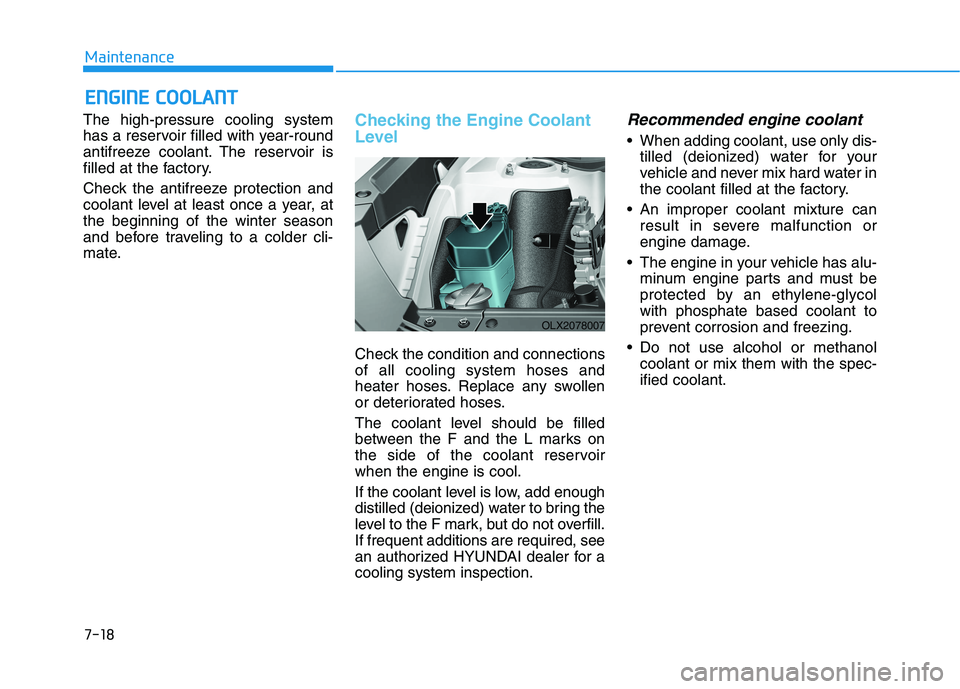
mate.Checking the Engine Coolant
Level
Check the condition and connections
of all cooling system hoses and
heater hoses. Replace any swollen
or deteriorated hoses.
The coolant level should be filled
between the F and the L marks on
the side of the coolant reservoir
when the engine is cool.
If the coolant level is low, add enough
distilled (deionized) water to bring the
level to the F mark, but do not overfill.
If frequent additions are required, see
an authorized HYUNDAI dealer for a
cooling system inspection.
Recommended engine coolant
When adding coolant, use only dis-
tilled (deionized) water for your
vehicle and never mix hard water in
the coolant filled at the factory.
An improper coolant mixture can
result in severe malfunction or
engine damage.
The engine in your vehicle has alu-
minum engine parts and must be
protected by an ethylene-glycol
with phosphate based coolant to
prevent corrosion and freezing.
Do not use alcohol or methanol
coolant or mix them with the spec-
ified coolant.
OLX2078007
Page 556 of 612
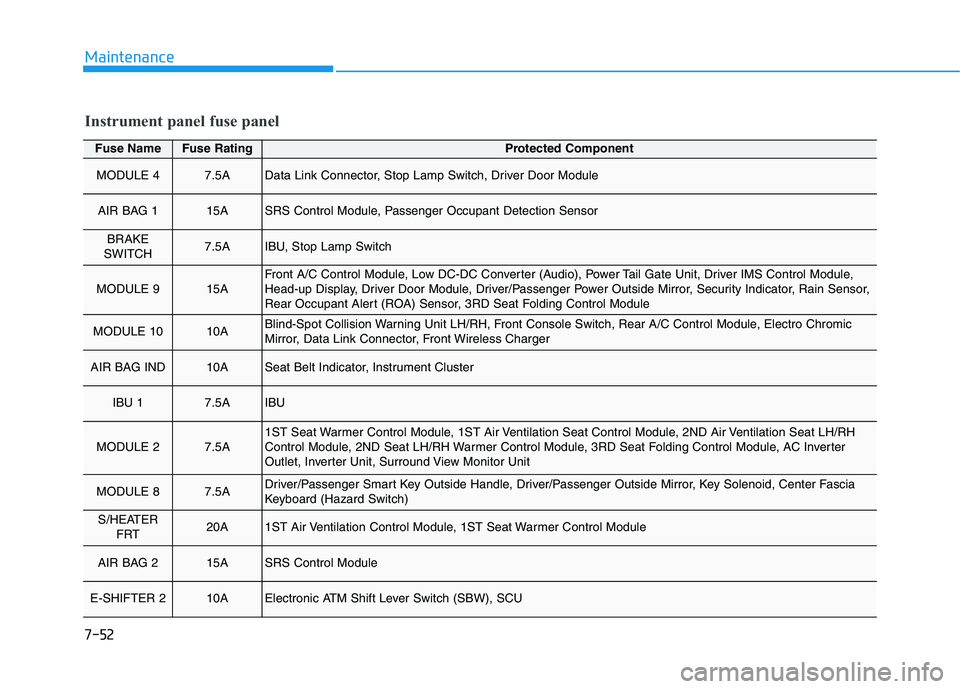
7-52
Maintenance
Fuse NameFuse RatingProtected Component
MODULE 47.5AData Link Connector, Stop Lamp Switch, Driver Door Module
AIR BAG 115ASRS Control Module, Passenger Occupant Detection Sensor
BRAKE
SWITCH7.5AIBU, Stop Lamp Switch
MODULE 915AFront A/C Control Module, Low DC-DC Converter (Audio), Power Tail Gate Unit, Driver IMS Control Module,
Head-up Display, Driver Door Module, Driver/Passenger Power Outside Mirror, Security Indicator, Rain Sensor,
Rear Occupant Alert (ROA) Sensor, 3RD Seat Folding Control Module
MODULE 1010ABlind-Spot Collision Warning Unit LH/RH, Front Console Switch, Rear A/C Control Module, Electro Chromic
Mirror, Data Link Connector, Front Wireless Charger
AIR BAG IND10ASeat Belt Indicator, Instrument Cluster
IBU 17.5AIBU
MODULE 27.5A1ST Seat Warmer Control Module, 1ST Air Ventilation Seat Control Module, 2ND Air Ventilation Seat LH/RH
Control Module, 2ND Seat LH/RH Warmer Control Module, 3RD Seat Folding Control Module, AC Inverter
Outlet, Inverter Unit, Surround View Monitor Unit
MODULE 87.5ADriver/Passenger Smart Key Outside Handle, Driver/Passenger Outside Mirror, Key Solenoid, Center Fascia
Keyboard (Hazard Switch)
S/HEATER
FRT20A1ST Air Ventilation Control Module, 1ST Seat Warmer Control Module
AIR BAG 215ASRS Control Module
E-SHIFTER 210AElectronic ATM Shift Lever Switch (SBW), SCU
Instrument panel fuse panel
Page 557 of 612

7-53
7
Maintenance
Fuse NameFuse RatingProtected Component
MODULE 57.5ACrash Pad Switch, IBU, Smart Cruise Control Radar, 4WD ECM, Front Console Switch, Lane Keeping Assist
Unit (Line)
IBU 215AIBU, Ignition Switch
SUNROOF 220APanoramic Sunroof
MODULE 17.5AIBU
P/SEAT (3rd)20A3RD Seat Folding Control Module
P/WINDOW
RH25APassenger Safety Power Window Module, Rear Power Window Switch RH
RR SEAT (LH)25A2ND Air Ventilation Seat LH Control Module, 2ND Seat LH Warmer, Control Module, 2ND Seat LH Reclining
Folding Actuator
CLUSTER7.5AInstrument Cluster, Head Up Display
MDPS10AMDPS Unit
A/C7.5AE/R Junction Block (Blower FRT Relay, Blower RR Relay, PTC Heater 1/2 Relay), Front A/C Control Module
CHILD LOCK15AICM Relay Box (Child Lock/Unlock Relay)
DOOR LOCK20ADoor Lock Relay, Door Unlock Relay, Liftgate Relay, Two Turn Unlock Relay
Instrument panel fuse panel