Page 170 of 506
3-86
Convenient features of your vehicle
The driving information will continue to
be counted while the engine is still run-
ning (for example, when the vehicle is
in traffic or stopped at a stop light).
Information
The vehicle must be driven for a mini-
mum of 0.19 miles (300 meters) since the
last ignition key cycle before the average
fuel economy will be recalculated.
Digital speedometer
The digital speedometer display
shows the speed of the vehicle.
i
OPDE046145R
Page 172 of 506
3-88
Convenient features of your vehicle
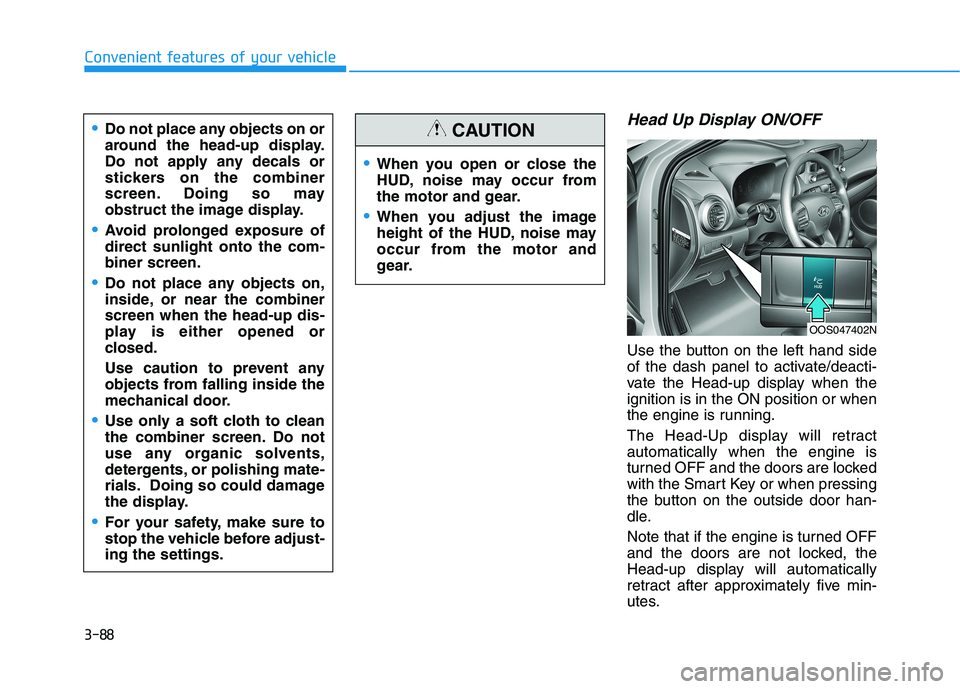
Head Up Display ON/OFF
Use the button on the left hand side
of the dash panel to activate/deacti-
vate the Head-up display when the
ignition is in the ON position or when
the engine is running.
The Head-Up display will retract
automatically when the engine is
turned OFF and the doors are locked
with the Smart Key or when pressing
the button on the outside door han-
dle.
Note that if the engine is turned OFF
and the doors are not locked, the
Head-up display will automatically
retract after approximately five min-
utes.
When you open or close the
HUD, noise may occur from
the motor and gear.
When you adjust the image
height of the HUD, noise may
occur from the motor and
gear.
CAUTIONDo not place any objects on or
around the head-up display.
Do not apply any decals or
stickers on the combiner
screen. Doing so may
obstruct the image display.
Avoid prolonged exposure of
direct sunlight onto the com-
biner screen.
Do not place any objects on,
inside, or near the combiner
screen when the head-up dis-
play is either opened or
closed.
Use caution to prevent any
objects from falling inside the
mechanical door.
Use only a soft cloth to clean
the combiner screen. Do not
use any organic solvents,
detergents, or polishing mate-
rials. Doing so could damage
the display.
For your safety, make sure to
stop the vehicle before adjust-
ing the settings.
OOS047402N
Page 175 of 506
3-91
Convenient features of your vehicle
3
• Do not cover or spill anything on
the sensor (1) located in front of
the instrument panel.
Do not clean the sensor using a
window cleaner, the cleanser may
leave a light film which could
interfere with sensor operation.
If your vehicle has window tint
or other types of metallic coat-
ing on the front windshield, the
AUTO headlamp system may not
work properly.
Parking lamp position ( )
The parking lamp, license plate lamp
and instrument panel lamp are turned
ON.
Headlamp position ( )
The headlamp, parking lamp, license
plate lamp and instrument panel lamp
are turned ON.
Information
The ignition switch must be in the ON
position to turn on the headlamp.
i
NOTICE
OOS047405NOOS047406N
Page 181 of 506
3-97
Convenient features of your vehicle
3
Headlamp delay function
If the key is removed from the ignition
switch or placed in the ACC position
or the LOCK/OFF position with the
headlamps ON, the headlamps
(and/or parking lamps) remain on for
about 5 minutes. However, if the dri-
ver’s door is opened and closed, the
headlights are turned off after 15
seconds. Also, with the engine off if
the driver's door is opened and
closed, the headlamps (and/or park-
ing lamps) are turned off after 15
seconds.
The headlamps (and/or parking
lamps) can be turned off by pressing
the lock button on the remote key or
smart key twice or turning the head-
lamp switch to the OFF or AUTO
position.
You can activate or deactivate the
Headlamp Delay function from the
User Settings Mode in the LCD dis-
play.
For more information, refer to the
"LCD Display" section in this
chapter.If the driver exits the vehicle
through another door besides the
driver door, the battery saver func-
tion does not operate and the
headlamp delay function does not
turn OFF automatically.
This may cause the battery to dis-
charge. To avoid battery dis-
charge, turn OFF the headlamps
manually from the headlamp
switch before exiting the vehicle.
Smart cornering lamp
(if equipped)
As an optional safety feature, your
vehicle may be equipped with a
smart cornering lamp. The cornering
lamp turns ON automatically while
driving when the vehicle enters into a
cornering maneuver.
The system will operate under the
following conditions:
When the headlamps are turned
ON
When the steering angle is above
25 to 35 degrees (depending on
vehicle speed)
When the vehicle speed is under
25 mph (40 kph)
When the smart cornering lamp
turns on, the front fog lamp turns off.
(if equipped)
NOTICE
Page 182 of 506
3-98
Convenient features of your vehicle
Interior Lights
Do not use the interior lights for
extended periods when the vehi-
cle is turned off or the battery will
discharge.
Interior lamp AUTO cut
The interior lamps will automatically
go off approximately 20 minutes after
the engine is turned off and the
doors are closed. If a door is opened,
the lamp will go off 40 minutes after
the engine is turned off. If the doors
are locked by the remote key or
smart key and the vehicle enters the
armed stage of the theft alarm sys-
tem, the lamps will go off five sec-
onds later.
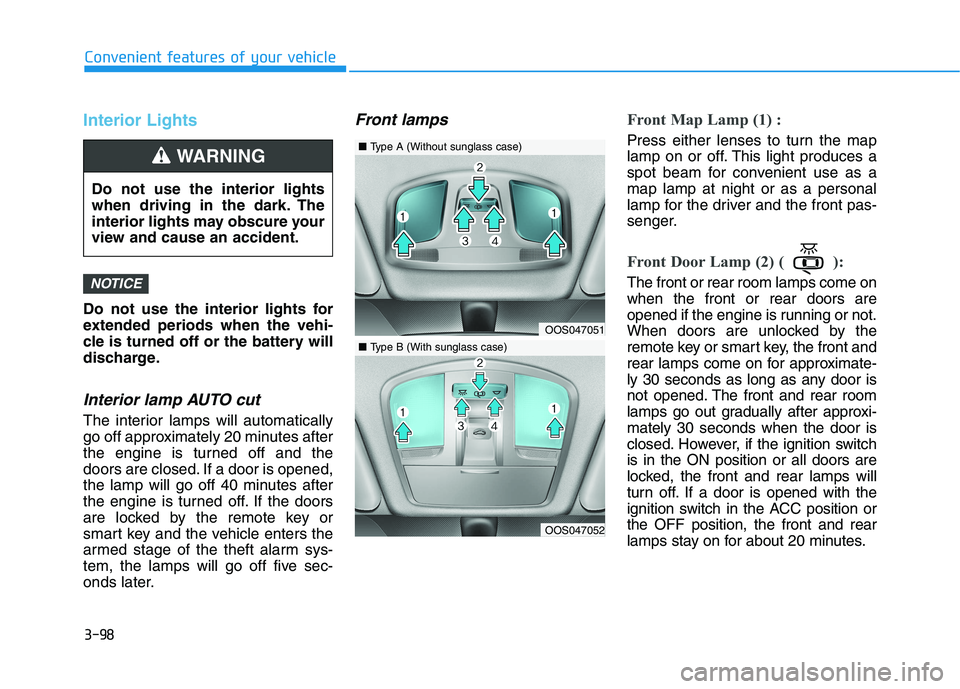
Front lampsFront Map Lamp (1) :
Press either lenses to turn the map
lamp on or off. This light produces a
spot beam for convenient use as a
map lamp at night or as a personal
lamp for the driver and the front pas-
senger.
Front Door Lamp (2) ( ):
The front or rear room lamps come on
when the front or rear doors are
opened if the engine is running or not.
When doors are unlocked by the
remote key or smart key, the front and
rear lamps come on for approximate-
ly 30 seconds as long as any door is
not opened. The front and rear room
lamps go out gradually after approxi-
mately 30 seconds when the door is
closed. However, if the ignition switch
is in the ON position or all doors are
locked, the front and rear lamps will
turn off. If a door is opened with the
ignition switch in the ACC position or
the OFF position, the front and rear
lamps stay on for about 20 minutes.NOTICE
OOS047051
OOS047052
■Type A (Without sunglass case)
■Type B (With sunglass case)
Do not use the interior lights
when driving in the dark. The
interior lights may obscure your
view and cause an accident.
WARNING
Page 186 of 506
3-102
Convenient features of your vehicle
LO : The wiper runs at a lower speed.
HI : The wiper runs at a higher speed.
Information
If there is heavy accumulation of snow
or ice on the windshield, defrost the
windshield for about 10 minutes, or
until the snow and/or ice is removed
before using the windshield wipers to
ensure proper operation.
If you do not remove the snow and/or
ice before using the wiper and washer,
it may damage the wiper and washer
system.
AUTO (Automatic) control
(if equipped)
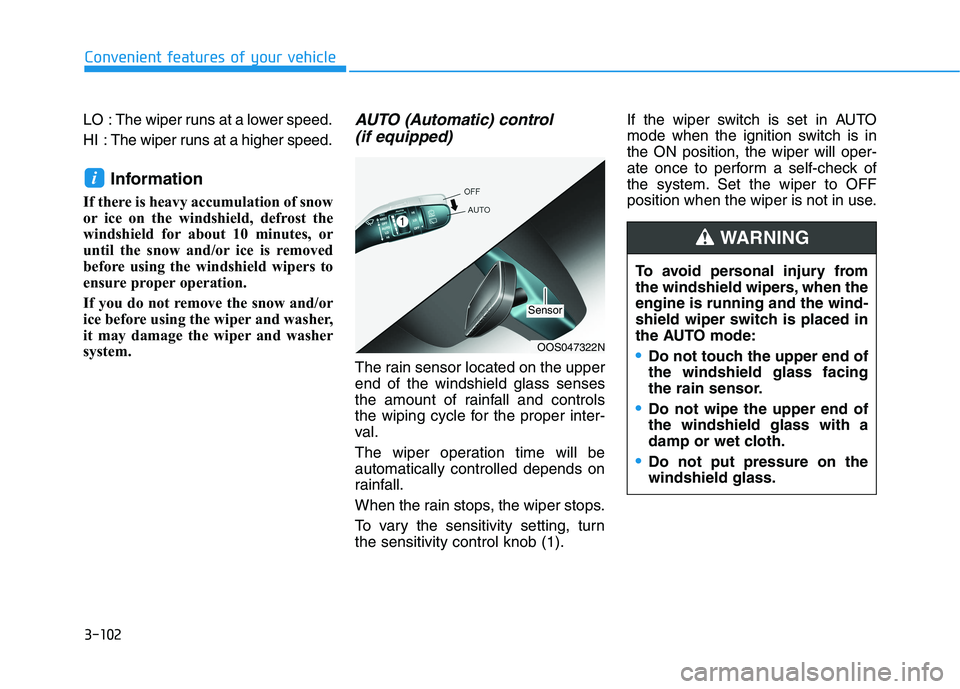
The rain sensor located on the upper
end of the windshield glass senses
the amount of rainfall and controls
the wiping cycle for the proper inter-
val.
The wiper operation time will be
automatically controlled depends on
rainfall.
When the rain stops, the wiper stops.
To vary the sensitivity setting, turn
the sensitivity control knob (1).If the wiper switch is set in AUTO
mode when the ignition switch is in
the ON position, the wiper will oper-
ate once to perform a self-check of
the system. Set the wiper to OFF
position when the wiper is not in use.
i
To avoid personal injury from
the windshield wipers, when the
engine is running and the wind-
shield wiper switch is placed in
the AUTO mode:
Do not touch the upper end of
the windshield glass facing
the rain sensor.
Do not wipe the upper end of
the windshield glass with a
damp or wet cloth.
Do not put pressure on the
windshield glass.
WARNING
OOS047322N
Sensor
Page 190 of 506
![HYUNDAI KONA 2021 Owners Manual 3-106
Convenient features of your vehicle
Parking Distance Warning
(Reverse) system (if equipped)
[A] : Sensor
The Parking Distance Warning
(Reverse) System assists the driver
during reverse movement HYUNDAI KONA 2021 Owners Manual 3-106
Convenient features of your vehicle
Parking Distance Warning
(Reverse) system (if equipped)
[A] : Sensor
The Parking Distance Warning
(Reverse) System assists the driver
during reverse movement](/manual-img/35/41161/w960_41161-189.png)
3-106
Convenient features of your vehicle
Parking Distance Warning
(Reverse) system (if equipped)
[A] : Sensor
The Parking Distance Warning
(Reverse) System assists the driver
during reverse movement of the vehi-
cle by chiming if any object is sensed
within approximately 50 in (120 cm)
behind the vehicle.
This system is a supplemental sys-
tem that senses objects within the
range and location of the sensors, it
cannot detect objects in other areas
where sensors are not installed.
Operation of the Parking
Distance Warning (Reverse)
system
Operating condition
This system will activate when
backing up with the ignition switch
in the ON position. However, if the
vehicle speed exceeds 3 mph
(5km/h), the system may not detect
objects.
If the vehicle speed exceeds 6 mph
(10 km/h), the system will not warn
you even though objects are
detected.
When more than two objects are
sensed at the same time, the clos-
est one will be recognized first.
ALWAYS look around your vehi-
cle to make sure there are not
any objects or obstacles before
moving the vehicle in any direc-
tion to prevent a collision.
Always pay close attention
when the vehicle is driven close
to objects, particularly pedestri-
ans, and especially children.
Be aware that some objects
may not be visible on the
screen or be detected by the
sensors, due to the objects
distance, size or material, all of
which can limit the effective-
ness of the sensor.
WARNING
OOS047042
Page 198 of 506
3-114
Convenient features of your vehicle
Fan speed control (1)
Turn the knob to the right to increase
the fan speed and airflow. Turn the
knob to the left to decrease fan
speed and airflow.
Setting the fan speed control knob to
the "0" position turns off the fan.
Operating the fan speed when the
ignition switch is in the ON posi-
tion could cause the battery to
discharge. Operate the fan speed
when the engine is running.
Air conditioning (5)
Push the A/C button to turn the sys-
tem on (indicator light will illuminate)
and off.
System Operation
Cooling / Ventilation
1. Select the Face Level mode.
2. Set the air intake control to fresh
mode.
3. Set the temperature control to the
desired position.
4. Set the fan speed control to the
desired speed.
Heating
1. Select the Floor Level mode.
2. Set the air intake control to fresh
mode.
3. Set the temperature control to the
desired position.
4. Set the fan speed control to the
desired speed.
5. If desired, turn the air conditioning
ON with the temperature control
knob set to heat in order to dehu-
midify the air before it enters into
the cabin.
If the windshield fogs up, select the
Floor & Defrost mode or press
the Front Defrost mode.
NOTICE
Continued use of the climate
control system operation in
Recirculation mode for a pro-
longed period of time may
cause drowsiness to the
occupants in the cabin. This
may lead to loss of vehicle
control which may lead to an
accident.
Continued use of the climate
control system operation in
Recirculation mode with the
A/C OFF may allow humidity
to increase inside the cabin.
This may cause condensation
to accumulate on the wind-
shield and obscure visibility.
Do not sleep in your vehicle or
remain parked in your vehicle
with the windows up and
either the heater or the air
conditioning ON for pro-
longed periods of time. Doing
so may increase the levels of
carbon dioxide in the cabin
which may lead to serious
injury or death.
WARNING