2021 HYUNDAI KONA EV mirror
[x] Cancel search: mirrorPage 11 of 478
1-2
E EX
XT
TE
ER
RI
IO
OR
R
O
OV
VE
ER
RV
VI
IE
EW
W
Your vehicle at a glance
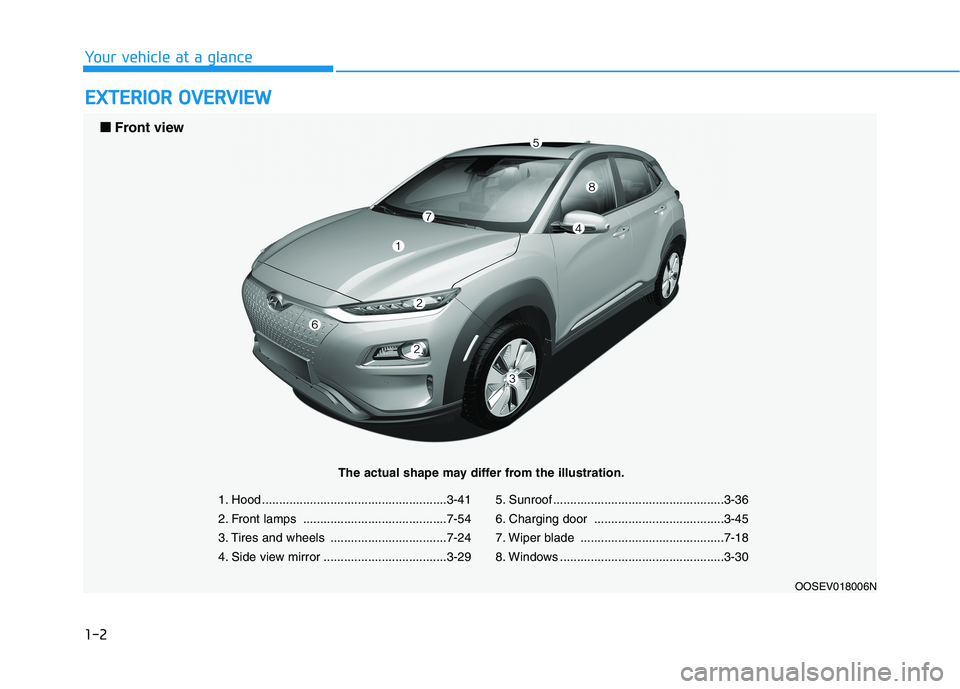
1. Hood ......................................................3-41
2. Front lamps ..........................................7-54
3. Tires and wheels ..................................7-24
4. Side view mirror ....................................3-295. Sunroof ..................................................3-36
6. Charging door ......................................3-45
7. Wiper blade ..........................................7-18
8. Windows ................................................3-30
OOSEV018006N
■ ■
Front view
The actual shape may differ from the illustration.
Page 13 of 478
1-4
Your vehicle at a glance
I IN
NT
TE
ER
RI
IO
OR
R
O
OV
VE
ER
RV
VI
IE
EW
W
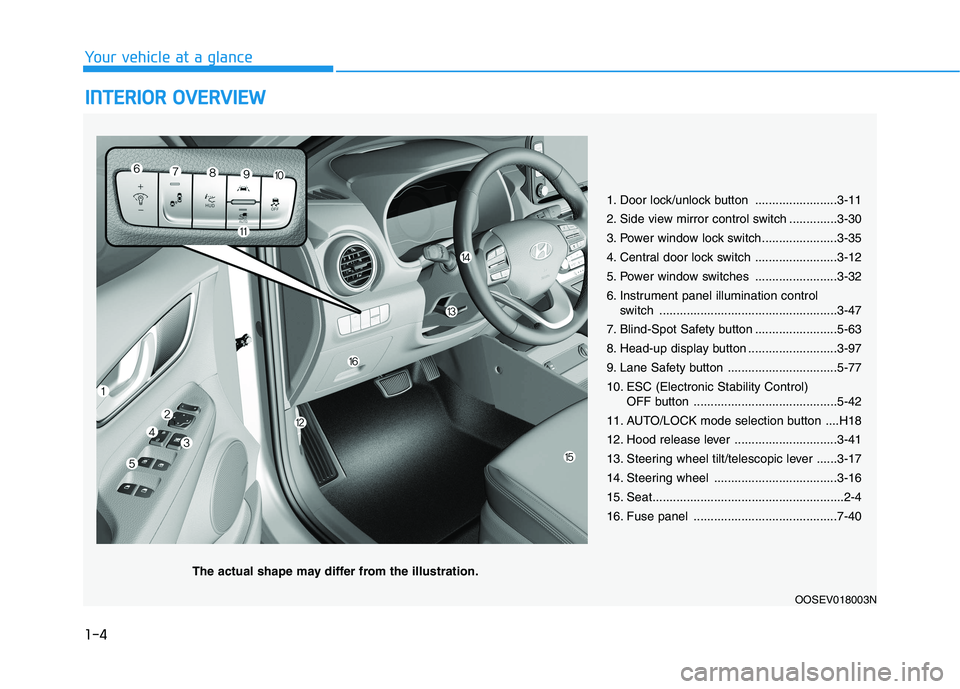
1. Door lock/unlock button ........................3-11
2. Side view mirror control switch ..............3-30
3. Power window lock switch......................3-35
4. Central door lock switch ........................3-12
5. Power window switches ........................3-32
6. Instrument panel illumination control
switch ....................................................3-47
7. Blind-Spot Safety button ........................5-63
8. Head-up display button ..........................3-97
9. Lane Safety button ................................5-77
10. ESC (Electronic Stability Control)
OFF button ..........................................5-42
11. AUTO/LOCK mode selection button ....H18
12. Hood release lever ..............................3-41
13. Steering wheel tilt/telescopic lever ......3-17
14. Steering wheel ....................................3-16
15. Seat........................................................2-4
16. Fuse panel ..........................................7-40
OOSEV018003N
The actual shape may differ from the illustration.
Page 65 of 478
![HYUNDAI KONA EV 2021 Owners Manual 2-50
Safety system of your vehicle
Side air bags ]
Your vehicle is equipped with a side
air bag in each front seat.The purpose of the air bag is to pro-
vide the vehicles driver and the front
passeng HYUNDAI KONA EV 2021 Owners Manual 2-50
Safety system of your vehicle
Side air bags ]
Your vehicle is equipped with a side
air bag in each front seat.The purpose of the air bag is to pro-
vide the vehicles driver and the front
passeng](/manual-img/35/56172/w960_56172-64.png)
2-50
Safety system of your vehicle
Side air bags ]
Your vehicle is equipped with a side
air bag in each front seat.The purpose of the air bag is to pro-
vide the vehicle's driver and the front
passenger with additional protection
than that offered by the seat belt
alone.
The side air bags are designed to
deploy during certain side impact col-
lisions, depending on the crash sever-
ity.
The side and curtain air bags on
both sides of the vehicle may deploy
if a rollover or possible rollover is
detected.
The side air bags are not designed to
deploy in all side impact or rollover
situations.
OOS037040
OOS037041
To reduce the risk of serious
injury or death from an inflating
side air bag, take the following
precautions:
Seat belts must be worn at all
times to help keep occupants
positioned properly.
WARNING
Move your seat as far back as
possible from front air bags,
while still maintaining control
of the vehicle.
Never lean against the door or
center console.
Do not allow the front passen-
ger to place their feet or legs
on the dashboard.
No objects (such as crash pad
cover, cellular phone holder,
cup holder, perfume or stick-
ers) should be placed over or
near the air bag modules on
the steering wheel, instrument
panel, windshield glass, and
the front passenger's panel
above the glove box. Such
objects could cause harm if
the vehicle is in a crash
severe enough to cause the
air bags to deploy.
Do not attach any objects on
front windshield and inside
mirror.
Page 85 of 478
Convenient features of your vehicle
Accessing Your Vehicle .........................................3-3
Smart Key ..........................................................................3-3
Immobilizer System ..........................................................3-8
Door Locks ............................................................3-10
Operating Door Locks from Outside the Vehicle ..3-10
Operating Door Locks from Inside the Vehicle ......3-11
Automatic Door Lock and Unlock Features .............3-13
Child-Protector Rear Door Locks ...............................3-14
Theft-Alarm System ............................................3-15
Steering Wheel .....................................................3-16
Electric Power Steering (EPS) .....................................3-16
Tilt Steering / Telescopic Steering .............................3-17
Horn ....................................................................................3-18
Heated Steering Wheel ..................................................3-18
Mirrors ...................................................................3-19
Inside Rearview Mirror ..................................................3-19
Side View Mirrors ...........................................................3-29
Windows ................................................................3-32
Power Windows ...............................................................3-33
Sunroof..................................................................3-36
Sunroof Opening and Closing ......................................3-37
Sliding the Sunroof .........................................................3-37
Tilting the Sunroof .........................................................3-38
Sunshade ...........................................................................3-39
Resetting the Sunroof ...................................................3-39
Sunroof Open Warning ..................................................3-40
Exterior Features .................................................3-41
Hood ...................................................................................3-41
Liftgate ..............................................................................3-43
Charging Door ..................................................................3-45
Instrument Cluster ...............................................3-46
Instrument Cluster Control............................................3-47
Gauges and Meters ........................................................3-48
Warning and Indicator lights ........................................3-53
LCD Display Messages ..................................................3-65
LCD Display ...........................................................3-78
LCD Display Control ........................................................3-78
LCD Display Modes ........................................................3-79
Trip Computer .......................................................3-92
Head Up Display (HUD) .......................................3-96
Lighting..................................................................3-99
Exterior Lights .................................................................3-99
Smart Cornering Lamp.................................................3-106
Welcome System ...........................................................3-106
Interior Lights ................................................................3-107
Wipers and Washers ........................................3-110
Front Windshield Wipers ...........................................3-110
Front Windshield Washers ........................................3-112
Rear Window Wiper and Washer..............................3-113
3
Page 103 of 478
3-19
Convenient features of your vehicle
3
M MI
IR
RR
RO
OR
RS
S
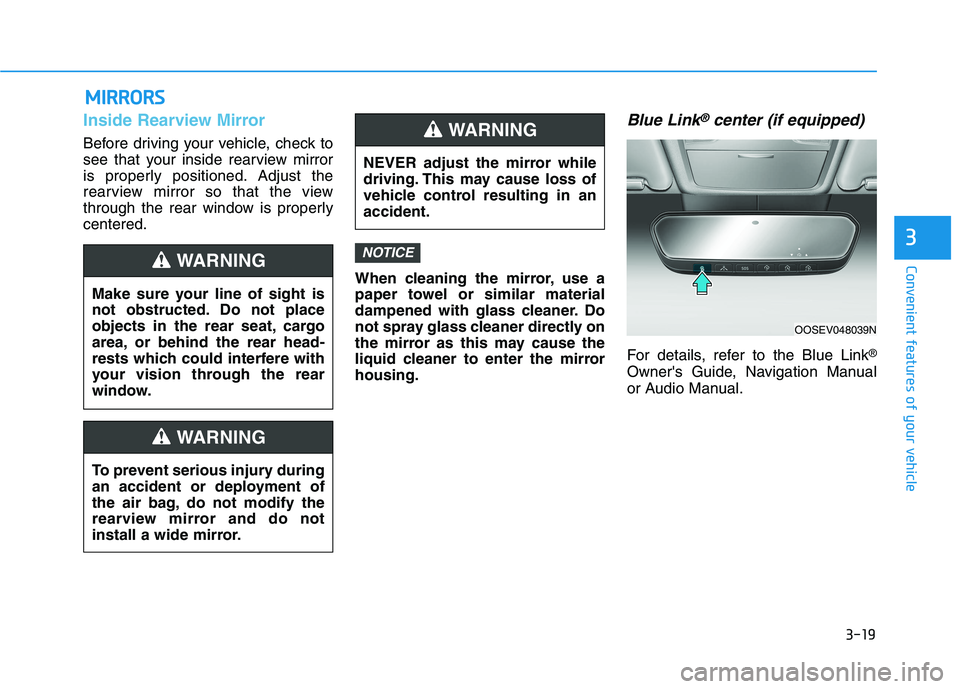
Inside Rearview Mirror
Before driving your vehicle, check to
see that your inside rearview mirror
is properly positioned. Adjust the
rearview mirror so that the view
through the rear window is properly
centered.
When cleaning the mirror, use a
paper towel or similar material
dampened with glass cleaner. Do
not spray glass cleaner directly on
the mirror as this may cause the
liquid cleaner to enter the mirror
housing.
Blue Link®center (if equipped)
For details, refer to the Blue Link®
Owner's Guide, Navigation Manual
or Audio Manual.
NOTICE
NEVER adjust the mirror while
driving. This may cause loss of
vehicle control resulting in an
accident.
WARNING
Make sure your line of sight is
not obstructed. Do not place
objects in the rear seat, cargo
area, or behind the rear head-
rests which could interfere with
your vision through the rear
window.
WARNING
To prevent serious injury during
an accident or deployment of
the air bag, do not modify the
rearview mirror and do not
install a wide mirror.
WARNING
OOSEV048039N
Page 104 of 478
3-20
Convenient features of your vehicle
Electrochromic mirror (ECM) with
HomeLink®system, compass and
Blue Link®(if equipped)
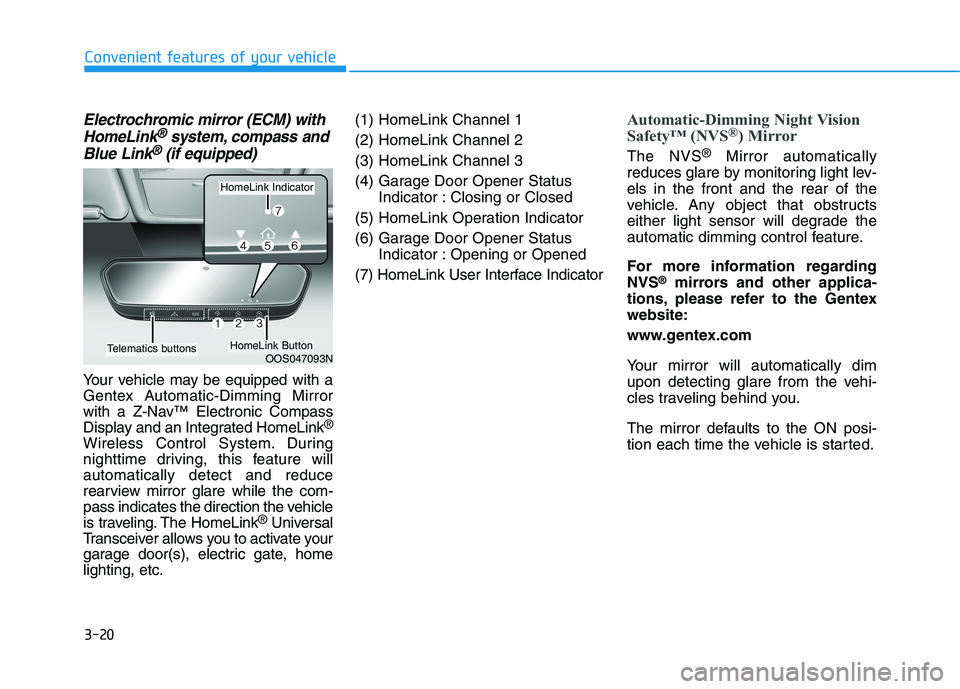
Your vehicle may be equipped with a
Gentex Automatic-Dimming Mirror
with a Z-Nav™ Electronic Compass
Display and an Integrated HomeLink
®
Wireless Control System. During
nighttime driving, this feature will
automatically detect and reduce
rearview mirror glare while the com-
pass indicates the direction the vehicle
is traveling. The HomeLink
®Universal
Transceiver allows you to activate your
garage door(s), electric gate, home
lighting, etc.(1) HomeLink Channel 1
(2) HomeLink Channel 2
(3) HomeLink Channel 3
(4) Garage Door Opener Status
Indicator : Closing or Closed
(5) HomeLink Operation Indicator
(6) Garage Door Opener Status
Indicator : Opening or Opened
(7) HomeLink User Interface Indicator
Automatic-Dimming Night Vision
Safety™ (NVS®) Mirror
The NVS®Mirror automatically
reduces glare by monitoring light lev-
els in the front and the rear of the
vehicle. Any object that obstructs
either light sensor will degrade the
automatic dimming control feature.
For more information regarding
NVS
®mirrors and other applica-
tions, please refer to the Gentex
website:
www.gentex.com
Your mirror will automatically dim
upon detecting glare from the vehi-
cles traveling behind you.
The mirror defaults to the ON posi-
tion each time the vehicle is started.
OOS047093N
HomeLink Indicator
HomeLink ButtonTelematics buttons
Page 105 of 478
3-21
Convenient features of your vehicle
3
Z-Nav™ Compass Display
The NVS™ Mirror in your vehicle is
also equipped with a Z-Nav™
Compass that shows the vehicle
Compass heading in the Display
Window using the 8 basic cardinal
headings (N, NE, E, SE, etc.).
Compass function
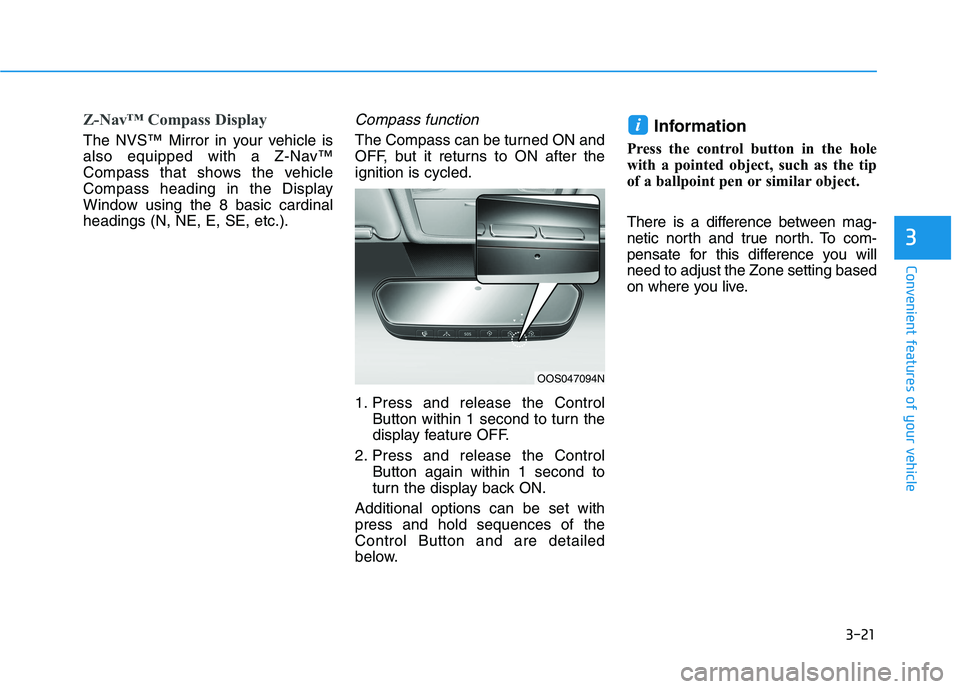
The Compass can be turned ON and
OFF, but it returns to ON after the
ignition is cycled.
1. Press and release the Control
Button within 1 second to turn the
display feature OFF.
2. Press and release the Control
Button again within 1 second to
turn the display back ON.
Additional options can be set with
press and hold sequences of the
Control Button and are detailed
below.Information
Press the control button in the hole
with a pointed object, such as the tip
of a ballpoint pen or similar object.
There is a difference between mag-
netic north and true north. To com-
pensate for this difference you will
need to adjust the Zone setting based
on where you live.
i
OOS047094N
Page 108 of 478
3-24
Convenient features of your vehicle
Programming HomeLink®
Please note the following:
When programming a garage door
opener, it is advised to park the
vehicle outside of the garage.
It is recommended that a new bat-
tery be placed in the hand-held
transmitter of the device being pro-
grammed to HomeLink
®for quicker
training and accurate transmission
of the radio-frequency signal.
Some vehicles may require the
ignition switch to be placed in the
ACC (or "Accessories") position for
programming and/or operation of
HomeLink
®.
In the event that there are still pro-
gramming difficulties or questions
after following the programming
steps listed below, contact
HomeLink
®at: www.homelink.com,
www.youtube.com/HomeLinkGentex
or by calling 1-800-355-3515.
Programming
To program most devices, follow
these instructions:
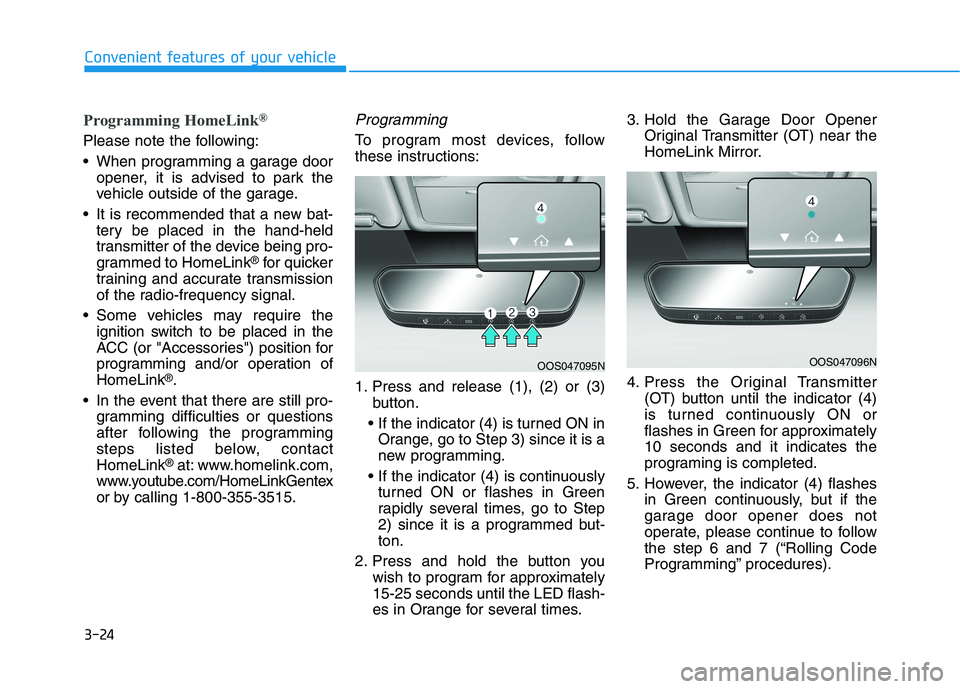
1. Press and release (1), (2) or (3)
button.
Orange, go to Step 3) since it is a
new programming.
turned ON or flashes in Green
rapidly several times, go to Step
2) since it is a programmed but-
ton.
2. Press and hold the button you
wish to program for approximately
15-25 seconds until the LED flash-
es in Orange for several times.3. Hold the Garage Door Opener
Original Transmitter (OT) near the
HomeLink Mirror.
4. Press the Original Transmitter
(OT) button until the indicator (4)
is turned continuously ON or
flashes in Green for approximately
10 seconds and it indicates the
programing is completed.
5. However, the indicator (4) flashes
in Green continuously, but if the
garage door opener does not
operate, please continue to follow
the step 6 and 7 (“Rolling Code
Programming” procedures).
OOS047095NOOS047096N