Page 310 of 478
5-75
Driving your vehicle
- United States & U.S. territory,
Micronesia, Dominican
Republic and Honduras- Canada
D DE
EC
CL
LA
AR
RA
AT
TI
IO
ON
N
O
OF
F
C
CO
ON
NF
FO
OR
RM
MI
IT
TY
Y
(
(I
IF
F
E
EQ
QU
UI
IP
PP
PE
ED
D)
)
5OANATEL002
OANATEL003
OANATEL004
The radio frequency components (Rear Corner Radar) complies:
Page 346 of 478
5-111
Driving your vehicle
5
Information
Radio frequency radiation exposure
information:
This equipment complies with FCC
radiation exposure limits set forth for
an uncontrolled environment.
This equipment should be installed
and operated with minimum distance
of 8 in. (20 cm) between the radiator
(antenna) and your body.
This transmitter must not be co-locat-
ed or operating in conjunction with
any other antenna or transmitter.
i
Page 364 of 478

6-5
What to do in an emergency
6
Pb
Information
An inappropriately disposed
battery can be harmful to the
environment and human
health. Dispose of the battery
according to your local law(s)
or regulations.
To prevent damage to your vehi-
cle:
Only use a 12-volt power supply
(battery or jumper system) to
jump start your vehicle.
Do not attempt to jump start
your vehicle by push-starting.
Jump starting procedure
1. Position the vehicles close enough
that the jumper cables will reach,
but do not allow the vehicles to
touch.
2. Avoid fans or any moving parts in
the motor compartment at all
times, even when the vehicles are
turned off.
3. Turn off all electrical devices such
as radios, lights, air conditioning,
etc. Put the vehicles in P (Park)
and set the parking brakes. Turn
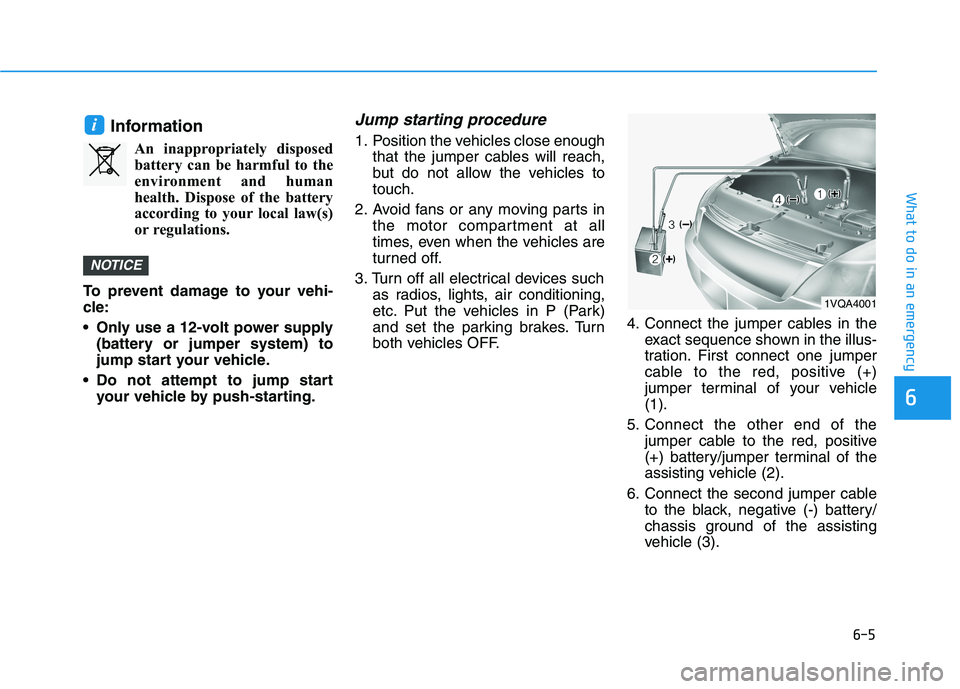
both vehicles OFF.4. Connect the jumper cables in the
exact sequence shown in the illus-
tration. First connect one jumper
cable to the red, positive (+)
jumper terminal of your vehicle
(1).
5. Connect the other end of the
jumper cable to the red, positive
(+) battery/jumper terminal of the
assisting vehicle (2).
6. Connect the second jumper cable
to the black, negative (-) battery/
chassis ground of the assisting
vehicle (3).
NOTICE
i
1VQA4001
Page 370 of 478

6-11
What to do in an emergency
6
The TPMS Malfunction Indicator
may illuminate after blinking for
one minute if the vehicle is near
electric power supply cables or
radio transmitters such as police
stations, government and public
offices, broadcasting stations,
military installations, airports,
transmitting towers, etc.
Additionally, the TPMS Malfunction
Indicator may illuminate if snow
chains are used or electronic
devices such as computers, charg-
ers, remote starters, navigation,
etc. This may interfere with normal
operation of the TPMS.
Changing a Tire with TPMS
If you have a flat tire, the Low Tire
Pressure and LCD position indicator
will come on. Have the flat tire
repaired by an authorized HYUNDAI
dealer as soon as possible.Once the original tire equipped with
a tire pressure monitoring sensor is
reinflated to the recommended pres-
sure and reinstalled on the vehicle,
the Low Tire Pressure LCD position
indicator and TPMS Malfunction
Indicator will go off within a few min-
utes of driving.
If the indicators do not disappear
after a few minutes, please visit an
authorized HYUNDAI dealer.
Each wheel is equipped with a tire
pressure sensor mounted inside the
tire behind the valve stem. You must
use TPMS specific wheels. It is rec-
ommended that you always have
your tires serviced by an authorized
HYUNDAI dealer.
NOTICE
Never use a puncture-repairing
agent not approved by a
HYUNDAI dealer to repair and/or
inflate a low pressure tire. Tire
sealant not approved by a
HYUNDAI dealer may damage
the tire pressure sensor.
CAUTION