2021 HYUNDAI KONA EV heater
[x] Cancel search: heaterPage 214 of 478
![HYUNDAI KONA EV 2021 Owners Manual 3-130
Convenient features of your vehicle
System Maintenance
Cabin air filter
[A] : Outside air, [B] : Recirculated air
[C] : Climate control air filter, [D] : Blower
[E] : Evaporator core, [F] : Heat HYUNDAI KONA EV 2021 Owners Manual 3-130
Convenient features of your vehicle
System Maintenance
Cabin air filter
[A] : Outside air, [B] : Recirculated air
[C] : Climate control air filter, [D] : Blower
[E] : Evaporator core, [F] : Heat](/manual-img/35/56172/w960_56172-213.png)
3-130
Convenient features of your vehicle
System Maintenance
Cabin air filter
[A] : Outside air, [B] : Recirculated air
[C] : Climate control air filter, [D] : Blower
[E] : Evaporator core, [F] : Heater core
The cabin air filter is installed behind
the glove box. It filters the dust or other
pollutants that enter the vehicle
through the heating and air condition-
ing system.
Have the The cabin air filter replaced
by an authorized HYUNDAI dealer
according to the maintenance sched-
ule.If the vehicle is frequently driven on
dusty or gravel roads, or if the occu-
pants inside the vehicle smoke, or if
pets are regularly inside the vehicle,
then it is recommended to change
the cabin filter more often. Refer to
the maintenance section in this man-
ual for more detailed information.
If the air flow rate suddenly decreas-
es, the system should be checked at
an authorized HYUNDAI dealer.
Checking the amount of air con-
ditioner refrigerant and com-
pressor lubricant
When the amount of refrigerant is
low, the performance of the air con-
ditioning is reduced. Overfilling also
reduces the performance of the air
conditioning system.
Therefore, if abnormal operation is
found, have the system inspected by
an authorized HYUNDAI dealer.
It is important that the correct
type and amount of oil and refrig-
erant is used. Otherwise, damage
to the compressor and abnormal
system operation may occur. To
prevent damage, the air condition-
ing system in your vehicle should
only be serviced by trained and
certified technicians.
NOTICE
OIK047401L
Page 216 of 478
3-132
For maximum defrost perform-
ance, set the temperature control
knob to the highest temperature
setting (rotated all the way to the
right) and the fan speed control to
the highest setting.
If warm air to the floor is desired
while defrosting or defogging, set the
mode to the floor-defrost position.
Before driving, clear all snow and
ice from the windshield, rear win-
dow, side view mirrors, and all side
windows.
Clear all snow and ice from the hood
and air inlet in the cowl grill to
improve heater and defroster effi-
ciency and to reduce the probability
of fogging up the inside of the wind-
shield.To Defog Inside Windshield
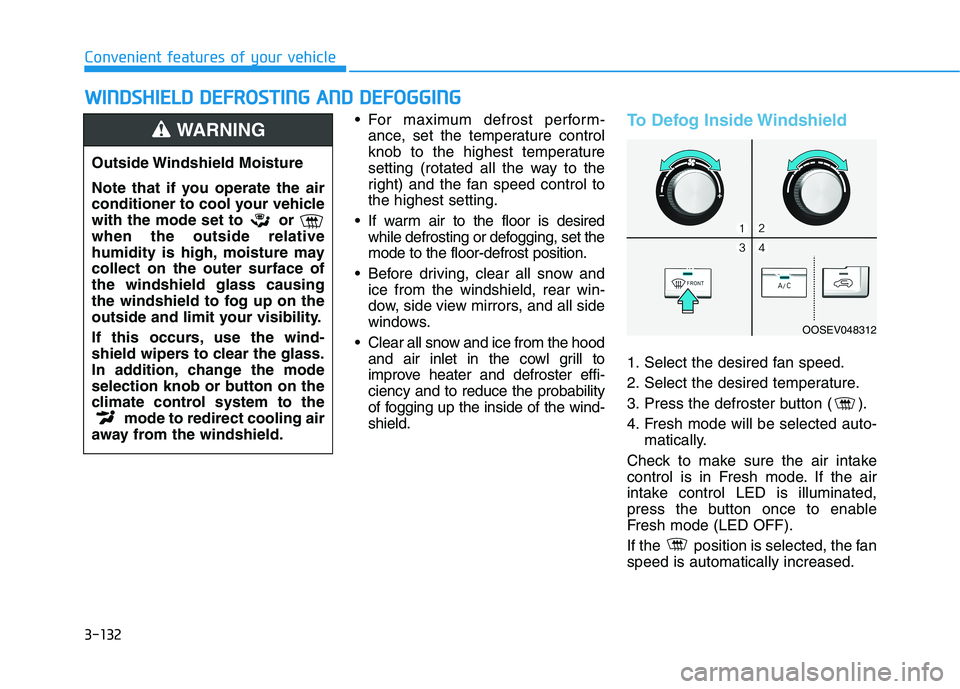
1. Select the desired fan speed.
2. Select the desired temperature.
3. Press the defroster button ( ).
4. Fresh mode will be selected auto-
matically.
Check to make sure the air intake
control is in Fresh mode. If the air
intake control LED is illuminated,
press the button once to enable
Fresh mode (LED OFF).
If the position is selected, the fan
speed is automatically increased.
W WI
IN
ND
DS
SH
HI
IE
EL
LD
D
D
DE
EF
FR
RO
OS
ST
TI
IN
NG
G
A
AN
ND
D
D
DE
EF
FO
OG
GG
GI
IN
NG
G
Convenient features of your vehicle
Outside Windshield Moisture
Note that if you operate the air
conditioner to cool your vehicle
with the mode set to or
when the outside relative
humidity is high, moisture may
collect on the outer surface of
the windshield glass causing
the windshield to fog up on the
outside and limit your visibility.
If this occurs, use the wind-
shield wipers to clear the glass.
In addition, change the mode
selection knob or button on the
climate control system to the
mode to redirect cooling air
away from the windshield.
WARNING
OOSEV048312
Page 217 of 478
3-133
Convenient features of your vehicle
3
To Defrost Outside Windshield
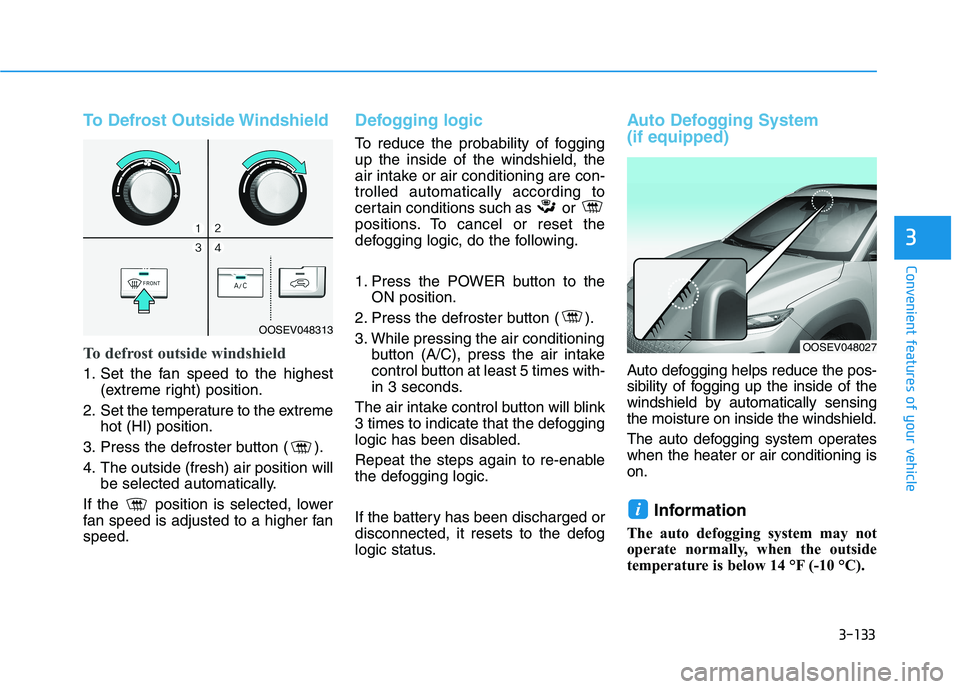
To defrost outside windshield
1. Set the fan speed to the highest
(extreme right) position.
2. Set the temperature to the extreme
hot (HI) position.
3. Press the defroster button ( ).
4. The outside (fresh) air position will
be selected automatically.
If the position is selected, lower
fan speed is adjusted to a higher fan
speed.
Defogging logic
To reduce the probability of fogging
up the inside of the windshield, the
air intake or air conditioning are con-
trolled automatically according to
certain conditions such as or
positions. To cancel or reset the
defogging logic, do the following.
1. Press the POWER button to the
ON position.
2. Press the defroster button ( ).
3. While pressing the air conditioning
button (A/C), press the air intake
control button at least 5 times with-
in 3 seconds.
The air intake control button will blink
3 times to indicate that the defogging
logic has been disabled.
Repeat the steps again to re-enable
the defogging logic.
If the battery has been discharged or
disconnected, it resets to the defog
logic status.
Auto Defogging System
(if equipped)
Auto defogging helps reduce the pos-
sibility of fogging up the inside of the
windshield by automatically sensing
the moisture on inside the windshield.
The auto defogging system operates
when the heater or air conditioning is
on.
Information
The auto defogging system may not
operate normally, when the outside
temperature is below 14 °F (-10 °C).
i
OOSEV048313
OOSEV048027
Page 225 of 478
3-141
Convenient features of your vehicle
3
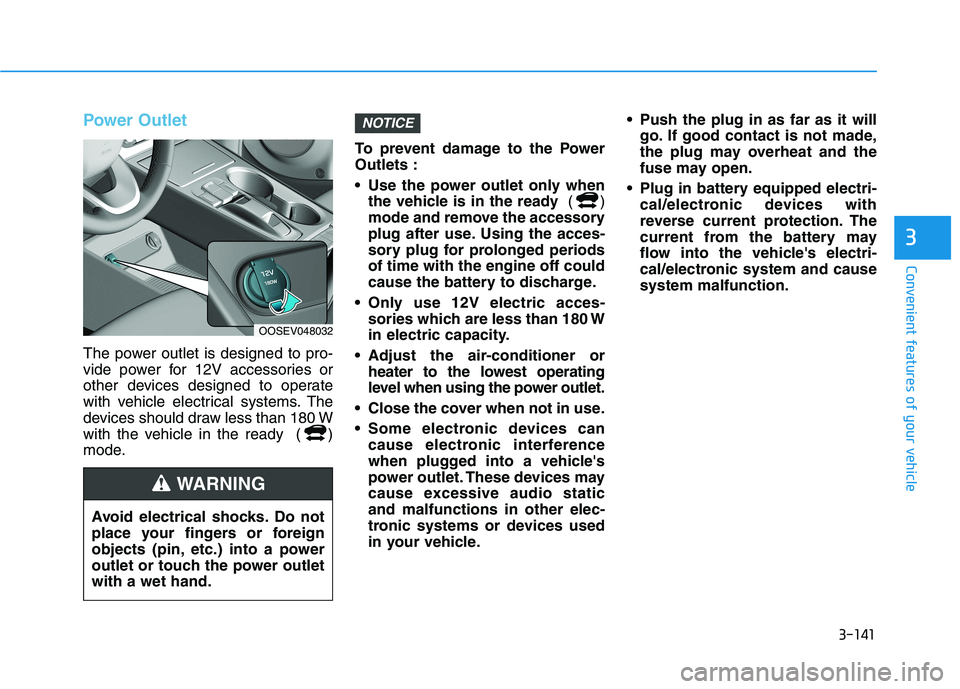
Power Outlet
The power outlet is designed to pro-
vide power for 12V accessories or
other devices designed to operate
with vehicle electrical systems. The
devices should draw less than 180 W
with the vehicle in the ready ( )
mode.To prevent damage to the Power
Outlets :
Use the power outlet only when
the vehicle is in the ready ()
mode and remove the accessory
plug after use. Using the acces-
sory plug for prolonged periods
of time with the engine off could
cause the battery to discharge.
Only use 12V electric acces-
sories which are less than 180 W
in electric capacity.
Adjust the air-conditioner or
heater to the lowest operating
level when using the power outlet.
Close the cover when not in use.
Some electronic devices can
cause electronic interference
when plugged into a vehicle's
power outlet. These devices may
cause excessive audio static
and malfunctions in other elec-
tronic systems or devices used
in your vehicle. Push the plug in as far as it will
go. If good contact is not made,
the plug may overheat and the
fuse may open.
Plug in battery equipped electri-
cal/electronic devices with
reverse current protection. The
current from the battery may
flow into the vehicle's electri-
cal/electronic system and cause
system malfunction.
NOTICE
Avoid electrical shocks. Do not
place your fingers or foreign
objects (pin, etc.) into a power
outlet or touch the power outlet
with a wet hand.
WARNING
OOSEV048032
Page 283 of 478
5-48
Driving your vehicle
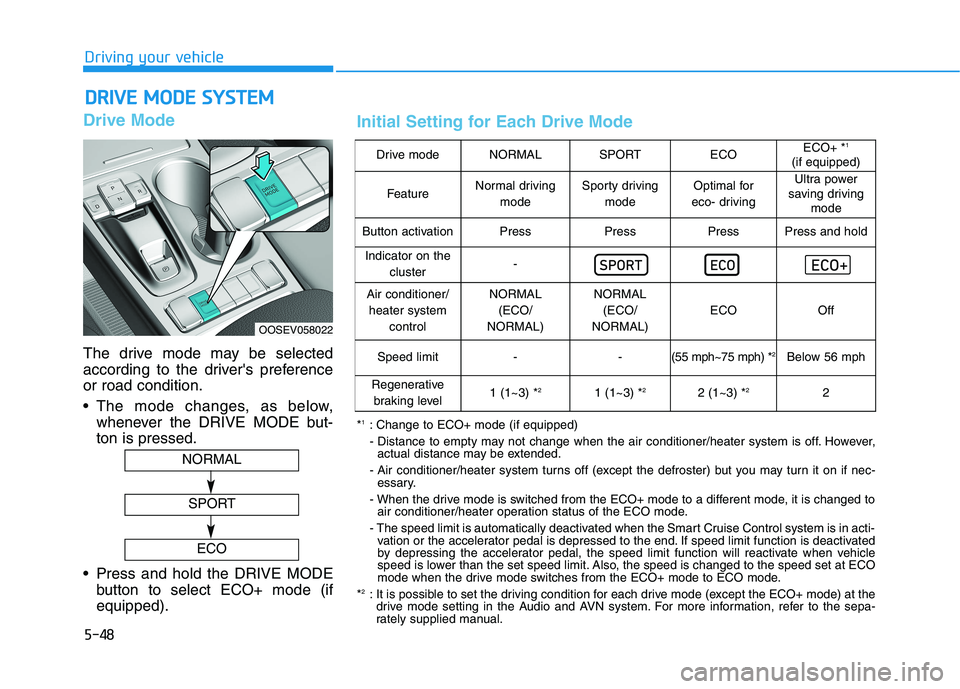
Drive Mode
The drive mode may be selected
according to the driver's preference
or road condition.
The mode changes, as below,
whenever the DRIVE MODE but-
ton is pressed.
Press and hold the DRIVE MODE
button to select ECO+ mode (if
equipped).
D DR
RI
IV
VE
E
M
MO
OD
DE
E
S
SY
YS
ST
TE
EM
M
OOSEV058022
NORMAL
SPORT
ECO
Drive modeNORMALSPORTECOECO+ *1
(if equipped)
FeatureNormal driving
modeSporty driving
modeOptimal for
eco- drivingUltra power
saving driving
mode
Button activationPressPressPressPress and hold
Indicator on the
cluster-
Air conditioner/
heater system
controlNORMAL
(ECO/
NORMAL)NORMAL
(ECO/
NORMAL)
ECOOff
Speed limit- -(55 mph~75 mph) *2Below 56 mph
Regenerative
braking level1 (1~3) *21 (1~3) *22 (1~3) *22
*1: Change to ECO+ mode (if equipped)
- Distance to empty may not change when the air conditioner/heater system is off. However,
actual distance may be extended.
- Air conditioner/heater system turns off (except the defroster) but you may turn it on if nec-
essary.
- When the drive mode is switched from the ECO+ mode to a different mode, it is changed to
air conditioner/heater operation status of the ECO mode.
- The speed limit is automatically deactivated when the Smart Cruise Control system is in acti-
vation or the accelerator pedal is depressed to the end. If speed limit function is deactivated
by depressing the accelerator pedal, the speed limit function will reactivate when vehicle
speed is lower than the set speed limit. Also, the speed is changed to the speed set at ECO
mode when the drive mode switches from the ECO+ mode to ECO mode.
*
2: It is possible to set the driving condition for each drive mode (except the ECO+ mode) at the
drive mode setting in the Audio and AVN system. For more information, refer to the sepa-
rately supplied manual.
Initial Setting for Each Drive Mode
Page 388 of 478
7-6
Maintenance
While operating your vehicle:
Check for vibrations in the steering
wheel. Notice if there is any
increased steering effort or loose-
ness in the steering wheel, or
change in its straight-ahead posi-
tion.
Notice if your vehicle constantly
turns slightly or "pulls" to one side
when traveling on smooth, level
road.
When decelerating with your vehi-
cle, listen and check for unusual
sounds, pulling to one side,
increased brake pedal travel or
"hard-to-push" brake pedal.
After driving your vehicle on a
regular basis check the follow-
ing:
Verify that the electronic parking
brake is engaging properly.
After you exit the vehicle check for
any signs of fluid leaks under your
vehicle (note that water dripping
from the air conditioning system is
normal).
At least monthly:
Check coolant level in the coolant
reservoir.
Check the operation of all exterior
lights, including the brake lights,
turn signals and hazard warning
flashers.
Check the inflation pressures of all
four tires and check to see the tire
tread condition and if there are any
signs of abnormal wear or dam-
age.
Check for loose wheel lug nuts.
At least twice a year:
Check radiator, heater and air con-
ditioning hoses for leaks or dam-
age.
Check windshield washer spray
and wiper operation. Clean wiper
blades with clean cloth dampened
with washer fluid.
Check headlamp alignment.
Check the seat belts for wear and
function.
At least once a year:
Clean body and door drain holes.
Lubricate door hinges and hood
hinges.
Lubricate door and hood locks and
latches.
Lubricate door rubber weather
strips.
Lubricate door checker.
Check the air conditioning system.
Inspect and lubricate reduction
gear linkage and controls.
Clean the battery and terminals.
Check the brake fluid level.
Page 394 of 478
7-12
Maintenance
C CO
OO
OL
LA
AN
NT
T
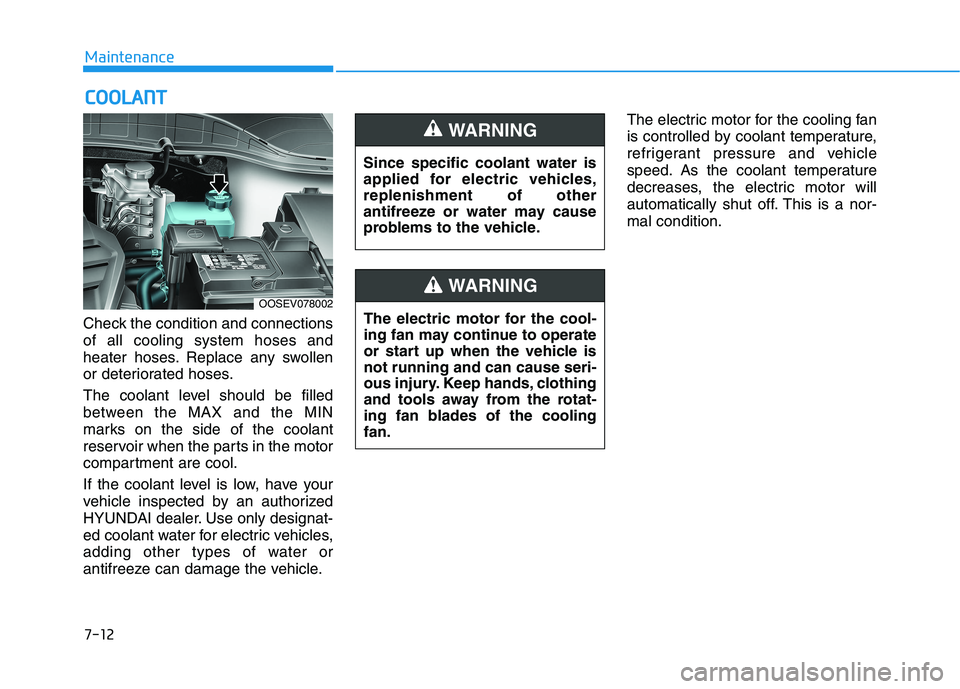
Check the condition and connections
of all cooling system hoses and
heater hoses. Replace any swollen
or deteriorated hoses.
The coolant level should be filled
between the MAX and the MIN
marks on the side of the coolant
reservoir when the parts in the motor
compartment are cool.
If the coolant level is low, have your
vehicle inspected by an authorized
HYUNDAI dealer. Use only designat-
ed coolant water for electric vehicles,
adding other types of water or
antifreeze can damage the vehicle.The electric motor for the cooling fan
is controlled by coolant temperature,
refrigerant pressure and vehicle
speed. As the coolant temperature
decreases, the electric motor will
automatically shut off. This is a nor-
mal condition.
OOSEV078002
Since specific coolant water is
applied for electric vehicles,
replenishment of other
antifreeze or water may cause
problems to the vehicle.
WARNING
The electric motor for the cool-
ing fan may continue to operate
or start up when the vehicle is
not running and can cause seri-
ous injury. Keep hands, clothing
and tools away from the rotat-
ing fan blades of the cooling
fan.
WARNING
Page 428 of 478
7-46
Maintenance
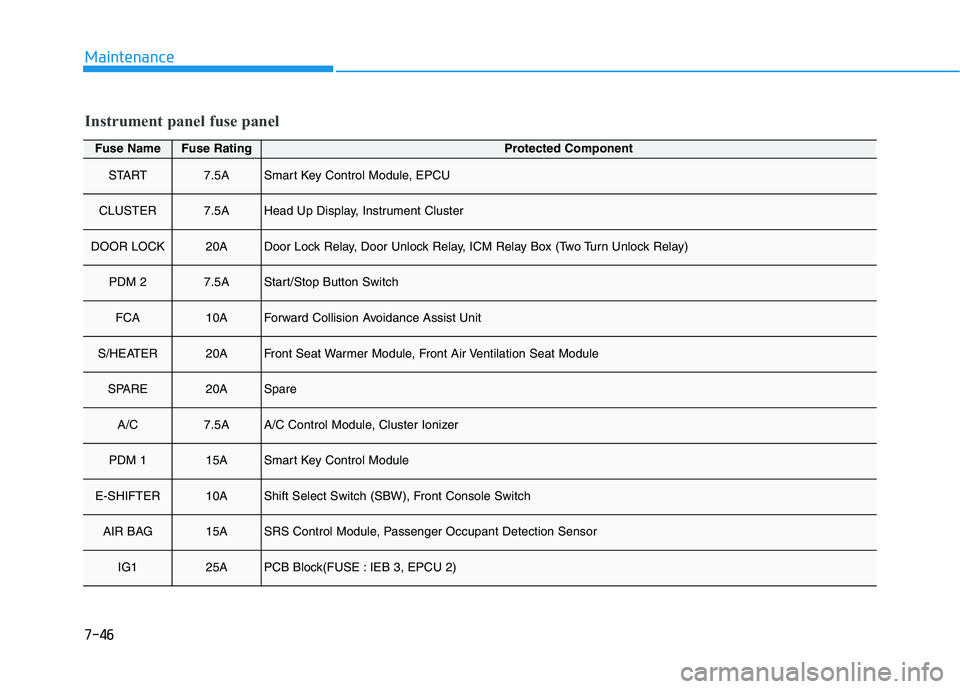
Fuse NameFuse RatingProtected Component
START7.5ASmart Key Control Module, EPCU
CLUSTER7.5AHead Up Display, Instrument Cluster
DOOR LOCK20ADoor Lock Relay, Door Unlock Relay, ICM Relay Box (Two Turn Unlock Relay)
PDM 27.5AStart/Stop Button Switch
FCA10AForward Collision Avoidance Assist Unit
S/HEATER20AFront Seat Warmer Module, Front Air Ventilation Seat Module
SPARE20ASpare
A/C7.5AA/C Control Module, Cluster Ionizer
PDM 115ASmart Key Control Module
E-SHIFTER10AShift Select Switch (SBW), Front Console Switch
AIR BAG15ASRS Control Module, Passenger Occupant Detection Sensor
IG125APCB Block(FUSE : IEB 3, EPCU 2)
Instrument panel fuse panel