Page 105 of 659
3-103
Convenient features of your vehicle
3
Operation of the Rear ParkingAssist System
Operating condition
This system will activate when
backing up with the ignition switch
in the ON position. However, if vehi-
cle speed exceeds 5 km/h (3 mph),
the system may not detect objects.
If vehicle speed exceeds 10 km/h (6 mph), the system will not warn you
even though objects are detected.
When more than two objects are sensed at the same time, the clos-
est one will be recognized first.
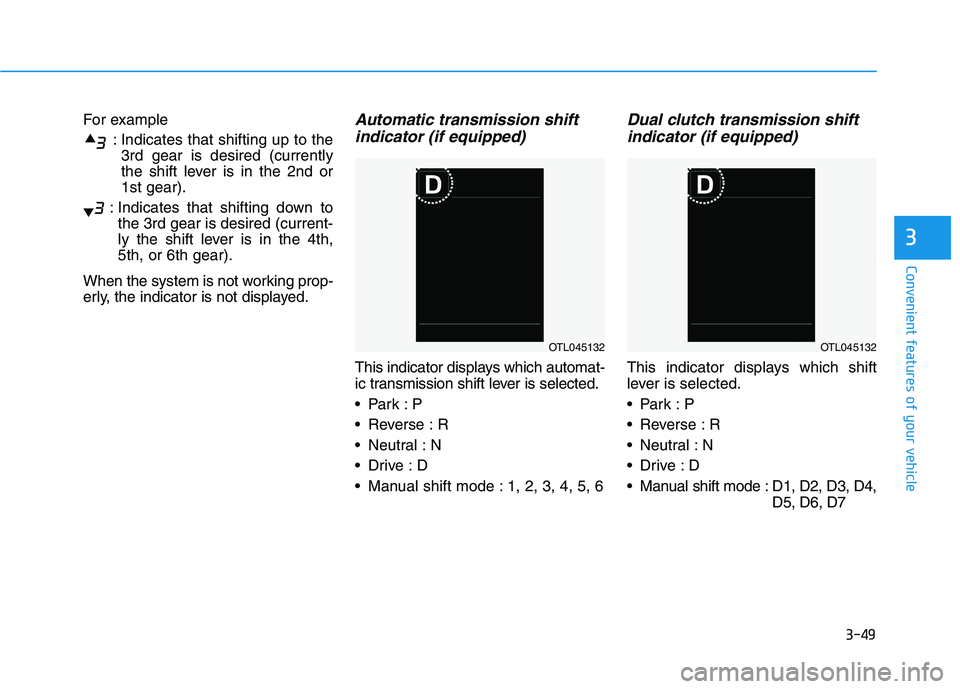
Types of warning sound and indicator
Types of warning soundIndicator
When an object is 120 cm to 60 cm (47 in. to 24 in.) from the rear
bumper : Buzzer beeps intermittently.
When an object is 60 cm to 30 cm (24 in. to 12 in.) from the rear
bumper : Buzzer beeps more frequently.
When an object is within 30 cm (12 in.) of the rear bumper :
Buzzer beeps continuously.
The indicator may differ from the illustration as objects or sensors sta-tus. If the indicator blinks, we recommend that you have your vehicle
checked by an authorized HYUNDAI dealer.
If the audible warning does not sound or if the buzzer sounds intermit- tently when shifting into R (Reverse) position, this may indicate a mal-
function with the Parking Assist System. If this occurs, we recommend
that you have your vehicle checked by an authorized HYUNDAI dealer as
soon as possible.
NOTICE
Page 109 of 659

3-107
Convenient features of your vehicle
3
The Parking Assist System buttonturns on automatically and acti-
vates the Parking Assist System
when you move the shift lever to
the R (Reverse) position. However,
if vehicle speed exceeds 10 km/h
(6 mph), the system will not warn
you even though objects are
detected, and if vehicle speed
exceeds 20 km/h (12 mph), the
system will turn off automatically.
To turn on the system, press the
Parking Assist System button.
When more than two objects are sensed at the same time, the clos-
est one will be recognized first.
The indicator may differ from the illustration as objects or sensorsstatus. If the indicator blinks, we recommend that the system be
checked by an authorized HYUNDAI dealer.
If the audible warning does not sound or if the buzzer sounds inter- mittently when shifting into R (Reverse) position, this may indicate a
malfunction with the Parking Assist System. If this occurs, we rec-
ommend that you have your vehicle checked by an authorized
HYUNDAI dealer as soon as possible.
NOTICE
Distance
from object Warning indicator
Warning soundWhen driving forwardWhen driving rearward
61 ~ 100(24 ~39)Front-Buzzer beeps intermittently
61 ~ 120(24 ~47)Rear-Buzzer beeps intermittently
31 ~ 60
(12 ~24)FrontBuzzer beeps frequently
Rear-Buzzer beeps frequently
30
(12)FrontBuzzer sounds continuously
Rear-Buzzer sounds continuously
Types of warning sound and indicatorcm (in)
Page 149 of 659
3-147
Convenient features of your vehicle
3
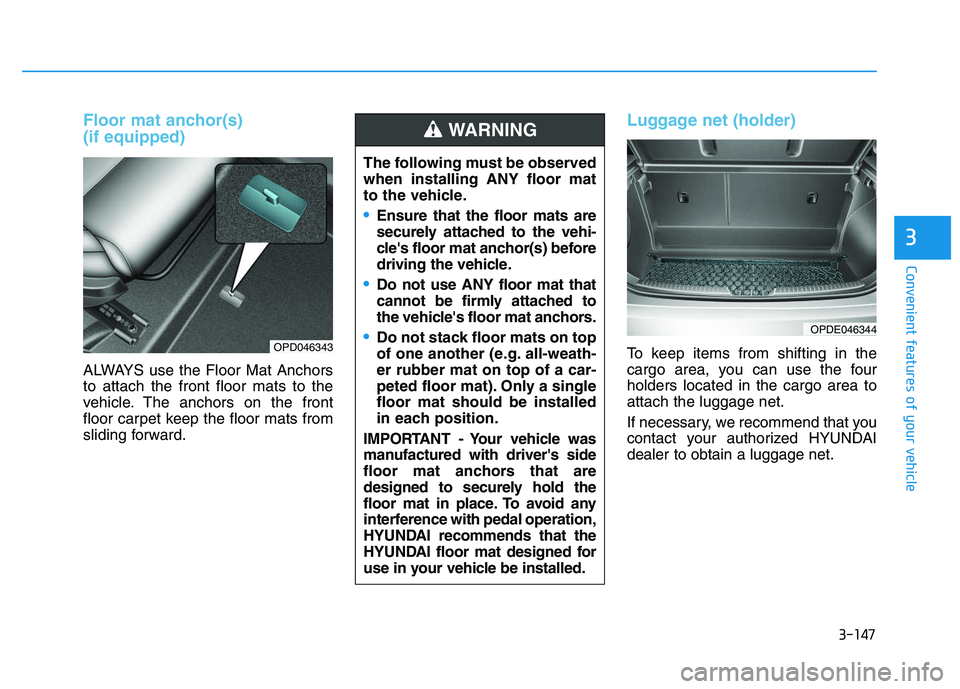
Floor mat anchor(s)
(if equipped)
ALWAYS use the Floor Mat Anchors
to attach the front floor mats to the
vehicle. The anchors on the front
floor carpet keep the floor mats from
sliding forward.
Luggage net (holder)
To keep items from shifting in the
cargo area, you can use the four
holders located in the cargo area to
attach the luggage net.
If necessary, we recommend that you
contact your authorized HYUNDAI
dealer to obtain a luggage net.
OPDE046344
OPD046343
The following must be observed
when installing ANY floor mat
to the vehicle.
Ensure that the floor mats are
securely attached to the vehi-
cle's floor mat anchor(s) before
driving the vehicle.
Do not use ANY floor mat that
cannot be firmly attached to
the vehicle's floor mat anchors.
Do not stack floor mats on top
of one another (e.g. all-weath-
er rubber mat on top of a car-
peted floor mat). Only a single
floor mat should be installed
in each position.
IMPORTANT - Your vehicle was
manufactured with driver's side
floor mat anchors that are
designed to securely hold the
floor mat in place. To avoid any
interference with pedal operation,
HYUNDAI recommends that the
HYUNDAI floor mat designed for
use in your vehicle be installed.
WARNING
Page 198 of 659
3-48
Convenient features of your vehicle
Distance to empty
The distance to empty is the esti-mated distance the vehicle can be
driven with the remaining fuel.
If the estimated distance is below 1 km (1 mi.), the trip computer will
display “---” as distance to empty.
Information
• If the vehicle is not on level groundor the battery power has been inter-
rupted, the distance to empty func-
tion may not operate correctly.
• The distance to empty may differ from the actual driving distance as
it is an estimate of the available
driving distance.
• The trip computer may not register additional fuel if less than 6 liters
(1.6 gallons) of fuel are added to the
vehicle.
• The distance to empty may vary sig- nificantly based on driving condi-
tions, driving habits, and condition
of the vehicle.
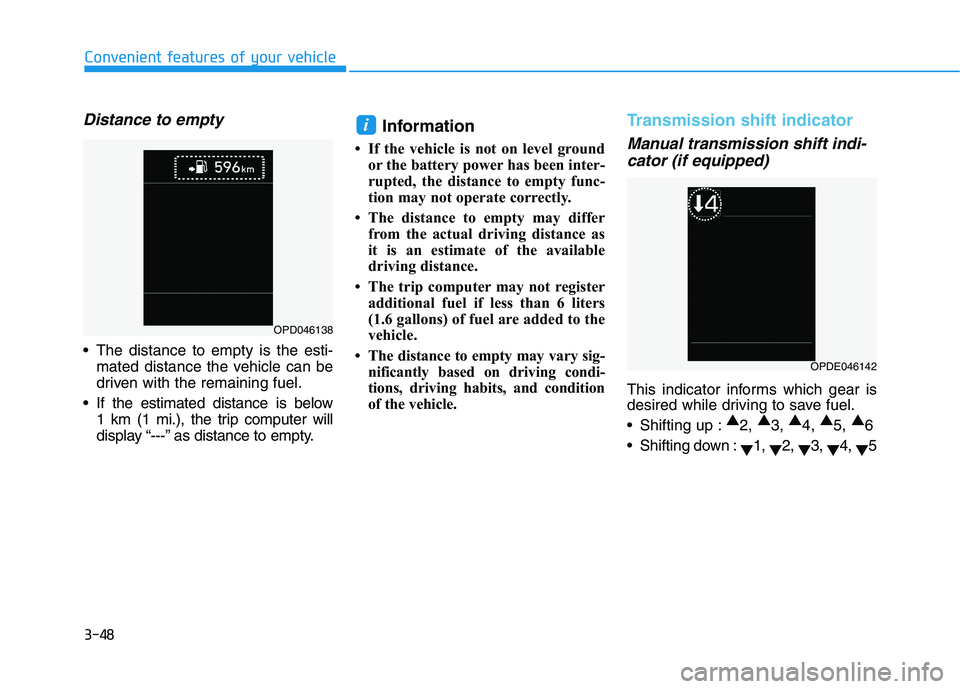
Transmission shift indicator
Manual transmission shift indi-cator (if equipped)
This indicator informs which gear is
desired while driving to save fuel.
Shifting up : ▲
2, ▲
3, ▲
4, ▲
5, ▲
6
Shifting down : ▼1,
▼2,
▼3,
▼4,
▼5
i
OPD046138
OPDE046142
Page 199 of 659
3-49
Convenient features of your vehicle
3
For example: Indicates that shifting up to the3rd gear is desired (currently
the shift lever is in the 2nd or
1st gear).
: Indicates that shifting down to the 3rd gear is desired (current-
ly the shift lever is in the 4th,
5th, or 6th gear).
When the system is not working prop-
erly, the indicator is not displayed.Automatic transmission shift indicator (if equipped)
This indicator displays which automat-
ic transmission shift lever is selected.
Reverse : R
Neutral : N
Manual shift mode : 1, 2, 3, 4, 5, 6
Dual clutch transmission shiftindicator (if equipped)
This indicator displays which shift
lever is selected.
Reverse : R
Neutral : N
Manual shift mode : D1, D2, D3, D4,
D5, D6, D7
OTL045132OTL045132
Page 200 of 659
3-50
Convenient features of your vehicle
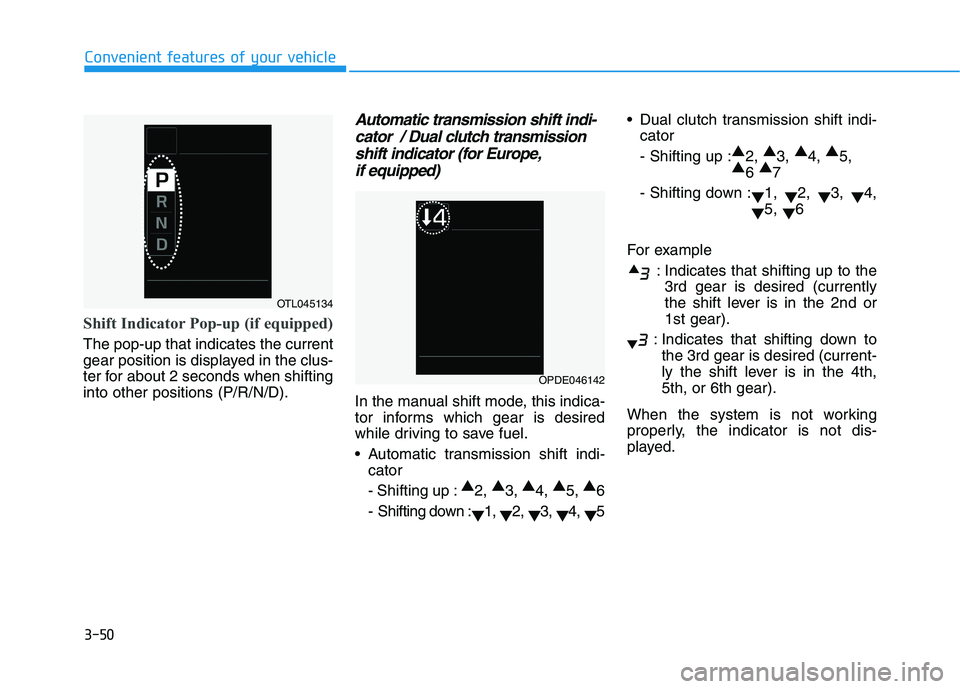
Shift Indicator Pop-up (if equipped)
The pop-up that indicates the current
gear position is displayed in the clus-
ter for about 2 seconds when shifting
into other positions (P/R/N/D).
Automatic transmission shift indi-cator / Dual clutch transmissionshift indicator (for Europe,if equipped)
In the manual shift mode, this indica-
tor informs which gear is desired
while driving to save fuel.
Automatic transmission shift indi-
cator
- Shifting up : ▲
2, ▲
3, ▲
4, ▲
5, ▲
6
- Shifting down : ▼1,
▼2,
▼3,
▼4,
▼5 Dual clutch transmission shift indi-
cator
- Shifting up : ▲
2, ▲
3, ▲
4, ▲
5,
▲ 6 ▲
7
- Shifting down : ▼1,
▼2,
▼3,
▼4,
▼ 5,
▼6
For example : Indicates that shifting up to the3rd gear is desired (currently
the shift lever is in the 2nd or
1st gear).
: Indicates that shifting down to the 3rd gear is desired (current-
ly the shift lever is in the 4th,
5th, or 6th gear).
When the system is not working
properly, the indicator is not dis-
played.
OTL045134
OPDE046142
Page 223 of 659
3-73
Convenient features of your vehicle
3
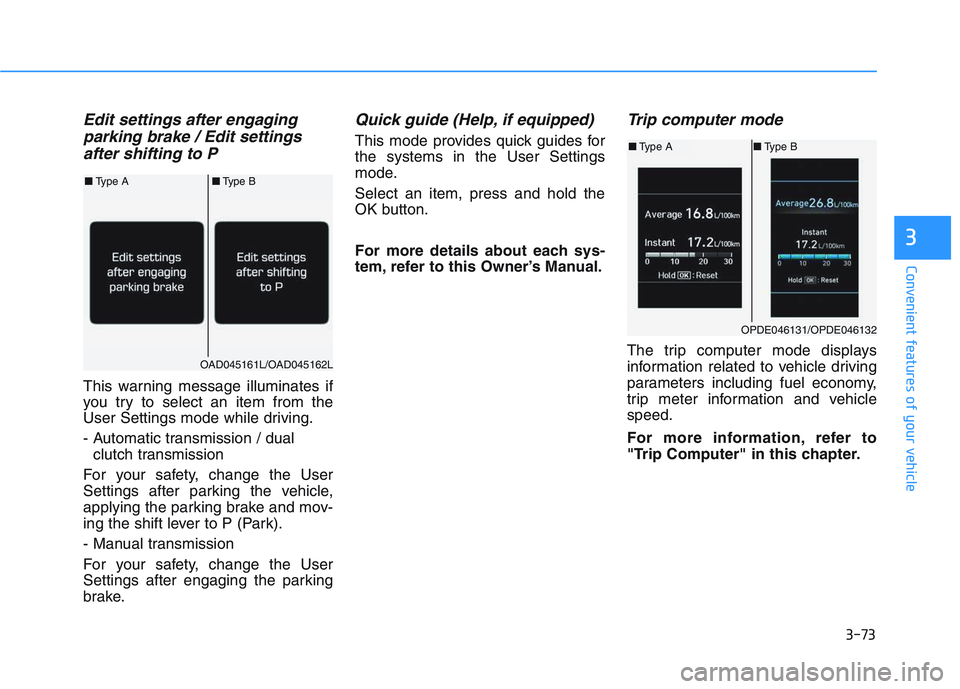
Edit settings after engaging parking brake / Edit settingsafter shifting to P
This warning message illuminates if
you try to select an item from the
User Settings mode while driving.
- Automatic transmission / dual
clutch transmission
For your safety, change the User
Settings after parking the vehicle,
applying the parking brake and mov-
ing the shift lever to P (Park).
- Manual transmission
For your safety, change the User
Settings after engaging the parking
brake.
Quick guide (Help, if equipped)
This mode provides quick guides for
the systems in the User Settings
mode.
Select an item, press and hold the
OK button.
For more details about each sys-
tem, refer to this Owner’s Manual.
Trip computer mode
The trip computer mode displays
information related to vehicle driving
parameters including fuel economy,
trip meter information and vehicle
speed.
For more information, refer to
"Trip Computer" in this chapter.
OPDE046131/OPDE046132
■ Type A ■Type B
OAD045161L/OAD045162L
■Type A ■Type B
Page 324 of 659
5-20
Driving your vehicle
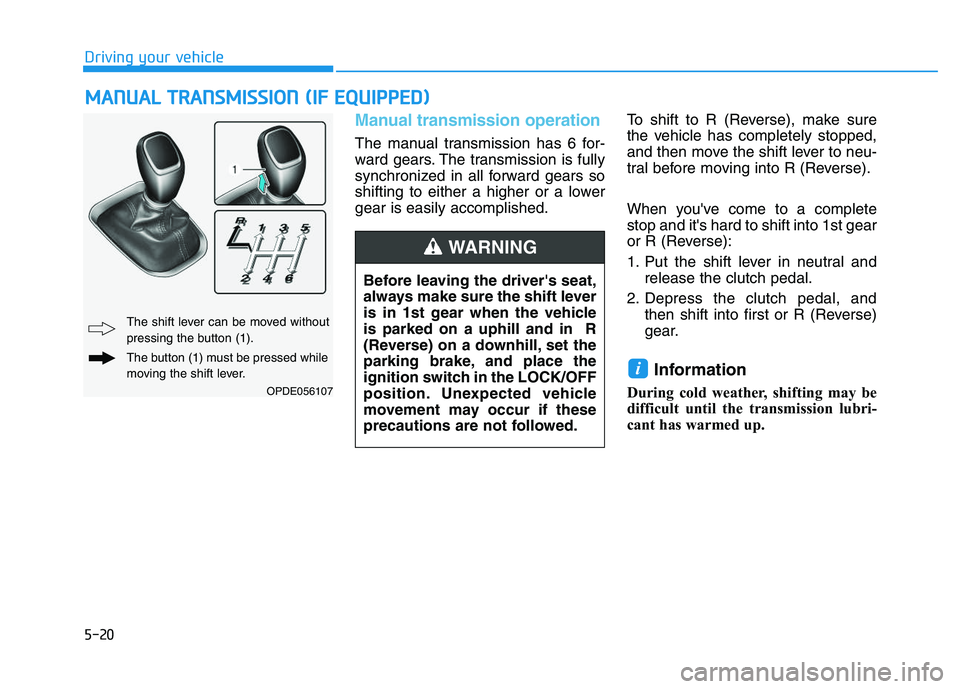
Manual transmission operation
The manual transmission has 6 for-
ward gears. The transmission is fully
synchronized in all forward gears so
shifting to either a higher or a lower
gear is easily accomplished.To shift to R (Reverse), make sure
the vehicle has completely stopped,
and then move the shift lever to neu-
tral before moving into R (Reverse).
When you've come to a complete
stop and it's hard to shift into 1st gear
or R (Reverse):
1. Put the shift lever in neutral and
release the clutch pedal.
2. Depress the clutch pedal, and then shift into first or R (Reverse)
gear.
Information
During cold weather, shifting may be
difficult until the transmission lubri-
cant has warmed up.
i
M
M A
A N
N U
U A
A L
L
T
T R
R A
A N
N S
S M
M I
I S
S S
S I
I O
O N
N
(
( I
I F
F
E
E Q
Q U
U I
I P
P P
P E
E D
D )
)
Before leaving the driver's seat,
always make sure the shift lever
is in 1st gear when the vehicle
is parked on a uphill and in R
(Reverse) on a downhill, set the
parking brake, and place the
ignition switch in the LOCK/OFF
position. Unexpected vehicle
movement may occur if these
precautions are not followed.
WARNING
OPDE056107
The shift lever can be moved without
pressing the button (1).
The button (1) must be pressed while
moving the shift lever.