2021 HYUNDAI GENESIS G70 low
[x] Cancel search: lowPage 92 of 516

3-7
Convenient features of your vehicle
3
If the smart key is in close proximity
to your mobile phone, the signal
could be blocked by your mobile
phones normal operational signals.
This is specifically relevant when the
phone is active such as making and
receiving calls, text messaging,
and/or sending/receiving emails.
When possible, avoid keeping the
smart key and your mobile phone in
the same location such as a pants or
jacket pocket in order to avoid inter-
ference between the two devices.
Keep the smart key away from
electromagnetic materials that
blocks electromagnetic waves to
the key surface.
• Do not leave the smart key near
metallic objects such as golf
bags, metal cases, etc.
• When the smart key is placed
near metallic objects, door
lock/unlock failure or poor vehi-
cle starting may occur.Always have the smart key with
you when leaving the vehicle. If
the smart key is left near the vehi-
cle, the vehicle battery may be dis-
charged.
Information
This device complies with Part 15 of
the FCC rules.
Operation is subject to the following
three conditions:
1. This device may not cause harmful
interference, and
2. This device must accept any inter-
ference received, including interfer-
ence that may cause undesired
operation.
3. Changes or modifications not
expressly approved by the party
responsible for compliance could
void the user's authority to operate
the device.
Restrictions in handling keys
When leaving keys with parking lot
and valet attendants, the following
procedures will ensure your vehicle’s
glove box compartment can only be
opened with the mechanical key.
To lock:
1. Remove the mechanical key from
the Smart Key.
2. Lock the glove box using the
mechanical key.
3. Leave the smart key with the
attendant and keep the mechani-
cal key with you.
i
NOTICE
NOTICE
NOTICE
OIK047061L
Page 94 of 516

3-9
Convenient features of your vehicle
3
Immobilizer System
The immobilizer system protects
your vehicle from theft. If an improp-
erly coded key (or other device) is
used, the engine's fuel system is dis-
abled.
When the Engine Start/Stop button
is in the ON position, the immobilizer
system indicator should come on
briefly, then go off. If the indicator
starts to blink, the system does not
recognize the coding of the Smart
Key.
Press the Engine Start/Stop button
to the OFF position, then press the
Engine Start/Stop button to the ON
position again.
In some circumstances, the vehicle
may not recognize your smart key if
another smart key device is nearby
or a metal object such as a key chain
is causing interference with the
smart key.
If this occurs, your vehicle may not
start. Remove any metal objects or
additional keys near the smart key
before attempting to start the vehicle
again.If the system repeatedly does not
recognize the coding of the key, con-
tact an authorized retailer of Genesis
Branded products.
Do not attempt to alter this system or
add other devices to it. Electrical
problems could result that may make
your vehicle inoperable.
The transponder in your key is an
important part of the immobilizer
system. It is designed to give
years of trouble-free service, how-
ever you should avoid exposure to
moisture, static electricity and
rough handling. Immobilizer sys-
tem malfunction could occur.
Information
This device complies with Part 15 of
the FCC rules.
Operation is subject to the following
three conditions:
1. This device may not cause harmful
interference, and
2. This device must accept any inter-
ference received, including interfer-
ence that may cause undesired
operation.
3. Changes or modifications not
expressly approved by the party
responsible for compliance could
void the user’s authority to operate
the device.
i
NOTICE
In order to prevent theft of your
vehicle, do not leave spare keys
anywhere in your vehicle. Your
immobilizer password is a cus-
tomer unique password and
should be kept confidential.
WARNING
Page 96 of 516

3-11
Convenient features of your vehicle
3
Press the button on the driver's out-
side door handle while carrying the
smart key with you or press the
unlock button (2) on the smart key, the
driver's door will unlock. If you press
the button on the front passenger's
outside door, all doors will unlock.
Once the doors are unlocked, they
may be opened by pulling the door
handle.
When closing the door, push the
door by hand. Make sure that doors
are closed securely.
Information
• In cold and wet climates, door lock
and door mechanisms may not work
properly due to freezing conditions.
• If the door is locked/unlocked multi-
ple times in rapid succession with
either the vehicle key or door lock
switch, the system may stop operat-
ing temporarily in order to protect
the circuit and prevent damage to
system components.
Operating Door Locks from
Inside the Vehicle
With the door lock button
• To unlock a door, push the door
lock button (1) to the "Unlock" posi-
tion. The red mark (2) on the door
lock button will be visible.
• To lock a door, push the door lock
button (1) to the "Lock" position. If
the door is locked properly, the red
mark (2) on the door lock button
will not be visible.
• To open a door, pull the door han-
dle (3) outward.• If the inner door handle of either
the driver door or passenger door
is pulled when the door lock button
is in the lock position, the button is
unlocked and the door will open.
• The doors cannot be locked if the
smart key is inside the vehicle and
any of the doors are open.
Information
If a power door lock ever fails to func-
tion while you are in the vehicle try
one or more of the following tech-
niques to exit:
• Operate the door unlock feature
repeatedly (both electronic and
manual) while simultaneously
pulling on the door handle.
• Operate the other door locks and
handles, front and rear.
• Lower a front window and use the
mechanical key to unlock the door
from outside.
i
iOIK047007
Page 99 of 516
3-14
Convenient features of your vehicle
Auto UNLOCK - Enable on Shift
(Automatic transmission vehicle)
When this feature is set in the LCD
cluster display, all the doors will be
unlocked automatically when the
vehicle is shifted back into P (Park).
For more information on these
features, refer to the LCD Display
section later in this chapter.
Additional Unlock Safety
Feature - Air Bag Deployment
As an additional safety feature, all
doors will be automatically unlocked
when an impact causes the air bags
to deploy.
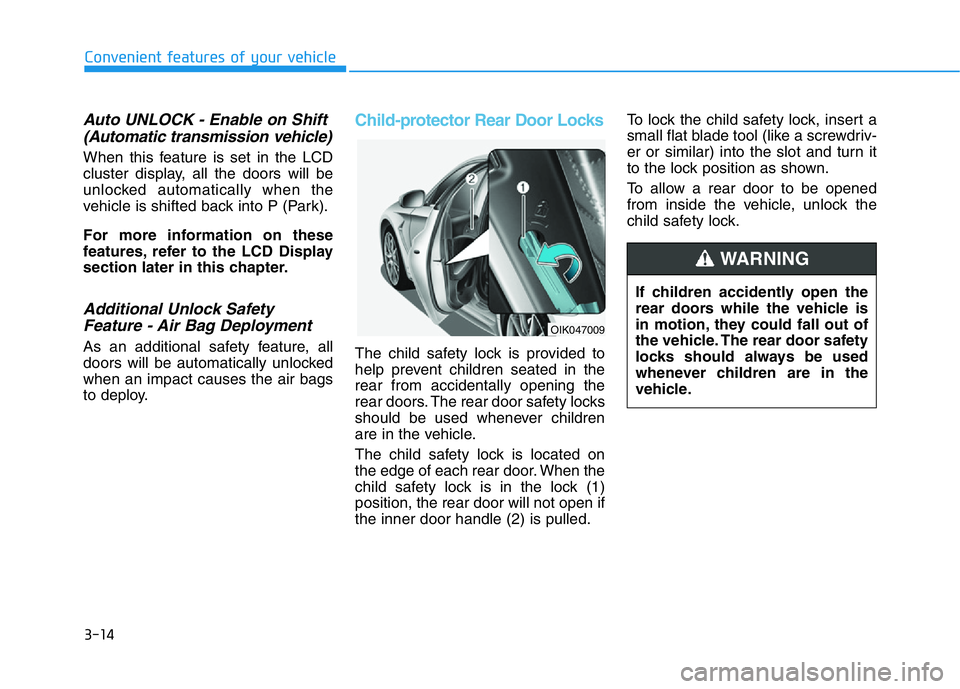
Child-protector Rear Door Locks
The child safety lock is provided to
help prevent children seated in the
rear from accidentally opening the
rear doors. The rear door safety locks
should be used whenever children
are in the vehicle.
The child safety lock is located on
the edge of each rear door. When the
child safety lock is in the lock (1)
position, the rear door will not open if
the inner door handle (2) is pulled.To lock the child safety lock, insert a
small flat blade tool (like a screwdriv-
er or similar) into the slot and turn it
to the lock position as shown.
To allow a rear door to be opened
from inside the vehicle, unlock the
child safety lock.
OIK047009
If children accidently open the
rear doors while the vehicle is
in motion, they could fall out of
the vehicle. The rear door safety
locks should always be used
whenever children are in the
vehicle.
WARNING
Page 100 of 516

3-15
Convenient features of your vehicle
THEFT-ALARM SYSTEM
3
This system helps to protect your
vehicle and valuables. The horn will
sound and the hazard warning lights
will blink continuously if any of the
following occurs:
- A door is opened without using the
smart key.
- The trunk is opened without using
the smart key.
- The engine hood is opened.
The alarm continues for 30 seconds
(repeats 2 times unless the system is
disarmed), then the system resets.
To turn off the alarm, unlock the
doors with the smart key.
The Theft Alarm System automati-
cally sets 30 seconds after you lock
the doors and the trunk. For the sys-
tem to activate, you must lock the
doors and the trunk from outside the
vehicle with the smart key or by
pressing the button on the outside of
the door handles with the smart key
in your possession.
The hazard warning lights will blink
and the chime will sound once to indi-
cate the system is armed.Once the security system is set,
opening any door, the trunk, or the
hood without using the smart key will
cause the alarm to activate.
The Theft Alarm System will not set if
the hood, the trunk, or any door is
not fully closed. If the system will not
set, check the hood, the trunk, or the
doors are fully closed.
Do not attempt to alter this system or
add other devices to it.Information
• Do not lock the doors until all pas-
sengers have left the vehicle. If the
remaining passenger leaves the
vehicle when the system is armed,
the alarm will be activated.
• If the vehicle is not disarmed with
the smart key, open the doors by
using the mechanical key and start
the engine.
• When the system is disarmed but a
door or trunk is not opened within
30 seconds, the system will be
rearmed.
i
Page 101 of 516

3-16
Convenient features of your vehicle
The Driver Position Memory System
is provided to store and recall the fol-
lowing memory settings with a sim-
ple button operation.
- Driver's seat position
- Side view mirror position
- Steering wheel (electric type) posi-
tion
- Head Up Display (HUD) position
(if equipped)
Information
• If the battery is disconnected, the
memory settings will be erased.
• If the Driver Position Memory
System does not operate normally,
have the system checked by an
authorized retailer of Genesis
Branded products.
Storing Positions into Memory
1. Check that the gear is in P (Park)
while the Engine Start/Stop button
is in the ON position.
2. Adjust the driver's seat position,
side view mirror position, steering
wheel position, instrument panel
illumination intensity and head-up
display height/brightness to posi-
tions comfortable for the driver.
3. Press the SET button. The system
will beep once and notify you
"Press button to save settings" on
the cluster LCD display.
4. Press one of the memory buttons
(1 or 2) within 4 seconds. The sys-
tem will beep twice when the mem-
ory has been successfully stored.
5. "Driver 1 (or 2) settings saved" will
appear on the cluster LCD display.
i
DRIVER POSITION MEMORY SYSTEM (IF EQUIPPED)
OIK047029
Never attempt to operate the
driver position memory system
while the vehicle is moving.
This could result in loss of con-
trol, and an accident causing
death, serious injury, or property
damage.
WARNING
Page 102 of 516

3-17
Convenient features of your vehicle
3
Recalling Positions from
Memory
1. Check that the gear is in P (Park)
while the Engine Start/Stop button
is in the ON position.
2. Press the desired memory button
(1 or 2). The system will beep
once, and then the driver's seat
position, side view mirror position,
steering wheel position, instru-
ment panel illumination intensity
and head-up display height/bright-
ness will automatically adjust to
the stored positions.
3. "Driver 1 (or 2) settings applied"
will appear on the cluster LCD dis-
play.
Information
• While recalling the "1" memory
position, pressing the SET or 1 but-
ton temporarily stops the adjust-
ment of the recalled memory posi-
tion. Pressing the 2 button recalls
the "2" memory position.
• While recalling the "2" memory
position, pressing the SET or 2 but-
ton temporarily stops the adjust-
ment of the recalled memory posi-
tion. Pressing the 1 button recalls
the "1" memory position.
• While recalling the stored positions,
pressing one of the control buttons
for the driver's seat, side view mir-
ror, steering wheel, instrument
panel illumination or head-up dis-
play will cause the movement of that
component to stop and move in the
direction that the control button is
pressed.
Resetting the Driver's Seat
Memory System
Take the following procedures to reset
the driver's seat memory system,
when it does not operate properly.
To reset the driver's seat memo-
ry system
1. Press the Engine Start/Stop but-
ton to the ON position, set the
gear in P (Park), and open the dri-
ver's door.
2. Operate the control switch to set
the driver's seat and seatback to
the foremost position.
3. Simultaneously press the SET
button and push forward the seat
movement switch over 2 seconds.
i
Page 103 of 516

3-18
Convenient features of your vehicle
While resetting the driver's seat
memory system
1. It starts with the notification
sound.
2. The driver's seat and seatback is
adjusted to the rearward position
with the notification sound.
3. The driver's seat and seatback is
re-adjusted to the default position
(central position) with the notifica-
tion sound.
However, in the following cases, the
resetting procedure and the notifica-
tion sound may stop.
- The memory button is pressed.
- The control switch is operated.
- The gear is shifted out of P (Park).
- The driving speed exceeds 2 mph
(3 km/h).
- The driver's door is closed.• Reattempt to do the resetting
procedure again, when the reset-
ting procedure incompletely
stops or the notification sound
do not stop.
• Make sure that there is no obsta-
cle around the driver's seat in
advance of resetting the driver's
seat memory system.
Easy Access Function
The system will move the driver's
seat and steering wheel automatical-
ly as follows:
• Exiting the vehicle:
The driver's seat will move rear-
ward and the steering wheel will
move upward when the driver’s
door is opened and the Engine
Start/Stop button is in the OFF
positon with the gear in P (Park).
However, the driver's seat may not
move rearward if there is not
enough space between the driver’s
seat and the rear seats.
Also, on a regular basis, the steer-
ing wheel will also move forward to
adjust its location by itself.
NOTICE